Note: This guide is written for everyday Android users who want more storage without turning their phone settings into a mystery novel. Menu names may vary slightly by brand, Android version, and carrier, but the core steps are similar on most Android phones and tablets that support microSD cards.
An Android phone running out of storage is a tiny modern tragedy. One minute you are taking a photo of your lunch, your dog, your homework, or the sunset doing its best movie-poster impression. The next minute, your phone says, “Storage almost full,” as if you personally offended it. That is where an SD card can become the little plastic hero of the story.
A microSD card can give your Android device extra room for photos, videos, music, documents, downloads, offline maps, podcasts, and sometimes even apps. But to get the best result, you need to know how to insert it correctly, format it safely, choose the right storage mode, move files without creating chaos, and avoid common mistakes that can lead to lost data. This guide explains how to insert, format and use an SD card on Android device in clear, practical steps.
What Is an SD Card on Android?
Most Android phones and tablets that support expandable storage use a microSD card, not a full-size SD card. The word “SD card” is often used casually, but on Android devices, the actual card is usually the tiny fingernail-sized microSD version. It slides into a SIM tray, a dedicated memory card tray, or a slot under a removable back cover on older devices.
An SD card acts as extra storage. It does not magically make your phone’s processor faster, improve your camera quality, or turn a budget phone into a spaceship. What it does very well is provide more room for files. If your Android device supports it, an SD card can help keep internal storage free, which may make your phone feel less cramped and reduce those annoying “not enough space” warnings.
Before You Start: Check Your Android Device Compatibility
Before buying or inserting a card, confirm that your device actually supports microSD storage. Many budget and midrange Android phones still include a microSD slot, while some modern flagship devices no longer do. Some tablets, rugged phones, and older Android models are more likely to include expandable storage.
How to Check for an SD Card Slot
Look at the side of your phone for a small tray with a pinhole. This tray may hold only a SIM card, or it may support both a SIM card and a microSD card. If your phone has a removable back cover, the card slot may be near the battery area. You can also search your phone model’s official support page for “microSD,” “memory card,” or “expandable storage.”
If your Android phone does not have a microSD slot, you cannot insert an SD card directly. However, you may still use alternatives such as USB-C flash drives, USB-C card readers, portable SSDs, or cloud storage. Those options are useful, but they are not the same as built-in expandable storage.
How to Choose the Right SD Card for Android
Not all microSD cards are equal. Some are built for basic storage, while others are designed for fast video recording, app performance, or heavy daily use. Choosing the cheapest card from a mysterious brand with a logo that looks like it was designed during a thunderstorm is usually not the smartest move.
Capacity: How Much Storage Do You Need?
For light use, a 64GB or 128GB microSD card may be enough for photos, documents, music, and a few videos. For heavy photo and video use, 256GB or 512GB is more comfortable. If you record lots of 4K video, download offline movies, or keep years of media on your phone, larger cards may be worth considering, as long as your device supports them.
Check your device’s maximum supported card capacity. Some phones support up to 512GB, 1TB, or more, while older devices may support less. If your device manual says it supports up to 256GB, do not assume a 1TB card will work perfectly just because it fits in the slot.
Speed Class: Why It Matters
SD cards have speed ratings such as Class 10, U1, U3, V30, A1, and A2. For Android users, the most important labels are usually Class 10, U1 or U3, and A1 or A2. A1 and A2 ratings are designed around app performance and random read/write activity, which matters if your device supports using the card for apps or internal-style storage.
If you mainly store photos and music, a good Class 10 card from a reliable brand is usually fine. If you record 4K video or want smoother app-related performance, choose a faster card with U3, V30, A1, or A2 ratings. A slow card can make saving files, loading media, or opening apps feel like waiting behind someone counting coins at a checkout counter.
How to Insert an SD Card on Android Device
Inserting a microSD card is simple, but you should do it carefully. The card is small, the tray is delicate, and forcing anything is a fast way to make your phone regret meeting you.
Step 1: Power Off Your Phone
Many phones support hot-swapping, but turning the phone off is safer, especially if you are not sure how your device handles memory cards. Powering off reduces the risk of file system errors and prevents apps from trying to access storage while you are inserting the card.
Step 2: Open the SIM or SD Card Tray
Use the ejector pin that came with your phone. Insert it gently into the tray’s pinhole and press until the tray pops out. Do not use excessive force. If the tray refuses to open, check that you are using the correct hole. Some phones have microphone holes nearby, and poking the wrong hole like an angry treasure hunter is not recommended.
Step 3: Place the microSD Card Correctly
Place the microSD card into the tray according to the shape and orientation shown. It should sit flat and snug. If it rocks, tilts, or refuses to fit, do not force it. Check the direction and make sure you are not trying to place it in the SIM slot.
Step 4: Reinsert the Tray
Slide the tray back into the phone slowly and evenly. Make sure the tray is fully inserted. If your device has water resistance, a properly seated tray is especially important because a loose tray can compromise the seal.
Step 5: Turn the Phone Back On
After the phone starts, Android should detect the SD card. You may see a notification asking whether you want to set up the card, format it, or explore its contents. If the card is new, formatting it inside the phone is usually the best choice.
Portable Storage vs Internal Storage: Which Should You Choose?
Android may offer two formatting options: portable storage and internal storage. The wording can vary. Some devices say “Format as portable,” “Format as internal,” “Use as phone storage,” or similar phrases. Not every phone supports both options.
Portable Storage
Portable storage is the safest and most flexible choice for most users. When formatted as portable storage, the SD card can store photos, videos, music, documents, and other files. You can remove it from the phone and read it on another device, such as a computer or card reader.
This option is ideal if you want to transfer files between devices, back up photos, store downloads, or keep media separate from internal storage. It is also easier to replace the card later.
Internal Storage or Adoptable Storage
Internal storage, sometimes called adoptable storage, treats the SD card more like part of the phone’s built-in storage. Android formats and encrypts the card so it works only with that device. This can allow more space for apps and app data on supported phones, but it comes with trade-offs.
Once a card is adopted as internal storage, you should not casually remove it. The card becomes tied to that phone, and another device will not be able to read it normally. If the card is slow, apps may run poorly. If the card fails, apps and data stored on it may become inaccessible. Because of these issues, many manufacturers limit or disable the internal storage option.
Best Choice for Most People
For most Android users, portable storage is the better choice. It is simpler, safer, easier to back up, and less likely to create problems later. Choose internal storage only if your phone supports it, your card is fast and reliable, and you understand that the card will be encrypted for that device.
How to Format an SD Card on Android
Formatting prepares the card for your phone. It also erases everything on the card, so back up any important files first. Formatting is like giving the card a fresh notebook. Useful, clean, and absolutely not interested in preserving your old scribbles.
Format a New SD Card
After inserting the card, Android may show a notification that says the card is detected. Tap the notification and follow the setup instructions. Choose portable storage or internal storage, then confirm. The phone will format the card and prepare it for use.
Format from Android Settings
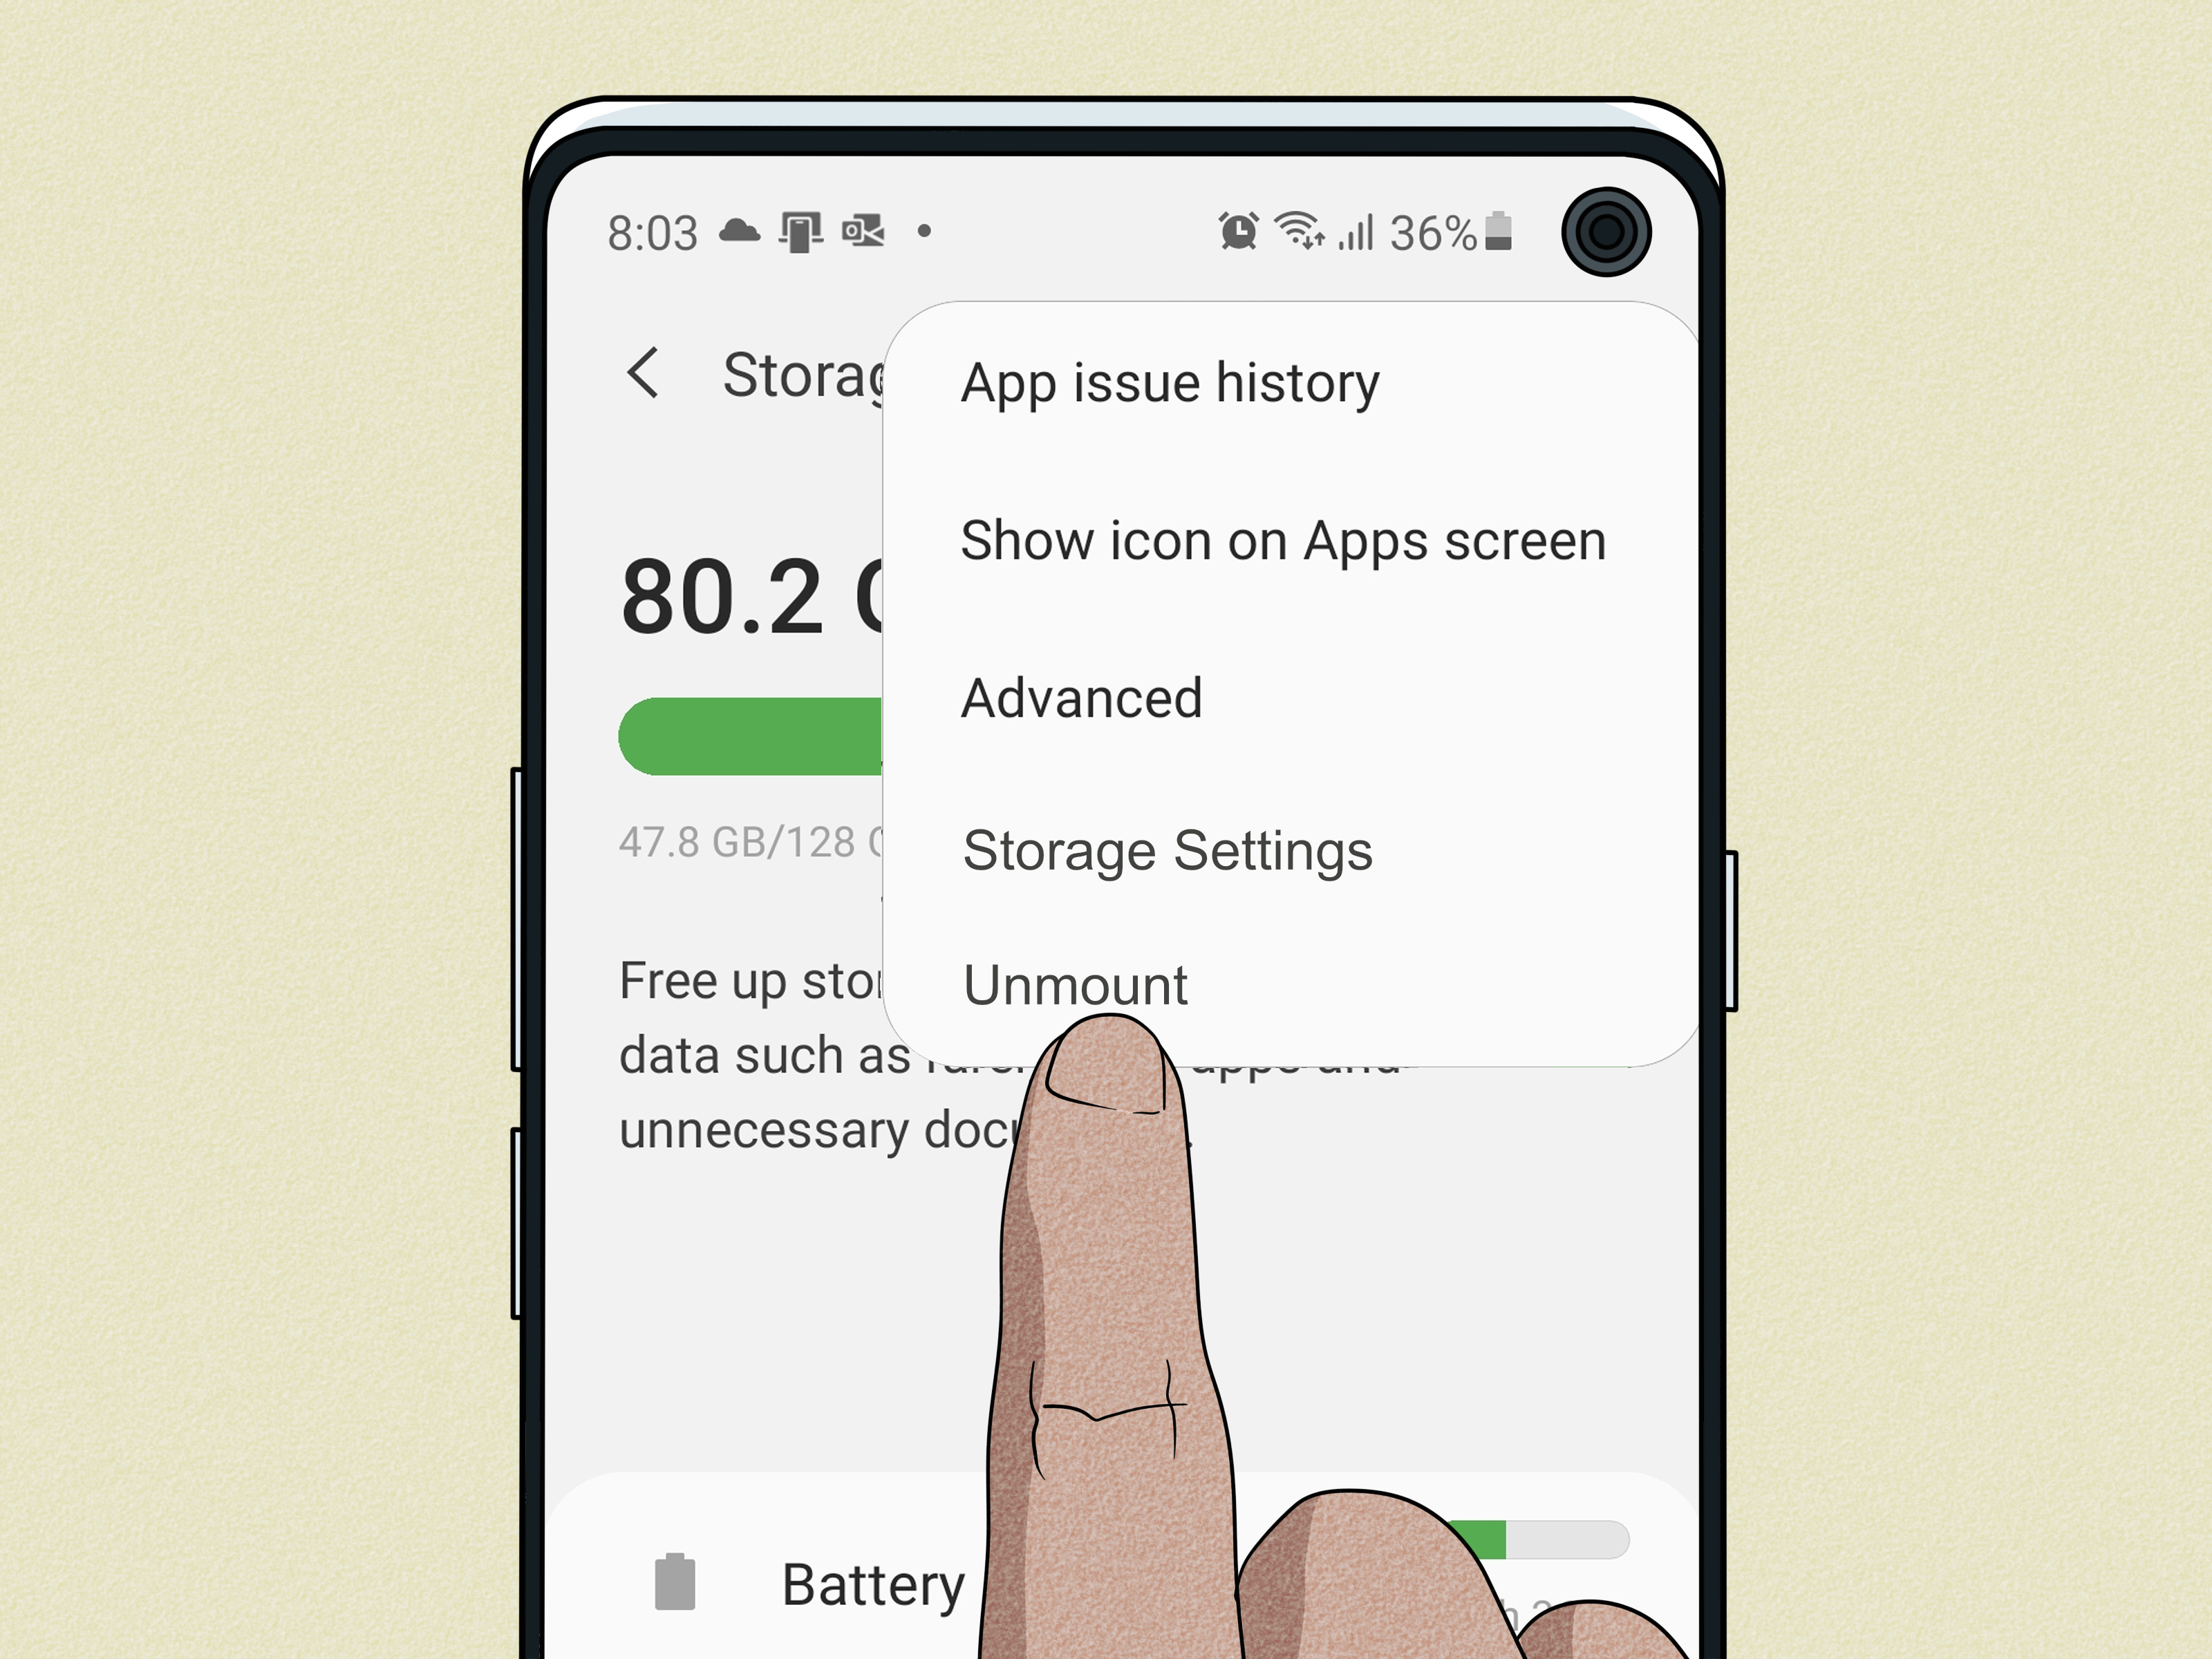
If you do not see a notification, open Settings, then go to Storage. Tap your SD card. Open the menu, usually shown as three dots, and choose Storage settings, Format, or Format card. Confirm the warning and wait for the process to finish.
On Samsung Galaxy devices, the path may be similar to Settings > Battery and device care > Storage, then select the SD card and choose the format option. On Motorola and other Android brands, you may find the card under Settings > Storage. Menu names change, but the idea stays the same: find the SD card inside Storage settings and format it there.
When Should You Reformat an SD Card?
You may need to reformat a card if it was previously used in another device, shows errors, has an unsupported file system, or behaves strangely. Reformatting can fix some file system problems, but it will not repair a physically damaged or worn-out card. If your card repeatedly disappears, refuses to format, or corrupts files, replace it.
How to Move Files to an SD Card on Android
Once the card is ready, you can move files from internal storage to the SD card. This is one of the best ways to free up space without deleting everything you love.
Use Files by Google
Open the Files app or Files by Google. Tap Browse, then select a category such as Images, Videos, Audio, Documents, or Downloads. Choose the files you want to move, tap the three-dot menu, and select Move to or Copy to. Choose your SD card as the destination and confirm.
Use Move if you want to free internal storage. Use Copy if you want a duplicate on the SD card while keeping the original in internal storage. If you are not sure, copy first, confirm the files open correctly, then delete the originals later.
Use Your Phone’s Built-In File Manager
Many Android brands include their own file manager, such as My Files on Samsung Galaxy devices. Open the file manager, select the files or folders you want, tap Move or Copy, choose SD card, then select or create a folder. For photos, you might create folders such as “Camera Backup,” “Travel,” or “Screenshots.” Your future self will appreciate the organization.
How to Save Photos and Videos Directly to SD Card
Some Android camera apps allow you to save new photos and videos directly to the SD card. This is especially useful if your internal storage is small or you record large videos.
Change Camera Storage Location
Open the Camera app, tap the Settings gear, and look for Storage location. If the option appears, choose SD card. After that, new photos and videos should save to the card automatically.
If you do not see the option, your phone or camera app may not support saving directly to SD card. Some devices only allow certain apps to use the card automatically. In that case, use the Files app to move media manually from time to time.
Can You Move Android Apps to an SD Card?
Sometimes, yes. Often, no. This is where Android likes to keep things interesting.
Whether you can move apps to an SD card depends on your phone model, Android version, manufacturer settings, how the card is formatted, and whether the app developer allows it. Some apps must stay on internal storage for performance, security, widgets, background services, or system requirements.
How to Check If an App Can Move
Open Settings, go to Apps, choose an app, tap Storage, and look for a Change or Move option. If the option does not appear, that app cannot be moved on your device. This is normal. It does not mean your phone is broken; it means Android is being Android.
If your SD card is formatted as internal storage, Android may automatically decide where compatible apps and data should go. Still, performance depends heavily on card speed, so use a reliable card if you plan to store apps on it.
How to Safely Remove an SD Card from Android
Never yank out an SD card while the phone is writing files. Removing a card during a file transfer is one of the easiest ways to corrupt data. Always unmount or eject it first.
Unmount the SD Card
Open Settings, go to Storage, select your SD card, and choose Eject or Unmount. Wait for Android to confirm that it is safe to remove the card. Then power off the phone if needed, open the tray, and remove the card carefully.
If the card is formatted as internal storage, do not remove it unless you are prepared for apps or data stored on it to stop working. Portable cards are much safer to remove and use with other devices.
Common SD Card Problems on Android and How to Fix Them
SD Card Not Detected
If your Android device does not detect the SD card, turn off the phone and remove the card. Check for dust, debris, cracks, bent contacts, or tray misalignment. Wipe the card gently with a soft, dry cloth and reinsert it. Also confirm that the card capacity is supported by your phone.
Format Failed
A format failure can happen because the card is corrupted, write-protected through an adapter, damaged, unexpectedly removed, or using an unsupported file system. Try restarting the phone and formatting again. If it still fails, test the card in another device or computer. If multiple devices cannot format it, the card may be worn out or fake.
Files Disappear or Become Corrupted
File corruption often happens when a card is removed during transfers, used across many devices without proper formatting, or damaged by age and heavy use. Back up important files regularly. SD cards are convenient, but they should not be your only copy of precious photos, school files, work documents, or family videos.
Phone Feels Slow After Using SD Card
A slow card can affect media loading and app performance, especially if used as internal storage. If your phone warns that the card is slow, believe it. Upgrade to a faster card from a reputable brand, preferably with A1 or A2 rating for app-heavy use and U3 or V30 for high-resolution video.
Best Practices for Using an SD Card on Android
Use your Android phone to format the card instead of formatting it elsewhere first. This helps ensure the file system is compatible with your device. Keep your card organized with folders for photos, videos, documents, and backups. Avoid filling the card completely; leaving some free space can help performance and reduce file management headaches.
Back up important data to a computer, external drive, or cloud service. Even a high-quality SD card can fail. Think of an SD card as a helpful backpack, not a bank vault. It carries your stuff, but you should not trust it as the only place your digital life exists.
Buy cards from trusted retailers and known brands. Fake cards are a real problem. A fake card may claim to have 512GB but actually store far less, causing files to vanish or break once the real capacity is exceeded. If a deal looks suspiciously cheap, your wallet may be walking into a trap wearing a tiny plastic hat.
Real-World Experiences: What Using an SD Card on Android Actually Feels Like
In daily use, an SD card is most helpful when you treat it as a media and file storage tool rather than a miracle cure for every storage problem. The best experience usually comes from saving photos, videos, music, podcasts, offline maps, documents, and downloads to the card while keeping important apps on internal storage. This setup gives you breathing room without making the phone depend too heavily on removable memory.
One common experience is the “photo rescue” moment. Someone has a phone with only 64GB of internal storage, and half of it is already eaten by the system, apps, and years of screenshots that apparently cannot be deleted because “maybe I’ll need this coupon from 2021.” After installing a 128GB or 256GB microSD card and moving old videos, the phone suddenly has enough room to update apps again. The device does not become brand new, but it stops acting like every new photo is a personal attack.
Another practical lesson is that not all files belong in the same place. Photos and videos are excellent SD card candidates because they are large and easy to organize. Music libraries and downloaded podcasts also work well. Documents are fine too, especially if you create clear folders. Apps are less predictable. Some move successfully, some refuse, and some move but still keep a large amount of data on internal storage. This is why users expecting an SD card to solve all app storage problems may feel disappointed.
Formatting choice also affects the long-term experience. Portable storage is usually calmer. You can remove the card, copy files to a computer, replace it, or use it in another device. Internal storage can be useful on supported phones, but it feels more locked down. Since the card is encrypted for one device, it is not convenient for quick file transfers. If the phone breaks, recovering data from an adopted card can be difficult. For most people, portable storage is the more forgiving option.
Speed is another lesson users learn quickly. A very cheap card may work for storing a few photos, but it can become annoying when recording video, browsing large galleries, or moving folders with thousands of small files. A faster, reputable card saves time and frustration. The difference may not sound exciting on the package, but in real life it can mean the difference between smooth file handling and staring at a progress bar like it owes you money.
Organization matters more than people expect. If every file is dumped into one giant folder, the SD card becomes a digital junk drawer. A better system is to create simple folders such as Camera, Videos, Music, Documents, Downloads, School, Work, and Backup. Keep names obvious. You do not need a museum-grade archive system; you just need enough order so you can find your vacation video without opening 47 mystery folders.
The most important experience-based advice is to back up anything valuable. SD cards are small, portable, and easy to lose. They can also fail without giving a dramatic farewell speech. If a file matters, keep another copy somewhere else. A card is excellent for expanding storage, but it should not be the only home for irreplaceable memories or important work.
Overall, using an SD card on Android is still one of the simplest ways to stretch a phone’s storage, especially on devices that support microSD expansion properly. Insert it carefully, format it in the phone, choose portable storage unless you have a good reason not to, move media files regularly, and eject it safely. Do that, and the little card will quietly do its jobno applause needed, though after freeing 50GB of space, it probably deserves a tiny parade.
Conclusion
Learning how to insert, format and use an SD card on Android device is not complicated, but doing it correctly matters. Start by confirming that your phone supports microSD cards. Choose a reliable card with enough capacity and speed for your needs. Insert it gently, format it through Android settings, and decide whether portable or internal storage is right for you. For most users, portable storage is the easiest and safest option.
After setup, use the SD card for photos, videos, music, downloads, and documents. Move files with Files by Google or your phone’s built-in file manager. Set your camera to save to the SD card if your device supports it. If you want to move apps, check each app individually and remember that not every app can be moved.
Finally, protect your data. Eject the card before removing it, avoid suspiciously cheap cards, and back up important files. An SD card is small enough to disappear in a couch cushion, but when used wisely, it can make your Android device feel far less crowded.