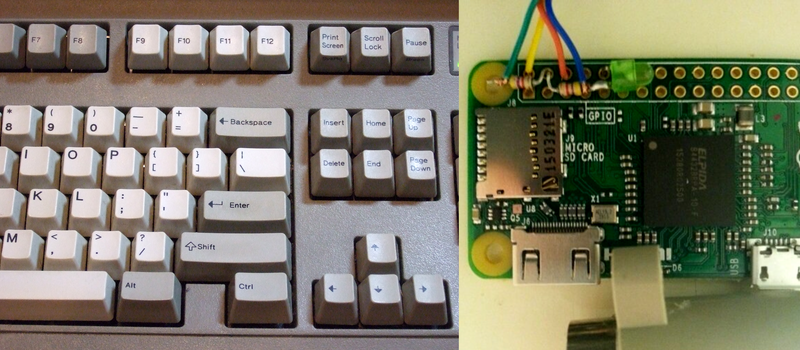
Some projects begin with a shiny new sensor, a laser-cut enclosure, and a shopping cart full of tiny screws that will absolute keyboard, a Raspberry Pi Zero, and the deeply satisfying idea that yesterday’s hardware still has a few tricks left in its beige plastic bones.
Hacking a PS/2 keyboard onto your Pi Zero is not just a nostalgia stunt. It is a practical way to give a tiny Linux board a dedicated keyboard input without relying on a USB hub, Bluetooth pairing, or a fragile chain of adapters. The Pi Zero is famously small and minimal, which is part of its charm. It also means every port matters. If your only USB port is already busy with networking, storage, debugging, or some wonderfully questionable homemade peripheral, connecting a keyboard through GPIO can feel like finding a secret door in the wall.
The basic idea is simple: a PS/2 keyboard communicates over two signal lines, clock and data. A Raspberry Pi Zero has general-purpose input/output pins that can read digital signals. With the right electrical precautions and software support, the Pi can interpret those PS/2 signals as keyboard events. The result is a compact, low-cost input setup that feels delightfully old-school while still being useful for embedded terminals, retro builds, cyberdeck-style projects, portable consoles, and headless machines that occasionally need human intervention.
Why Use a PS/2 Keyboard With a Pi Zero?
The Raspberry Pi Zero is inexpensive, compact, and wonderfully flexible, but it has limited onboard connectivity compared with larger Raspberry Pi boards. A typical USB keyboard works perfectly well, of course, but it may require a micro-USB OTG adapter. Add networking, storage, or another USB device, and suddenly you are shopping for a hub. That is not terrible, but it is not always elegant.
A PS/2 keyboard gives you another path. Instead of consuming the USB port, it can connect through GPIO pins. For projects where the keyboard is permanently installed, such as a homebrew terminal, a retro computer replica, or a Pi Zero hidden inside a keyboard case, PS/2 is especially attractive. It is electrically simple, widely documented, and easy to salvage from older hardware.
There is also a philosophical reason. PS/2 keyboards are not trying to be smart lifestyle accessories. They do not need charging, pairing, firmware apps, or cloud accounts. They press keys. They send scan codes. They do their job with the calm confidence of a device that has survived several generations of operating systems and at least one basement flood.
How the PS/2 Keyboard Protocol Works
A PS/2 keyboard uses two main signal lines: clock and data. When the keyboard is idle, both lines normally sit high. When a key event occurs, the keyboard controls the clock line and sends a frame of bits over the data line. Each data frame typically includes a start bit, eight data bits sent least significant bit first, a parity bit, and a stop bit.
That structure matters because the Pi must read the data line at the correct moments. The usual approach is to watch the clock signal and sample the data line on the clock edge. In plain English: the keyboard taps the table, and the Pi writes down the bit it sees each time the tap happens.
The keyboard does not usually send letters directly. Instead, it sends scan codes. A scan code tells the host which physical key changed state. Pressing a key sends a make code. Releasing a key sends a break sequence. Modifier keys such as Shift, Ctrl, and Alt are handled as separate key events. This is why keyboard input is more than simply “A equals 65.” The system has to track key presses, releases, modifiers, and sometimes extended key codes.
The Hardware You Need
A basic PS/2-to-Pi Zero project usually needs only a small set of parts. You need a Raspberry Pi Zero or Pi Zero W, a PS/2 keyboard, a PS/2 female connector or a sacrificed keyboard extension cable, jumper wires, and a way to protect the Pi’s GPIO pins from unsafe voltage levels. If you want a durable build, add heat-shrink tubing, a small perfboard, a case, and proper strain relief so the keyboard cable does not slowly turn your GPIO header into modern art.
Understanding the PS/2 Connector
The classic PS/2 keyboard connector is a 6-pin mini-DIN plug. The important connections are data, clock, ground, and power. Many PS/2 keyboards expect 5V power. The Raspberry Pi Zero can provide 5V from its header, but the GPIO signal pins are 3.3V logic and should not be treated as 5V-tolerant inputs. That difference is the part of the project that deserves your full attention.
A keyboard powered at 5V may pull its signal lines high through internal or external pull-ups. Feeding a 5V signal directly into a Pi GPIO pin is risky. The safer approach is to use proper level shifting, resistor-based protection, or open-collector-friendly wiring with pull-ups to 3.3V where appropriate. The exact solution depends on your keyboard and circuit design, but the rule is beautifully simple: the Pi’s GPIO pins should see 3.3V, not 5V.
Recommended GPIO Setup
At the signal level, you need one GPIO pin for PS/2 clock and one GPIO pin for PS/2 data. You also need a shared ground between the keyboard and the Pi. The 5V power pin can power many PS/2 keyboards, but the signal lines still need safe translation. Choose GPIO pins that are not already used by your display, buttons, SPI devices, I2C devices, or other project hardware.
For a clean build, label the wires before connecting them. This sounds boring until you discover that clock and data are swapped, ground is floating, and the keyboard is responding with the emotional availability of a brick. A few labels save a lot of detective work.
The Software Side: Turning Bits Into Keypresses
Once the hardware can safely deliver PS/2 clock and data signals to the Pi Zero, software has to decode them. There are two common approaches: use a Linux driver path or write a user-space decoder.
Option 1: Use a GPIO-Based PS/2 Driver
Modern Linux includes infrastructure for input devices, and GPIO-based PS/2 support can appear through the kernel’s serio/input layers when properly configured. In this style of setup, the GPIO pins act as a PS/2 host interface. The decoded keyboard can then appear to Linux much like any other input device. From the user’s perspective, the keyboard may show up under the input subsystem, where tools can inspect events and applications can receive keystrokes.
This approach is elegant because it lets Linux do the heavy lifting. The system already understands keyboard events, modifiers, repeat behavior, and input devices. Instead of writing an entire keyboard stack, you configure the low-level interface and let the operating system handle the boring-but-important plumbing.
The catch is that availability and setup details can vary by kernel version, distribution, device tree overlays, and whether the required driver is enabled. If you are building this for a published project, document your exact Raspberry Pi OS version and kernel. Future you will appreciate this. Future you is tired.
Option 2: Decode PS/2 in User Space
The user-space method is more educational. A small program watches the clock GPIO, samples the data GPIO, assembles the 11-bit frame, checks parity, extracts the scan code, and maps it to a character or Linux input event. This approach is ideal if you want to understand what the keyboard is actually sending.
In a simple decoder, the program waits for the falling edge of the clock line. On each falling edge, it reads the data line and shifts the bit into a buffer. After a full frame arrives, the program validates it and interprets the scan code. For real keyboard use, the program also needs to track release codes, extended codes, Shift state, Caps Lock behavior, and special keys. That is where a “quick weekend hack” begins wearing a tiny fake mustache and pretending to be a driver project.
If your goal is a reliable daily-use keyboard, the driver approach is usually better. If your goal is learning, debugging, or building a custom embedded interface, user-space decoding can be rewarding. It gives you a front-row seat to how keyboard input becomes text.
A Practical Wiring Strategy
A sensible wiring plan starts with safety. Connect the keyboard ground to a Pi ground pin. Power the keyboard from 5V only if your keyboard requires it and your power supply can handle the extra current. Route the PS/2 clock and data lines through safe level-shifting or pull-up arrangements so the GPIO pins never receive more than 3.3V.
Do not hot-plug the keyboard during early testing. PS/2 was not designed with the same hot-plug expectations as modern USB. Power down the Pi, connect the keyboard, double-check the wiring, and then power up. This small ritual may feel dramatic, but it is less dramatic than smelling warm electronics and whispering, “That was probably fine,” when it was not fine.
For a more permanent build, solder the connections instead of relying on loose jumper wires. Add strain relief to the keyboard cable. Mount the Pi so that the GPIO header is not bearing mechanical stress. If the project lives inside a keyboard shell, leave space for airflow and avoid pressing the board against conductive metal plates or mystery foil from the old enclosure.
Testing the Keyboard
Testing should happen in layers. First, verify power and ground. Then confirm that the clock and data lines idle high at a safe voltage. Next, press a key and check whether the clock line pulses. A logic analyzer is extremely helpful here, but even a simple oscilloscope or GPIO edge counter can tell you whether the keyboard is alive.
Once the signal looks good, move to software. If the keyboard is exposed through the Linux input subsystem, input testing tools can show key events. If you are using a custom decoder, print raw scan codes before trying to translate them into characters. Raw scan code output is not pretty, but it is honest. When you press “A” and see consistent data, you know the electrical and timing foundation works.
After that, test modifier keys, arrow keys, function keys, and key release behavior. Many simple decoders work beautifully for letters and then panic when confronted with Pause, Print Screen, or the numeric keypad. Keyboards contain history, and some of that history is weird.
Common Problems and Fixes
The Keyboard Does Nothing
Check power first. Some PS/2 keyboards are picky about supply voltage or current. Verify that ground is shared between the Pi and keyboard. Then check whether clock and data are swapped. Swapping those two lines is a classic mistake and practically a rite of passage.
The Pi Freezes or Behaves Strangely
Disconnect power immediately and re-check the electrical interface. A GPIO pin exposed to 5V can cause unpredictable behavior or permanent damage. Also inspect for shorts, loose strands of wire, and connector pins touching where they should not.
Some Keys Work, Others Do Not
This often points to incomplete scan code handling. Basic letter keys may use simple make codes, while extended keys may use prefix bytes. Release sequences also matter. If your software treats every scan code as a fresh character, it may behave oddly when keys are held or released.
Characters Repeat Too Fast
Keyboard repeat can be handled by the keyboard, the driver, or user-space software depending on the implementation. If you are writing your own decoder, make sure you distinguish between a key being held and multiple independent presses.
Good Project Ideas for a PS/2 Pi Zero Keyboard
The most obvious project is a compact Linux terminal built into an old keyboard case. Add a small HDMI display, a Pi Zero W, and Wi-Fi, and you have a charming portable shell machine. It will not replace a laptop, but it will make every coffee shop table look like a tiny hacker movie set.
Another strong use case is a retro computer emulator. Many retro builds feel better with a full-size wired keyboard, especially one with clicky switches and enough desk presence to intimidate a modern ultrabook. A PS/2 keyboard can also serve as a control panel for kiosks, lab equipment, ham radio logging stations, lightweight writing devices, or classroom demonstrations about serial protocols.
You can also use the project as a teaching tool. PS/2 is approachable enough to decode, but complex enough to teach timing, parity, scan codes, electrical safety, Linux input handling, and hardware debugging. It is a small project with several big lessons tucked inside.
Why This Hack Still Matters
It is easy to dismiss PS/2 as obsolete because USB keyboards are everywhere. But old technology often survives because it is simple, predictable, and well understood. PS/2 gives you direct visibility into keyboard communication in a way that USB usually hides behind layers of descriptors, endpoints, host controllers, and drivers.
For the Pi Zero, that simplicity is valuable. A GPIO keyboard interface can reduce adapter clutter, free the USB port, and support embedded designs where the keyboard is part of the enclosure. It also reminds us that “old” does not mean “useless.” Sometimes it means “documented well enough to hack without crying into a datasheet.”
Experience Notes: What You Learn When You Actually Build It
The first real lesson from hacking a PS/2 keyboard onto a Pi Zero is that wiring confidence and wiring correctness are not the same thing. You may look at the connector, nod wisely, and still reverse clock and data because the diagram is shown from the plug side while you are staring at the socket side. This is why careful pin verification matters. A continuity tester is not glamorous, but neither is debugging a project for two hours because the connector was mentally mirrored.
The second lesson is that voltage levels deserve respect. Many builders hear “two-wire protocol” and assume the connection is as casual as plugging in a button. It is not. The Pi Zero’s GPIO pins are 3.3V logic inputs, and an old keyboard may live in a 5V world. The project becomes much more reliable when you stop treating level shifting as optional seasoning and start treating it as part of the main recipe.
The third lesson is that PS/2 feels simple until you care about every key. Getting one letter to appear is exciting. Getting all keys, releases, modifiers, arrow keys, and extended scan codes working is where the project grows up. Shift plus a letter is not one event; it is a sequence. Releasing a key matters. Holding a key matters. Special keys bring their own baggage. This is the point where you begin to appreciate boring, mature keyboard drivers with the kind of affection normally reserved for reliable shoes.
The fourth lesson is that mechanical design matters more than expected. A Pi Zero dangling from jumper wires may work on the bench, but a real keyboard cable gets tugged, bumped, twisted, and shoved behind desks. A permanent build needs strain relief, insulation, and a mounting plan. Even a small piece of perfboard can make the difference between “cool prototype” and “why did it stop working when I breathed near it?”
The fifth lesson is that old keyboards vary. Some are polite and predictable. Others are fussy, noisy, power-hungry, or odd about initialization. If one keyboard behaves strangely, test another before rewriting all your code in despair. The PS/2 standard gives you a common language, but individual hardware can still have an accent.
The sixth lesson is that debugging tools are worth it. A cheap logic analyzer can turn invisible clock and data pulses into something you can actually see. Without it, you may guess whether the keyboard is sending data. With it, you can watch frames arrive, inspect timing, and confirm whether your software is sampling correctly. It is like switching on the lights in a room where you have been trying to assemble furniture by vibes.
Finally, the project teaches a broader maker truth: the best hacks are not always the most complicated. A PS/2 keyboard on a Pi Zero is not flashy in the modern sense. It does not involve machine learning, cloud dashboards, or an app that needs fourteen permissions to blink an LED. But it connects hardware history to modern Linux in a way that is useful, understandable, and fun. You finish with a working keyboard, a freer USB port, and a sharper understanding of how input devices speak to computers. That is a pretty good return on a few wires and an old keyboard that was probably waiting in a drawer for its comeback tour.
Conclusion
Hacking a PS/2 keyboard onto your Pi Zero is a satisfying blend of practical problem-solving and retro-computing charm. The project takes a simple old keyboard interface and gives it new life through the Pi’s GPIO pins. Along the way, you learn about clocked serial communication, scan codes, Linux input handling, voltage safety, and the importance of not trusting unlabeled wires just because they look innocent.
The most important takeaway is safety: protect the Pi’s 3.3V GPIO pins, verify your PS/2 connector pinout, share ground correctly, and avoid hot-plugging during testing. Once the electrical side is handled properly, the software path can be as straightforward or as educational as you want it to be. Use a driver-based approach for a cleaner system integration, or decode the protocol yourself if you want to understand every bit that crosses the wire.
A PS/2 keyboard may be old, but in the right project, it still feels purposeful. Pair it with a Pi Zero and you get a compact, low-cost input system that is perfect for terminals, retro builds, embedded machines, and maker projects with a taste for practical nostalgia.
Note: Before publishing or building from this guide, verify the exact PS/2 connector pinout, Raspberry Pi Zero GPIO pin numbers, and voltage protection method for your specific hardware. Never feed 5V signals directly into Pi GPIO pins.