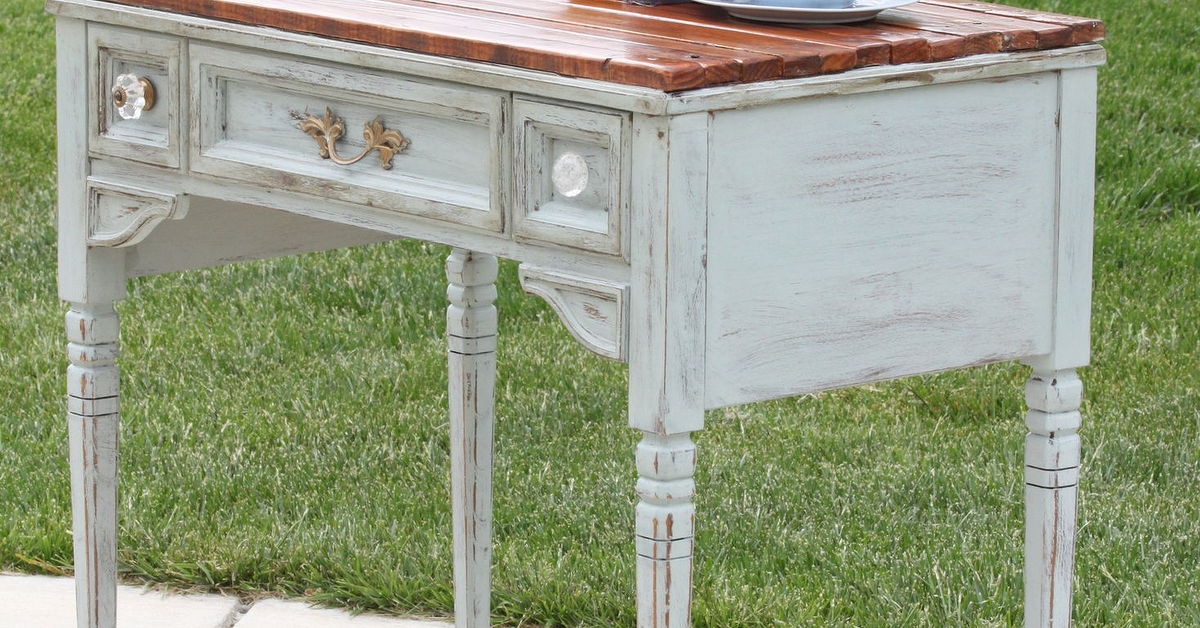
Some people see old planks on the side of the road and think, “Trash day.” A DIYer sees them and thinks, “Free character, free lumber, and possibly a mild tetanus risk if I forget my gloves.” A sewing table makeover with side of the road planks is exactly the kind of project that turns forgotten wood into a hardworking, charming, and very personal piece of furniture. It is thrifty, creative, practical, and just dangerous enough to make you feel like a home-improvement pirate.
At its heart, this project is simple: take a tired sewing table, rescue some usable planks, clean and prep everything properly, then build a new rustic tabletop or accent surface that gives the whole piece a second life. The result can be farmhouse, cottage, industrial, vintage, or “I made this and will now casually mention it to every guest who walks into the room.”
But this is not just about slapping old boards onto an old table and calling it a day. A sewing table has a real job. It must be stable, smooth enough for fabric, comfortable for long sessions, and strong enough to support a machine that vibrates like it has had three espressos. The best makeover balances beauty with function, because a pretty table that snags silk and wobbles during hemming is not charmingit is furniture with a villain arc.
Why a Sewing Table Makeover Is Worth the Effort
Old sewing tables are often built better than many modern lightweight desks. They may have solid frames, useful drawers, compact footprints, and a nostalgic shape that fits beautifully in a craft room, guest room, studio corner, or hallway nook. The problem is usually the surface. Laminate may be peeling, veneer may be chipped, paint may be dull, and the tabletop may have scars from years of pins, scissors, coffee mugs, and questionable late-night craft decisions.
Adding reclaimed planks gives the table a new surface and a new identity. Instead of hiding the age, you celebrate it. Nail holes, grain variations, knots, saw marks, and weathered color become design features. A sewing table makeover with reclaimed wood works especially well because sewing itself is already a hands-on craft. The table feels like it belongs in the same world as thread, fabric, scissors, patterns, and “I’ll just make one quick adjustment” projects that somehow last until midnight.
Choosing Side of the Road Planks Safely
Free wood is exciting, but not every roadside plank deserves a place in your home. Before loading mystery lumber into your car, inspect it carefully. Look for signs of rot, mold, oil stains, chemical odors, active insects, excessive warping, and embedded metal. A few nail holes are charming. A board that smells like gasoline and sadness should stay exactly where it is.
Good Planks for a Sewing Table
Ideal planks are dry, reasonably straight, structurally sound, and thick enough to sand without falling apart. Boards from old shelves, fencing, crates, non-treated furniture, or clean interior paneling can work beautifully. For a sewing table top, thinner boards can be attached over an existing tabletop, while thicker boards can be joined to create a more substantial surface.
Planks to Avoid
Avoid pressure-treated lumber for indoor furniture, especially if you cannot identify its age or treatment. Also avoid wood with unknown chemical exposure, heavy paint flakes, dampness, or pest damage. If the boards are painted and look old, be cautious. Older painted materials may contain lead-based paint, and sanding them without testing or proper precautions can create hazardous dust. When in doubt, test first or choose cleaner wood.
Tools and Materials You May Need
This project does not require a professional workshop, but a few basic tools make the process smoother. You will likely need gloves, safety glasses, a dust mask or respirator, a pry bar or hammer, pliers, a tape measure, clamps, wood glue, screws, a drill, sandpaper in several grits, a sander, wood filler, primer or stain, paint, and a protective topcoat. A circular saw, miter saw, or hand saw may be needed to cut boards to length.
For the finish, choose based on how the table will be used. Paint can refresh the base and legs. Stain can highlight the salvaged plank top. A clear protective coat is essential if fabric will slide across the surface. Polyurethane is a popular option for durability, while polycrylic is often chosen for indoor projects where a clearer, less amber finish is desired. Furniture wax can look soft and beautiful, but a sewing surface usually benefits from a harder, more wipeable finish.
Step 1: Clean and Inspect the Sewing Table
Start with the existing sewing table. Remove drawers, hardware, knobs, hinges, loose trim, and any pieces that make sanding harder. Vacuum dust from corners and wipe the entire table with a mild cleaner or degreaser. Craft furniture tends to collect lint, oil from hands, adhesive residue, and tiny thread nests in places only a flashlight can find.
Once clean, inspect the structure. Tighten screws, reinforce wobbly legs, and glue loose joints. If the table shakes before the makeover, it will still shake afterward, only now it will look cuter while betraying you. A sewing table needs stability because machine vibration can exaggerate even small weaknesses.
Step 2: Prepare the Roadside Planks
Put on gloves before handling reclaimed boards. Remove nails, staples, screws, and any hidden metal. Use a magnet if necessary. This is not only safer for your hands; it also protects saw blades and sanding equipment. After removing metal, scrub the planks with a stiff brush. If they are dirty but otherwise sound, wipe them down and let them dry fully before cutting or finishing.
Next, lay the boards out on a flat surface. Arrange them by color, grain, width, and character. This is the fun design part, where you pretend to be casual while actually moving the same board one inch to the left seventeen times. Try alternating grain direction and tone so the finished top looks intentional rather than accidental.
Step 3: Measure Twice, Cut Once, Then Measure Again Because You Are Human
Measure the existing tabletop and decide whether the plank surface will sit flush with the edges, overhang slightly, or create a framed top. A slight overhang can look polished, but too much overhang may interfere with drawers, knees, or the sewing machine pedal setup. Mark each board clearly and cut to size.
Dry-fit the planks before attaching them. Check for gaps, uneven edges, cupping, and rocking. A little variation gives reclaimed wood its charm, but fabric needs a friendly surface. If a board is badly twisted, save it for a garden sign, not a sewing table. Your future self does not want to fight a bumpy tabletop while cutting linen.
Step 4: Sand for Smoothness Without Erasing the Character
Sanding is where reclaimed wood becomes furniture instead of “stuff from the curb.” Begin with a medium grit if the boards are rough, then move to finer grits for a smooth finish. Always sand with the grain when possible. The goal is to remove splinters, grime, sharp edges, and raised fibers while keeping the weathered personality that made the boards interesting in the first place.
Round the front edge slightly, especially where your arms may rest while sewing. Sharp corners look crisp in photos but feel rude during long projects. Pay special attention to seams between boards. Fabric should glide across the surface without catching. If you can run a delicate scrap of fabric over the top without snagging, you are on the right path.
Step 5: Attach the Planks Securely
There are several ways to attach side of the road planks to a sewing table. If the original tabletop is solid and flat, you can glue and screw the boards from underneath. This keeps the top surface clean and avoids visible screw heads. If you want a more rustic look, exposed screws can work, but they must be countersunk and filled so they do not catch fabric.
Use clamps while the glue dries to reduce gaps and keep the boards flat. If the planks are different thicknesses, consider planing, sanding, or mounting them over a thin plywood substrate to create a more even surface. For a high-use sewing table, function wins. Rustic should mean textured and warm, not lumpy like a gravel driveway.
Step 6: Fill Gaps, Cracks, and Nail Holes Strategically
Some holes should stay visible because they tell the story of the reclaimed wood. Others should be filled because they will collect dust, thread, pins, glitter, and possibly snacks. Use wood filler for deep cracks, screw holes, and seams where fabric might catch. Choose a filler color close to the wood tone, or use a darker filler for a more aged look.
After the filler dries, sand lightly again. Run your hand across the top with your eyes closed. This simple test reveals rough areas that your eyes may miss. Just be careful if you skipped the nail-removal step, because that would turn this into a very different article.
Step 7: Paint or Refinish the Base
The base of the sewing table can be painted, stained, or left as is. A painted base with a stained plank top is a classic combination because it lets the wood shine while giving the old frame a clean update. Soft white, charcoal, sage green, navy, warm gray, and muted black all pair well with rustic wood. For a brighter craft room, a cheerful color can make the table feel playful without overwhelming the plank surface.
Prep matters. Sand glossy surfaces, wipe away dust, prime if needed, and apply thin coats. Two thin coats almost always look better than one heroic blob coat. Let paint dry properly between coats. DIY impatience is real, but so are fingerprints permanently embedded in tacky paint.
Step 8: Stain the Plank Top
If your reclaimed planks already have a beautiful natural tone, you may only need a clear coat. If the boards look mismatched in a not-so-charming way, stain can bring them together. Test stain on a scrap or hidden area first because reclaimed boards absorb finish differently. One plank may turn honey brown while another goes full dramatic walnut, because wood enjoys keeping secrets.
Apply stain in the direction of the grain, wipe off excess, and allow it to dry according to the product instructions. For softwoods or uneven boards, a pre-stain conditioner may help reduce blotchiness. The goal is not perfection. The goal is a unified, touchable, lived-in surface that still looks like real wood.
Step 9: Seal the Surface for Sewing
The protective topcoat is one of the most important parts of this sewing table makeover. Sewing involves fabric, thread, pins, measuring tools, machine vibration, and frequent hand contact. The tabletop should resist scratches and be easy to wipe clean. Apply the clear finish in thin, even coats, following the grain. Let each coat dry fully, then sand lightly between coats with fine-grit sandpaper if the product recommends it.
For a tabletop, two coats may be acceptable, but three coats often provide better protection. Avoid thick, drippy applications. A smooth sealed surface keeps fabric moving easily and makes the table more practical for everyday use. Once cured, the planks should feel smooth but not plasticky, rustic but not rough, and durable enough for real work.
Step 10: Think About Sewing Ergonomics
A gorgeous sewing table is only successful if it is comfortable. Sewing for long stretches can strain the neck, shoulders, wrists, and back if the table height is wrong. The work area should allow your wrists to stay fairly straight and your shoulders relaxed. If the table is too high, you may hunch your shoulders. If it is too low, you may lean forward like a detective studying suspicious thread tension.
If the sewing machine sits on top of the plank surface, remember that the needle area will be higher than the table itself. Sit at the table with your chair and machine in place before declaring the project finished. You may need to adjust chair height, add a footrest, or use a thinner tabletop approach. Comfort is not an optional bonus; it is the difference between “I love sewing” and “Why does my neck sound like bubble wrap?”
Design Ideas for a Roadside Plank Sewing Table
Farmhouse Worktable Style
Pair a white or cream painted base with a warm stained plank top. Add cup pulls or simple black knobs. This look is cozy, classic, and perfect for a sewing nook with baskets, folded fabric, and a suspiciously large ribbon collection.
Industrial Salvage Style
Use darker stain, matte black legs, and metal hardware. Keep more nail holes visible and choose a satin topcoat. This style works well in a studio space with task lighting, pegboards, and metal storage bins.
Cottage Craft Room Style
Paint the base in pale blue, sage, blush, or buttery yellow. Keep the plank top light and natural. Add floral drawer liners or ceramic knobs. Yes, it may make you want to label everything in handwritten script. That is a normal side effect.
Common Mistakes to Avoid
The first mistake is using unsafe wood. If the planks are contaminated, moldy, rotten, or covered in unknown old paint, skip them. The second mistake is not sanding enough. A sewing table cannot have splinters or raised edges because fabric will catch. The third mistake is forgetting about height. Adding planks changes the tabletop thickness, and even a small height change can affect comfort.
Another common issue is under-sealing the surface. Reclaimed wood is porous, and unsealed boards can collect lint, dust, and stains. Finally, avoid rushing curing time. A finish may feel dry before it is fully cured. Give the surface enough time before placing a sewing machine on it or stacking fabric across the top.
How to Style the Finished Sewing Table
Once the table is finished, style it with function in mind. Add a task lamp, a small thread organizer, a pin cushion, and a tray for scissors and measuring tape. Use drawer dividers if the table has storage. A small cutting mat can protect the plank surface during trimming, while a machine mat can reduce vibration and protect the finish.
Do not overcrowd the tabletop. Reclaimed wood already brings visual texture, so a few practical accessories are enough. Let the planks be the star. After all, they went from roadside rejects to craft-room royalty. That kind of glow-up deserves breathing room.
Budget-Friendly Benefits
A sewing table makeover with side of the road planks can be extremely affordable. The main expense is usually finishing supplies: sandpaper, primer, paint, stain, screws, wood glue, and topcoat. If you already own basic tools, this project may cost far less than buying a new sewing desk. Better yet, it keeps usable materials out of the landfill and gives your workspace a custom piece that cannot be ordered in a flat-pack box.
There is also creative satisfaction in using what you have. The table becomes more than furniture. It becomes a story: the day you found the planks, the moment the grain appeared under the sander, the paint color you debated for too long, and the first project you sewed on the finished surface.
Personal Experience: What This Project Teaches You
A project like this teaches patience in a very direct way. At first, the planks may look hopeless. They may be dusty, gray, uneven, and full of nails. The sewing table may look tired and slightly embarrassed to still be in the room. But as soon as the boards are cleaned and sanded, the transformation begins. Hidden grain appears. Edges soften. The table starts to look less like a rescue case and more like a plan.
One of the biggest lessons is that reclaimed wood does not behave like fresh lumber from a store. Every board has its own mood. Some sand quickly. Some hold stains from their previous life. Some have knots that drink stain like they have been wandering the desert. You learn to stop forcing perfect uniformity and start designing around variation. That is where the charm lives.
Another experience that stands out is the importance of touch. Photos can make a rustic plank top look wonderful, but sewing is tactile. Your hands, wrists, and fabric interact with the surface constantly. During the makeover, the hand test becomes more useful than the eye test. If a seam feels raised, fix it. If an edge feels sharp, round it. If fabric catches, sand again. A sewing table has to feel as good as it looks.
The project also changes how you see discarded materials. After making one useful piece from roadside planks, you may find yourself slowing down near curb piles and mentally redesigning half the neighborhood’s trash. An old shelf becomes a tabletop. A broken cabinet becomes drawer fronts. A weathered board becomes a wall rack. This is both inspiring and mildly dangerous, because suddenly your garage starts looking like a lumber adoption center.
There is also something satisfying about mixing rough materials with careful craft. Sewing is precise. You measure seams, align fabric, press edges, and adjust tension. Reclaimed wood is imperfect. It has dents, gaps, nail holes, and attitude. Bringing the two together creates a workspace that feels honest. It says creativity does not require perfect conditions. Sometimes it starts with a wobbly table, roadside planks, and the confidence to make a useful mess.
The finished table often becomes more motivating than expected. A dedicated sewing space, even a small one, removes friction. Instead of dragging the machine to the kitchen table and clearing it away before dinner, you have a ready-to-use station. That makes it easier to hem pants, repair seams, quilt blocks, make gifts, or finally tackle the fabric pile that has been quietly judging you from the closet.
Perhaps the best part is the emotional value. Anyone can buy a new table, but not everyone has a sewing table with a reclaimed plank top they built themselves. Every mark in the wood becomes part of the story. Every smooth coat of finish reminds you that old things can become useful again. And every time someone asks where you bought it, you get the pleasure of saying, “Actually, I found the wood on the side of the road,” which is the DIY version of dropping a microphone.
Conclusion
A sewing table makeover with side of the road planks is a smart, sustainable, and deeply satisfying DIY project. It rescues old materials, upgrades a practical workspace, and adds character that new furniture often lacks. The key is to choose safe wood, prep carefully, sand thoroughly, attach the planks securely, and seal the surface so it works beautifully for sewing.
Whether your style leans farmhouse, cottage, vintage, or industrial, reclaimed planks can turn a forgotten sewing table into a custom craft-room centerpiece. It may not be flawless, but that is exactly the point. The small imperfections tell the story. The smooth finish makes it useful. And the final result proves that sometimes the best furniture makeover starts with a second look at what everyone else left behind.