Note: This article is written as original, publish-ready web content and synthesizes real craft guidance commonly recommended by reputable U.S. DIY, family activity, food safety, and art-safety resources.
A salt dough thumbprint heart is one of those crafts that looks adorably sentimental, costs almost nothing, and somehow turns ordinary pantry ingredients into a keepsake that can make grandparents emotional in under seven seconds. It is simple enough for kids, sweet enough for Valentine’s Day, charming enough for Mother’s Day, and personal enough to become a holiday ornament, fridge magnet, gift tag, classroom project, or tiny “I made this with my actual thumb” masterpiece.
The magic is in the thumbprint. Flour, salt, and water create a firm craft dough. A small thumb pressed into the surface creates one half of a heart. A second thumbprint, angled toward the first, completes the shape. Add paint, ribbon, sealant, and perhaps a little glitter if your home has already surrendered to sparkle, and you have a handmade keepsake that feels far more meaningful than something bought from a store shelf.
This guide walks through how to make a salt dough thumbprint heart from start to finish, including the best salt dough recipe, shaping tips, baking instructions, decorating ideas, safety reminders, troubleshooting advice, and personal experience-style notes to help your project come out beautifully instead of looking like a potato with fingerprints. No judgment. Salt dough has a learning curve, even if that curve is mostly “use less water.”
What Is a Salt Dough Thumbprint Heart?
A salt dough thumbprint heart is a handmade keepsake made from a basic mixture of flour, salt, and water. The dough is rolled or shaped, then pressed with two thumbprints to create a heart design. Once dried or baked, it can be painted, sealed, and displayed as a decoration or given as a gift.
The project is especially popular for Valentine’s Day crafts, Mother’s Day gifts, Christmas ornaments, preschool keepsakes, baby mementos, and family craft nights. Because the materials are inexpensive and easy to find, salt dough projects work well for classrooms, daycare activities, Sunday school crafts, homeschool art lessons, and rainy-day kitchen-table creativity.
Unlike clay, salt dough does not require specialty tools or a kiln. Unlike paper crafts, it feels sturdy and keepsake-worthy. Unlike glitter slime, it will not attempt to move into your carpet permanently. That alone deserves applause.
Why This Craft Is So Popular
The appeal of a salt dough thumbprint heart is emotional, practical, and budget-friendly. Parents and caregivers love it because it captures the size of a child’s thumb at a specific moment in time. Kids love it because they get to squish dough, press fingerprints, paint, and proudly announce, “I made that!” Teachers love it because the supplies are affordable and the process can be adapted for groups.
It also fits many occasions. A red and pink heart becomes a Valentine’s Day keepsake. A white heart with gold edges feels elegant for a wedding favor. A small round ornament with a thumbprint heart in the center makes a sweet Christmas tree decoration. Add a magnet to the back, and suddenly the refrigerator becomes an art gallery curated by tiny hands.
Supplies You Will Need
The basic supply list is wonderfully short. You probably already have most of it in your kitchen or craft drawer.
Ingredients for the Salt Dough
- 2 cups all-purpose flour
- 1 cup table salt
- 3/4 to 1 cup warm water
Tools and Decorating Supplies
- Mixing bowl
- Spoon or spatula
- Rolling pin
- Parchment paper
- Heart-shaped cookie cutter or round cutter
- Straw, skewer, or toothpick for making a hanging hole
- Baking sheet
- Acrylic paint or paint pens
- Mod Podge or clear acrylic sealer
- Ribbon, twine, magnet, or gift string
For a polished look, use fine table salt rather than coarse salt. Coarse salt can leave the surface grainy. That can be charming if you like rustic texture, but if you want smooth thumbprints, fine salt is the better choice.
Best Salt Dough Recipe for Thumbprint Hearts
The classic salt dough ratio is simple: two parts flour, one part salt, and about one part water. However, water should be added slowly because humidity, flour brand, and measuring style can all affect the dough. Salt dough is not fussy, but it does enjoy pretending to be.
Basic Recipe
- Add 2 cups of all-purpose flour and 1 cup of salt to a large bowl.
- Stir the dry ingredients together until evenly combined.
- Add 3/4 cup warm water and mix.
- If the dough feels dry or crumbly, add more water 1 tablespoon at a time.
- Knead the dough for 5 to 10 minutes until smooth and workable.
The finished dough should feel similar to firm play dough or sugar cookie dough. It should hold together without cracking, but it should not stick heavily to your fingers. If it sticks like it has emotional attachment issues, knead in a little flour. If it crumbles, add a few drops of water and keep kneading.
How to Make a Salt Dough Thumbprint Heart
Step 1: Roll the Dough
Place the dough on parchment paper or a lightly floured surface. Roll it to about 1/4 inch thick for smaller ornaments or closer to 3/8 inch thick for larger keepsakes. Thicker pieces feel sturdier, but they take longer to dry. Thin pieces dry faster, but they can become fragile if handled roughly.
Step 2: Cut the Shape
Use a heart-shaped cookie cutter for a classic look, or cut circles and place the thumbprint heart in the center. Circles are especially nice for ornaments, magnets, and gift tags because they frame the thumbprint neatly. If you do not have a cutter, use the rim of a cup. Crafting is not about perfection; it is about creative problem-solving with kitchen objects.
Step 3: Create the Thumbprint Heart
Ask the child or maker to press one thumb gently into the dough at a slight angle. Then press the same thumb or the other thumb at the opposite angle so the two prints meet at the bottom, forming a heart. The key word is gently. Pressing too hard can flatten the ornament or create a canyon instead of a heart.
If the first attempt does not look right, simply roll the dough again and try another. Salt dough is forgiving before it dries. After it dries, it becomes less forgiving and more like a tiny salty brick.
Step 4: Add a Hole for Hanging
If you want to turn the piece into an ornament or gift tag, use a straw or skewer to make a hole near the top before baking. Make the hole slightly larger than you think you need because salt dough can shrink a little as it dries. Avoid placing the hole too close to the edge, or it may crack when you add ribbon.
Step 5: Bake or Air Dry
Place the shapes on a parchment-lined baking sheet. Bake at a low temperature, around 200°F to 250°F, for 2 to 3 hours, depending on thickness. The goal is to dry the dough, not toast it into a breakfast item. Low and slow helps prevent puffing, browning, curling, and cracking.
You can also air dry salt dough, but it takes longer. Small pieces may dry in a few days, while thicker ones may need a week or more. Air drying works best in a warm, dry room with good airflow. Flip the pieces occasionally so both sides dry evenly.
Important Safety Tips
Salt dough is made with kitchen ingredients, but it is not food. Children should not taste or eat raw salt dough. Raw flour can contain germs, and the high salt content is not safe to consume. Keep the project supervised, especially with toddlers or young children who are still in the “everything goes in my mouth” phase of scientific research.
Wash hands, tools, and surfaces after handling the dough. If pets live in the home, keep both raw dough and finished ornaments away from them. Homemade salt dough contains a large amount of salt, and eating it can be dangerous for dogs and cats.
When decorating, choose washable, non-toxic craft paint for children. For sealers, adults should handle spray products outdoors or in a well-ventilated area. If children are helping seal the project, brush-on Mod Podge is usually easier to manage than sprays.
Painting and Decorating Ideas
Once the salt dough thumbprint heart is completely cool and dry, the fun part begins. Acrylic paint works well because it provides strong color and dries quickly. Paint the whole ornament white, cream, pink, red, or pastel blue, then paint the thumbprint heart in a contrasting color.
Classic Valentine Style
Use a white base with a red or pink thumbprint heart. Add tiny painted dots around the border for a handmade confetti effect. Finish with red ribbon or baker’s twine.
Rustic Keepsake Style
Leave the salt dough natural or paint it warm beige. Use a soft red, terracotta, or dusty rose heart. Tie it with jute twine for a farmhouse look that says, “I am sentimental, but I also own a basket.”
Elegant Gift Style
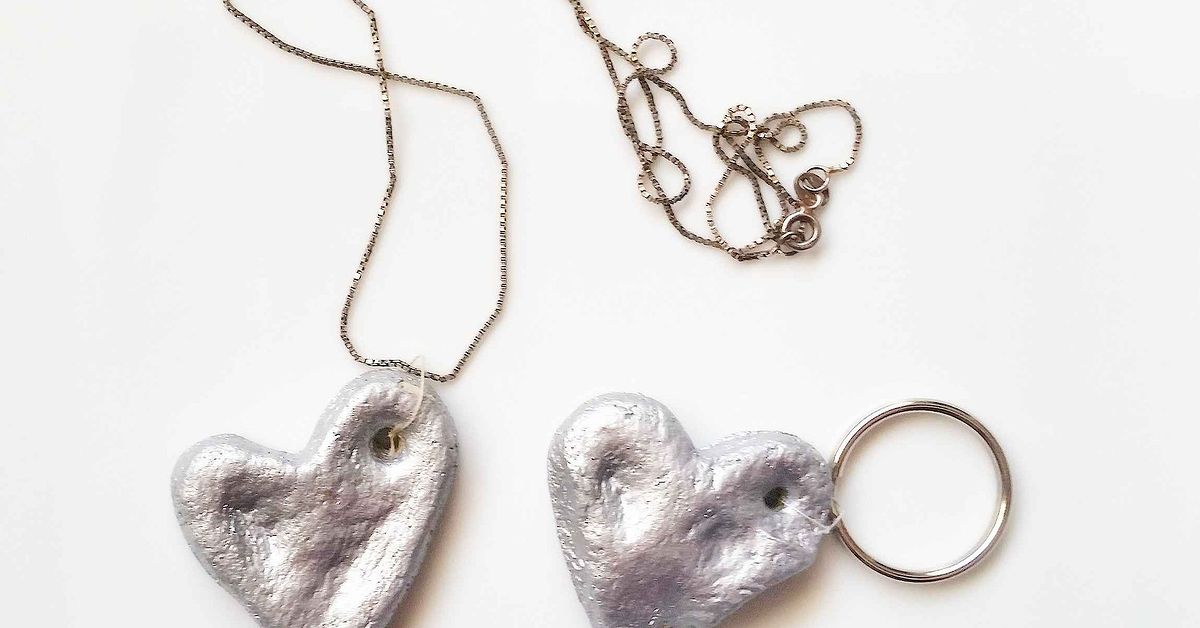
Paint the heart white and use metallic gold, rose gold, or silver around the edges. Add the child’s name and year on the back with a fine paint pen. This version works beautifully as a Mother’s Day gift or wedding keepsake.
Christmas Ornament Style
Use a round cutter, paint the base snowy white, and make the thumbprint heart red. Add the year, a tiny bow, and ribbon. Hang it on the tree, then prepare to say “Look how little your thumb was!” every December for the next 20 years.
How to Seal Salt Dough Thumbprint Hearts
Sealing is one of the most important steps if you want the keepsake to last. Salt dough is porous, which means it can absorb moisture from the air. Moisture can lead to softening, cracking, or mold over time. A clear sealant helps protect the finished piece.
Before sealing, make sure the ornament is fully dry. This includes the dough itself and any paint. Sealing too early can trap moisture inside, which is like giving future problems a tiny locked apartment.
Brush on one or two thin coats of Mod Podge, covering the front, back, sides, and inside the hanging hole. Let each coat dry fully. For a smoother finish, adults can use clear acrylic spray sealer outdoors. Matte sealers look soft and natural, while gloss sealers make colors brighter and shinier.
How to Store Salt Dough Keepsakes
Store finished salt dough hearts in a cool, dry place. Wrap each piece in tissue paper or soft cloth before placing it in a box. Avoid damp basements, humid garages, or hot attics. Moisture and temperature swings are not friends of salt dough.
If you live in a humid climate, place a small silica gel packet in the storage box. You can also store ornaments in resealable bags with as much air removed as possible. The goal is to keep the keepsake dry, protected, and safe from being crushed under heavier decorations.
Common Problems and Easy Fixes
The Dough Is Too Sticky
Add flour a tablespoon at a time and knead until the dough becomes smooth. Sticky dough usually means too much water was added or the room is humid.
The Dough Is Too Crumbly
Add water slowly, about a teaspoon or tablespoon at a time, and knead well before adding more. Salt dough often looks too dry before it has been kneaded enough.
The Ornament Puffed Up
The oven may have been too hot. Use a lower temperature and bake longer. Salt dough needs gentle drying, not aggressive baking.
The Edges Cracked
Cracking can happen when dough is too dry or rolled unevenly. Knead thoroughly, keep the thickness consistent, and smooth edges with a damp fingertip before baking.
The Thumbprint Disappeared
The print may have been too shallow. Press firmly enough to create a visible indentation, but not so hard that the piece bends. If needed, deepen the heart shape slightly with a rounded tool before baking.
Creative Ways to Use Salt Dough Thumbprint Hearts
A finished salt dough thumbprint heart can become more than a simple craft. It can be a gift, decoration, memory marker, or personalized tag. Here are some practical ideas:
- Ornament: Add ribbon and hang it on a Christmas tree or seasonal branch display.
- Magnet: Glue a strong magnet to the back for a refrigerator keepsake.
- Gift tag: Tie it onto a wrapped present for grandparents, teachers, or parents.
- Shadow box: Display it with a photo, date, and short note.
- Necklace pendant: Make a smaller version and hang it from cord or ribbon.
- Classroom project: Let each student make one for a family gift.
You can also personalize the back with initials, age, date, or a short message such as “Made with love,” “Tiny thumb, big heart,” or “Love, 2026.” Keep the wording short so it fits neatly and remains readable.
Why Handmade Keepsakes Matter
In a world filled with fast shipping, digital photos, and gifts that arrive in cardboard boxes, handmade keepsakes still have a special kind of charm. A salt dough thumbprint heart is imperfect in the best possible way. The edges may not be machine-smooth. The paint may wobble slightly. The thumbprint may lean a little to the left like it has weekend plans. That is exactly what makes it meaningful.
Handmade crafts capture personality. They preserve a moment, not just an object. A child’s thumbprint, a parent’s handwriting, a date on the back, and a ribbon chosen from the craft drawer all become part of the story. Years later, the keepsake can bring back memories of the table, the laughter, the flour on the floor, and the small hands that made it.
Experience Notes: What Making Salt Dough Thumbprint Hearts Teaches You
Making a salt dough thumbprint heart sounds like a tiny project, but it has a way of turning into a full family memory. The first thing you learn is that simple crafts are not always “clean” crafts. Flour drifts. Salt scatters. Water gets poured with great confidence by children who believe measuring cups are merely suggestions. Within minutes, the table may look like a bakery had a pillow fight. That is part of the experience.
The second thing you learn is that kids love control. They want to pour, mix, knead, roll, cut, press, paint, and proudly inspect every piece. For younger children, the thumbprint step is usually the highlight. They may press too lightly the first time, then too hard the second time, then ask to make twelve more because they have suddenly become professional thumb artists. Letting them practice on scrap dough before making the final keepsake can save frustration.
Another useful experience is discovering that salt dough rewards patience. When you rush the drying process, the pieces may puff, crack, or brown. When you bake low and slow, flip carefully, and wait until the dough is truly dry before painting, the results look much better. This is a great lesson for kids and adults alike: not every meaningful thing is instant. Some things need time, even if they are only two inches wide and shaped like a heart.
Painting the thumbprint heart can become surprisingly personal. Some children choose bright red because hearts are “supposed” to be red. Others pick purple, rainbow stripes, glitter, or blue because they are independent thinkers with strong artistic management skills. Adults may be tempted to correct the colors, smooth every line, and make the final craft Pinterest-perfect. But the best keepsakes often come from letting the maker’s personality show. A lopsided purple thumbprint heart with too much glitter may become the favorite one precisely because it is honest.
One of the sweetest parts of this project is writing the date on the back. At the moment, it may feel like a small detail. Years later, it becomes the detail that matters most. A thumbprint heart made by a four-year-old, a second grader, a new baby, or even a whole family becomes a tiny time capsule. The thumbprint is not just decoration; it is proof of a moment that will not happen in the same way again.
If you are making these as gifts, the reaction is usually worth the effort. Grandparents tend to love anything with a child’s handprint, footprint, or thumbprint. Parents appreciate the personal touch. Teachers enjoy gifts that feel thoughtful rather than expensive. Even kids feel proud giving something they made themselves. It teaches that gifts do not have to be costly to matter. Sometimes flour, salt, water, and effort can say more than a store-bought item ever could.
The best practical advice from experience is to make extra pieces. One may crack. One may get painted into an experimental color situation. One may be claimed by a sibling. One may mysteriously vanish under the drying rack. Making a few extras gives everyone room to relax. Salt dough is inexpensive, and backup hearts can become magnets, tags, or ornaments later.
Finally, the project reminds you that crafting is not just about the finished object. It is about slowing down long enough to make something together. A salt dough thumbprint heart is small, but it carries a big emotional message: someone took time, pressed their thumb into dough, painted it with care, and made a keepsake meant to last. That is why this simple craft keeps showing up in homes, classrooms, and gift boxes year after year.
Conclusion
A salt dough thumbprint heart is easy to make, affordable, personal, and deeply giftable. With just flour, salt, water, paint, and a little patience, you can create a keepsake that works for Valentine’s Day, Mother’s Day, Christmas, birthdays, classrooms, and family memory boxes. The best results come from kneading the dough well, rolling it evenly, pressing the thumbprints clearly, drying the piece completely, and sealing it carefully against moisture.
Most importantly, do not worry about making every heart perfect. The charm of this craft is in the fingerprint, the handmade edges, the tiny personality marks, and the story behind it. A salt dough thumbprint heart is not just a craft project. It is a small piece of time you can hold in your hand.