Note: This guide uses “Twitter” because many people still search for it that way, but the platform is now officially called X. Same birdhouse, new sign on the door.
Why Twitter Notifications Pile Up So Fast
If your Twitter notifications look like a tiny digital fireworks show that never ends, you are not alone. Likes, reposts, replies, mentions, follows, direct messages, recommendations, Spaces alerts, post notifications, browser pop-ups, email alerts, and app badges can all show up in different places. That is why clearing Twitter notifications is not always as simple as tapping one magic broom button and watching the mess disappear like a cartoon dust cloud.
The first thing to understand is that Twitter notifications live in several layers. There is the Notifications timeline inside X itself, where you see interactions such as likes, replies, reposts, mentions, new followers, and verified-account activity. Then there are push notifications on your phone, browser notifications on your computer, app badge numbers on iPhone or Android, and sometimes email notifications lurking in your inbox like they pay rent there.
So when people ask how to clear Twitter notifications, they may mean one of three things: remove alerts from their phone or desktop, make the red badge number go away, or reduce the clutter inside the Notifications tab. This guide covers all of those, including desktop, iPhone, Android, browser settings, and the smart filters that stop the notification avalanche from rebuilding itself five minutes later.
Can You Delete All Twitter Notifications at Once?
Here is the honest answer: Twitter/X does not currently work like an email inbox where you can select every notification and delete them all from the in-app Notifications timeline. Opening the Notifications tab usually marks recent activity as seen, which may remove the unread badge or blue-dot feeling of doom, but the timeline itself remains a history of account activity.
That means “clearing” Twitter notifications usually means one of the following:
- Clearing phone notifications from the iPhone or Android notification center.
- Dismissing desktop browser pop-ups.
- Opening the Notifications tab to mark items as viewed.
- Changing Twitter notification settings so fewer alerts appear later.
- Using muted words, quality filters, and advanced filters to reduce noise.
Think of it like cleaning a kitchen. You can wipe the counter, but if the popcorn machine is still exploding in the corner, congratulations, you have invented a snack storm. Clearing old alerts is useful, but controlling future notifications is what keeps your account peaceful.
How to Clear Twitter Notifications on Desktop
Step 1: Open the Notifications Timeline
On desktop, go to X.com and log in to your account. In the left-side navigation menu, click Notifications. This opens your Notifications timeline, where you can view activity connected to your account.
You will usually see tabs such as All, Verified, and Mentions. The All tab includes broad account activity, while Mentions focuses on posts that mention your username. If your goal is to clear the mental clutter quickly, start with Mentions because those are usually the items that need your attention most.
Step 2: Review New Activity
Click through the new notifications. This does not erase the history from the Notifications tab, but it helps mark activity as seen and may remove unread indicators. If the notification badge on your browser tab or app icon is driving you bananas, simply opening and reviewing the Notifications timeline can often calm it down.
Step 3: Dismiss Browser Pop-Ups
If you are receiving desktop pop-up notifications from Twitter, those are browser notifications. You can dismiss them from your operating system’s notification panel, but if they keep coming back, you need to change browser or X settings.
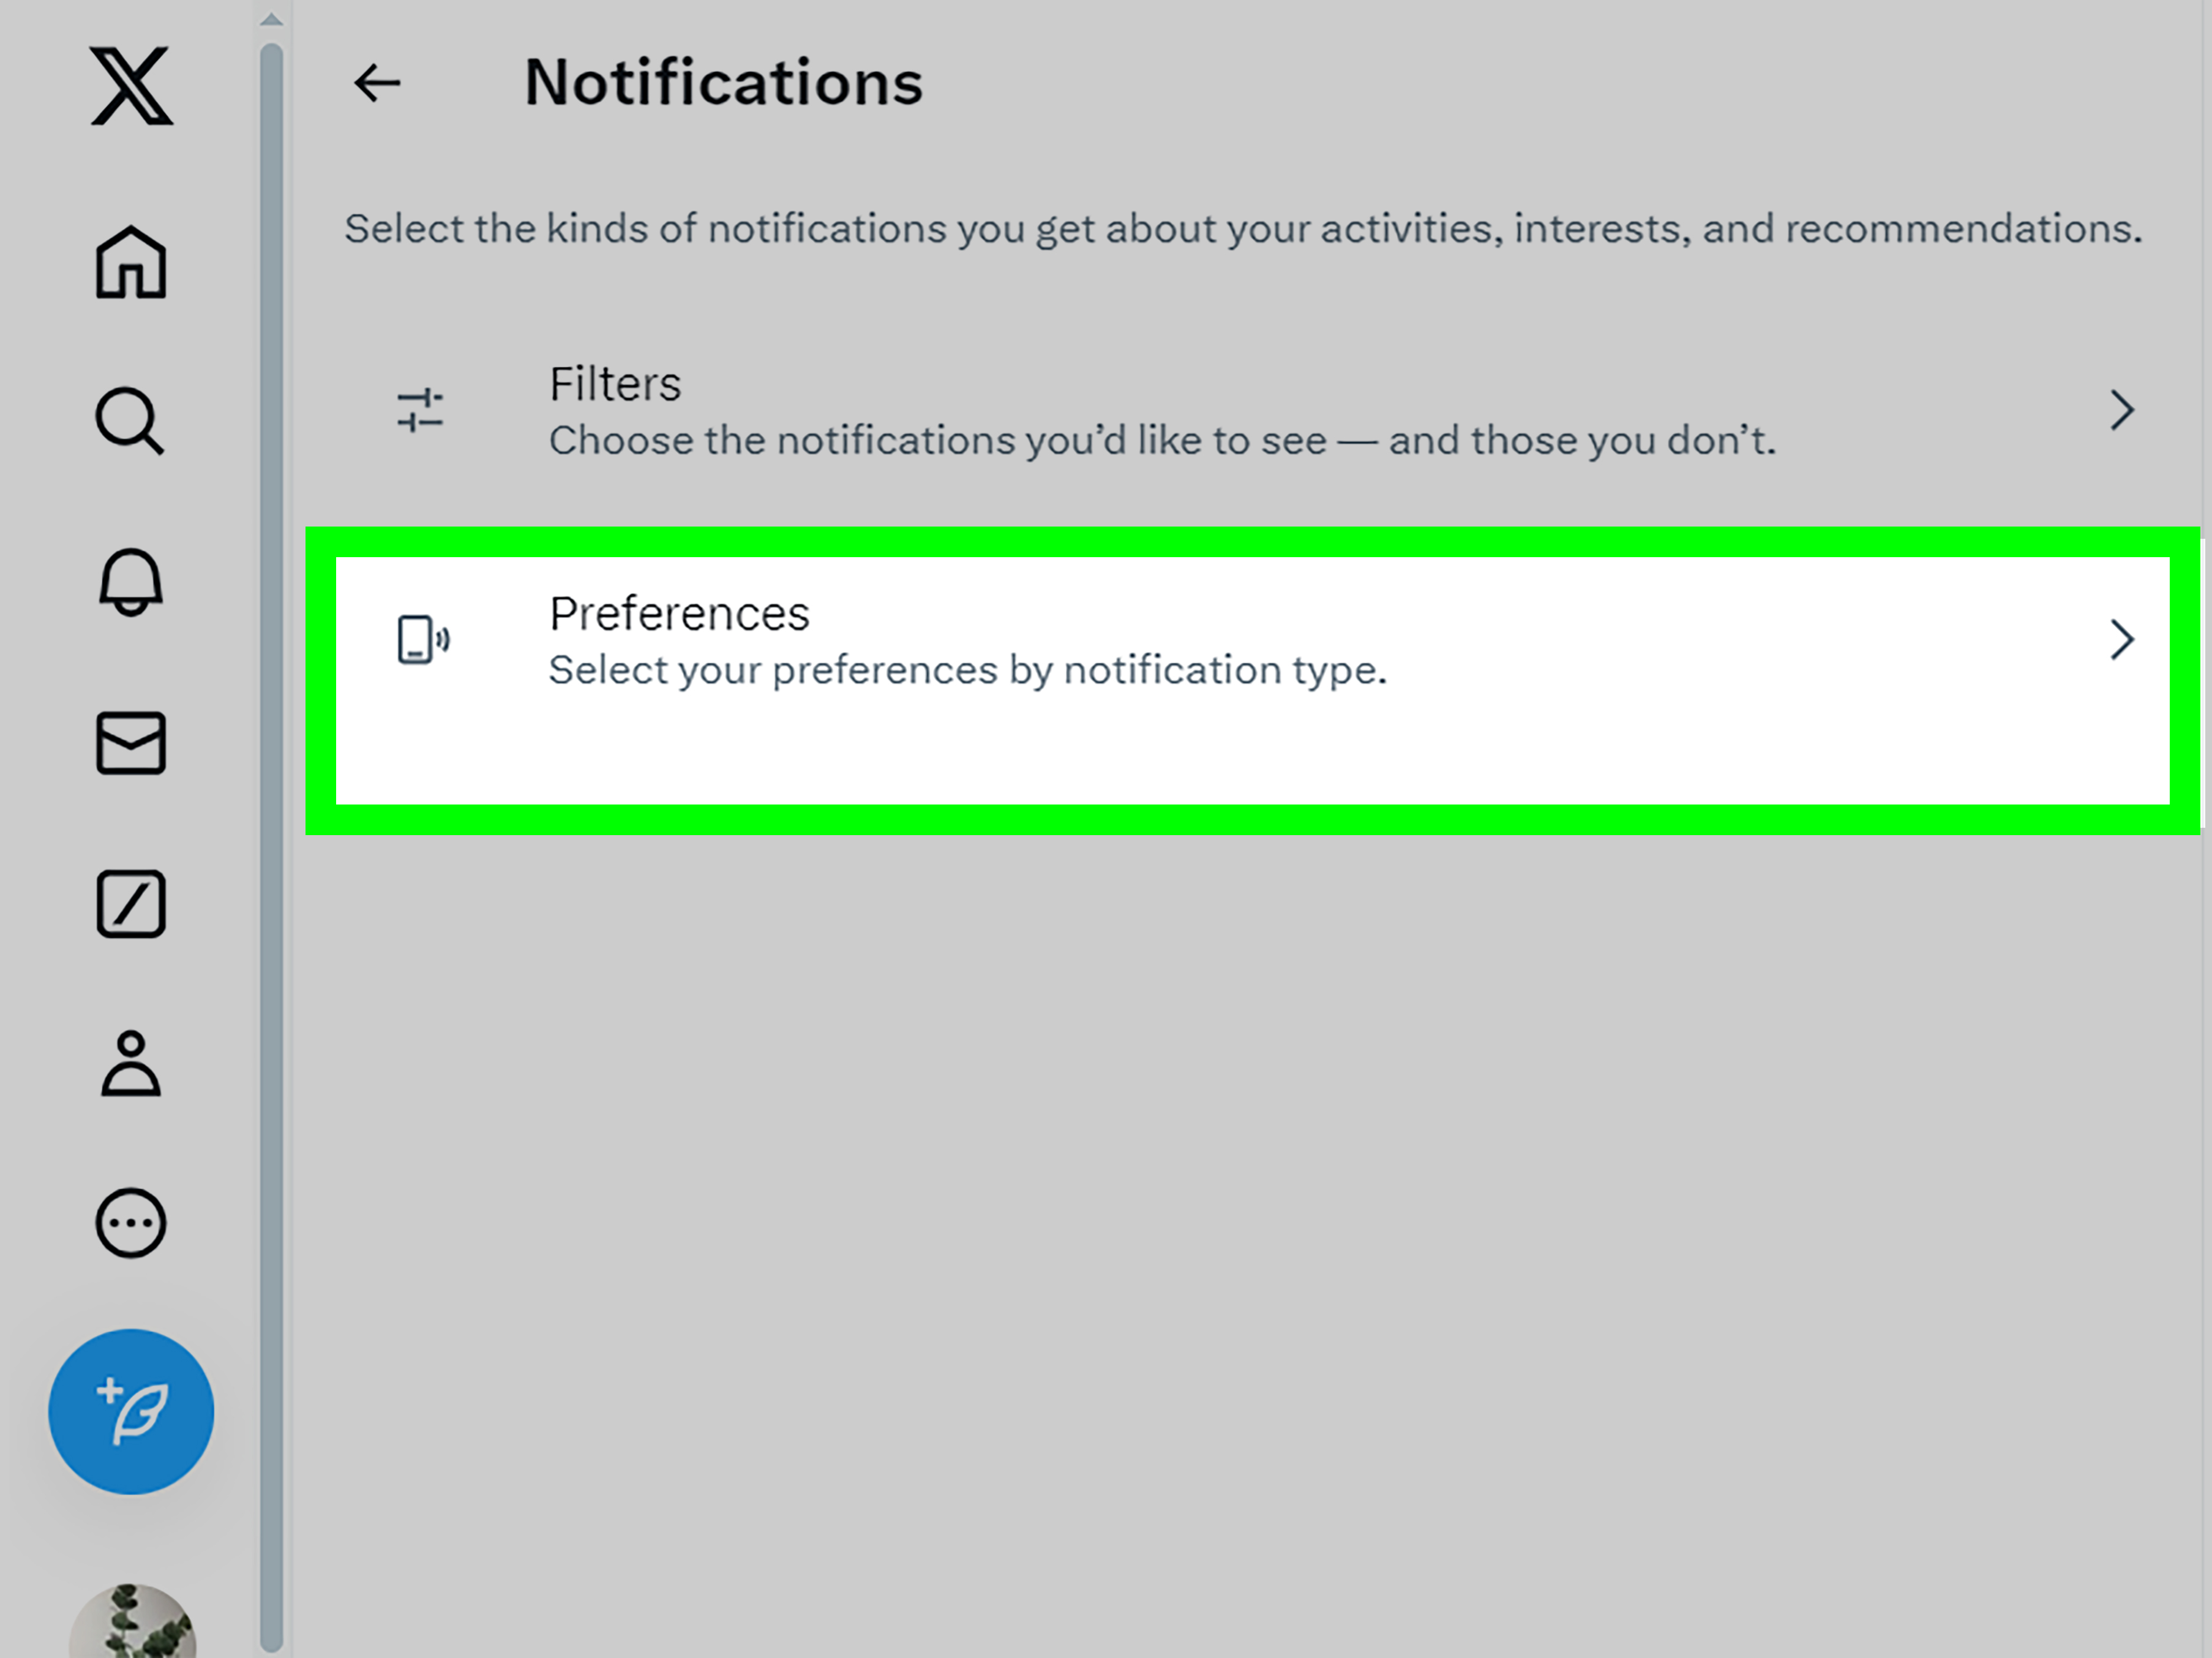
On X.com, go to More > Settings and privacy > Notifications > Preferences. Look for web or push notification options, then turn off categories you do not want. For example, you may want mentions and direct messages but not recommendations, trending topics, or “someone you barely remember liked a post from someone you do not follow” alerts.
Step 4: Block Twitter Notifications in Chrome
If Chrome is sending desktop alerts, open Chrome settings and go to Privacy and security > Site settings > Notifications. Find x.com or twitter.com, then change the permission to block notifications. You can also visit X.com, click the site information icon near the address bar, and adjust notification permissions there.
Step 5: Block Twitter Notifications in Firefox
In Firefox, open Settings or Preferences, go to Privacy & Security, then find the Permissions section. Next to Notifications, click Settings. From there, you can remove or block notification permission for X.com or Twitter.com. This is especially helpful if your desktop has become a tiny news ticker with commitment issues.
How to Clear Twitter Notifications on iPhone
Step 1: Clear Alerts From Notification Center
On iPhone, swipe down from the top of the screen to open Notification Center. Find the X/Twitter notification group. Depending on your iOS version and notification layout, you may be able to swipe left on a notification and tap Clear, or clear a grouped set of notifications at once.
This removes the alert from your iPhone’s notification center. It does not delete the notification history inside the X app. In plain English: your phone stops waving the flag, but X still remembers the parade.
Step 2: Open the X App Notifications Tab
Open the X app and tap the bell icon. Review the items in All, Mentions, and other available tabs. Opening the tab can help clear unread indicators and update the app badge.
If the badge number remains stuck, close and reopen the app. You can also refresh the Notifications tab by pulling down from the top of the timeline. Sometimes the app simply needs a little nudge, like a shopping cart with one rebellious wheel.
Step 3: Turn Off Unwanted Push Notifications
To reduce future alerts, open the X app and tap your profile icon or navigation menu. Go to Settings and privacy > Notifications > Preferences > Push notifications. Turn off categories you no longer want.
Good candidates to disable include recommendations, news, topics, Spaces, live video, and post notifications from accounts you no longer follow closely. Keep the alerts that matter, such as mentions, replies, direct messages, or security-related notifications.
Step 4: Adjust iPhone Notification Settings
You can also control X notifications at the iOS level. Open Settings > Notifications > X. From there, you can turn off Allow Notifications, disable sounds, remove badges, hide lock screen alerts, or change banner style.
If the red badge number is the main problem, turn off Badges. This does not stop notifications from existing inside X, but it removes the tiny red circle that somehow has the emotional power of a tax notice.
How to Clear Twitter Notifications on Android
Step 1: Clear Notifications From the Shade
On Android, swipe down from the top of the screen to open the notification shade. Find the X/Twitter notification, then swipe it away. If you have several notifications grouped together, you may see a Clear all option at the bottom of the notification list.
Some notifications may not clear until you open the related app or action. For example, a direct message alert may need you to open the conversation before the badge disappears. Android versions and phone brands vary, so the exact layout may look a little different on Samsung, Google Pixel, Motorola, OnePlus, or other devices.
Step 2: Open X and Check the Bell Tab
Open the X app and tap the bell icon. Review the newest notifications. This helps the app recognize that you have seen recent activity. If the notification count stays stuck, refresh the tab, restart the app, or restart your phone.
Step 3: Change Push Notification Preferences in X
Inside the X app, tap your profile icon or menu icon, then go to Settings and privacy > Notifications > Preferences > Push notifications. Uncheck or toggle off notification types you do not want.
This is the best long-term fix for notification overload. Clearing alerts without changing preferences is like mopping while the sink is still running. Admirable effort, questionable strategy.
Step 4: Use Android App Notification Settings
For device-level control, open Settings > Apps > X > Notifications. You can turn off all notifications or manage categories if your Android version supports them. Some devices let you disable badges, sounds, vibration, lock screen previews, or specific notification channels.
If X notifications are not clearing correctly, you can also try clearing the app cache. Go to Settings > Apps > X > Storage > Clear cache. Avoid clearing app data unless you understand that it may reset app preferences and require you to sign in again.
How to Stop Twitter Notifications From Coming Back
Use the Quality Filter
The Quality filter is designed to reduce lower-quality notifications, such as duplicate content or activity that appears automated. You can find it in the Notifications settings. On mobile, open the Notifications tab, tap the gear icon, and look for Quality filter. On desktop, open the Notifications timeline and click settings.
This filter is useful if your account receives spammy likes, bot-like replies, or random engagement that feels less like conversation and more like a robot sneezing into your mentions.
Turn On Advanced Filters
Advanced filters let you reduce notifications from certain types of accounts, such as new accounts, accounts you do not follow, accounts that do not follow you, accounts with default profile photos, or accounts without confirmed contact information. These filters are especially helpful during viral moments, heated discussions, giveaways, or any situation where strangers arrive in your notifications carrying emotional luggage.
Mute Words, Phrases, Usernames, and Hashtags
Muted words are one of the most underrated tools for clearing Twitter notifications long term. You can mute words, hashtags, usernames, phrases, and even emojis from notifications. For example, if a topic keeps dragging you into conversations you do not want, mute the keyword for 24 hours, 7 days, 30 days, or forever.
To do this, go to Settings and privacy > Privacy and safety > Mute and block > Muted words. Add the term, choose whether it applies to notifications, and select the duration.
Mute Accounts Without Blocking Them
If one account keeps appearing in your notifications but blocking feels too dramatic, muting is the polite digital version of stepping into another room. The muted account is not notified, and you can unmute them later. This is helpful for overly active accounts, noisy topics, or people who post every thought as if the internet is their refrigerator door.
Disable Post Notifications From Specific Accounts
If you previously turned on post notifications for an account, X may alert you every time that person posts. Visit the account’s profile, tap or click the notification bell, and change the setting to None or turn off account notifications. This is a quick way to stop alerts from creators, news accounts, celebrities, or friends who post with the energy of a caffeinated squirrel.
Common Problems When Clearing Twitter Notifications
The Badge Number Will Not Go Away
If the app badge is stuck, open X, visit the Notifications tab, refresh it, then check Direct Messages too. Sometimes the badge is tied to a message request, a hidden DM, or an account alert rather than a regular notification.
On iPhone, you can turn badges off through Settings > Notifications > X > Badges. On Android, badge controls are usually under app notification settings or home screen settings, depending on your device.
Desktop Notifications Still Appear After Turning Them Off in X
If you turned off notifications inside X but still see desktop pop-ups, check your browser permissions. Chrome, Firefox, Edge, and other browsers can store notification permissions separately from X account settings. Block notifications for X.com and Twitter.com in your browser settings.
Email Notifications Keep Arriving
Email notifications are controlled separately. In X, go to Settings and privacy > Notifications > Preferences > Email notifications. Turn off email categories you do not need. Your inbox will thank you by being slightly less dramatic.
You Still See Old Notifications in the App
That is normal. The Notifications timeline is more like an activity log than a trash folder. You can reduce what appears in the future, but old interactions may remain visible in the tab. The practical goal is not to erase every footprint; it is to make the notification area useful again.
Best Notification Settings for a Cleaner Twitter Experience
If you want a balanced setup, keep notifications for direct messages, mentions, replies, and security alerts. Turn off recommendations, topics, news, Spaces, live video, and post notifications unless you truly use them. Enable the Quality filter and consider Advanced filters if you often receive random engagement from unfamiliar accounts.
For professional accounts, brands, writers, creators, and businesses, it may be smart to keep mentions and replies on because those are engagement opportunities. For personal accounts, stricter filters can make Twitter feel less like a crowded train station and more like a place where you intentionally choose what to read.
Here is a simple rule: if a notification helps you respond, protect your account, or maintain a relationship, keep it. If it only interrupts you, disable it. Your attention is not a free buffet.
Experience-Based Tips: What Actually Works When Notifications Get Out of Control
After managing noisy Twitter accounts, the biggest lesson is that most people try to clear notifications too late. They wait until the bell tab looks like a laundry pile after a three-week vacation, then search for a one-click solution. Unfortunately, the better strategy is prevention. The cleanest Twitter notification setup is built before the chaos arrives.
One practical experience is to separate urgent notifications from curiosity notifications. Mentions, replies, direct messages, and login/security alerts usually deserve attention. Likes, reposts, recommendations, and topic suggestions usually do not need to interrupt your day. Once you make that distinction, the settings become easier. You stop asking, “Do I want notifications?” and start asking, “Does this notification deserve to interrupt me?” That question alone can rescue your phone from becoming a pocket-sized slot machine.
Another useful habit is the weekly notification reset. Once a week, open the Notifications tab, check Mentions first, respond to anything important, then scan All only if needed. After that, visit your muted words and add anything that has been annoying lately. This is especially helpful during sports events, political debates, entertainment scandals, product launches, or viral memes that mutate faster than a cold in a kindergarten classroom.
For desktop users, browser notifications are usually the sneakiest problem. Many people disable push alerts inside X but forget that Chrome or Firefox has already granted site-level notification permission. The result is confusion: “Why is Twitter still yelling at me?” The answer is often the browser, not the app. Blocking X.com notifications at the browser level can make desktop work sessions much quieter.
For mobile users, badges are often more stressful than the notifications themselves. A red number on an app icon can make your brain feel unfinished, even when nothing important happened. Turning off badges while keeping selected notifications can be a great compromise. You still receive direct messages or mentions, but you do not have a tiny red circle judging your life choices from the home screen.
Creators and business accounts need a slightly different approach. If you post content for an audience, you probably should not shut everything down. Instead, filter aggressively. Keep replies, mentions, and DMs active. Turn off low-value recommendations. Use muted words for spam phrases, repetitive hashtags, giveaway bots, and unrelated trending topics. This keeps the account responsive without forcing you to swim through every like and repost.
One more real-world tip: do not use notification settings as a substitute for boundary settings. If someone repeatedly bothers you, mute, restrict, or block as needed. If a topic keeps pulling you into arguments, mute the topic. If an account posts too often, turn off post notifications or unfollow. Clearing notifications treats the symptom; better privacy and filter settings treat the cause.
The best Twitter notification system is boring in the nicest possible way. It tells you when something matters and stays quiet when something does not. That is the goal. Not zero notifications, not maximum alerts, but a clean signal. When your notification tab becomes useful again, Twitter feels less like a room full of people tapping you on the shoulder and more like a tool you control.
Conclusion
Clearing Twitter notifications on desktop and mobile is really about understanding where the alerts live. You can clear phone notifications from iPhone or Android, dismiss browser pop-ups on desktop, open the X Notifications tab to mark activity as seen, and adjust settings to reduce future alerts. While X does not function like a traditional inbox with a universal delete-all button for the Notifications timeline, you still have plenty of control.
Start with the simple cleanup: open the Notifications tab, check Mentions, clear device alerts, and dismiss browser pop-ups. Then move into prevention: turn off unnecessary push notifications, block browser notifications, enable Quality filter, use Advanced filters, mute noisy words, and disable post notifications from accounts that have become too loud.
The secret is not to fight every notification one by one forever. The secret is to teach Twitter what deserves your attention. Once you do that, the bell icon becomes helpful again instead of looking like it is plotting against your peace and quiet.