Note: This guide is written for hobbyists building a small, bench-mounted sheet metal brake for light-duty projects such as flashing, brackets, trays, model parts, HVAC-style patches, and thin aluminum or mild steel bends. Wear eye protection, cut-resistant gloves, and hearing protection when cutting, drilling, grinding, or bending metal. A homemade brake is not a substitute for an industrial press brake, and your first test piece should never be the expensive one. Metal has a wicked sense of humor.
Introduction: Why Build a Small Sheet Metal Brake?
A sheet metal brake is one of those shop tools you do not fully appreciate until you need a clean 90-degree bend and your bench vise, two clamps, and “positive thinking” produce something that looks like a potato chip. A small sheet metal brake gives you a straight clamping edge, a hinged bending leaf, and enough leverage to fold thin sheet metal accurately without wrestling it like an angry raccoon.
The good news is that a compact DIY metal brake can be built from common steel angle, hinges or rod-style pivots, bolts, clamps, and a sturdy base. The better news is that you do not need a giant machine, a factory floor, or a mysterious uncle named Louie who “knows a guy.” For a small home shop, a brake between 18 and 36 inches wide is usually enough for repair panels, small boxes, drip edges, drawer dividers, custom brackets, and craft-metal work.
This guide explains how to build a small sheet metal brake in 13 clear steps. It focuses on a practical angle-iron design: one fixed bed, one clamp bar, and one bending leaf. The design can be welded if you have the tools, but it can also be adapted as a bolted build. The most important ideas are alignment, rigidity, a close pivot point, and safe handling. If those four are right, the brake will behave. If they are wrong, the brake will teach you humility in public.
What a Small Sheet Metal Brake Can and Cannot Do
A homemade sheet metal bending brake is best for thin material. Aluminum flashing, thin galvanized steel, copper sheet, brass sheet, and mild steel in lighter gauges are realistic targets. The exact capacity depends on the width of the brake, the thickness and hardness of the metal, the strength of your hinges or pivots, and how rigidly the tool is mounted. Shorter bends are easier than full-width bends. Soft aluminum is easier than stainless steel. Your brake may fold a 6-inch-wide strip of thicker metal happily, then complain loudly when asked to bend a 30-inch-wide piece of the same thickness.
For most hobby builds, plan on light-duty use. A small brake is perfect for crisp flanges and simple bends, but it is not designed for heavy plate, hardened materials, or precision production work. It also will not magically calculate bend allowance for you. Metal stretches around the bend, so finished dimensions can differ from the flat layout. For accurate boxes and brackets, make test bends and measure the result before cutting final parts.
Materials and Tools You Will Need
Suggested Materials
- Two or three pieces of steel angle iron, commonly 1 1/2-inch or 2-inch angle, cut to the same length
- One flat steel bar or additional angle iron for the clamping bar
- Heavy-duty door hinges, gate hinges, piano hinge, or a rod-and-pipe hinge system
- Bolts, washers, lock nuts, and wing nuts or knobs for the clamp bar
- A strong wooden or steel base, such as a thick workbench top, hardwood plank, or steel channel
- Pipe, square tubing, or round bar for handles
- Optional springs to help lift the clamp bar
- Optional rubber feet or mounting tabs
Useful Tools
- Tape measure, square, marker, and center punch
- Angle grinder, hacksaw, chop saw, or metal-cutting bandsaw
- Drill press or handheld drill with metal bits
- Clamps, especially C-clamps or bar clamps
- Files or deburring tools
- Wrenches and sockets
- Welder, if you choose a welded version
- Safety glasses, gloves, and hearing protection
How to Build a Small Sheet Metal Brake: 13 Steps
Step 1: Decide the Width of Your Brake
Choose the working width before buying or cutting steel. A 24-inch brake is a sweet spot for many small shops because it is wide enough for useful parts but still compact enough to mount on a bench. If you mostly make model parts, a 12- to 18-inch brake may be plenty. If you work with roof flashing or HVAC patches, consider 30 to 36 inches.
Remember that wider brakes need stiffer material. A flimsy 36-inch brake will flex in the middle, creating bends that are sharper at the ends and lazy in the center. Nobody wants a banana-shaped bracket unless the project is fruit-themed.
Step 2: Cut the Fixed Bed, Clamp Bar, and Bending Leaf
Cut three main pieces to equal length. The fixed bed is the part that stays bolted or clamped to the bench. The clamp bar holds the sheet metal down. The bending leaf swings upward to form the bend.
For a simple design, use angle iron for the fixed bed and bending leaf. The sharp outside corner of the angle can form a clean bend line. The clamp bar can be another piece of angle iron or a flat bar with a straight edge. Whatever you use, the working edges must be straight. If the steel looks like it was stored under a truck tire, save it for another project.
Step 3: Deburr Every Cut Edge
Fresh-cut steel can be sharp enough to slice gloves, fingers, and enthusiasm. Use a file, flap disc, or deburring tool to smooth all cut edges. Pay special attention to the working edges, bolt holes, and handle areas. Burrs can scratch sheet metal and keep parts from sitting flat.
This is not glamorous work, but it matters. A clean brake is easier to align, safer to use, and less likely to leave mystery gouges in your finished parts.
Step 4: Lay Out the Hinge or Pivot Line
The hinge line is the soul of the brake. The bending leaf must rotate as close as possible to the clamping edge. If the pivot sits too far away or too high, the metal may slide, the radius may become sloppy, and the bend angle may vary across the length.
Place the bending leaf tight against the fixed bed and mark where the pivot hardware will sit. If you use separate hinges, keep them perfectly aligned. If you use a rod-and-pipe hinge, the rod should run straight through all hinge sections. A long hinge pin or rod helps keep the bending leaf parallel to the bed during rotation.
Step 5: Attach the Hinges to the Bending Leaf
Clamp the hinges in place before drilling or welding. Open and close the bending leaf by hand to make sure nothing binds. The leaf should swing smoothly and evenly. If the hinge barrels interfere with the angle iron, cut small relief notches so the hinge can sit in the correct position.
For a bolted build, mark and drill matching holes, then fasten the hinges with bolts, washers, and lock nuts. For a welded build, tack first, test movement, then finish weld only after you are satisfied. Welding too early is how a five-minute alignment job becomes a two-hour grinding apology.
Step 6: Mount the Hinged Leaf to the Fixed Bed
With the hinges attached to the bending leaf, position the assembly against the fixed bed. The working edge of the bending leaf should line up closely with the clamping edge. Clamp everything securely and test the swing again.
Raise the bending leaf through its travel and check that the gap remains consistent. If one end opens more than the other, your hinges are not aligned. Fix this now. Once the brake is mounted to a bench, every alignment mistake becomes more annoying, louder, and somehow more personal.
Step 7: Build the Clamp Bar
The clamp bar presses the sheet metal against the fixed bed. It needs a straight front edge and enough stiffness to resist bowing. Angle iron works well because the vertical leg adds strength. A flat steel bar can also work for short brakes, especially if it is thick enough.
For sharper bends, slightly bevel or clean the lower front edge of the clamp bar. Do not make it knife-sharp; a tiny radius is safer and more durable. If the edge is too rounded, your bends will be soft. If it is too sharp, it may mark or crack delicate material.
Step 8: Drill Clamp Holes
Drill holes through the clamp bar and fixed bed for clamping bolts. Place one bolt near each end, and add a center bolt if your brake is wider than about 24 inches. Wider brakes benefit from more even clamping pressure.
Use washers under nuts or knobs so the clamp bar tightens smoothly. Wing nuts are convenient, but threaded knobs are more comfortable if you will use the brake often. If you want bonus points, add light springs around the bolts so the clamp bar lifts when loosened. This makes sliding sheet metal in and out much easier.
Step 9: Add Handles to the Bending Leaf
The bending leaf needs leverage. Attach pipe, round bar, or square tubing handles to the bending leaf. For a small brake, two handles are better than one because they let you apply pressure evenly across the width. Uneven pressure can twist the leaf and create bends that are accurate on one side and dramatic on the other.
If you weld the handles, make strong welds and keep them clear of the workpiece path. If you bolt them, use brackets or tabs that cannot slip. The handles should feel solid. If they flex before the sheet metal bends, they are too weak.
Step 10: Mount the Brake to a Solid Bench
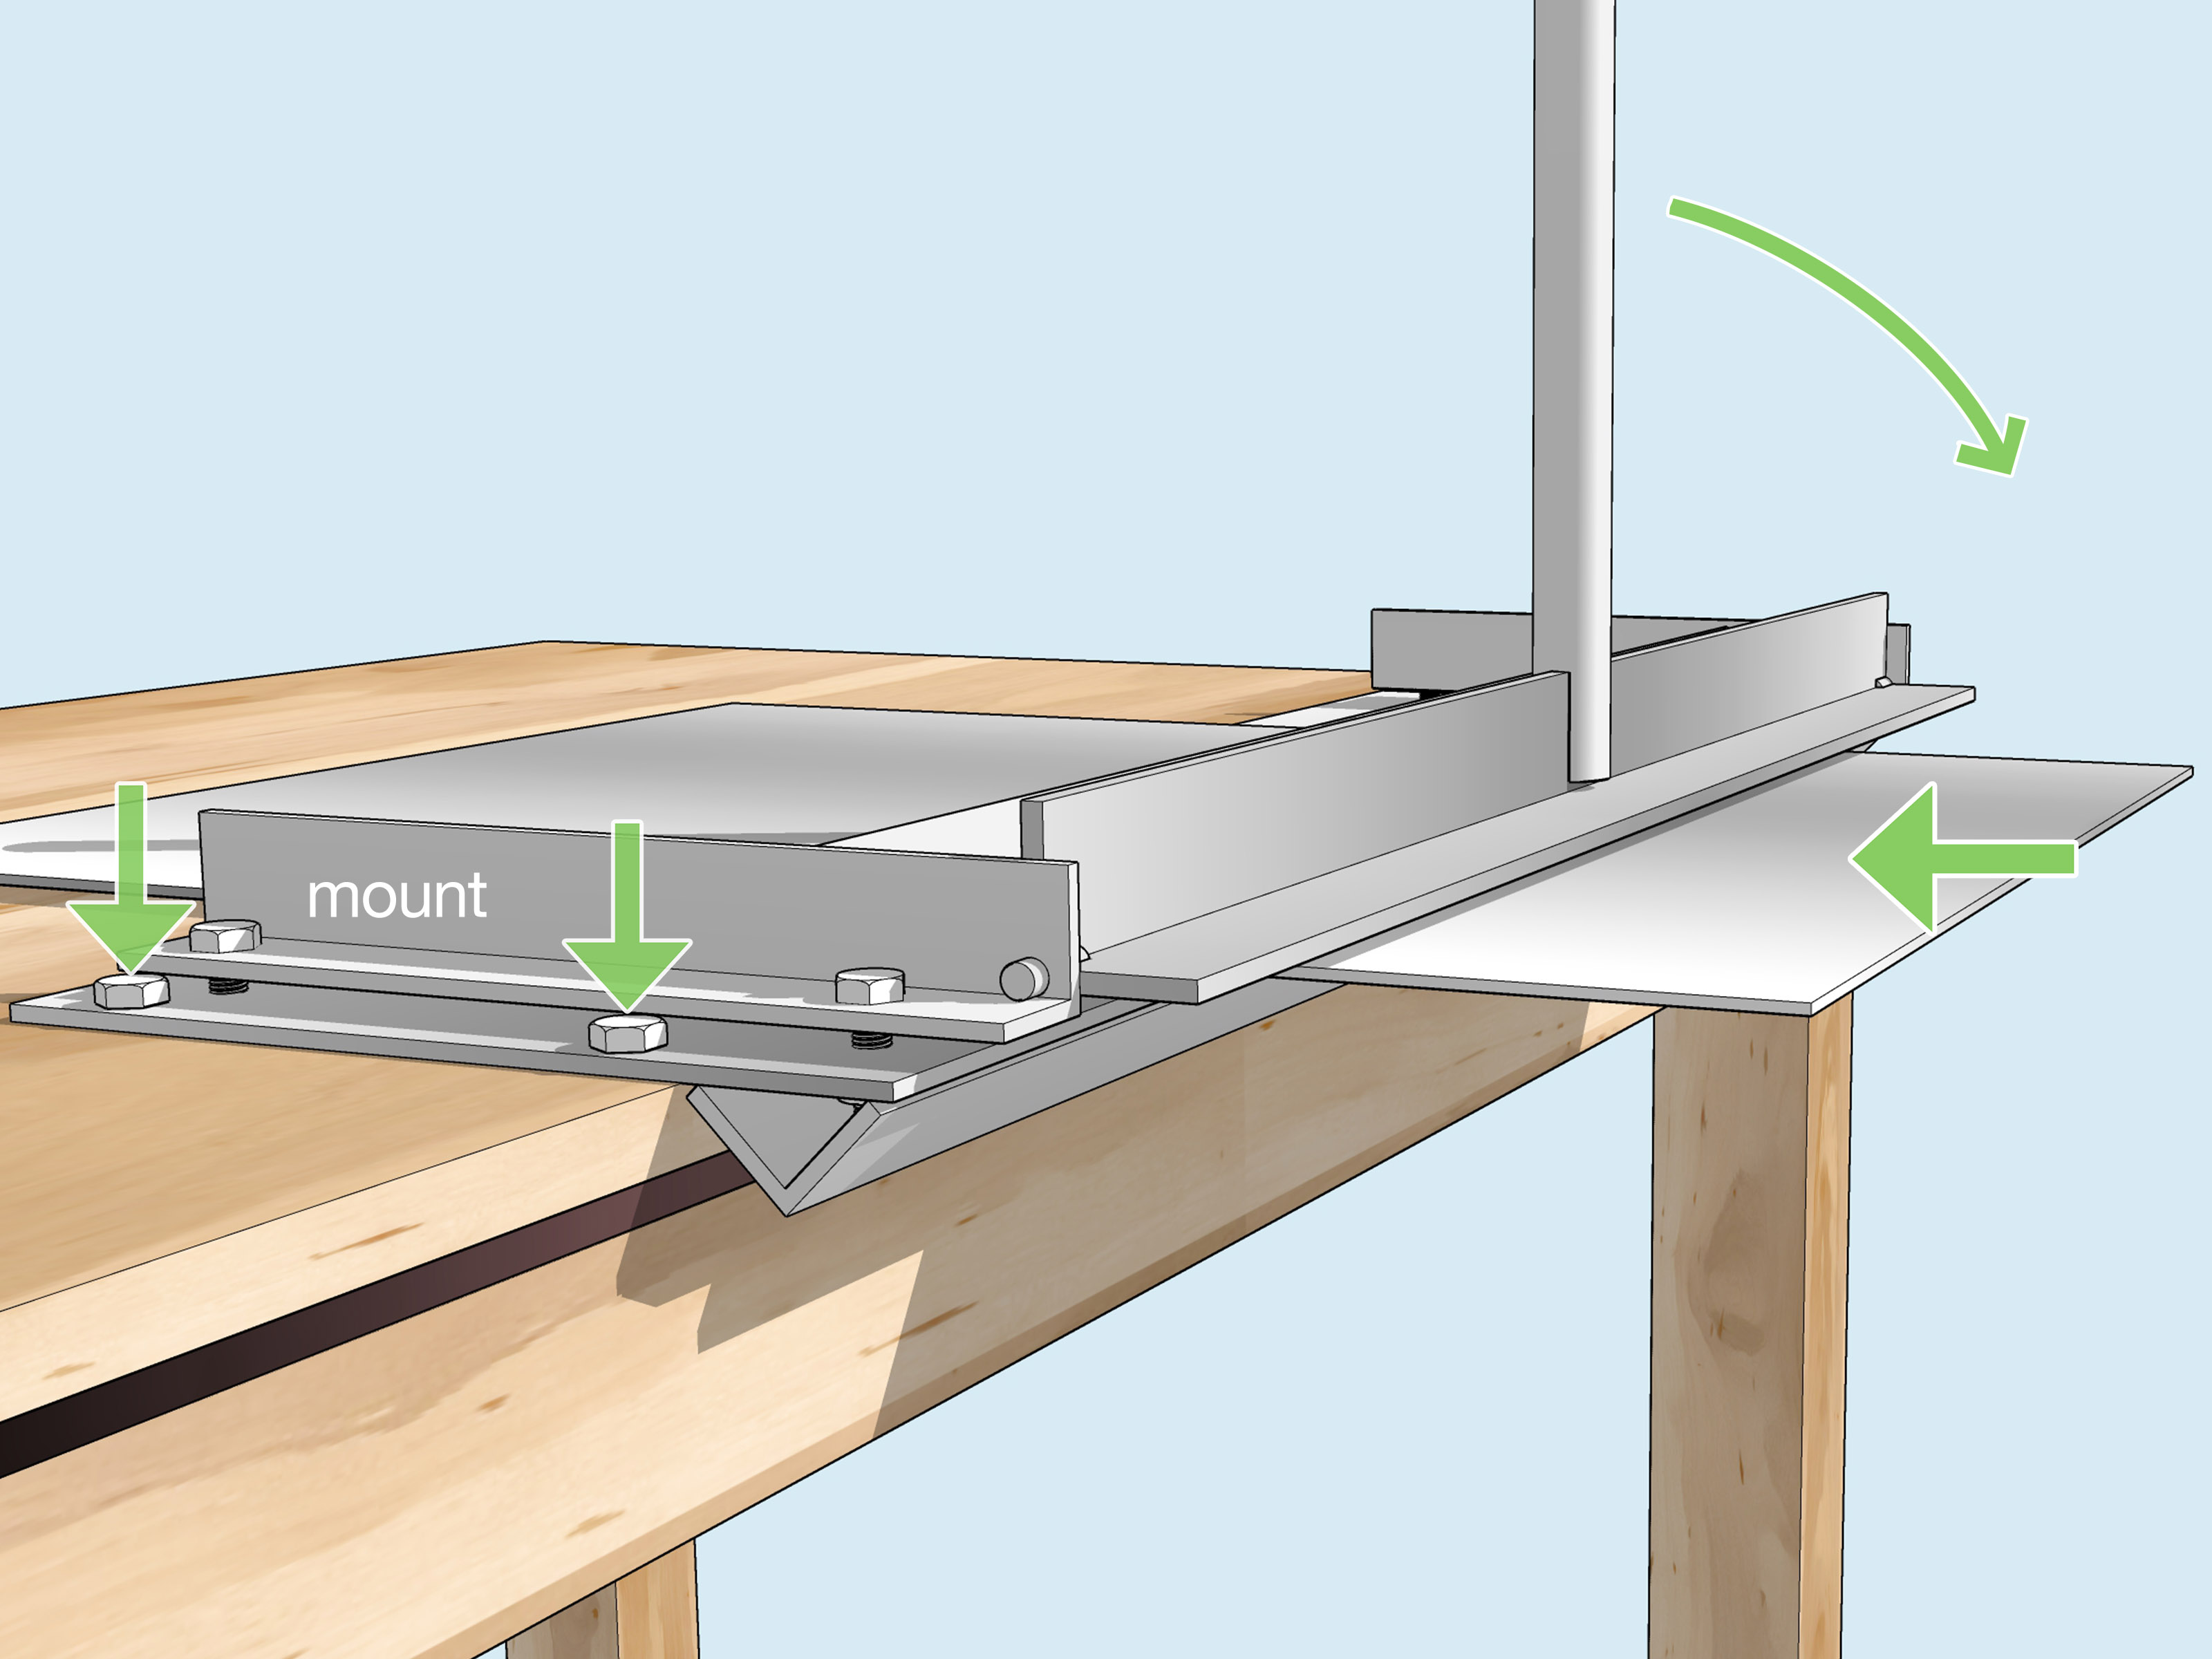
A brake is only as good as what holds it down. Bolt it to a heavy workbench, clamp it to a thick tabletop, or mount it to a steel frame. The front edge should overhang slightly so the bending leaf can swing upward without hitting the bench.
Before final mounting, check that the brake sits flat. Shim if necessary. A twisted base causes uneven clamping and inconsistent bends. In sheet metal work, “close enough” sometimes works. A wobbly base does not.
Step 11: Test With Scrap Metal
Never test a new brake on your final workpiece. Cut several strips of scrap metal and make trial bends. Start with soft aluminum or thin galvanized sheet. Mark a bend line, slide the sheet under the clamp bar, align the mark with the edge, tighten the clamp, and lift the bending leaf slowly.
Metal springs back after bending, so you usually need to bend slightly past the desired angle. For a 90-degree finished bend, you may need to lift the bending leaf a few degrees beyond 90. The exact amount depends on the material and thickness. Make notes directly on scrap pieces so you can build your own reference library.
Step 12: Tune the Brake for Cleaner Bends
If your bend is rounded, move the pivot closer to the bend line or sharpen the clamp edge slightly. If the metal slips, tighten the clamp bolts more evenly or add a center clamp. If the bend is deeper at the ends than in the middle, the clamp bar or bending leaf is flexing. Add reinforcement, shorten the working width, or use thicker steel.
For box corners or tray-style parts, cut bend relief notches where flanges meet. Bend relief helps prevent tearing, bulging, and ugly corner distortion. Keep holes and slots away from the bend line when possible because features too close to a bend can warp during forming.
Step 13: Paint, Label, and Store the Brake
Once the brake works, clean off oil and scale, then paint non-working surfaces to prevent rust. Do not paint the clamping edge or bending edge heavily; thick paint can affect accuracy and transfer marks to sheet metal.
Label the brake with its practical limits after testing. For example: “Works well on 24-inch aluminum flashing” or “Use short pieces only for 20-gauge steel.” This small note saves future-you from trying to bend something unreasonable while saying, “I’m sure it’ll be fine.” Future-you is optimistic, but not always wise.
Tips for Better Sheet Metal Bends
Understand Gauge Before You Bend
Sheet metal gauge numbers can be confusing because gauge is not a universal thickness. The same gauge number may represent different thicknesses depending on whether the material is steel, galvanized steel, stainless steel, aluminum, brass, or copper. When accuracy matters, check the actual thickness with calipers instead of trusting the gauge label alone.
Think About Bend Radius
A tight bend looks crisp, but every material has limits. If the inside bend radius is too small, the outside surface can crack, especially on harder materials or aluminum bent parallel to the grain direction. A practical rule for many small projects is to keep the inside bend radius near the material thickness when possible. Softer materials may tolerate tighter bends; harder materials usually want more radius.
Make a Bend Allowance Test Strip
For accurate parts, cut a strip of the same material, mark two flange dimensions, bend it, and measure the final result. This tells you how your brake, your material, and your technique behave together. Professional shops use bend allowance, bend deduction, K-factor, and calibrated tooling. In a home shop, a measured test strip is often the fastest path to truth.
Use Even Pressure
When lifting the bending leaf, use both handles and move smoothly. Jerky pressure can leave waves. If the brake is wide, work slowly and keep your body centered. For long bends, ask a helper to lift the second handle at the same pace. Good bending is not about brute force; it is about controlled force. Also brute force, occasionally. But controlled brute force.
Common Mistakes to Avoid
Placing the hinge too far from the bend line: This causes sloppy bends and poor clamping action. The pivot should be close to the bending edge.
Using steel that is too thin: Lightweight angle may flex. Flex creates uneven bends and frustration. Choose thicker angle iron for wider brakes.
Skipping test bends: Sheet metal springs back. If you skip testing, your finished angle may be close, but close is not always useful when making a box or bracket.
Under-clamping the workpiece: If the metal slides during bending, the bend line moves. Tighten the clamp evenly and make sure the sheet is fully seated.
Ignoring sharp edges: Sheet metal cuts quickly and quietly. Wear gloves when handling raw edges, but keep gloves away from rotating tools such as drill bits and grinders where they could catch.
Safety Notes for Building and Using the Brake
Cutting, drilling, grinding, and bending metal create hazards. Wear safety glasses with side protection whenever cutting or drilling. Use hearing protection around grinders and saws. Secure workpieces before drilling. Remove burrs before handling sheet metal. Keep hands out of pinch points between the clamp bar, bed, and bending leaf.
When drilling steel, use cutting oil and moderate speed. Let the bit cut; do not force it like you are trying to win an argument. Hot chips are sharp, and they love landing exactly where you do not want them. Clean the work area often so small chips do not scratch finished panels or migrate into your shoes, where they become tiny medieval torture devices.
Real-World Experience: What Building a Small Sheet Metal Brake Teaches You
The first thing you learn when building a small sheet metal brake is that straight lines are not as easy as they look. On paper, the project seems simple: three pieces of steel, a hinge, a few bolts, and a handle. In the shop, every small misalignment has a personality. A hinge that is off by a little becomes a bending leaf that rubs. A clamp bar with a slight bow becomes a flange that looks straight until you hold it against a square. A workbench that seemed sturdy suddenly starts dancing when you pull the handle. The tool is simple, but it rewards patience.
The second lesson is that stiffness matters more than weight alone. A heavy piece of steel can still flex if it is shaped poorly or unsupported in the wrong direction. Angle iron is useful because its shape resists bending better than a flat strip of similar thickness. Adding a vertical leg, a rib, or a second layer can dramatically improve results. If the brake bends beautifully on a narrow test strip but makes a lazy curve across a wide piece, the problem is usually flex. The cure is reinforcement, shorter bends, or more clamping pressure.
The third lesson is that the hinge line is everything. Many first-time builders focus on the handles because handles look powerful. Handles are important, but the pivot determines how the metal forms. When the pivot is close to the clamping edge, the bending leaf pushes the sheet around a tighter, more predictable radius. When the pivot is too far away, the metal can pull forward and make a rounded, wandering bend. This is why careful builders spend extra time mocking up the hinge before drilling final holes. Ten minutes of testing can save an afternoon of muttering.
The fourth lesson is that sheet metal has memory. You bend it to 90 degrees, release it, and it relaxes back a little as if it suddenly remembered another appointment. This springback is normal. Different materials spring back by different amounts, and harder metals usually spring back more. After a few test bends, you start developing a feel for how far past the target angle you need to go. That little bit of overbending is not cheating; it is sheet metal negotiation.
The fifth lesson is that homemade tools become better when you use them. After the first few projects, you may add a center clamp, longer handles, a removable back gauge, a better stop block, or rubber pads under the base. You may mark common bend angles on the side or keep a small stack of test coupons labeled by material. This is the charm of shop-made equipment: it evolves around your actual work instead of pretending every user has the same hands, bench, materials, and patience level.
Finally, building a brake teaches respect for layout. A clean bend begins before the metal touches the tool. Accurate marks, square cuts, deburred edges, and a thoughtful bend sequence make the difference between “custom fabricated” and “custom fabricated by a raccoon during a thunderstorm.” Start with scrap, write down what works, and improve the tool as you go. A small sheet metal brake may not look fancy, but once it makes its first crisp flange, it earns a permanent spot in the shop.
Conclusion
Building a small sheet metal brake is a practical weekend project that can upgrade your entire workshop. With angle iron, a solid hinge system, a straight clamp bar, and careful alignment, you can create a compact tool capable of making clean bends in thin sheet metal. The secret is not complicated: keep the pivot close to the bend line, clamp the work securely, use stiff materials, and test before committing to final parts.
A homemade brake will not replace professional equipment, but it does not need to. For small brackets, flashing, trays, covers, repair panels, and creative fabrication projects, it is more than enough. Build it carefully, tune it patiently, and treat every test bend as useful data. Before long, you will stop avoiding sheet metal projects and start looking for excuses to make tiny metal boxes. This is how it begins. First a brake, then a bracket, then suddenly you are explaining bend allowance at dinner.