The holidays have a peculiar relationship with time. Adults wonder how December arrived so quickly, while children ask whether the big day is tomorrow approximately every seven minutes. An easy DIY holiday countdown board solves at least half of that problemand looks much prettier than repeatedly checking a phone.
This reusable countdown board combines a painted wooden sign, interchangeable number cards, and printable activity prompts. It can count down to Christmas, Hanukkah, New Year’s Eve, a winter vacation, or any celebration your household eagerly awaits. Better still, you can customize it without owning an intimidating collection of power tools or a craft room large enough to require its own ZIP code.
Why Make a Reusable Holiday Countdown Board?
Traditional Advent calendars often contain 24 numbered doors, drawers, envelopes, or packages. Their roots are connected to the Christian season of Advent, but countdown calendars have gradually developed into broader holiday traditions. Modern versions may reveal candy, photographs, toys, family activities, kind deeds, or simple messages.
A countdown board offers a streamlined alternative. Instead of preparing two dozen compartments, you change two number cards each day. It requires less storage, creates less waste, and can return every year with new colors or activity cards.
The finished project also provides several practical benefits:
- Children can see how many days remain without asking for a minute-by-minute update.
- The daily ritual builds anticipation while making the season feel less rushed.
- Printable cards let you change the holiday, wording, and activities whenever necessary.
- A neutral design can stay on display from early December through New Year’s Day.
- The board becomes a handmade decoration with genuine family history.
DIY Holiday Countdown Board Design
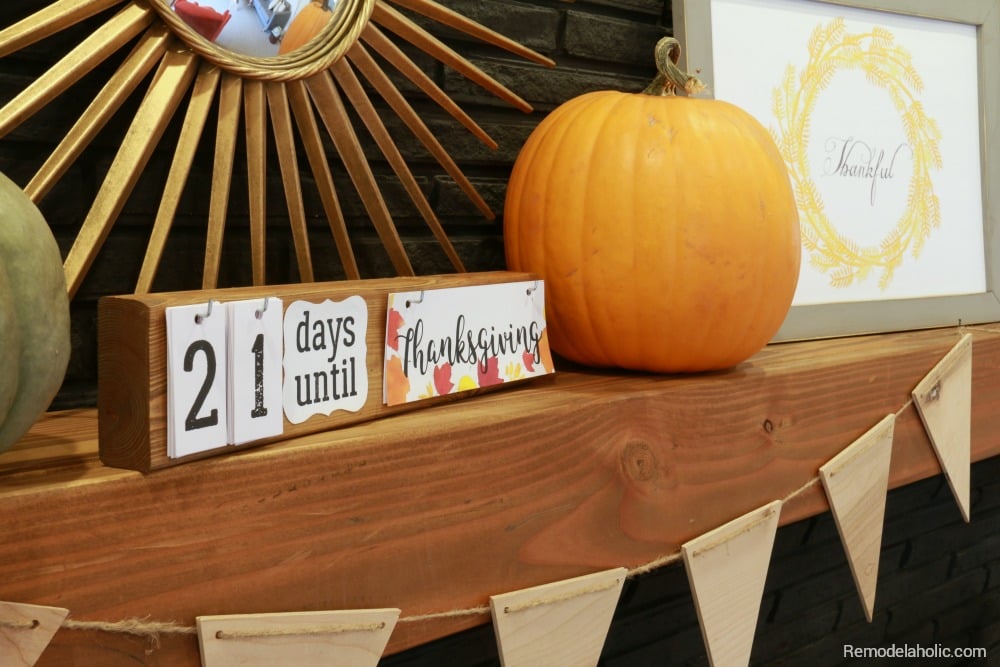
This tutorial uses a rectangular wood or MDF panel with two small clothespins attached near the center. Each clothespin holds one stack of digit cards numbered zero through nine. Together, the cards can display any number from 00 to 99.
Under the numbers, add a phrase such as “Days Until Christmas,” “Days Until Celebration,” or “Days Until Holiday Fun.” An envelope attached to the back stores unused number cards and printable activities. It is simple, tidy, and less likely to launch tiny wooden numbers beneath the refrigerator.
Recommended Finished Size
A 12-by-16-inch or 12-by-18-inch board provides enough room for large, readable numbers without dominating the mantel. For a tabletop version, an 8-by-10-inch panel works well. If you want the countdown to be visible from across a large room, choose a board approximately 16 by 20 inches and enlarge the printables accordingly.
Materials and Tools
Basic Supplies
- One unfinished wood panel, plywood sign, or MDF board
- 120-grit and 220-grit sandpaper or sanding sponges
- Primer suitable for the selected surface
- Acrylic, chalk-style, or interior craft paint
- Small foam roller or quality paintbrush
- Painter’s tape, ruler, and pencil
- Two mini wooden clothespins
- Strong craft adhesive or wood glue
- White or colored cardstock
- Scissors or a paper trimmer
- Printable number and activity cards
- Small envelope for storing extra cards
- Picture-hanging hardware or a tabletop easel
Optional Decorating Supplies
- Permanent adhesive vinyl and transfer tape
- Letter stencils
- Paint pens
- Decorative paper or removable wallpaper scraps
- Ribbon, greenery, bells, or wooden snowflakes
- Self-adhesive laminating sheets
- Clear water-based protective finish
Before buying anything, inspect your craft supplies and recycling bin. A leftover cabinet panel, sturdy picture frame backing, or old wooden sign may work perfectly. Reusing materials lowers the cost and gives you a convenient explanation for why you have been saving that oddly specific piece of wood.
How to Make an Easy DIY Holiday Countdown Board
Step 1: Prepare the Board
Inspect the panel for splinters, rough corners, dents, or residue. Sand unfinished wood with 120-grit paper, moving in the direction of the grain. Follow with 220-grit paper for a smoother finish. Round sharp corners slightly if children will help update the countdown.
Remove dust with a vacuum and a clean, slightly damp cloth, then let the surface dry. Wood dust becomes airborne during sanding, so work in a ventilated location and use appropriate eye and dust protection. Children can help with gentle hand sanding under close supervision, but adults should handle cutting, drilling, and power tools.
Step 2: Prime and Paint
Bare wood and MDF can absorb paint unevenly. Apply a thin coat of compatible primer, particularly when using a light color over a dark or porous board. Allow it to dry according to the manufacturer’s directions, lightly sand any raised fibers, and remove the dust.
Apply two thin coats of paint rather than one heroic, pudding-thick layer. Thin coats dry more evenly and are less likely to show brush marks. Let each coat dry completely. For indoor projects, choose low-odor or low-VOC products when available, follow all label precautions, and keep fresh air moving through the workspace.
Classic combinations include cream with forest green, white with cranberry red, navy with silver, or black with warm wood accents. For a board that works with multiple holidays, choose a neutral background and let the printable cards supply the seasonal color.
Step 3: Plan the Layout
Place the board on a flat surface and mark its vertical center lightly with pencil. Arrange two sample number cards near the upper middle, leaving about half an inch between them. Position the countdown phrase below the cards and reserve space for a small decorative element at the top or bottom.
Do not glue anything yet. Step back and view the layout from several feet away. Numbers should be the largest visual feature because the board has one important job: announcing that there are nine days left, not making everyone squint at an elegant beige smudge.
Step 4: Add the Wording
Use a paint pen, stencil, adhesive letters, or permanent vinyl to add your headline and countdown phrase. Good headline options include “The Countdown Is On,” “Making Spirits Bright,” and “Holiday Cheer Starts Here.”
If applying cut vinyl, weed away the excess material, cover the design with transfer tape, and burnish it firmly. Position one edge or the center first, then smooth outward. Peel the transfer tape back slowly at a low angle. A large design is easier to align with a temporary strip of painter’s tape acting as a hinge.
No cutting machine? Print the wording, shade the back of the paper with pencil, tape it to the board, and trace the letters. The graphite will transfer a faint outline that can be filled with a paint pen.
Step 5: Attach the Number Holders
Measure carefully and glue two mini clothespins where the number cards will hang. Use only enough adhesive to secure each pin; excessive glue can spread around the edges and create shiny blobs. Let the adhesive cure fully before adding the cards.
Clothespins are easier than loose magnets and allow damaged cards to be replaced individually. If small children live in or visit the home, avoid detachable high-powered magnets and other tiny embellishments. Small, powerful magnets can cause severe internal injuries if swallowed. Keep all small parts inaccessible and supervise children during daily updates.
Step 6: Print and Cut the Cards
Print two complete sets of digits zero through nine on cardstock. In the printer dialog, choose the correct paper size and select a cardstock or heavyweight-paper setting if your printer supports it. Print at 100 percent or “Actual Size” unless you intentionally want to resize the cards.
Run a test on ordinary paper first. This inexpensive rehearsal catches incorrect scaling, clipped edges, and upside-down sheets before premium cardstock becomes a very festive casualty.
Cut the cards to identical dimensions with a paper trimmer or scissors. Rounded corners are optional but give the set a polished appearance. Laminate the cards or cover both sides with self-adhesive laminating sheets if you expect sticky fingers, cocoa splashes, or many years of use.
Printable Number Cards
Use the following digits to create two matching printable sets. Each finished card should measure approximately 3 by 4 inches for a medium-size board. Choose a bold, uncomplicated font so the countdown remains readable from a distance.
| 0 | 1 | 2 | 3 | 4 |
| 5 | 6 | 7 | 8 | 9 |
| 0 | 1 | 2 | 3 | 4 |
| 5 | 6 | 7 | 8 | 9 |
For additional flexibility, print a star, heart, snowflake, candle, gift, and “Today!” card. Display the decorative card in place of a leading zero or use “Today!” when the long-awaited celebration finally arrives.
Printable Holiday Activity Cards
A number tells the family when the holiday is coming; an activity card gives everyone something meaningful to do while waiting. Print these prompts, cut them apart, and place them in an envelope or basket. Select one each day or save them for evenings when the schedule allows.
- Make hot cocoa and add one delightfully unnecessary topping.
- Read a favorite holiday story aloud.
- Donate food or household supplies to a local organization.
- Take an evening walk to see neighborhood lights.
- Write a thank-you note to someone who helped you this year.
- Make paper snowflakes for a window.
- Call a relative or friend you have not spoken with recently.
- Bake cookies and share a few with a neighbor.
- Watch a family holiday movie.
- Create a playlist with one song chosen by each person.
- Wear festive socks all day.
- Make a simple ornament from paper or salt dough.
- Have breakfast for dinner.
- Look through photographs from past holidays.
- Choose toys, books, or clothing to donate.
- Build a blanket fort and read inside it.
- Make a card for a teacher, caregiver, or community helper.
- Turn off screens and play a board game.
- Decorate a bedroom door with removable paper decorations.
- Learn how another culture celebrates during the winter season.
- Prepare a favorite family recipe together.
- Write three things that made you grateful today.
- Have a holiday dance party in the living room.
- Let everyone open one small present or shared treat.
Activities need not be elaborate. In fact, simple prompts are more likely to happen during an already crowded month. “Listen to one holiday song” may create a better memory than “Construct a life-size gingerbread railway station before bedtime.”
Ways to Customize Your Holiday Countdown
Farmhouse Christmas Board
Paint the board warm white, lightly distress the edges, and use black lettering with natural wood clothespins. Add a small plaid ribbon or faux cedar sprig. Practice distressing on scrap wood first because charmingly weathered and accidentally attacked are separated by surprisingly few sandpaper strokes.
Modern Minimalist Countdown
Choose a matte black, cream, or muted green background. Use a clean sans-serif font and limit the palette to two colors. Skip extra embellishments and print oversized numbers with generous white space.
Kid-Friendly Colorful Version
Paint a bright border and let children decorate number cards with washable markers, stickers, or fingerprints. Adults should manage adhesives, cutting tools, hot glue, and any finishing products. Add children’s names to activity cards so everyone receives a turn changing the number.
Inclusive Winter Celebration Board
Use wording such as “Days Until We Celebrate” and prepare interchangeable labels for Christmas, Hanukkah, Kwanzaa, New Year’s Eve, winter break, birthdays, and family visits. This approach makes one project useful throughout the year.
Troubleshooting Common DIY Problems
The Paint Looks Streaky
Let the coat dry before judging it. Wet paint frequently appears uneven. If streaks remain, lightly sand with fine-grit paper, remove the dust, and apply another thin coat with a foam roller or quality brush.
The Printed Cards Do Not Match in Size
Check that every page uses the same scaling setting. “Fit to Page” can resize designs unexpectedly, while “Actual Size” preserves the intended dimensions. Confirm that the paper guides fit snugly against the cardstock.
The Vinyl Will Not Transfer
Burnish the front and back again, then peel the backing slowly. Make sure the painted surface is clean, dry, and fully cured. Fresh paint may feel dry on top while remaining soft underneath.
The Layout Looks Crooked
Use painter’s tape to create temporary horizontal and vertical guides. Measure from the board’s edges rather than relying on eyesight. Human vision is remarkably talented, but it becomes strangely optimistic when glue is nearby.
A Realistic Maker Experience: What This Project Teaches You
A typical first attempt at a holiday countdown board begins with confidence. The board looks small, the supply list looks manageable, and two clothespins hardly qualify as advanced engineering. Then the maker discovers that “centered” can mean three different things: mathematically centered, visually centered, and centered according to the relative who is watching from the kitchen.
The most useful lesson is to arrange every element before attaching anything. A headline that appears perfectly sized on a computer screen may overwhelm the actual board. Number cards may cover part of the phrase below them. A decorative bow can transform from charming accent to textile shrub once it is placed on a 12-inch sign. Temporary positioning prevents most of these problems.
Another common discovery is that drying time deserves respect. Holiday crafting encourages impatience because the calendar is already racing ahead. Touching paint too soon leaves fingerprints; applying vinyl over uncured paint can pull up the finish; clipping cards onto wet glue can shift both holders. Allowing each layer to dry often takes longer than the hands-on work, but it also produces the greatest improvement in the final result.
Families usually find that the activity cards become more memorable than the board itself. Children may initially focus on changing 12 to 11, but they remember the evening they drank cocoa under a blanket fort or delivered cookies to a neighbor. The countdown turns an abstract wait into a collection of small experiences.
It also helps to include several extremely easy cards. A December schedule can collapse under school events, travel, shopping, work deadlines, and weather. If every prompt requires baking equipment and a three-hour block, the countdown starts behaving like an unpaid event coordinator. Mixing larger traditions with five-minute activities keeps the ritual enjoyable.
Storage is another lesson learned after the first season. Loose number cards possess a mysterious ability to disappear, particularly the digit needed next year. Attaching a labeled envelope to the back of the board keeps the complete set together. Store the board upright in a dry location, wrap delicate decorations in tissue, and avoid stacking heavy boxes on top.
Finally, handmade projects improve as they become part of family life. A slightly uneven letter or paint mark often feels enormous while the board is new. After several seasons, that imperfection becomes evidence that someone made it. Children grow tall enough to update the cards themselves, favorite activities turn into traditions, and the board gathers stories that a factory-perfect decoration could never supply.
Conclusion
An easy DIY holiday countdown board turns waiting into a visible, reusable tradition. With a prepared panel, two clothespins, printable number cards, and a little paint, you can create personalized holiday decor in an afternoon. Add simple activity prompts and the project becomes more than a calendarit becomes a gentle invitation to slow down, connect, and enjoy the days leading to the celebration.
Note: Adjust the countdown wording and printable activities to reflect your family’s holidays, beliefs, ages, and traditions. Adults should supervise children around tools, adhesives, paints, small parts, and detachable decorations.