Note: This article is for educational makers, robotics students, and hobbyists. Repurposing a hoverboard involves lithium-ion batteries, high-current motor controllers, and moving machinery. Inspect parts carefully, avoid damaged batteries, use proper fusing and charging practices, and treat the finished project as a bench-tested learning platformnot a passenger vehicle.
Somewhere in a closet, garage, or “I’ll fix it someday” corner of the house, there may be an old hoverboard quietly waiting for its second act. Maybe it was a holiday gift. Maybe it was fun for three glorious afternoons before the charger disappeared. Maybe it developed the classic hoverboard personality: beeping dramatically, refusing to balance, and acting like a tiny robot with trust issues.
Good news: even if the hoverboard is no longer useful as a ride-on toy, it can still be a surprisingly rich learning platform. Inside that plastic shell is a compact robotics starter kit: two brushless hub motors, wheel assemblies, a battery pack, wiring harnesses, LEDs, sensors, a charger port, structural parts, and often a controller based around embedded motor-control electronics. For a curious maker, that is not junk. That is tuition.
Turning an old hoverboard into a robotics learning platform can teach real skills in electronics, software, mechanical design, safety engineering, motor control, sensor integration, and debugging. It is a hands-on way to understand how modern personal mobility devices work, while building something more flexible than a toy that only wants to go forward, backward, and occasionally into a laundry basket.
Why an Old Hoverboard Is a Robotics Goldmine
A typical self-balancing scooter is built around a simple idea: keep two wheels under a rider and constantly adjust motor output based on motion and balance sensors. But once you remove the rider from the equation, those same components can be reused for small robots, camera platforms, telepresence carts, assistive device experiments, indoor delivery bots, or classroom demonstrations.
Two Strong Hub Motors
The most valuable parts are usually the two wheel hub motors. These are brushless DC motors built directly into the wheels, which makes them compact, quiet, and mechanically simple. Many hoverboard motors include Hall sensors, which help a controller detect rotor position. That opens the door to lessons in feedback control, torque, speed regulation, and the difference between “the motor spins” and “the robot moves smoothly without doing the electric chicken dance.”
A Battery Pack Worth Respecting
Hoverboards commonly use lithium-ion battery packs, often around the 36-volt class depending on the model. These packs are powerful enough to move a person, so they are more than powerful enough to move a robot chassis across a garage. They also deserve serious respect. A damaged, swollen, water-exposed, overheated, or unknown battery should not be reused. Battery safety is not the place to practice optimism.
Built-In Electronics and Sensors
Many hoverboards include controller boards, gyroscopes, accelerometers, LED boards, power switches, charging connectors, and wiring that can be salvaged or studied. Even if you decide not to reuse the stock controller, analyzing how the original system was assembled is a useful lesson in product engineering. You learn how consumer devices package power, signal wiring, thermal limits, connectors, and user controls into a tight enclosure.
The Learning Goals: More Than Making Wheels Spin
A hoverboard conversion becomes valuable when it is treated as a structured learning project, not just a weekend attempt to create a robot that scares the dog. The goal is not merely to build something that moves. The goal is to understand why it moves, how to control it, and how to make it safer and more predictable.
Motor Control
Hoverboard motors are excellent for exploring brushless motor control. Students can compare simple speed-control boards, open-loop behavior, Hall sensor feedback, and more advanced approaches such as field-oriented control. This teaches the relationship between voltage, current, torque, speed, acceleration, and load. It also reveals why motor control is a discipline of patience: the first test often produces either nothing, a twitch, or a wheel that suddenly believes it is late for a meeting.
Embedded Systems
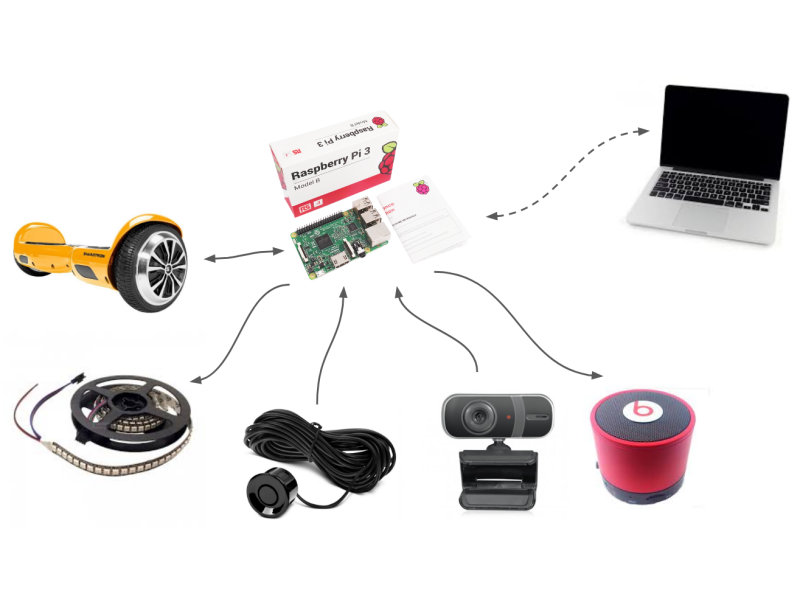
A hoverboard robot can be controlled with an Arduino, ESP32, Raspberry Pi, STM32 board, or another microcontroller platform. Each choice teaches something different. Arduino-style boards are approachable for PWM, sensor input, and basic control loops. ESP32 boards add wireless connectivity and enough processing power for compact robotics experiments. A Raspberry Pi can support dashboards, camera streams, Python scripts, web controls, and higher-level planning.
Software Architecture
Once the platform moves, software becomes the real playground. A maker can build a simple browser dashboard, add joystick controls, stream camera video, log battery voltage, display ultrasonic sensor readings, or send text-to-speech messages from the robot. Event-driven programming is especially useful here because a robot is constantly reacting to input: button clicks, sensor readings, motor status updates, connection events, and emergency stop commands.
A Practical Build Concept: The Hoverboard Robot Base
One of the most practical ways to reuse an old hoverboard is to turn it into a two-wheel-drive robot base with caster support. Instead of keeping the original foot pads and shell, you mount the hub motors into a new chassis, add one or two caster wheels for stability, and place the electronics on top in an accessible layout.
Chassis Design
A good beginner chassis does not need to be fancy. Plywood, aluminum extrusion, acrylic sheet, or a sturdy plastic tray can work. The key is rigidity. The motors must stay aligned, the caster wheels must touch the floor evenly, and the battery must be mounted securely. If the chassis flexes too much, your robot may wobble like a shopping cart with a philosophical crisis.
Keep the battery low and centered. Keep heavy parts close to the wheel axis. Leave room to access wiring, fuses, USB ports, programming headers, and power switches. A learning platform should be easy to service because you will be servicing it. Frequently. With humility.
Motor Driver Options
There are two common paths: reuse the original hoverboard controller or replace it with a compatible brushless DC motor driver. Reusing the stock controller can be powerful and efficient, especially when open-source firmware is available for a matching board. However, it requires careful identification of the board, flashing tools, wiring knowledge, and confidence with embedded systems.
Using an external BLDC motor driver may be easier for beginners. Some inexpensive controllers support three-phase brushless motors with Hall sensors and provide simple inputs for speed, direction, and braking. That makes it possible to control a hoverboard motor from a microcontroller without immediately diving into advanced firmware. This path sacrifices some elegance but gains a big advantage: the robot starts moving sooner, and motivation is a renewable resource.
Controller Board
For a first learning build, a microcontroller can handle basic motion commands, sensor input, and safety checks. For example, an Arduino-compatible board can generate PWM-style control signals and read switches or sensors. An ESP32 can add Wi-Fi or Bluetooth control. A Raspberry Pi can run a web dashboard and send serial commands to a motor-control microcontroller.
A robust architecture often uses two layers: a low-level controller for motors and safety, and a high-level computer for user interface, mapping, video, or experimental features. This separation prevents a web dashboard crash from becoming a full-speed wall inspection.
Safety Comes First: The Non-Negotiable Section
Hoverboards became famous not only for their futuristic look but also for battery and fire safety concerns in poorly built or damaged units. When converting one into a learning platform, safety cannot be an afterthought. It is part of the curriculum.
Inspect Before Reuse
Before powering anything, open the hoverboard carefully and inspect the battery, wiring, connectors, and boards. Look for swollen cells, corrosion, burnt smell, melted insulation, cracked solder joints, loose connectors, missing insulation, or signs of water damage. If the battery looks questionable, recycle it properly through an approved battery recycling channel and use a known-good pack instead.
Add Protection
A learning platform should include a main fuse, an accessible power switch, strain relief for wires, secure battery mounting, insulated terminals, and an emergency stop. Do not leave high-current wiring exposed. Do not charge unattended. Do not mix random chargers with random battery packs. Do not assume a battery management system is healthy just because the pack has one.
Test on Blocks
During early tests, lift the wheels off the ground or place the robot on a stand. This lets you verify motor direction, throttle range, braking behavior, and failsafe logic without the machine launching itself into the nearest chair leg. First tests should be boring. In robotics, boring is often another word for “successful.”
Projects You Can Build From the Platform
Once the base is moving reliably, the hoverboard learning platform becomes a sandbox for increasingly advanced experiments. This is where the project starts to feel less like salvage and more like a small robotics lab.
Remote-Controlled Rover
The simplest project is a remote-controlled rover. Add a joystick, Bluetooth controller, phone interface, or web dashboard. The learning value comes from mapping user input to motor commands. Differential drive is a perfect topic here: to go forward, both wheels turn the same direction; to rotate, the wheels turn opposite directions; to curve, one wheel moves faster than the other.
Obstacle-Avoiding Robot
Add ultrasonic sensors, infrared sensors, or a time-of-flight distance sensor, then program the robot to slow down or turn when it detects an obstacle. This project introduces sensor noise, threshold tuning, reaction time, and the frustrating truth that a chair leg is sometimes invisible from exactly the wrong angle.
Telepresence Platform
Mount a camera, microphone, speaker, and small screen to create a basic telepresence bot. A Raspberry Pi can host video streaming and web controls, while a microcontroller handles motor commands. This teaches networking, latency, power budgeting, and user interface design. It also teaches that driving a robot through a camera feed is harder than it looks, especially when Wi-Fi has opinions.
Autonomous Navigation Experiments
Advanced learners can add wheel odometry, an IMU, lidar, or computer vision. From there, the platform can explore mapping, path planning, localization, and closed-loop control. A hoverboard base is not a precision laboratory robot, but that is part of the lesson. Real-world robotics is messy, slippery, noisy, and full of little compromises.
What Skills This Project Teaches
The best part of turning an old hoverboard into a learning platform is how many disciplines collide in one project. It is not just electronics. It is not just code. It is the intersection of physical design, power systems, embedded logic, software interfaces, safety procedures, and iterative problem-solving.
Mechanical Skills
You learn how to mount motors, balance weight, reinforce a chassis, manage vibration, and design for serviceability. You also learn that “temporary mounting” has a sneaky habit of becoming permanent unless it falls off first.
Electrical Skills
You learn voltage levels, current limits, connectors, polarity, wire gauge, fuses, grounding, signal isolation, and battery care. These are practical skills that apply far beyond hoverboards. They apply to drones, e-bikes, robots, electric carts, and almost any project with motors.
Programming Skills
You learn serial communication, PWM control, sensor polling, event handling, failsafe states, control loops, and interface design. A small robot gives immediate feedback. Good code produces smooth motion. Bad code produces interpretive dance.
Debugging Skills
Debugging is where the real education happens. Motors spin backward. Sensors return impossible numbers. Batteries sag under load. Wi-Fi disconnects. One wheel has more friction than the other. The robot drifts left even though the code swears it is innocent. Solving these problems builds engineering judgment.
Common Mistakes to Avoid
The first mistake is starting with the most complicated version of the project. Do not begin with autonomous navigation, machine vision, voice control, and a cup holder. Start with safe power. Then spin one motor. Then spin two motors. Then control direction. Then add sensors. Then add autonomy.
The second mistake is ignoring documentation. Label wires, photograph the original layout, write down connector pinouts, and keep a build log. Future you will not remember which red wire was “probably battery positive.” Future you is busy and slightly annoyed.
The third mistake is treating the battery like a generic power brick. Lithium-ion packs need proper charging, storage, protection, and disposal. If the pack is from an unknown or recalled hoverboard, it may be better as a recycling lesson than a power source.
The fourth mistake is skipping failsafes. A robot should stop when it loses signal, receives invalid commands, detects low voltage, or boots into an uncertain state. Motion should be intentional, not a surprise feature.
Why This Makes a Great Classroom or Workshop Project
For educators, a hoverboard learning platform provides a memorable way to teach STEM concepts. Students can see how math, physics, and software affect a physical machine. Torque is no longer a formula on a board; it is the reason the robot can climb a small ramp. Sensor filtering is no longer abstract; it is the difference between smooth obstacle detection and a robot that panics at shadows.
The project also supports teamwork. One student can focus on mechanical design, another on wiring, another on microcontroller code, another on the dashboard, and another on testing procedures. That mirrors real engineering teams, where success depends on communication as much as technical skill.
Experience Notes: What It Feels Like to Build One
Building a hoverboard-based learning platform is a humbling experience in the best possible way. At first, the project feels simple. There are two wheels. Robots need wheels. Therefore, robot. That confidence usually lasts until the first wiring session, when the hoverboard reveals that it contains more connectors than expected and none of them are labeled in a way that says, “Hello, beginner, I made this easy for you.”
The first major lesson is patience. Before cutting or rewiring anything, it helps to photograph every connector, every board, and every cable path. A few minutes with a phone camera can save hours later. Many builders discover that the original hoverboard layout is actually a compact engineering puzzle. The wiring is short because space is limited. The boards are placed to reduce cable runs. The battery sits where it balances weight. Even the annoying plastic shell often has molded supports that keep parts from rattling loose. Taking it apart teaches product design before a single new part is added.
The second lesson is that motion is emotional. The first time one wheel spins under microcontroller control, the project suddenly feels alive. It may spin the wrong way, at the wrong speed, with a noise that suggests mild protest, but it moves. That moment is powerful because it connects code to physical reality. A number in a program becomes rotation. A button press becomes torque. A small change in a command becomes acceleration. This is why robotics is addictive. It gives software a body.
The third lesson is that small mechanical details matter. If one caster wheel is slightly taller, the chassis may tilt. If the battery is mounted too high, the robot may wobble. If motor brackets flex, the platform may vibrate under load. If wires are left loose, they will eventually find the rotating part they were born to meet. Good cable management is not decoration; it is survival.
The fourth lesson is that sensors are not magic. An ultrasonic sensor can be excellent for detecting a wall, but it may struggle with soft fabric, angled surfaces, narrow chair legs, or objects outside its cone. An IMU can detect motion, but it may drift. Wheel odometry can estimate distance, but it gets confused by wheel slip. Each sensor tells part of the truth, sometimes with a tiny bit of drama. Learning to combine sensor data is one of the most useful outcomes of the project.
The fifth lesson is that safety habits make experimentation more enjoyable. A fused power line, a clearly marked switch, insulated connectors, and a test stand are not boring extras. They let you experiment with confidence. When the wheels are lifted off the ground, you can test motor direction without chasing the robot. When the emergency stop works, you can push software limits without turning the workshop into a low-budget action scene.
Most importantly, the project changes how you see discarded electronics. An old hoverboard is no longer just a failed gadget. It becomes a collection of lessons: battery management, power electronics, embedded control, mechanical packaging, software interfaces, and real-world debugging. Even if the final robot is not beautiful, it teaches beautifully. And if it does look a little ridiculous rolling around with exposed wires, a plywood deck, and a camera taped to the top, that is part of the charm. Every serious maker has built at least one machine that looks like it escaped from a science fair and learned confidence on the way out.
Conclusion: Give the Hoverboard a Better Second Life
Turning that old hoverboard into a learning platform is one of the most practical ways to recycle technology into education. Instead of throwing away motors, wheels, sensors, wiring, and structural parts, you can transform them into a hands-on robotics system. The project teaches motor control, embedded programming, battery safety, mechanical design, sensor integration, and software architecture in a way that textbooks alone cannot match.
The smartest approach is to start small, prioritize safety, document everything, and build in stages. First understand the hardware. Then control one motor. Then build a stable chassis. Then add remote control. Then add sensors, dashboards, autonomy, or whatever ambitious idea is currently scribbled on the nearest sticky note.
An old hoverboard may no longer be the coolest ride on the sidewalk, but as a learning platform, it still has plenty of miles left. It can become a robot base, a classroom tool, a software experiment, a sensor testbed, or simply a reminder that broken gadgets are often just future projects wearing dusty plastic.