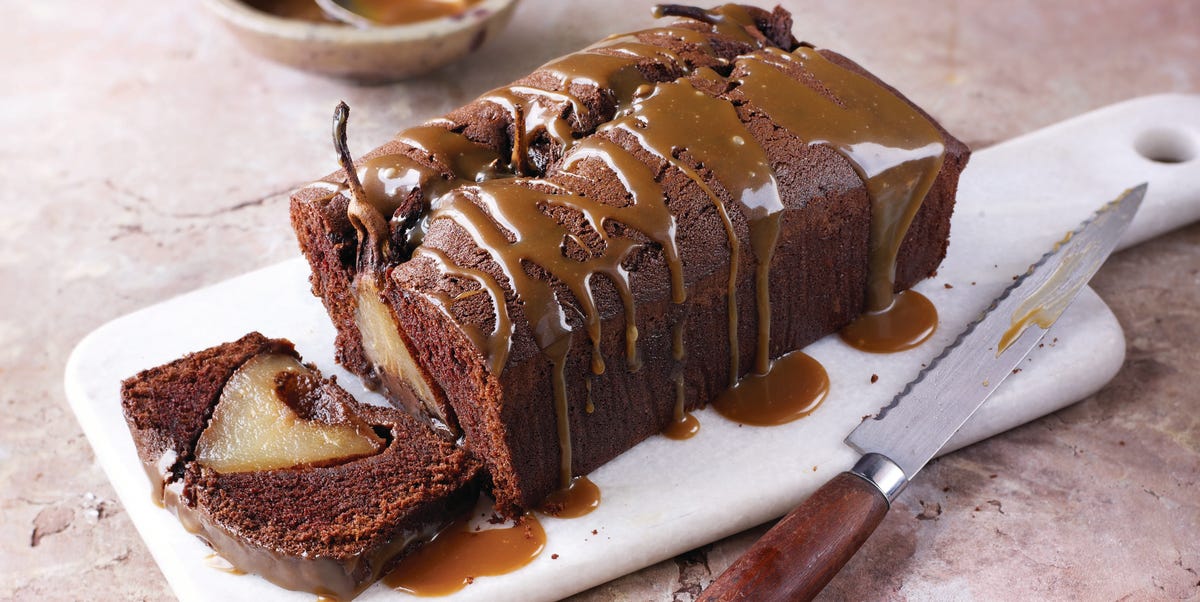
Some cakes arrive politely. This toffee, pear and chocolate loaf cake recipe walks into the kitchen wearing a cozy sweater, smelling like brown sugar, and casually making everyone forget their errands. It is tender, buttery, packed with juicy pear pieces, dotted with chocolate chunks, and finished with the caramel-like crunch of toffee bits. In other words, it is what banana bread dreams about when banana bread wants a glow-up.
This loaf cake sits comfortably between a classic fruit quick bread and a proper dessert cake. It is easy enough for a weeknight bake, handsome enough for a brunch table, and rich enough to serve warm with vanilla ice cream when you want dessert to feel like a tiny celebration. Pears bring moisture and gentle floral sweetness, chocolate gives depth, and toffee adds that buttery, slightly salty sparkle that makes people ask, “Wait, what is in this?” before taking a second slice.
The best part is that this recipe does not require fancy equipment or pastry-school nerves. You need one loaf pan, a couple of bowls, ripe but firm pears, and the emotional strength not to eat all the toffee bits before they reach the batter. That last part is the true technical challenge.
Why This Toffee, Pear and Chocolate Loaf Cake Works
A great loaf cake needs balance. Too much fruit can make the center heavy. Too much chocolate can dominate the pear. Too much toffee can turn the loaf into a candy bar with cake ambitions. This recipe keeps the ingredients in friendly conversation rather than letting one of them grab the microphone.
The base is made with butter, brown sugar, eggs, sour cream, and a modest amount of milk. Butter gives flavor, brown sugar supports the toffee notes, and sour cream helps create a moist, fine crumb. The pears are diced rather than sliced so they distribute evenly through the loaf. Chocolate chunks melt into soft pockets, while toffee bits add sweetness and a little crunch on top.
This is also a practical cake. It keeps well, slices cleanly after cooling, and tastes even better the next day once the flavors have had time to become acquainted. Think of it as a bake-ahead loaf cake with excellent manners.
Ingredients
For the Loaf Cake
- 1 3/4 cups all-purpose flour, spooned and leveled, about 210 g
- 1 1/2 teaspoons baking powder
- 1/4 teaspoon baking soda
- 1/2 teaspoon fine salt
- 1/2 teaspoon ground cinnamon, optional but recommended
- 1/2 cup unsalted butter, softened
- 3/4 cup packed light brown sugar
- 2 large eggs, room temperature
- 2 teaspoons vanilla extract
- 1/2 cup sour cream or plain Greek yogurt, room temperature
- 1/4 cup whole milk
- 1 1/2 cups peeled, diced ripe but firm pears, from about 2 medium pears
- 3/4 cup semisweet or dark chocolate chunks
- 1/2 cup toffee bits, plus 2 tablespoons for topping
- 1 tablespoon all-purpose flour, for tossing with the pears and chocolate
Optional Toffee Drizzle
- 1/3 cup soft caramel sauce or dulce de leche
- 1 tablespoon heavy cream or milk, as needed
- A pinch of flaky sea salt
Best Pears for Loaf Cake
The best pears for this pear loaf cake are ripe enough to smell sweet and taste juicy, but firm enough to hold their shape in the oven. Bosc, Anjou, Bartlett, and Comice pears can all work. Bosc pears are especially reliable because they stay structured when baked. Bartlett pears are softer and more fragrant, so use them only when they are ripe but not squishy.
To check ripeness, press gently near the stem end. If the neck gives slightly, the pear is ready. If the whole pear feels soft, save it for smoothies, pear sauce, or a dramatic apology to your fruit bowl. For this cake, mushy pears can add too much moisture and make the center dense.
How to Make Toffee, Pear and Chocolate Loaf Cake
Step 1: Prepare the Pan
Preheat the oven to 350°F. Grease a 9-by-5-inch loaf pan and line it with parchment paper, leaving overhang on the long sides. The parchment handles make it easy to lift the cake out later, which is helpful because loaf cakes are not known for their acrobatic exits.
Step 2: Mix the Dry Ingredients
In a medium bowl, whisk together the flour, baking powder, baking soda, salt, and cinnamon. Whisking matters because it distributes the leavening evenly. Nobody wants a surprise pocket of baking powder. That is not a plot twist; that is a baking crime.
Step 3: Cream the Butter and Brown Sugar
In a large bowl, beat the softened butter and brown sugar until light and fluffy, about 2 to 3 minutes. This step builds structure and helps the loaf rise. Scrape down the bowl once or twice so the butter hiding at the bottom gets invited to the party.
Step 4: Add Eggs, Vanilla, and Sour Cream
Beat in the eggs one at a time, mixing well after each addition. Add the vanilla. Mix in the sour cream until mostly smooth. The batter may look slightly uneven at this stage, especially if your ingredients are cooler than room temperature. Do not panic. Cakes are surprisingly forgiving, unlike printers.
Step 5: Combine Wet and Dry Ingredients
Add half of the dry mixture to the butter mixture and stir on low speed or fold by hand. Add the milk, then the remaining dry ingredients. Stop mixing as soon as no dry streaks remain. A few small lumps are fine. Overmixing can make a loaf cake tough, and this cake deserves tenderness, not the texture of a doorstop.
Step 6: Fold in Pears, Chocolate, and Toffee
Toss the diced pears and chocolate chunks with 1 tablespoon of flour. This light coating helps keep the add-ins suspended in the batter instead of sinking to the bottom like tiny dessert anchors. Fold the pears, chocolate, and 1/2 cup toffee bits into the batter gently with a spatula.
Step 7: Bake
Spread the batter into the prepared pan and smooth the top. Sprinkle with the remaining 2 tablespoons of toffee bits. Bake for 55 to 70 minutes, or until the top is golden, the loaf springs back lightly when touched, and a toothpick inserted near the center comes out with a few moist crumbs but no wet batter. If the top browns too quickly, tent it loosely with foil during the final 15 minutes.
Step 8: Cool and Finish
Let the cake cool in the pan for 15 to 20 minutes. Lift it out using the parchment and transfer it to a wire rack. Cool completely before slicing for the cleanest pieces. For the optional drizzle, warm caramel sauce with a splash of cream until pourable, then drizzle over the cooled loaf and finish with a small pinch of flaky sea salt.
Texture, Flavor, and What to Expect
This chocolate pear cake has a soft, close crumb rather than a fluffy layer-cake texture. The brown sugar gives it a faintly caramelized flavor, the pears create tender pockets, and the chocolate adds richness without turning the entire loaf into a brownie. The toffee bits on top melt slightly and crisp around the edges, making the first slice feel like the baker’s reward.
If you serve the cake warm, the chocolate will be gooey and the pear flavor will feel cozy and mellow. If you serve it the next day, the crumb will be neater, the spices will be more noticeable, and the loaf will slice beautifully for breakfast, snack time, or the honorable tradition of “just trimming the end again.”
Helpful Baking Tips for a Moist Loaf Cake
Use Ripe but Firm Pears
Pears should be fragrant and slightly yielding near the stem, but not soft all over. Firm-ripe pears bake into sweet, juicy pieces without collapsing into watery pockets.
Weigh the Flour if Possible
Too much flour is one of the fastest ways to make a dry loaf cake. If you use cups, spoon the flour into the measuring cup and level it with a knife. Do not scoop directly from the bag unless you enjoy surprise density.
Do Not Overmix
Once the flour goes in, mix gently. The goal is to combine the batter, not train it for a marathon. Overmixing develops too much gluten, which can make the cake tough, chewy, or gummy.
Cool Before Slicing
Warm loaf cake smells irresistible, but slicing too early can make it crumble. Letting it cool gives the structure time to set, especially because the pears and chocolate add moisture.
Ingredient Swaps and Variations
This easy loaf cake recipe welcomes small changes. Replace sour cream with full-fat Greek yogurt for a slightly tangier crumb. Use dark chocolate if you prefer a less sweet cake, or milk chocolate if you want the dessert to lean candy-shop cozy. Chopped toasted pecans or walnuts can be added for crunch, though you may want to reduce the chocolate slightly so the loaf does not become overcrowded.
For spice, add a pinch of nutmeg, cardamom, or ginger. Ginger is especially nice with pear and toffee because it cuts through the sweetness with a little warmth. If you want a more dessert-like finish, serve slices with whipped cream, vanilla ice cream, or a spoonful of lightly sweetened mascarpone.
Storage and Make-Ahead Tips
Store the cooled loaf tightly wrapped at room temperature for up to 2 days. Because pears add moisture, refrigerate it after that and enjoy within 4 to 5 days. Bring slices to room temperature before serving, or warm them briefly in the microwave for that fresh-baked feeling.
To freeze, skip the caramel drizzle and wrap the cooled loaf or individual slices tightly in plastic wrap, then place in a freezer-safe bag. Freeze for up to 2 months. Thaw overnight in the refrigerator or at room temperature. Add the drizzle after thawing for the best texture.
Serving Ideas
For breakfast, serve a plain slice with coffee. For brunch, dust it with powdered sugar and add fresh pear slices on the side. For dessert, warm a slice and top it with vanilla ice cream so the chocolate softens and the toffee notes bloom. If you are serving guests, cut thick slices and add a small drizzle of caramel on each plate. It looks fancy, but the cake did most of the work while you stood nearby pretending to be extremely skilled.
Common Mistakes to Avoid
Using Overripe Pears
Very soft pears can release too much liquid and make the loaf heavy in the center. Choose pears that yield slightly at the neck but still feel firm through the body.
Adding Too Many Mix-Ins
It is tempting to add more chocolate, more toffee, more everything. Resist. A loaf cake needs enough batter to hold the add-ins together. Too many extras can cause sinking, uneven baking, or slices that fall apart.
Underbaking the Center
Loaf cakes are thick, so the center needs time. If the top looks done but the toothpick still has wet batter, tent the loaf with foil and continue baking. A slightly longer bake is better than a sunken middle.
Kitchen Experience: What Baking This Cake Teaches You
Baking a toffee, pear and chocolate loaf cake recipe is one of those kitchen projects that looks simple on paper but teaches you several useful baking instincts. The first lesson is patience with fruit. Pears are tricky little characters. They can sit on the counter like decorative rocks for days, then suddenly become ripe while you are not looking. For this cake, learning to choose pears at the firm-ripe stage makes a huge difference. When the pear pieces hold their shape, the slices look beautiful and the texture stays balanced.
The second lesson is restraint. Toffee and chocolate are both bold ingredients, and it is easy to assume that more must be better. In reality, the best loaf comes from moderation. Too much chocolate can hide the pear; too much toffee can make the loaf overly sweet. The goal is not to build a candy drawer in cake form. The goal is a moist loaf where each bite has a little fruit, a little chocolate, and just enough buttery crunch to make your eyebrows lift approvingly.
This cake also teaches the value of cooling time. Many home bakers, myself included, have committed the noble mistake of slicing into a loaf too early. The smell is warm, the chocolate is melty, and common sense leaves the building. But pear loaf cake needs time to settle. The crumb firms up, the chocolate stops smearing everywhere, and the slices become neat enough to serve without looking like a delicious landslide. Waiting is difficult, but so is explaining why half the loaf collapsed because you “needed to check the texture.”
Another useful experience is learning how a loaf cake changes overnight. On day one, this cake is soft, fragrant, and slightly gooey where the chocolate is still tender. On day two, the pear flavor deepens, the brown sugar tastes more caramel-like, and the crumb becomes even more sliceable. That makes it a smart recipe for holidays, bake sales, lunch boxes, or brunches where you want to prepare something ahead without sacrificing flavor.
Finally, this recipe reminds you that homemade baking does not need to be complicated to feel special. A loaf pan, ripe pears, pantry chocolate, and a handful of toffee bits can create something that tastes bakery-worthy. It is the kind of cake that makes a kitchen smell expensive even when the ingredients are humble. Serve it on a wooden board, add coffee, and suddenly your afternoon has main-character energy.
Conclusion
This toffee, pear and chocolate loaf cake recipe is cozy, simple, and just fancy enough to make people think you planned your life better than you did. The pears keep the crumb moist, the chocolate adds richness, and the toffee brings buttery sweetness with a little crunch. It is a fall baking favorite, a winter comfort bake, and an anytime treat for people who believe fruit in cake still counts as emotional wellness.
For the best result, use ripe but firm pears, measure the flour carefully, fold the batter gently, and let the loaf cool before slicing. Follow those steps and you will get a tender, flavorful cake that works for breakfast, brunch, dessert, or quiet kitchen snacking while standing near the counter like a person with excellent priorities.