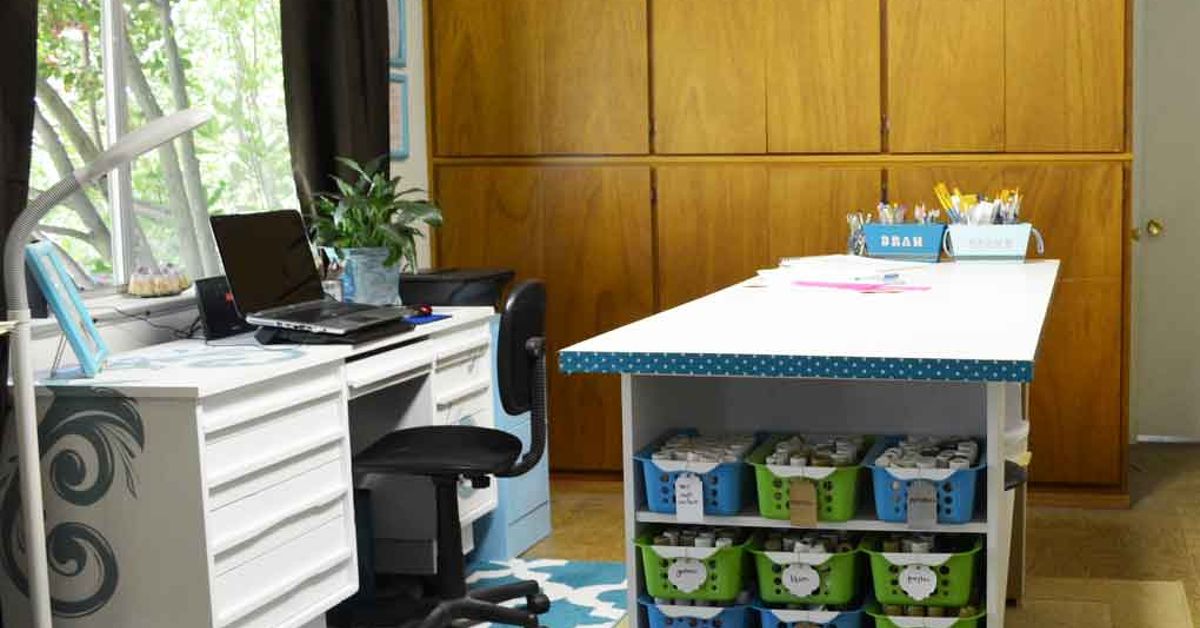
Welcome to my favorite room in the house: the place where paper becomes cards, fabric becom This craft room tour is not about showing off a perfectly staged studio that never sees a glue spill. It is about creating a practical, cheerful workspace where supplies are easy to find, projects are easier to finish, and cleanup does not require a search-and-rescue team.
The room is designed around one simple principle: Every item should live near the activity that uses it. Paper stays by the cutting tools, thread stays by the sewing machine, and everyday essentials remain within arm’s reach. Professional organizing guidance frequently recommends grouping supplies by hobby, frequency of use, or type, while vertical storage and labeled containers help preserve valuable work surfaces. t Room at a Glance
My craft room is divided into zones rather than arranged like a traditional office. There is a central worktable for active projects, a wall-mounted storage area for frequently used tools, a paper and vinyl station, a sewing corner, and closed cabinets for the less glamorous supplies. That last category includes bulk glue, unfinished projects, mystery cords, and several objects I am emotionally prepared to organize “next weekend.”
A Layout That Supports the Way I Work
The central table acts as mission control. I can walk around it, spread out large materials, and work with another person without turning the room into a polite elbow competition. A kitchen island, long desk, or sturdy dining table can serve the same purpose, especially when it includes shelves or drawers below. Designers often use islands and extended work surfaces in craft rooms because they combine generous project space with convenient storage. e pathway between the table, storage wall, and machines open. This sounds obvious, but craft supplies have a natural instinct to colonize floors. A clear route makes the room safer and also makes cleanup faster because I am not stepping over a basket of yarn while carrying a hot-glue gun.
Color, Light, and a Little Personality
The room uses a mostly neutral background, with colorful supplies providing the decoration. White or light walls help the space feel brighter, while natural wood and woven baskets keep it from looking like a laboratory for highly organized scissors. Color-coded drawers add energy without overwhelming the room.
Natural light is ideal for color matching, sewing, drawing, and photography, but I also use focused task lighting at each major work area. One lamp illuminates the cutting surface, another sits near the sewing machine, and a softer overhead light keeps the entire room comfortable. The goal is not dramatic mood lighting. No one needs cinematic shadows while threading a needle.
The Main Worktable: Where Projects Actually Happen
The worktable is intentionally simple. The top stays mostly empty except for a cutting mat, a small tool caddy, and the project currently in progress. Keeping the main surface clear is one of the best ways to make a craft room feel usable. A beautiful room is nice, but a clear table is an invitation.
In the top drawer, dividers separate scissors, rulers, pencils, bone folders, craft knives, and replacement blades. Small supplies are stored in a single visible layer whenever possible. This prevents the classic craft-room problem of owning six identical tools because the first five disappeared beneath a pile of decorative paper. Drawer inserts, trays, and dividers are widely recommended for improving visibility and keeping essentials close to the workspace. table, shallow bins hold active projects. Each bin contains the materials, notes, and tools for one project, so I can pause without leaving the entire room in mid-explosion. When I am ready to continue, I pull out the bin and pick up where I stopped.
The Pegboard Wall: Useful Storage That Doubles as Decor
The pegboard is the visual star of the room. It holds scissors, rotary cutters, rulers, tape, brushes, small baskets, and a narrow shelf for frequently used paint. The layout is flexible, so hooks and containers can move whenever my hobbies change.
Vertical storage is especially helpful in a small craft room because it frees the desktop and keeps tools visible. Pegboards, wall rails, floating shelves, hooks, and over-the-door organizers all turn underused surfaces into functional storage. fill every inch of the pegboard. A little blank space keeps it from looking chaotic and leaves room for new tools. It is also wise to place the most-used items between waist and eye level, while lightweight or seasonal supplies can go higher.
Paper, Vinyl, and the Battle Against Bent Corners
Paper is stored upright by size and category in magazine files and vertical dividers. Cardstock is grouped by color family, patterned paper has its own section, and specialty sheets are protected in labeled folders. Smaller scraps are sorted by material and color in shallow drawers. The important rule is that scraps must be large enough to be genuinely useful. A one-inch triangle of silver paper is not a treasure; it is paperwork.
Vinyl rolls stand vertically in divided bins, while flat sheets stay in folders. Transfer tape, weeding tools, and machine mats live in the same zone. Storing related supplies together reduces unnecessary movement and makes it easier to see what needs replacing before a project begins. Cricut’s organization guidance similarly emphasizes labeled bins, tool caddies, and sorting scraps by material or color. ng Corner
The sewing station has a dedicated table, a comfortable chair, and enough clear surface on the left side of the machine to support fabric. Thread is displayed by color on a wall rack, while bobbins, needles, presser feet, clips, and measuring tools are stored in labeled drawers.
Fabric is folded to a consistent size and arranged vertically or stacked in short piles so each print remains visible. Bulky batting and interfacing are stored in larger labeled bins. Open shelving works well for attractive fabric, but closed storage is better for anything that creates visual noise or collects dust. Several craft-room guides recommend combining open display storage with drawers and cabinets so colorful supplies can inspire without making the room feel crowded. Carts for Flexible Craft Storage
A rolling cart follows the current project. During painting, it holds brushes, water cups, palettes, and paper towels. During paper crafting, it carries adhesives, stamps, and markers. When the project ends, the cart returns to its parking spot beside the cabinet.
This is one of the most useful ideas in the entire room because it adds storage without permanently crowding the worktable. Mobile carts are particularly practical in shared rooms or multipurpose spaces, and narrow versions can fit beside a desk or inside a closet. abinets: Because Not Everything Needs to Be Inspirational
Open shelves are wonderful until every container has a different label, shape, color, and personal philosophy. The lower cabinets hide backup supplies, shipping materials, unfinished kits, seasonal decorations, and messy items such as adhesives and paint refills.
Inside, clear bins are labeled by category: adhesives, stamping, jewelry making, painting, party supplies, and packaging. The labels are simple and broad enough to remain useful as the collection changes. Organizing by hobby makes it easier to return items to the correct place, while clear or consistently labeled containers improve visibility. ration Wall That Does Not Become Clutter
Above a small side desk, a corkboard holds color palettes, sketches, photographs, and current project ideas. I rotate the display every few months. Finished pieces are photographed or moved elsewhere so the board remains active rather than becoming a museum of everything I have ever liked.
A narrow picture ledge displays a few completed crafts and favorite books. Dedicated display space can make a craft room feel personal and motivating, but limiting the display prevents it from stealing storage or workspace. Repurposed frames, jars, trays, baskets, and vintage containers can also add character while organizing small supplies. up System
A craft room stays organized only when putting things away is easier than leaving them out. I keep a small trash can near the cutting table, a recycling bin for clean paper, and a donation box for useful supplies I no longer want. A handheld vacuum handles thread, paper confetti, and the glitter that has ignored all international border agreements.
At the end of a session, I follow a ten-minute reset: return tools, sort usable scraps, discard trash, place the active project in its bin, and clear the table. Labels face forward, carts return to their stations, and anything without a home goes into a temporary “decide later” basket. The basket is emptied weekly so it does not evolve into a permanent geological layer.
What I Would Change Next
No craft room is ever completely finished because creative interests change. My next improvement would be adjustable shelving in one cabinet, followed by better storage for oversized paper and cutting mats. I would also add a fold-down surface for messy work such as painting and resin projects.
The larger lesson is to build slowly. It is tempting to buy matching containers before understanding what the room needs, but effective organization begins with inventory, categories, and workflow. Use temporary boxes first, observe which supplies you reach for, and invest only after the system proves itself. A craft room should support creativity, not become an expensive exhibition of empty bins.
Extra Experience: What Living With an Organized Craft Room Has Taught Me
Convenience Matters More Than Perfection
The biggest change is not that the room looks better. It is that starting a project takes less effort. Before organizing the space, creative time often began with 20 minutes of searching. I would look for a ruler, discover an unfinished card, become distracted by ribbon, and somehow end up reorganizing buttons instead of making anything. Now the tools I use most are visible and close, so the distance between “I have an idea” and “I am working on it” is much shorter.
I also learned that a system can be attractive and still fail. At one point, I placed every marker into a beautiful container on a high shelf. The arrangement looked excellent in photographs and was mildly annoying every single day. I eventually moved the markers into a desktop caddy because useful storage should respect real behavior. When an item is used constantly, it deserves a convenient home, even when that home is not the most decorative option.
Project Bins Prevent Creative Pileups
Dedicated project bins have saved more space than almost any piece of furniture. I used to leave unfinished work on the table because I feared forgetting the idea or losing a small component. The result was a permanent layer of half-made objects. Now each project receives a bin with its materials and a note describing the next step. That tiny note is surprisingly valuable. Returning to a project after two weeks is much easier when I do not have to reconstruct the plot.
The bins also make it easier to switch activities. A sewing repair can pause while I make a birthday card, and neither project has to swallow the room. The system creates permission to stop without creating chaos.
Visible Supplies Inspire, but Too Many Create Noise
I love seeing color, especially rows of thread, paper, paint, and ribbon. Visible materials remind me what is available and often spark unexpected combinations. However, displaying everything made the room feel busy. The solution was selective visibility: Beautiful or frequently used supplies stay open, while duplicates, refills, and awkward packaging go behind doors.
This balance changed the emotional tone of the room. It still feels creative, but it no longer shouts 17 ideas at once. The wall shows possibilities; the cabinets hold inventory.
Cleanup Has to Be Part of the Creative Process
I once treated cleanup as a separate event scheduled for a mythical future version of myself who had unlimited energy. That person never arrived. The better approach was to make cleanup the final step of each project, just like signing a painting or trimming a loose thread.
The ten-minute reset is short enough that I actually do it. Some days the room is not perfect, but the main table is clear and the essential tools are back in place. That is enough to make tomorrow’s creative session welcoming.
The Room Should Be Allowed to Evolve
The craft room has changed as my interests have changed. A shelf once devoted to scrapbooking now stores fabric, and a drawer of rubber stamps has become a home for electronic cutting tools. Flexible furniture, movable dividers, pegboards, and rolling carts make these transitions easier.
The best craft room is not the one with the most storage or the prettiest labels. It is the room that reduces friction, protects time, and makes creativity feel available. Mine still has an unruly scrap drawer and at least one box labeled “miscellaneous,” but it works. That is the real tour: not a perfect room, but a practical space that helps ideas become finished things.
Conclusion
A successful craft room combines generous work surfaces, clear zones, flexible storage, good lighting, and a cleanup routine that fits everyday life. Use walls before crowding the floor, group supplies by activity, display only what inspires you, and hide the backups. Most importantly, design the room around the way you actually create. Your craft space does not need to resemble a showroom. It needs to help you sit down, find what you need, and make something worth keeping.
Research note: This article synthesizes practical craft-room and home-organization guidance from Better Homes & Gardens, HGTV, Martha Stewart, The Spruce, IKEA USA, The Container Store, Cricut, Apartment Therapy, Real Simple, House Beautiful, Good Housekeeping, Country Living, and My 100 Year Old Home.
Note: Adapt the first-person details, room dimensions, and supply categories to match the actual space before publication.