Note: This article is synthesized from real astrophotography editing practices commonly taught by astronomy educators, camera brands, image-processing software documentation, and experienced night-sky photographers, including guidance on stacking, calibration frames, noise reduction, color calibration, and non-destructive post-processing.
Astrophotography editing is where your sleepy-looking night-sky photos finally wake up, stretch, drink coffee, and reveal what they were hiding all along. A raw image of the Milky Way, Orion Nebula, or Andromeda Galaxy often looks flat, gray, noisy, and slightly disappointing at first. That does not mean you failed. It means the camera captured faint light from space, and now your job is to politely convince that light to step forward.
Learning the basics of astrophotography editing is not about turning the universe into neon soup. Good editing helps you separate signal from noise, recover detail, balance color, control stars, and create a final image that feels both beautiful and believable. Whether you use Lightroom, Photoshop, Siril, DeepSkyStacker, PixInsight, Affinity Photo, or another editing tool, the core principles are surprisingly similar.
This beginner-friendly guide walks through the essential workflow: organizing your files, stacking exposures, using calibration frames, stretching the image, reducing noise, correcting color, sharpening details, and finishing the photo without making the stars look like they were drawn with a glitter pen. Let’s open the digital observatory.
What Is Astrophotography Editing?
Astrophotography editing, also called astrophotography post-processing, is the process of turning captured night-sky data into a polished image. Regular photo editing often focuses on exposure, contrast, color, and cropping. Astrophotography editing does all of that, but it also deals with special problems: sensor noise, light pollution, star movement, gradients, vignetting, hot pixels, and extremely faint subjects.
A deep-sky image may require dozens or hundreds of exposures. These exposures are aligned and combined through stacking, which improves the signal-to-noise ratio. In plain English, stacking helps keep the useful light from your target while reducing random noise. It is the digital version of asking the universe to repeat itself until the message becomes clearer.
There are two common editing paths. The first is landscape astrophotography editing, often used for Milky Way scenes with mountains, deserts, lakes, or lonely trees pretending to be dramatic. The second is deep-sky astrophotography editing, used for galaxies, nebulae, star clusters, and other celestial objects captured with longer focal lengths or telescopes. The tools may differ, but both require patience, subtlety, and a healthy fear of over-saturation.
Start With The Right Files
Great editing begins before you touch a slider. If the files are weak, the edit becomes a rescue mission. If the files are strong, editing feels less like wrestling a raccoon in the dark.
Use RAW Files Whenever Possible
RAW files contain far more image data than JPEGs. They preserve shadow detail, color information, and exposure flexibility. Since astrophotography involves faint light and heavy adjustments, RAW gives you room to edit without destroying quality. JPEGs can work for casual practice, but they are already compressed and processed by the camera, which limits your control.
Keep Your Light Frames Organized
Light frames are your actual photos of the night sky. These are the images that contain the stars, nebula, galaxy, or Milky Way. Put them in a clearly named folder, such as “Orion_Nebula_Lights” or “Milky_Way_Desert_Lights.” Future you will be grateful. Future you is already tired.
Understand Calibration Frames
Calibration frames help remove defects and unwanted patterns from your images. They are especially important in deep-sky astrophotography. The main types are:
- Dark frames: Taken with the lens cap on, using the same exposure length, ISO or gain, and temperature as your light frames. They help reduce thermal noise and hot pixels.
- Flat frames: Taken with an evenly illuminated field. They help correct vignetting, dust spots, and uneven brightness.
- Bias frames: Very short dark exposures that record the camera sensor’s readout noise.
- Dark flat frames: Dark frames matched to the exposure length of your flat frames, often used with some camera workflows.
You do not need to master every calibration method on day one. However, learning what these files do will make your stacking results cleaner and your editing life much calmer.
Step 1: Import And Inspect Your Images
Before stacking or editing, review your images carefully. Look for obvious problems: blurred stars, clouds, airplane trails, accidental flashlight blasts, or frames where your tripod apparently decided to explore modern dance.
Reject the worst frames. You do not need to delete them forever, but you should exclude them from your stack. A few bad frames can soften stars, add artifacts, or reduce the quality of the final image. Sharpness matters. Consistency matters. Your stack is only as good as the data you feed it.
Step 2: Stack Your Photos
Stacking is one of the most important basics of astrophotography editing. The idea is simple: combine multiple exposures so the real signal becomes stronger while random noise becomes less noticeable.
Popular stacking tools include DeepSkyStacker, Siril, Sequator, PixInsight, Astro Pixel Processor, and Affinity Photo’s astrophotography stack feature. For beginners, DeepSkyStacker and Siril are popular because they are powerful and accessible. PixInsight is extremely capable but has a learning curve steep enough to require emotional snacks.
What Happens During Stacking?
Stacking software usually performs several tasks. It detects stars, aligns the images, applies calibration frames, rejects outlier pixels, and combines the exposures into a master image. The final stacked image may look boring at first. That is normal. A stacked astrophotography file often appears dark, flat, and unimpressive because much of the data is still hidden in the shadows.
Do not panic. The magic comes during stretching.
Step 3: Stretch The Image Carefully
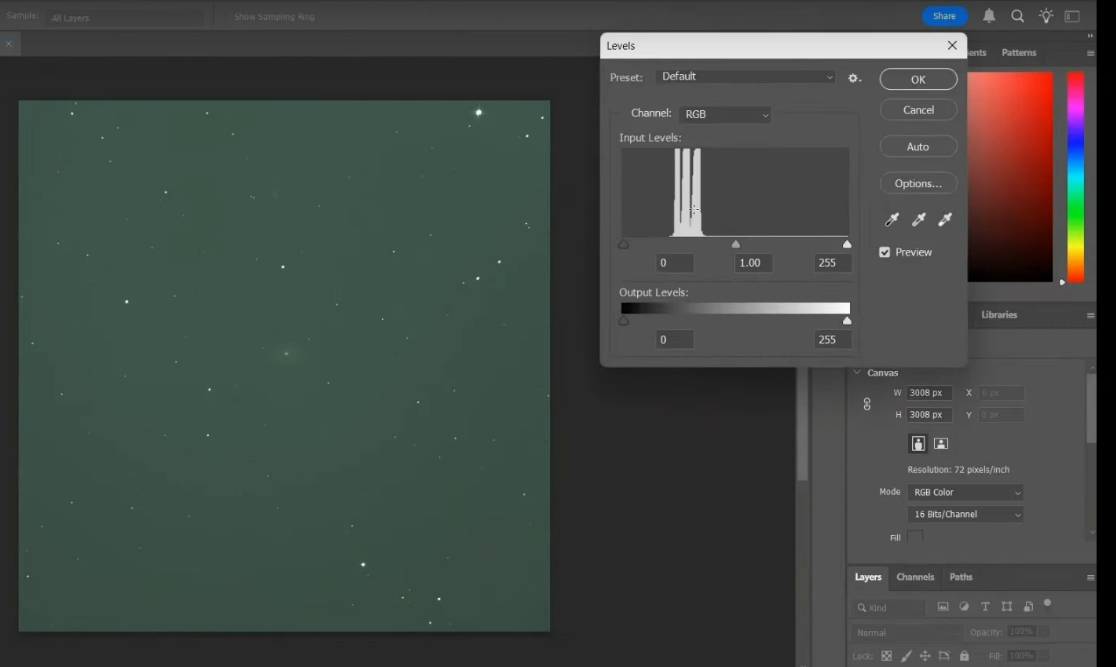
Stretching means brightening faint details without blowing out the highlights. In astrophotography, most of the interesting signal is buried in the darker tones. A stretch expands that hidden data so nebula structure, galaxy arms, or Milky Way dust lanes become visible.
This can be done with curves, levels, histogram transformation, generalized hyperbolic stretch, or other tools depending on your software. The key is to stretch gradually. If you push too hard, stars become bloated, backgrounds turn crunchy, and the image starts looking like a cosmic fruit roll-up.
A Simple Stretching Approach
- Open the stacked image in your editing software.
- Adjust the black point gently, but do not clip shadow detail.
- Use curves or levels to brighten faint midtones.
- Repeat small adjustments instead of making one extreme move.
- Watch the stars, background, and target detail at the same time.
The best stretch reveals detail while keeping the image natural. The background sky should usually remain dark, but not crushed into pure black. Space is not a black wall; it has subtle tone, dust, glow, and texture.
Step 4: Remove Gradients And Light Pollution
Light pollution, moonlight, city glow, and uneven optics can create gradients across the frame. A gradient might look like one side of the image is brighter, warmer, greener, or generally having a bad attitude.
Many astrophotography programs include background extraction or gradient removal tools. Siril has background extraction, PixInsight has DynamicBackgroundExtraction and AutomaticBackgroundExtractor, and Photoshop users often rely on careful curves, masks, plugins, or manual correction techniques.
When removing gradients, avoid sampling directly on nebulae, galaxies, or bright star clouds. The software needs to understand the background, not accidentally remove your target. Imagine cleaning a window and accidentally wiping away the view.
Step 5: Balance Color Without Going Full Candy Store
Color is one of the most exciting parts of astrophotography editing, but it is also where beginners often go slightly feral. Nebulae can contain red hydrogen-alpha regions, blue reflection areas, golden dust, and teal oxygen emissions. Stars also have natural colors, from cooler reddish stars to hotter blue-white ones.
Good color editing starts with white balance or color calibration. Some tools use photometric color calibration, matching star colors against catalog data. Others rely on manual white balance, curves, HSL sliders, or neutral background correction.
Beginner Color Tips
- Keep the background neutral, not strongly green, red, or purple.
- Increase saturation gradually.
- Protect star color by avoiding aggressive highlight clipping.
- Compare your image with trusted reference photos, but do not copy them blindly.
- Remember that artistic interpretation is fine, but radioactive-looking stars may raise eyebrows.
For Milky Way photo editing, color balance often means cooling the sky slightly, warming the foreground carefully, and increasing contrast in the galactic core. For deep-sky images, color calibration is usually more technical because the subject itself may emit light in specific wavelengths.
Step 6: Reduce Noise Without Erasing The Universe
Noise reduction is essential in astrophotography editing because night images are often captured at high ISO, long exposure times, or high gain. Noise can appear as grain, color speckles, blotchy patches, or rough background texture.
The trick is to reduce noise without smearing real detail. Heavy-handed noise reduction can make nebulae look like plastic fog and stars look like they were printed on wet paper. Apply noise reduction selectively, especially to the background. Protect stars and fine structures when possible.
Common Noise Reduction Methods
- Luminance noise reduction: Smooths grain in brightness values.
- Color noise reduction: Removes red, green, or blue speckles.
- Mask-based noise reduction: Targets background areas while protecting stars and detail.
- Stacking more exposures: Reduces noise naturally by improving the signal-to-noise ratio.
If you are editing in Lightroom, use the noise reduction panel carefully and zoom in to check the results. In Photoshop, use layers and masks for better control. In PixInsight or Siril, noise reduction can be applied at specific stages of the workflow, often before or after stretching depending on the tool and technique.
Step 7: Sharpen Details Selectively
Sharpening can enhance detail in nebula structures, lunar craters, galaxy dust lanes, and Milky Way texture. But sharpening everything is a classic beginner trap. If you sharpen the background noise, congratulations: you have created high-definition chaos.
Use sharpening selectively. Apply it to the subject, not the empty sky. Protect stars from becoming harsh white dots. For lunar and planetary images, sharpening is often more aggressive because the target is bright and detailed. For deep-sky images, subtlety wins.
What To Sharpen
- Nebula edges and dust structures
- Galaxy arms and core detail
- Milky Way dust lanes
- Moon craters and surface texture
- Planetary cloud bands, when working with video stacks
What should you avoid sharpening? Background noise, color blotches, halos, and every single star in the frame. Stars are already bright. They do not need a motivational speech.
Step 8: Control Stars
Stars are beautiful, but they can dominate an astrophotography image. If stars become too large or too bright, they distract from the nebula, galaxy, or Milky Way structure. Star control is the art of keeping stars attractive without letting them take over the room like guests who found the karaoke machine.
Modern workflows often separate stars from the background using star removal tools. This allows you to edit the nebula or galaxy separately, then bring the stars back later. Beginners do not have to use advanced star separation immediately, but it is helpful to understand the concept.
Simple Star Control Tips
- Avoid over-stretching highlights.
- Use masks when increasing contrast or saturation.
- Reduce star size gently if your software supports it.
- Preserve star color by avoiding pure white clipping.
- Watch for halos around bright stars.
Good star control makes the whole image feel more balanced. The viewer should notice the subject first, then enjoy the star field as supporting cast.
Step 9: Crop, Rotate, And Compose
After stacking and stretching, edges may show artifacts from alignment. Cropping removes these rough borders and improves composition. Rotate the image if the framing feels awkward. There is no rule saying north must always be up for artistic astrophotography, although scientific images may follow stricter conventions.
Use cropping to strengthen the story of the image. Place the Milky Way core where the eye naturally travels. Give a galaxy enough breathing room. Do not cut off a nebula’s faint outer regions unless the crop truly improves the image. Space is big; your crop should not feel like it is panicking.
Step 10: Make Final Adjustments
The final stage is where you polish the image. Adjust contrast, saturation, clarity, local brightness, and background tone. Check the histogram. Zoom in and out. Step away for a few minutes, then look again. Fresh eyes catch mistakes that tired eyes proudly ignore.
Final Editing Checklist
- Are the shadows dark but not crushed?
- Are the highlights controlled?
- Does the background look neutral and smooth?
- Are stars sharp but not bloated?
- Does the color feel intentional?
- Is the subject clear at both full size and small preview size?
- Would you still like the image tomorrow morning?
Export your final image as a high-quality JPEG for web use and keep a TIFF or project file for future editing. Astrophotography editing skills improve quickly, and you may want to revisit old data later. Many photographers discover that their first “finished” image was actually version one of twelve.
Recommended Beginner Workflow
If you feel overwhelmed, use this simple beginner astrophotography editing workflow:
- Shoot RAW files.
- Collect multiple light frames.
- Capture calibration frames if possible.
- Stack the images in DeepSkyStacker, Siril, Sequator, PixInsight, or similar software.
- Crop rough edges.
- Remove gradients.
- Color calibrate or set white balance.
- Stretch the histogram gradually.
- Reduce noise carefully.
- Enhance contrast and detail selectively.
- Control stars.
- Export for web or print.
This workflow is not the only way, but it gives beginners a reliable path. Once you understand the basics, you can experiment with advanced tools, star masks, narrowband palettes, deconvolution, drizzle integration, local contrast enhancement, and other techniques with names that sound like secret spells from a wizard academy.
Common Astrophotography Editing Mistakes
Over-Stretching The Image
Stretching too much can create noisy backgrounds, giant stars, clipped highlights, and strange color patches. Use small adjustments and check the histogram often.
Crushing The Blacks
Many beginners make the sky pure black to hide noise. This removes faint dust, nebulosity, and natural background tone. A slightly lifted background often looks more realistic.
Too Much Saturation
Color is fun, but too much saturation can make stars and nebulae look artificial. Increase color slowly and compare before-and-after versions.
Ignoring The Background
A messy background can ruin an otherwise strong image. Look for gradients, blotches, color casts, and banding. Smooth does not mean fake; it means controlled.
Editing Only While Zoomed In
Pixel-level inspection is useful, but viewers usually see the whole image first. Zoom out often. A technically perfect corner does not save a confusing composition.
Best Software For Learning Astrophotography Editing
You do not need every program on Earth to begin. Start with one stacking tool and one finishing editor.
Lightroom
Lightroom is excellent for Milky Way photos, single-frame nightscapes, and final global adjustments. It is beginner-friendly and great for exposure, white balance, contrast, noise reduction, and lens corrections.
Photoshop
Photoshop offers layers, masks, curves, selective color, blending, and advanced cleanup. It is especially useful for combining sky and foreground edits or making precise local adjustments.
Siril
Siril is a strong free option for stacking, calibration, background extraction, color calibration, and stretching. It is popular among beginners who want real astrophotography processing tools without buying advanced software immediately.
DeepSkyStacker
DeepSkyStacker is often used to register, calibrate, and stack deep-sky images. It is not a full creative editor, so many photographers stack in DeepSkyStacker and finish the image in Photoshop, Lightroom, or another program.
PixInsight
PixInsight is a professional-level astrophotography processing environment. It is powerful, precise, and widely respected, but beginners should expect a serious learning curve. Start slowly and learn one tool at a time.
Experiences From Learning The Basics Of Astrophotography Editing
The first real lesson of astrophotography editing is humility. You can spend three hours under a beautiful sky, come home with a memory card full of stars, open the files, and wonder if your camera accidentally photographed a dusty sock. This is normal. Raw astro data rarely looks dramatic at first. The beginner’s mistake is assuming the image is bad. Often, the data is there; it is simply quiet.
One of the most useful experiences is learning to slow down. In regular photo editing, you may move a slider and instantly know whether the result looks better. In astrophotography editing, one adjustment affects everything else. A stronger stretch reveals more nebula, but it also reveals more noise. More saturation brings out color, but it can also make the background look strange. Sharpening adds detail, but it may also sharpen grain. Every edit is a trade-off, so the best mindset is not “How far can I push this?” but “What does this image actually need?”
Another big lesson is that stacking is not optional magic; it is practical math. When you stack several exposures, the image becomes cleaner and more flexible. The first time you compare a single high-ISO Milky Way frame with a stacked version, it feels like someone cleaned a window you did not realize was dirty. The same applies to deep-sky images. More clean data usually gives you more editing freedom. A weak stack forces you to over-process. A strong stack lets you edit gently.
Calibration frames also teach patience. At first, darks, flats, and bias frames sound like homework assigned by a telescope with authority issues. But once you see flat frames remove dust spots and vignetting, they become less annoying. They are not glamorous. Nobody frames a dark frame and hangs it over the couch. Still, they help the final image look cleaner and more professional.
The most surprising experience is how often beginners over-edit because they are excited. That excitement is good; keep it. But make duplicate versions. Try the dramatic edit, then make a softer one. Sleep on it. The next day, the neon-purple sky that looked “epic” at 1:00 a.m. may look like a galaxy spilled grape soda. A balanced edit usually ages better than an extreme one.
It also helps to practice on public astrophotography data. Many educators and astrophotographers share raw data sets for learning. Editing someone else’s clean data removes the pressure of wondering whether your capture settings were wrong. You can focus only on processing: stretching, color, contrast, star control, and noise reduction. Then, when you return to your own images, you will understand what better data looks like and how to treat it.
Finally, learning astrophotography editing teaches you to respect subtle detail. The goal is not always the brightest image. Sometimes the best version is the one where the faint dust appears gently, the stars keep their color, the background stays calm, and the subject feels natural. Good editing does not scream, “Look what I did!” It whispers, “Look what was already there.” That is the heart of astrophotography post-processing: revealing the sky without bullying it.
Conclusion
Learning the basics of astrophotography editing is a journey through stacking, calibration, stretching, color correction, noise reduction, sharpening, and final polish. At first, the workflow may feel technical, but each step has a clear purpose. Stacking improves image quality. Calibration frames remove unwanted defects. Stretching reveals faint details. Color correction creates balance. Noise reduction and sharpening refine the final result.
The best beginner advice is simple: work slowly, edit non-destructively, compare versions, and do not chase perfection in one night. The universe has been around for a while. It can wait while you learn curves.
With practice, astrophotography editing becomes less mysterious and more rewarding. Your first edits may be noisy, too dark, too bright, or suspiciously purple. That is part of the process. Every image teaches you something. Every mistake improves your eye. And every finished photo is proof that a little camera, a little patience, and a lot of careful editing can pull ancient light out of the dark.