Trying to read a Microsoft Word document at the wrong zoom level is like trying to read the fine print on a shampoo bottle in a dim hotel bathroom: technically possible, but nobody is having a good time. Whether your document looks microscopic, giant, awkwardly wide, or mysteriously stuck in a two-page view, Word gives you several quick ways to zoom in, zoom out, and return your page to a comfortable reading size.
The good news is that zooming in Word does not require advanced computer skills, a secret Microsoft certification, or a dramatic sigh at your monitor. You can change the view using the zoom slider, the View tab, keyboard shortcuts, or built-in display options such as One Page, Multiple Pages, and Page Width. Even better, zooming only changes how the document appears on your screen. It does not change your font size, margins, page layout, or printed document.
In this guide, you will learn how to zoom in or out of a Microsoft Word document in three simple steps, plus practical tips for Windows, Mac, Microsoft 365, Word desktop versions, and common troubleshooting situations.
What Does Zoom Mean in Microsoft Word?
In Microsoft Word, zoom controls the magnification of your document on the screen. When you zoom in, the text and page appear larger, making details easier to read or edit. When you zoom out, the page appears smaller, allowing you to see more of the document at once. This is especially useful when reviewing formatting, checking page breaks, comparing headings, or scanning a long report.
Here is the key point: zoom is not the same as font size. If your document is set in 12-point Times New Roman, zooming to 150% does not turn it into 18-point text. It simply makes the 12-point text look larger while you work. When you print or export the document, the actual formatting remains unchanged. Think of zoom as putting on reading glasses, not rewriting the document.
How to Zoom In or Out of a Microsoft Word Document: 3 Steps
Step 1: Open Your Word Document and Find the Zoom Controls
First, open the Microsoft Word document you want to view. Look at the bottom-right corner of the Word window. In most desktop versions of Word, you will see a zoom slider on the status bar. The slider usually includes a minus sign, a plus sign, and a percentage number such as 100%.
The status bar is the narrow strip along the bottom of the Word window. It may also show information such as page number, word count, language, and view shortcuts. The zoom slider is usually on the far right. If you have ever wondered why that little bar was sitting there quietly, this is its moment to shine.
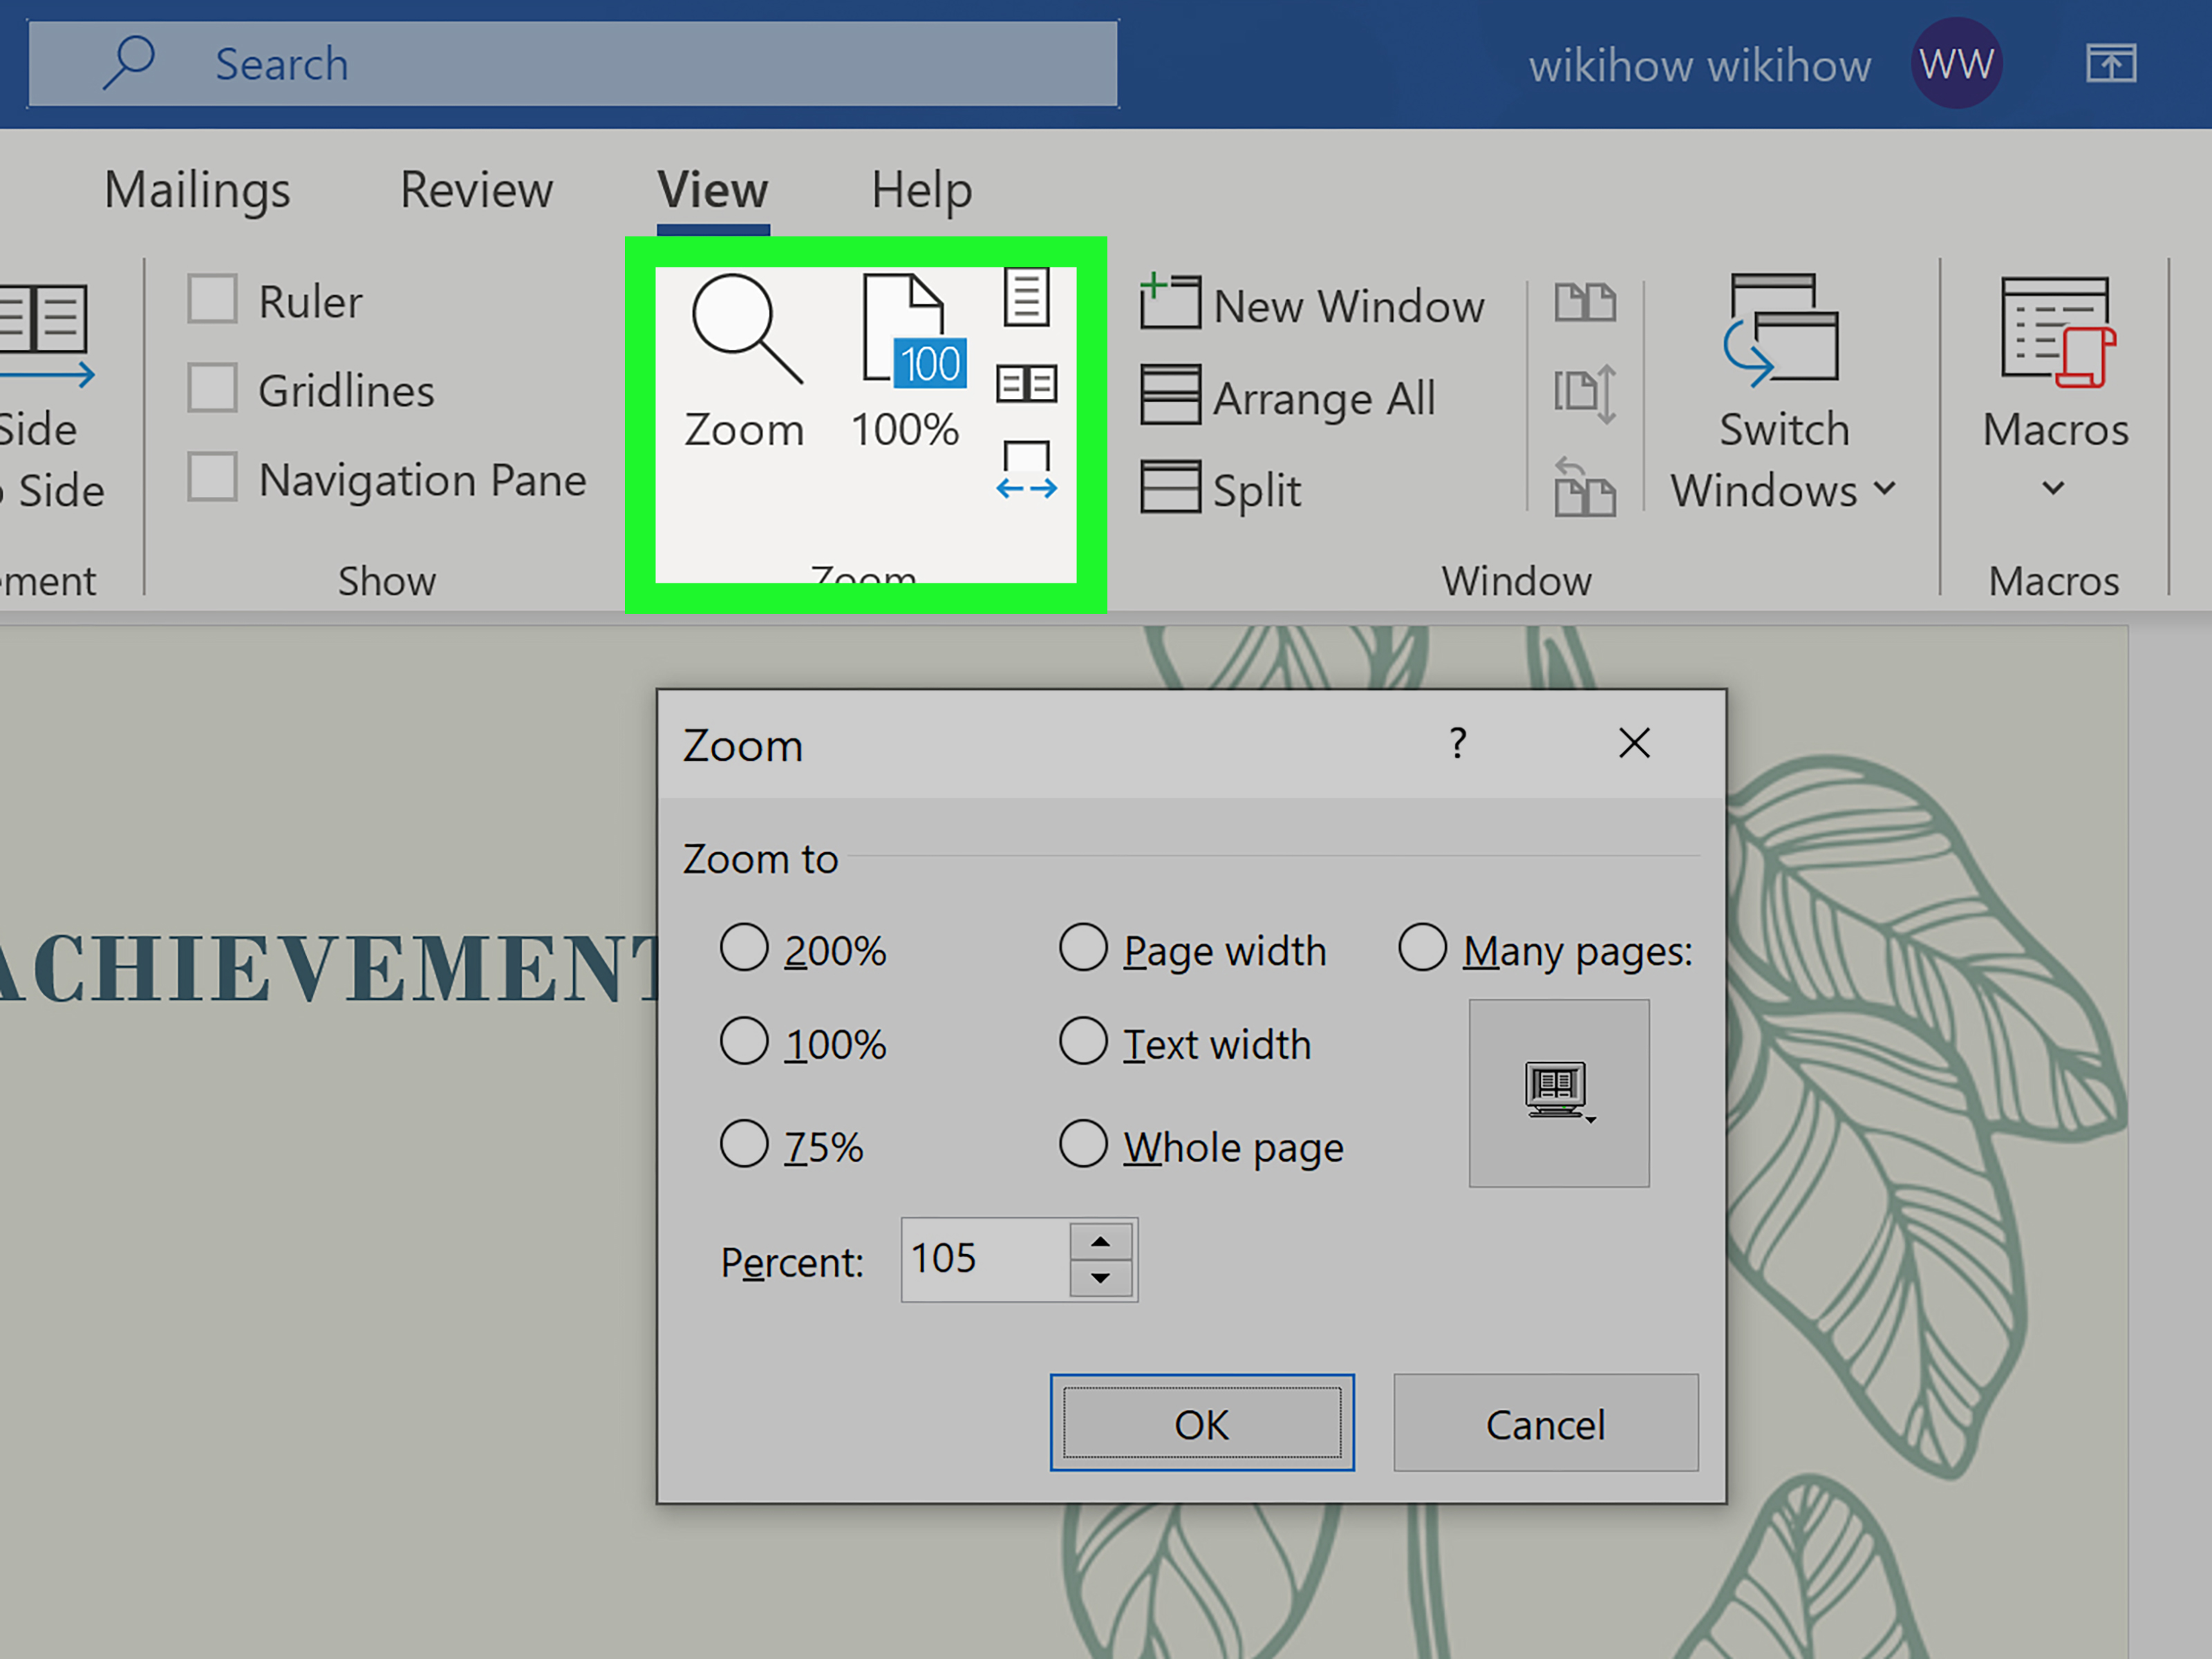
If you do not see the zoom slider, do not panic. You can still use the View tab. At the top of Word, select View, then look for the Zoom group. This area includes options such as Zoom, 100%, One Page, Multiple Pages, and Page Width, depending on your version of Word.
Step 2: Drag the Slider or Choose a Zoom Option
To zoom in, move the zoom slider to the right or click the plus sign. To zoom out, move the slider to the left or click the minus sign. As you adjust it, Word changes the magnification percentage and updates the document view immediately.
If you want more precise control, go to View > Zoom. A Zoom dialog box will open, allowing you to choose a preset percentage or enter your own custom zoom level. This is helpful when you want a specific view, such as 125% for editing or 75% for reviewing page layout.
You can also select one of Word’s built-in page view options:
- 100%: Returns the document to a standard viewing size.
- One Page: Shows one full page on the screen.
- Multiple Pages: Displays more than one page at a time, useful for checking layout.
- Page Width: Fits the page width to the Word window, making text easier to read.
For most everyday writing and editing, Page Width is one of the most comfortable choices. It fills the available workspace without making you scroll sideways like you are exploring a spreadsheet with commitment issues.
Step 3: Use Shortcuts for Faster Zooming
If you work in Word often, keyboard shortcuts can save time. On many Windows versions of Word, you can use Ctrl + Plus to zoom in, Ctrl + Minus to zoom out, and Ctrl + 0 to return to 100% zoom. You can also hold Ctrl and scroll your mouse wheel to zoom in or out quickly.
On Mac, similar zoom behavior may use the Command key instead of Ctrl, depending on your version of Word and system settings. If a shortcut does not work as expected, use the zoom slider or the View tab instead. Word versions, keyboard layouts, and operating system shortcuts sometimes overlap, which is a polite way of saying your keyboard may occasionally have its own opinions.
For keyboard-based ribbon navigation in Word for Windows, you can also press Alt + W to open the View tab. From there, you can access zoom settings without using the mouse. This is useful for accessibility, speed, or those moments when your mouse decides to disappear under a pile of papers.
Best Zoom Settings for Different Tasks
Use 100% for Normal Editing
The 100% zoom setting is a safe default for most writing tasks. It gives you a balanced view of the page and is especially useful when you want a realistic sense of how text, headings, and spacing appear. If your document suddenly looks too large or too small, returning to 100% is often the quickest fix.
Use Page Width for Comfortable Writing
Page Width is excellent when you are drafting, revising, or proofreading. It expands the page to fit the width of your Word window, making the text larger and easier to read without changing the document itself. Many writers prefer Page Width because it reduces eye strain and keeps the focus on the words instead of the surrounding gray workspace.
Use Multiple Pages for Layout Review
Multiple Pages is helpful when you want to see how pages flow together. For example, if you are designing a brochure, formatting a report, checking section breaks, or reviewing page numbers, seeing two or more pages at once can reveal layout issues quickly. It is not always ideal for writing because the text may become smaller, but it is great for visual inspection.
Use One Page Before Printing
One Page gives you a full-page preview inside the editing window. This can help you spot awkward spacing, lonely headings, oversized images, or a table that is trying to escape onto the next page. Before sending an important document, One Page view can act like a quick visual safety check.
How to Zoom with the Mouse Wheel
One of the fastest ways to zoom in or out of a Word document is to hold Ctrl and move the mouse wheel. Scroll upward to zoom in and downward to zoom out. This method is quick, natural, and especially useful when you are editing a long document and need to jump between close-up text editing and broad layout review.
However, be careful when using the mouse wheel. If you accidentally hold Ctrl while scrolling, you may suddenly zoom your document to a size that makes your paragraph look like a billboard. If that happens, do not worry. Click the zoom percentage on the status bar or press Ctrl + 0 to return to 100%.
How to Zoom from the View Tab
The View tab is the best place to find all major zoom tools in one location. To use it, open your Word document, select View from the ribbon, and look for the Zoom group. From there, choose Zoom to enter a custom percentage, 100% to reset the view, One Page to see an entire page, Multiple Pages to view several pages, or Page Width to fit the page across your screen.
This method is ideal for beginners because it clearly shows the available options. It is also useful when the zoom slider is hidden, too small, or difficult to use on a high-resolution display.
Why You Might Need to Zoom In or Out in Word
Zooming is not just a comfort feature. It can improve accuracy, productivity, and document quality. When you zoom in, you can catch small punctuation errors, inspect footnotes, review comments, and place your cursor more precisely. When you zoom out, you can evaluate the overall structure of the document, including headings, images, spacing, and page breaks.
For students, zooming out can help review essay structure. For office workers, zooming in can make dense contracts easier to read. For designers and marketers, Multiple Pages view can reveal whether a proposal, flyer, or newsletter flows properly. For anyone working late at night, Page Width can reduce the classic “why is this document fighting me?” feeling.
Common Zoom Problems and How to Fix Them
The Document Is Stuck in Side-to-Side View
If your Word document scrolls horizontally and the zoom controls seem unavailable, you may be using Side to Side page movement. In this mode, Word displays pages like a book and may limit normal zoom choices. To fix this, go to the View tab and choose Vertical page movement. Once Word returns to vertical scrolling, the usual zoom options should work again.
The Page Looks Too Small on a Large Monitor
Large monitors and high-resolution screens can make a Word page look smaller than expected. Try Page Width or a custom zoom percentage such as 120%, 130%, or 150%. The best setting depends on your screen size, viewing distance, and personal comfort. There is no trophy for squinting, so choose the zoom level that lets you work comfortably.
The Document Opens at the Wrong Zoom Level
Word may remember the view settings of a document, especially if the file was saved at a particular zoom level or opened on another computer. If a document opens at an awkward size, adjust the zoom to your preferred setting, save the document, close it, and reopen it. In many cases, Word will remember the last view.
The Zoom Slider Is Missing
If the zoom slider is not visible, right-click the status bar and check whether zoom options are enabled. You can also use the View tab instead. The ribbon method works even when the status bar is customized or your Word window is too narrow to show everything clearly.
Does Zoom Affect Printing?
No. Zooming in or out does not affect how the document prints. It only changes the on-screen view. If you want printed text to be larger, you need to change the font size, paragraph spacing, page size, or scaling options in the print settings. Zoom is for your eyes; formatting is for the document.
This distinction matters. Many beginners zoom in, see larger text, and assume the document itself has changed. It has not. If you email the file to someone else, they may see it at a different zoom level depending on their Word settings, but the actual document formatting remains the same.
Quick Example: Choosing the Right Zoom Level
Imagine you are editing a five-page resume and cover letter package. At 80% zoom, you can see the overall layout and check whether headings line up. At 125% zoom, you can comfortably proofread bullet points and fix punctuation. At Page Width, you can write naturally without feeling like the text is hiding in the distance. Before exporting to PDF, you might switch to One Page or Multiple Pages to check the final layout.
That is the real power of zoom in Word: it lets you change your perspective without changing the document. Like stepping closer to a painting and then stepping back, both views help you notice different things.
Practical Experience: What I’ve Learned from Using Word Zoom Every Day
After working with countless Microsoft Word documents, from simple one-page notes to sprawling reports that look like they have been training for a marathon, one thing becomes clear: the right zoom setting can change the entire writing experience. It sounds small, but it affects focus, speed, and even how confident you feel while editing.
For drafting, Page Width is often the most comfortable choice. It gives the text room to breathe and makes the page feel more like a clean writing space than a tiny sheet floating in a gray ocean. When writing long articles, reports, or instructions, I usually avoid staying zoomed out for too long because small text encourages skimming. Skimming is fine for a quick review, but it is not ideal when you are trying to catch missing commas, awkward phrasing, or that one sentence that somehow became 47 words long and still refuses to end gracefully.
For proofreading, I prefer zooming in slightly above 100%. A setting around 110% to 130% often makes errors easier to catch without making the document feel oversized. This is especially useful when checking punctuation, capitalization, hyperlinks, footnotes, and comments. The closer view slows the eye down in a good way. Instead of racing across the paragraph, you start noticing details.
For layout checks, zooming out is the better move. Multiple Pages view is great when reviewing documents with headings, tables, images, or page breaks. If a heading is stranded at the bottom of a page or an image pushes one lonely line onto the next page, you will notice it faster when you can see more than one page at a time. This is particularly helpful before exporting a document to PDF or sending it to a client, teacher, editor, or manager.
One common mistake is using zoom as a replacement for formatting. If the text looks too small, some users zoom in and think the document is fixed. It may be easier to read on their screen, but the actual font size has not changed. If the document is meant for printing, sharing, or publishing, always adjust real formatting settings instead of relying on zoom. Zoom is personal; formatting is permanent.
Another useful habit is resetting to 100% when something feels strange. If Word looks “wrong” and you cannot immediately explain why, check the zoom percentage first. Many layout mysteries begin with an accidental Ctrl-scroll. One moment you are reading normally; the next, your document looks like it was designed for ants or projected on a movie theater wall. Resetting the zoom often solves the problem in seconds.
The best experience comes from switching zoom levels intentionally. Use Page Width when writing, zoom in when editing details, zoom out when checking structure, and return to 100% when you need a neutral view. Once you get used to this rhythm, Word feels less like a stubborn software tool and more like a flexible workspace that adjusts to the way your eyes and brain actually work.
Conclusion
Learning how to zoom in or out of a Microsoft Word document is a simple skill, but it can make a big difference in how comfortably and accurately you work. The fastest method is the zoom slider on the status bar. The most complete method is the View tab, where you can choose 100%, One Page, Multiple Pages, Page Width, or a custom percentage. The quickest power-user method is a keyboard shortcut or Ctrl-scroll with your mouse wheel.
Remember, zoom changes only what you see on the screen. It does not change the font size, spacing, margins, or printed result. Use zoom to improve readability, review layout, and move between close-up editing and big-picture checking. Your eyes will thank you, your formatting will stay safe, and your document will stop looking like it is either hiding from you or yelling at you.
SEO Tags
Note: This guide focuses on Microsoft Word zoom controls for viewing and editing. Zoom settings may vary slightly by Word version, device, screen size, and operating system, but the core methods remain the same: status bar slider, View tab options, and keyboard or mouse shortcuts.