Straight lacing shoes is one of those tiny style upgrades that feels almost suspiciously powerful. You start with a pair of ordinary sneakers, Oxfords, Derbies, or boots, spend a few quiet minutes threading the laces into neat horizontal bars, and suddenly your shoes look like they have a personal assistant and a calendar full of important meetings.
Also called straight bar lacing, bar lacing, or parallel lacing, this method creates clean horizontal lines across the top of the shoe instead of the familiar X-shaped crisscross pattern. The result is sleeker, tidier, and especially popular on dress shoes because it keeps the upper looking polished. But straight lacing is not just about looking sharp enough to cut a sandwich. It can also reduce pressure across the top of the foot, make certain shoes feel less tight, and give wide or high-instep feet a little more breathing room.
In this guide, you will learn exactly how to straight lace shoes, which shoes work best, what to do with odd eyelets, how to avoid messy lace ends, and how to troubleshoot common problems. Grab your shoes, remove the old lacing pattern, and prepare to become the kind of person who notices shoe eyelets at parties. It happens.
What Is Straight Lacing?
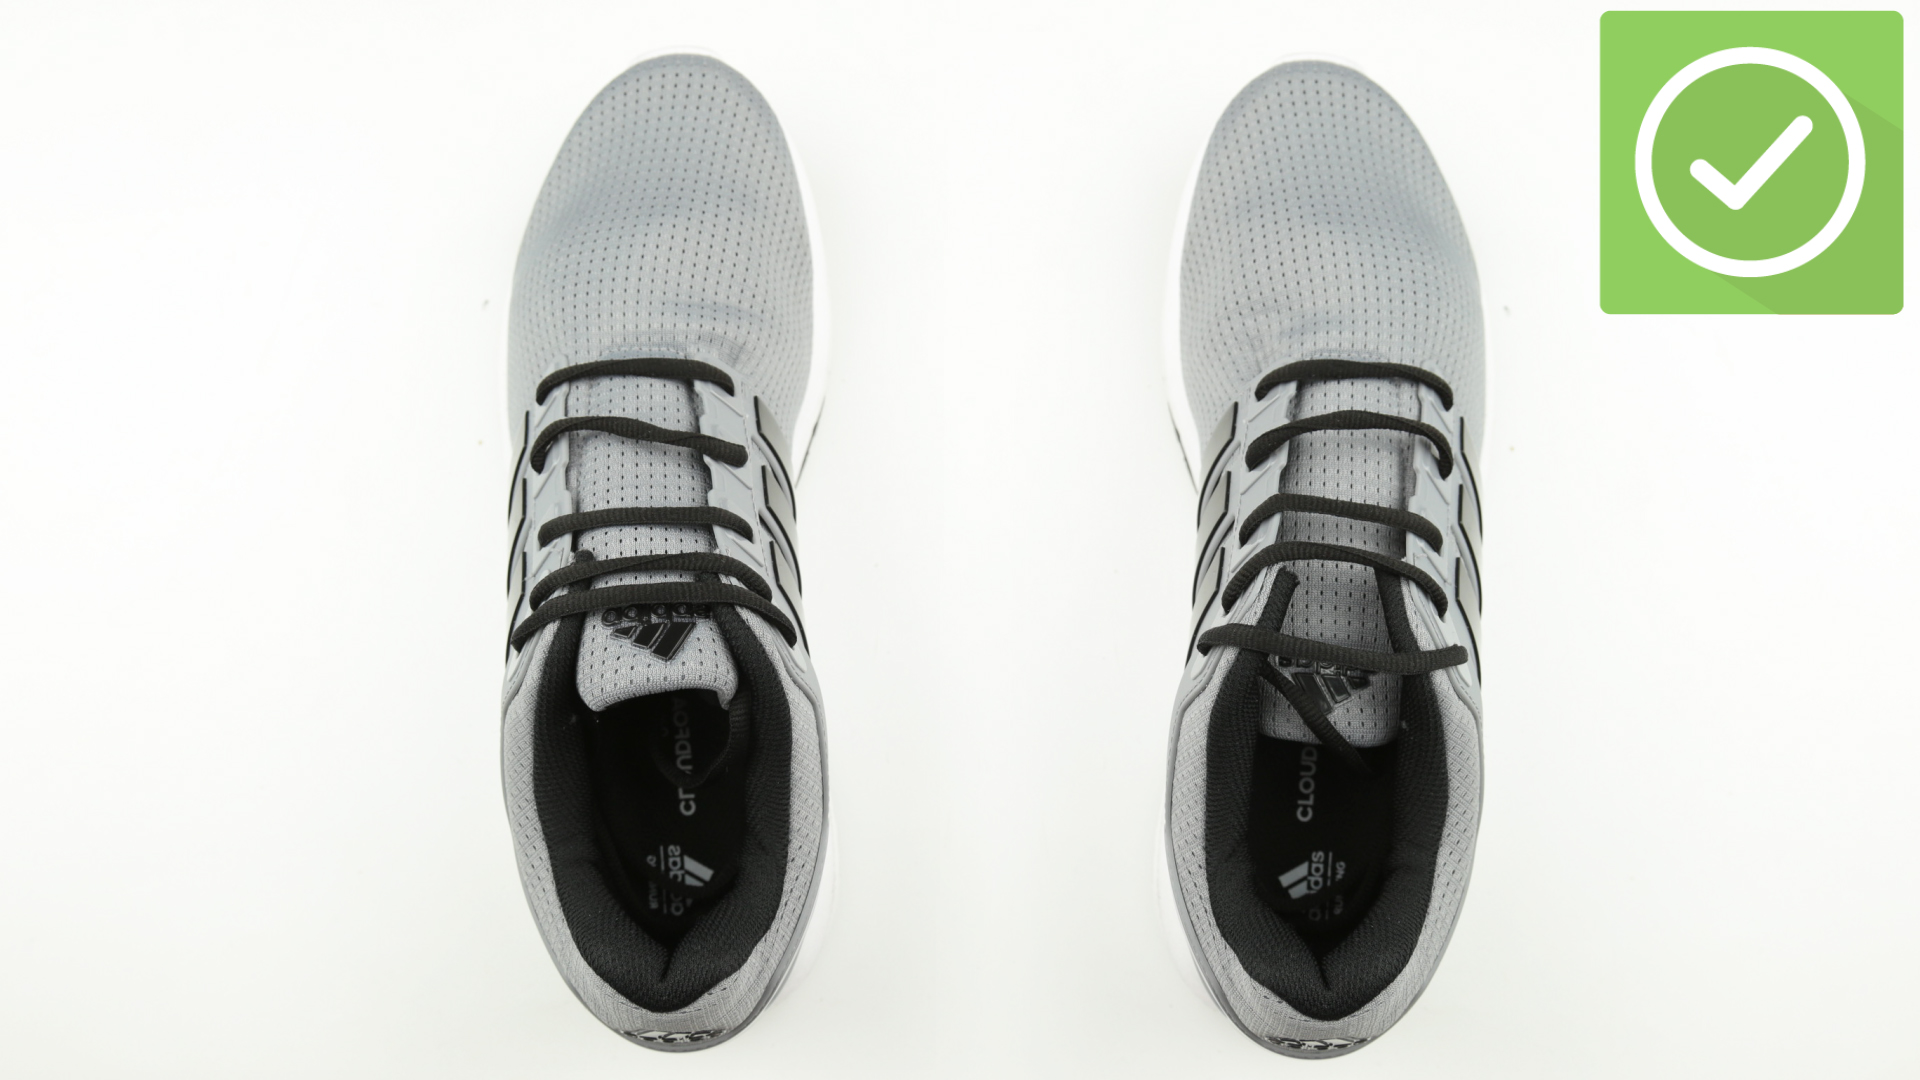
Straight lacing is a shoelace pattern where the visible sections of lace run horizontally across the shoe. Instead of crossing diagonally over the tongue, the lace travels mostly underneath the facing and pops out only to create each clean bar. From above, the shoe looks organized, minimal, and symmetrical.
The most common version is straight bar lacing. It works especially well on shoes with an even number of eyelet pairs, such as four, six, or eight pairs. If your shoes have five or seven pairs, do not panic. Your footwear is not cursed. You simply need a small adjustment, such as skipping one hidden eyelet, using a diagonal section near the top, or choosing a European straight-lacing variation.
Why Straight Lace Shoes?
There are several good reasons to learn how to lace shoes straight, and “because it looks cool” is only the opening act.
1. It Looks Clean and Dressy
Straight lacing gives shoes a refined, uncluttered appearance. On leather dress shoes, especially Oxfords, the horizontal bars complement the formal shape of the shoe. The result is neat without being flashy, like a well-ironed shirt that does not announce itself but quietly wins the room.
2. It Can Reduce Top-of-Foot Pressure
Traditional crisscross lacing creates diagonal pressure points across the tongue. For some people, especially those with a high instep or sensitive top of foot, this can feel tight or irritating. Straight bar lacing removes the visible crisscross sections and can distribute tension more evenly.
3. It Works for Style and Comfort
While straight lacing is popular for dress shoes, it can also work on casual sneakers and some everyday shoes. It is not always the best option for intense running or hiking, where lock-down support matters more, but for walking, office wear, school shoes, and smart-casual outfits, it is a strong choice.
4. It Makes Old Shoes Feel Fresh
You do not need to buy new shoes to upgrade your look. Sometimes the cheapest style improvement is already hanging from your eyelets. Re-lacing a pair of shoes can make them look newer, more intentional, and less like they were tied during a small emergency.
Before You Start: Check Your Shoes and Laces
Before learning the steps, take a quick look at your shoes. Straight lacing is simple, but it behaves better when the shoe and lace are a good match.
Count the Eyelet Pairs
Look at one shoe and count the pairs of holes across from each other. A shoe with six holes on each side has six eyelet pairs. Even-numbered eyelet pairs are easiest for classic straight bar lacing. Odd-numbered pairs require a small workaround, which we will cover later.
Choose the Right Lace Length
If your laces are too short, you may end up with tiny lace ends that are impossible to tie without making the face people make when opening a stuck jar. If they are too long, you will have floppy loops that swing around like decorative spaghetti. Use the original lace length as your baseline. For dress shoes, thinner round or waxed laces usually look best. For sneakers, flat laces can make the straight bars stand out nicely.
Make Sure the Shoes Fit Properly
Lacing can improve comfort, but it cannot magically fix shoes that are the wrong size. If your toes are crushed, your heel slips badly, or your foot slides forward with every step, straight lacing may help a little but will not solve the whole problem. Start with shoes that fit reasonably well, then use lacing to fine-tune the feel.
How to Straight Lace Shoes: Step-by-Step Guide
This classic method is best for shoes with an even number of eyelet pairs. For this example, imagine a shoe with six eyelet pairs.
Step 1: Remove the Old Lacing
Pull the laces out completely. This gives you a clean start and lets the tongue lie flat. Smooth the tongue with your hand so it sits centered under the eyelets.
Step 2: Start at the Bottom Eyelets
Point the toe of the shoe away from you. Insert both lace ends into the bottom eyelets from the outside going in. This creates the first straight bar across the bottom of the shoe. Pull the lace ends until they are even.
The visible part should now be a clean horizontal line. If it already looks crooked, fix it now. Straight lacing is like painting a wall: the first line decides whether the rest looks intentional or like a raccoon helped.
Step 3: Run One Lace Up the Inside
Take the lace end on the left side. Run it straight up on the inside of the shoe to the next available eyelet on the same side. Push it out through that eyelet from inside to outside.
Step 4: Cross Straight Across
Take that same lace end and pass it horizontally across the shoe into the opposite eyelet. Thread it from outside to inside. You have now created your second visible straight bar.
Step 5: Move the Other Lace Up Two Eyelets
Now take the lace end on the right side. Run it up underneath the facing, skipping the eyelet already used by the other lace. Bring it out through the next open eyelet on the same side. Then pass it straight across to the opposite eyelet, outside to inside.
Step 6: Repeat the Pattern
Continue alternating lace ends. Each lace travels vertically on the inside, comes out through an open eyelet, then crosses straight across the outside to form a horizontal bar. Keep the bars flat and untwisted as you go.
Step 7: Finish at the Top
When both lace ends reach the top, pull gently to adjust the tension. The bars should look parallel and evenly spaced. Tie the shoe as usual. For dress shoes, keep the bow small and centered. For sneakers, you can tie normally or tuck the bow if you prefer a cleaner streetwear look.
How to Straight Lace Shoes With Odd Eyelets
Odd eyelet pairs are the little puzzle box of straight lacing. The classic straight bar method naturally works best with even pairs because the lace ends finish neatly at the top. With odd pairs, one end may finish in the wrong place or create an uneven final bar. Fortunately, there are several easy fixes.
Option 1: Skip One Hidden Eyelet
The simplest solution is to skip one eyelet pair near the top or bottom. This works well if the skipped section is not obvious. For example, on a five-pair shoe, you can lace four clean bars and leave one pair unused near the tongue opening. This is best for casual shoes where perfect formality is not required.
Option 2: Use a Hidden Diagonal
Another method is to hide one diagonal lace section underneath the facing. From the outside, the shoe still looks mostly straight-laced, but one hidden diagonal solves the math problem. This is a good option for dress shoes because it keeps the visible pattern clean.
Option 3: Try European Straight Lacing
European straight lacing creates straight bars on the outside while allowing diagonal sections underneath. It is slightly easier to tighten than classic straight bar lacing and can work better for odd eyelet counts. If you want a clean look but also want easier adjustment, this variation is worth trying.
Straight Lacing for Different Types of Shoes
Dress Shoes
Straight lacing is a natural match for dress shoes. Oxfords, in particular, often look best with clean bar lacing because their closed-lacing construction is already formal. Derbies are more forgiving and can also look excellent with straight bars. Use thin round waxed laces in black, brown, burgundy, or another color that matches the shoe.
Sneakers
For sneakers, straight lacing creates a crisp, street-ready look. Flat laces usually work best because they make the bars appear wider and more graphic. White laces on white sneakers are classic, but contrasting laces can add personality. Just remember: bright neon laces are not “subtle.” They are tiny traffic signs on your feet.
Boots
Straight lacing can work on fashion boots, but it is not always ideal for hiking or work boots. Boots often need more secure tension, especially around the ankle. If you are walking long distances, carrying weight, or using boots outdoors, comfort and support should come before style. For casual boots, however, bar lacing can look sharp and modern.
Running Shoes
Straight lacing is not usually the first choice for performance running. Runners often need crisscross lacing, heel-lock lacing, or window lacing to control movement, reduce heel slip, or relieve pressure spots. That said, some people use straight bar lacing for casual wear or light walking when they want less pressure across the top of the foot.
Common Mistakes When Straight Lacing Shoes
Twisting the Laces
Twisted laces ruin the clean-bar effect. After every pass, flatten the lace with your fingers. This takes a few extra seconds, but the final result looks much better.
Pulling Too Tight
Straight lacing should feel secure, not like your shoe is trying to turn your foot into a panini. Tighten gradually from the bottom upward. If the top of your foot feels squeezed, loosen the bars slightly.
Ignoring Uneven Lace Ends
If one lace end is much longer than the other, go back and adjust early. Do not wait until the top and hope the laces will “work it out emotionally.” They will not.
Using the Wrong Laces
Thick athletic laces can look bulky on slim dress shoes. Thin dress laces may look weak on chunky sneakers. Match the lace style to the shoe. It is a tiny detail, but tiny details are where style likes to hide.
How Tight Should Straight Lacing Be?
A properly straight-laced shoe should feel evenly snug. The shoe should hold your foot in place without pinching the top of your foot or forcing the eyelet rows too close together. If the eyelet rows are almost touching, the shoe may be too wide or the laces may be too tight. If the rows are spread far apart and the tongue bulges, the shoe may be too narrow or your laces may be too short.
Walk around for a minute after lacing. Your heel should not slip dramatically, your toes should not press into the front, and the tongue should not slide sideways. If something feels off, adjust the tension row by row instead of yanking only at the top.
Best Tips for a Cleaner Straight Lace Look
Use Fresh Laces
Old, frayed laces can make even perfect straight lacing look tired. Replacing laces is inexpensive and can instantly improve the look of your shoes.
Match Lace Color to the Shoe
For formal shoes, matching laces usually look most polished. Black shoes with black laces, brown shoes with brown laces, and so on. For sneakers, contrast can be stylish, but keep the overall outfit in mind.
Center the Tongue
A crooked tongue can make straight lacing look uneven. Before tying, pull the tongue gently upward and center it between the eyelet rows.
Tuck the Ends for a Minimal Look
If you want a clean sneaker style, tie the bow behind the tongue or tuck the lace ends inside the shoe. Make sure it still feels comfortable. Looking cool is great; walking like there is a pebble convention under your arch is not.
When Not to Use Straight Lacing
Straight lacing is stylish and comfortable for many people, but it is not perfect for every situation. Avoid relying on it when you need maximum foot lockdown, such as during intense running, hiking on uneven terrain, or sports with quick side-to-side movement. In those cases, a crisscross pattern, runner’s loop, or sport-specific lacing method may provide better control.
You should also reconsider straight lacing if your shoes already feel loose. Because straight lacing can create a slightly more relaxed fit across the top, it may not solve heel slip or foot sliding. For that, heel-lock lacing is usually more useful.
Personal Experience: What Straight Lacing Actually Feels Like in Real Life
The first time I straight-laced a pair of shoes, I expected a small visual difference. Instead, the shoes looked surprisingly upgraded, as if they had quietly enrolled in finishing school. The pair was a simple set of brown leather dress shoes that I usually wore with dark jeans and a button-down shirt. With crisscross lacing, they looked fine. With straight bar lacing, they looked deliberate. Not expensive, exactly, but more cared for. And in style, “cared for” often does half the job before your wallet even enters the conversation.
The biggest lesson was patience. Straight lacing is not difficult, but it rewards slow hands. When I rushed, the bars twisted, the lace ends came out uneven, and one shoe looked slightly more confident than the other. When I slowed down and flattened every lace section before moving to the next eyelet, the result improved immediately. That tiny habit changed everything: thread, flatten, adjust, repeat. It is almost relaxing, like folding laundry if laundry actually made you look sharper afterward.
I also noticed that straight lacing felt different on different shoes. On dress shoes, it made the upper feel smoother and less cluttered. The tongue stayed flatter, and the shoe looked better under trousers. On casual sneakers, the effect was more playful. White leather sneakers with straight white laces looked clean and minimal, while black sneakers with contrasting laces looked more like a design choice. The same technique gave two completely different personalities.
Comfort-wise, straight lacing was helpful on shoes that felt slightly tight across the top. The lack of diagonal crisscross pressure made the fit feel more even. However, it did not fix every issue. On one pair of sneakers that was half a size too large, straight lacing made the shoe look great but did not stop my heel from slipping. That was a reminder that lacing is a tuning tool, not a miracle machine. If the shoe fit is wrong, your shoelaces can only negotiate so much before they call for backup.
Another useful discovery: lace quality matters. A pair of waxed dress laces made straight bars look crisp and elegant. Cheap, fuzzy laces looked messy no matter how carefully I threaded them. For sneakers, flat cotton laces created a bold, clean line, while thin round laces almost disappeared. Since replacement laces are usually inexpensive, upgrading them is one of the easiest ways to make straight lacing look intentional.
My favorite practical tip is to lace both shoes side by side instead of finishing one completely before starting the other. Do the bottom bar on both shoes, then the next bar on both shoes, and so on. This makes it easier to match the tension and spacing. It also prevents the classic problem where one shoe looks like it belongs at a wedding and the other looks like it just woke up from a nap.
After trying straight lacing on several pairs, I would recommend it most for dress shoes, minimalist sneakers, and casual shoes that already fit well. It is ideal when you want a cleaner look without buying anything new. It is also great before interviews, presentations, dates, photos, weddings, or any situation where people may not consciously notice your shoes but will notice that your outfit feels pulled together. Straight lacing is not loud. It is not dramatic. It simply whispers, “Yes, I know where my laundry detergent is.” Sometimes that is enough.
Conclusion
Learning how to straight lace shoes is a simple skill that delivers a surprisingly polished result. The technique creates clean horizontal bars, works beautifully on dress shoes and sneakers, and can make certain shoes feel more comfortable across the top of the foot. Start with the bottom eyelets, keep the first bar straight, run the laces vertically underneath, and form neat horizontal bars as you move upward.
For even eyelet pairs, classic straight bar lacing is the cleanest option. For odd eyelet pairs, use a hidden diagonal, skip an eyelet, or try European straight lacing. Most importantly, adjust the tension carefully and choose laces that match your shoes. Do that, and your footwear will look sharper without needing a dramatic shopping trip. Your shoes may not thank you out loud, but they will absolutely stand taller.