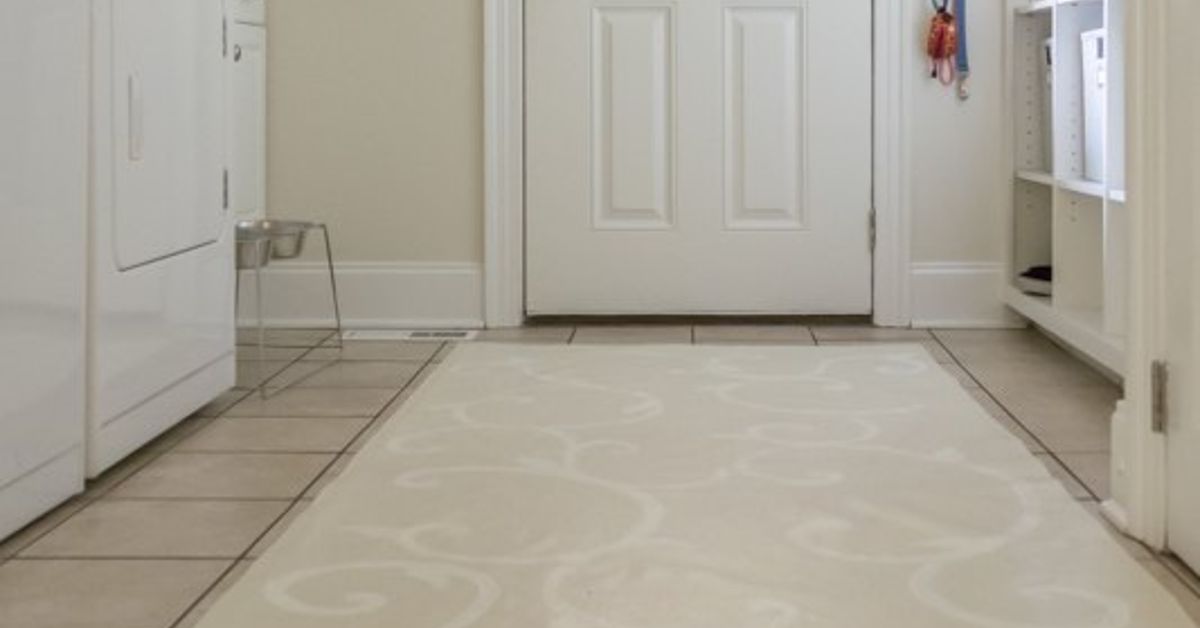
If your floor is begging for personality but your wallet is dramatically pretending not to hear, a DIY drop cloth floor cloth may be the budget-friendly makeover you need. A floor cloth is basically a painted canvas rug: flat, wipeable, customizable, and charmingly old-school. Long before every home store had an aisle full of machine-made rugs, painted canvas floor cloths were used to add color, pattern, and protection to rooms without the cost of woven carpets.
The best part? You do not need to be a professional artist, a flooring expert, or the kind of person who owns seventeen different specialty brushes. With a sturdy canvas drop cloth, primer, paint, a clear protective finish, and a little patience, you can create a custom floor covering that looks intentionally designed instead of “I panicked and bought the cheapest rug online at 1 a.m.”
This guide walks you through how to make a floor cloth from a drop cloth DIY style, including choosing the right canvas, prepping it properly, painting a design, sealing it for durability, and keeping it looking good once real life starts walking across it.
What Is a Drop Cloth Floor Cloth?
A drop cloth floor cloth is a handmade floor covering created from heavy canvas, usually the same type of cotton canvas painters use to protect floors and furniture. Instead of tossing the drop cloth over a sofa during a painting project, you cut it to size, prime it, paint it, seal it, and turn it into a decorative rug alternative.
Unlike a plush area rug, a floor cloth is thin and firm. It works especially well in places where you want color and pattern but do not want a thick rug collecting crumbs, pet hair, or mysterious tiny objects that nobody in the house will claim. Think kitchens, breakfast nooks, craft rooms, laundry rooms, covered porches, mudrooms, and casual dining areas.
Why Make a Floor Cloth From a Drop Cloth?
The appeal of a DIY canvas floor cloth is simple: control. You choose the size, color, pattern, border, finish, and mood. Want a checkerboard runner for a hallway? Easy. A faux vintage tile design for a kitchen? Absolutely. A modern striped mat in soft neutrals? Very classy. A wildly colorful geometric rug that makes your room look like it drinks espresso? Also allowed.
Drop cloths are also inexpensive compared with many area rugs, especially large ones. A heavy-duty canvas drop cloth gives you a lot of material for the price, and the finished piece can be trimmed to fit awkward spaces. That makes this project especially useful for renters, first apartments, seasonal decorating, kids’ play spaces, and anyone who loves custom decor but not custom-decor pricing.
Best Places to Use a DIY Drop Cloth Floor Cloth
A painted floor cloth works best in low- to medium-traffic areas. It can handle daily use if sealed well, but it is still a handmade surface, not a factory-produced vinyl mat or commercial-grade rug. Use it where it can shine without being punished like a doormat at a muddy boot convention.
Good locations include:
- Kitchen sink areas
- Breakfast nooks
- Craft rooms
- Laundry rooms
- Home offices
- Kids’ reading corners
- Covered patios or screened porches
- Entry areas with light use
Avoid using a painted canvas floor cloth in soaking-wet areas, uncovered outdoor spaces, or rooms where the floor is constantly exposed to heavy moisture. Canvas and water can have a complicated relationship, much like toddlers and white furniture.
Supplies You Need
Before you begin, gather your materials. Having everything ready makes the project smoother and prevents the classic DIY moment where you are covered in paint and suddenly realize the sealer is still at the store.
Basic materials:
- Heavy-duty canvas drop cloth
- Iron or steamer
- Scissors or rotary cutter
- Measuring tape
- Straightedge or yardstick
- Painter’s tape
- Latex primer
- Latex or acrylic paint
- Foam roller or paint roller
- Paintbrushes
- Stencil, sponge, or template if desired
- Clear water-based protective finish
- Fine-grit sandpaper
- Non-slip rug pad or double-sided carpet tape
For the drop cloth itself, choose heavy cotton canvas rather than thin plastic-backed material. A heavier canvas lies flatter, accepts paint better, and feels more substantial underfoot. Prewashed or preshrunk canvas is helpful because untreated cotton can shrink or wrinkle when exposed to moisture.
Step 1: Choose the Right Drop Cloth
Not all drop cloths are created equal. Some are thin, loosely woven, and better suited to catching paint splatters than becoming a floor covering. For a floor cloth, look for a heavy-duty cotton canvas drop cloth, ideally around 8 to 12 ounces in weight. The tighter the weave, the smoother the painted finish will look.
Inspect the drop cloth before you commit. Some canvas drop cloths have seams running through the middle. That is not automatically a problem, but it will affect your design. You can either embrace the seam as part of the look, place it strategically, or cut around it if your project is smaller.
If you want a crisp, polished result, choose the smoothest section of canvas. If you prefer a farmhouse, handmade, slightly imperfect style, small weave variations can actually add character. In other words, what perfectionists call “flaws,” decorators often call “texture.” Convenient, right?
Step 2: Wash, Dry, and Iron the Canvas
Prepping the canvas is one of the most important steps. Wash the drop cloth first to remove sizing, dust, and manufacturing residue. Use mild detergent, then dry it completely. Some canvas may shrink, which is exactly why you want that shrinkage to happen before you paint your masterpiece.
Once dry, iron the canvas as flat as possible. Wrinkles may seem harmless at first, but paint can lock them into place. A smooth canvas gives you cleaner lines, better paint coverage, and fewer “why is there a mountain range in my rug?” moments.
Step 3: Measure and Cut Your Floor Cloth
Decide where the floor cloth will go, then measure the space carefully. For a kitchen sink mat, a common size might be around 2 by 3 feet. For a runner, you might choose 2 by 6 feet. For a dining nook, measure around the table and chairs, leaving enough room for chairs to slide without catching the edges.
Mark your canvas using a pencil and straightedge. Cut slowly with sharp scissors or a rotary cutter. If you want finished edges, leave extra fabric so you can fold the edges under. A folded hem gives the floor cloth a cleaner look and adds a little weight to help it lie flat.
Step 4: Finish the Edges
You have several options for finishing the edges. The simplest method is to fold the edges under and glue them with fabric glue or heavy-duty adhesive. You can also sew a hem if you have a sewing machine that can handle canvas. Another option is to paint and seal the raw edges thoroughly, which works for a rustic look but may fray over time.
For most DIYers, folding the edge under by about one inch creates a nice balance of neatness and ease. Press the fold with an iron, secure it, and make sure the corners are flat. If the corners look bulky, trim a little excess fabric before folding.
Step 5: Prime the Canvas
Primer turns floppy canvas into a better painting surface. It fills some of the weave, helps paint adhere, and creates a more even base color. Lay the canvas flat on a protected surface. Use a roller to apply a thin, even coat of latex primer. Let it dry according to the product directions, then apply a second coat if the fabric still looks too absorbent.
Do not glob on primer like you are frosting a cake after a difficult week. Thin coats work better. Heavy coats can crack, dry unevenly, or make the canvas stiff in strange ways. The goal is flexible durability, not a crunchy floor cracker.
Step 6: Paint the Base Color
Once the primer is dry, paint your base color. This is the background shade that will show beneath your pattern. White, cream, gray, tan, navy, black, and sage green are popular choices because they work with many interior styles. But if your heart wants coral, mustard, or deep teal, let your floor have a personality.
Use latex or acrylic paint and apply it with a roller. Again, thin coats are your friend. Let each coat dry fully before adding another. Two coats usually give better coverage than one heavy coat. If the canvas texture still shows slightly, that is normal and often part of the floor cloth charm.
Step 7: Plan Your Design
This is where the fun begins. Before painting the final pattern, sketch your idea on paper. Simple designs usually look best on floor cloths because they are easier to paint cleanly and easier to live with. A bold stripe, border, checkerboard, diamond pattern, faux tile motif, or oversized stencil can look professional without requiring art-school-level hand control.
Beginner-friendly design ideas:
- Wide horizontal stripes
- Classic checkerboard
- Painted border with solid center
- Simple diamonds
- Repeating stencil pattern
- Faux vintage tile design
- Color-blocked geometric shapes
If you are nervous, use painter’s tape and stick with straight lines. Tape is the calm, reliable friend of DIY projects. It does not judge your shaky hands. It simply holds the line.
Step 8: Tape or Stencil the Pattern
For stripes or geometric designs, use painter’s tape to mark your pattern. Press the tape down firmly, especially along the edges. To reduce bleeding, paint a thin coat of your base color along the tape edge first. This seals the edge so your top color is less likely to sneak underneath.
If using a stencil, secure it with painter’s tape or temporary spray adhesive. Use a stencil brush, foam roller, or sponge with very little paint. Too much paint causes blurry edges. Stenciling is one of those times when being stingy with paint is not cheap; it is professional.
Step 9: Add the Decorative Paint
Paint your pattern in thin layers. For crisp designs, pull the tape while the paint is still slightly wet, unless your paint instructions suggest otherwise. Removing tape too late can sometimes lift dry paint. Work slowly and touch up small mistakes with a fine brush.
Do not panic if the first layer looks uneven. Canvas has texture, and paint often needs a second coat. Let the first coat dry, then repeat. For more dimension, you can dry-brush a slightly lighter or darker shade over parts of the design. This creates an aged, hand-painted look that hides small imperfections beautifully.
Step 10: Let the Paint Cure
Dry paint and cured paint are not the same thing. Paint may feel dry to the touch after a short time, but it usually needs longer to harden enough for regular use. Follow the instructions on your paint label and give the floor cloth extra time before sealing if the surface feels soft or tacky.
This waiting period is not glamorous, but it matters. If you seal paint before it is ready, moisture can get trapped, the finish may look cloudy, or the surface may stay tacky. In DIY, patience is often the cheapest supply and somehow the hardest one to find.
Step 11: Seal the Floor Cloth
The protective finish is what turns a painted canvas into a wipeable floor covering. Use a clear, water-based protective finish such as polycrylic or water-based polyurethane. Water-based finishes are popular for this type of project because they dry clear, clean up with soap and water, and are less likely to yellow than many oil-based products.
Apply the sealer in several thin coats using a synthetic brush, foam brush, or smooth roller. Let each coat dry as directed. Lightly sand between coats if the product instructions recommend it, then wipe away dust before applying the next coat. Three to four thin coats are usually better than one thick coat.
For a floor cloth that will get regular foot traffic, do not skimp on sealing. The sealer protects the paint from scuffs, spills, and daily wear. Think of it as a clear raincoat for your artwork, except nobody will ask why your rug is wearing outerwear.
Step 12: Add a Non-Slip Backing
A painted floor cloth can slide on hard flooring, especially if the bottom is smooth. For safety, use a non-slip rug pad underneath or secure the floor cloth with double-sided carpet tape. This is especially important in kitchens, hallways, and homes with kids, pets, or enthusiastic adults who walk like they are entering a game show.
Choose a rug pad that is safe for your flooring type. Some rubber or adhesive products can discolor certain floors over time, so check the label. If you are renting, use removable options and test them in a hidden area first.
How to Clean a Painted Drop Cloth Floor Cloth
One of the biggest advantages of a sealed floor cloth is easy cleaning. Sweep or vacuum it regularly using a brush attachment or gentle setting. For spills, wipe the surface promptly with a soft damp cloth. Use mild soap only when needed, and avoid soaking the canvas.
Do not scrub aggressively with abrasive pads. Also avoid harsh cleaners, bleach, or steam mops. A floor cloth is durable when sealed, but it is still a painted textile. Treat it kindly, and it will reward you by looking charming instead of battered.
Design Tips for a More Professional Look
If you want your DIY floor cloth to look less like a craft experiment and more like something from a boutique home shop, focus on scale, contrast, and finish.
Use a limited color palette
Two or three colors usually look more polished than seven. A restrained palette also makes the floor cloth easier to match with furniture, curtains, cabinets, and wall colors.
Add a border
A painted border gives the piece a finished rug-like appearance. Even a simple two-inch border can make the design look intentional and balanced.
Repeat colors from the room
Pull one color from nearby decor, such as cabinet hardware, throw pillows, wall art, or dishes displayed on open shelves. This makes the floor cloth feel connected to the room instead of dropped in from another planet.
Embrace imperfect texture
Canvas has a natural weave, and that texture is part of the appeal. Do not chase factory perfection. A handmade floor cloth should look crisp, but it does not need to look printed by a robot with commitment issues.
Common Mistakes to Avoid
The most common mistake is skipping prep. If the canvas is wrinkled, dusty, or unprimed, the finished floor cloth may look uneven or wear poorly. Another mistake is using too much paint at once. Heavy paint layers can crack or feel rubbery. Thin, patient coats are better.
Another issue is forgetting about curing time. A floor cloth may look finished before it is ready for use. Give the paint and sealer time to harden. Finally, do not forget the non-slip layer underneath. A beautiful rug that behaves like a banana peel is not a success story.
Budget Breakdown
The cost of a DIY drop cloth floor cloth depends on size and supplies you already own. If you have leftover paint, primer, brushes, or sealer, the project can be very affordable. A basic small floor cloth may cost less than a store-bought rug of similar size. Larger designs with multiple paint colors, premium sealer, or specialty stencils will cost more, but still often remain budget-friendly compared with custom rugs.
To save money, check your garage or utility closet first. Many people already have leftover wall paint or sample pots that can be used for decorative sections. Just make sure the paint is still usable and appropriate for the surface.
Experience Notes: What You Learn When Making a Drop Cloth Floor Cloth
The first thing you learn when making a floor cloth from a drop cloth is that canvas has opinions. It wrinkles when you want it flat, absorbs more paint than expected, and occasionally reveals a seam right where you imagined a perfect stripe. But that is also what makes the project satisfying. You are not just buying decor; you are convincing humble painter’s canvas to become something worthy of a room.
One helpful experience is to test everything on a scrap first. Cut a small piece from the edge of the drop cloth and practice primer, paint, tape, stencil, and sealer. This tiny test square can save you from big regrets. You will see whether the paint bleeds, whether the color dries darker than expected, and whether the sealer changes the finish. It is much better to discover these things on a six-inch scrap than on the center of your almost-finished kitchen mat.
Another real-world lesson is that simple patterns often win. Intricate designs look exciting on paper, but once you are kneeling on the floor with tape stuck to your sleeve and paint drying faster than your confidence, a clean stripe suddenly looks like genius. Checkerboards, borders, and large-scale geometric shapes are forgiving, stylish, and easy to touch up. If you want detail, add it in small areas rather than across the entire cloth.
Drying space also matters more than most beginners expect. A floor cloth needs to lie flat while primer, paint, and sealer dry. If you have pets, children, or roommates with poor spatial awareness, choose a protected drying spot. Nothing adds drama like finding paw prints across your final coat. Cute? Maybe. Desired? Usually not.
You also learn that sealer is not the place to rush. The painted design may look done, but the protective coats determine how well the floor cloth survives. Thin coats dry more evenly and feel smoother underfoot. Several light applications create a better finish than one thick, impatient coat. Between coats, check for rough spots and gently smooth them if needed.
Finally, a DIY floor cloth teaches you to appreciate practical beauty. It is not as soft as a wool rug, and it will not hide dust like a shag carpet, but it offers something special: a custom piece made by your own hands. Every line, brush mark, and tiny imperfection tells the truth of the project. It says, “I made this,” which is far more interesting than “It was on clearance and I blacked out near the checkout button.”
Conclusion
Learning how to make a floor cloth from a drop cloth DIY style is a creative, affordable way to add custom personality to your home. With a heavy canvas drop cloth, good prep, smart paint choices, and a durable clear finish, you can create a wipeable painted rug that fits your space perfectly. Whether you choose stripes, stencils, faux tile, or a simple painted border, the project gives you the freedom to design something practical and personal.
The secret is not complicated: start with sturdy canvas, keep your coats thin, let everything dry properly, seal it well, and use a non-slip backing. Do that, and your humble drop cloth can graduate from paint-spill duty to stylish floor decor. Not bad for a piece of canvas that started life expecting to be stepped on.