A sturdy deadbolt is one of the simplest upgrades you can make to an exterior door. It does not need Wi-Fi, a monthly subscription, or a motivational speech from your home-security app. It just needs to be installed correctly.
Fortunately, learning how to install a deadbolt is manageable for most homeowners. Replacing an existing lock may require little more than a screwdriver, while adding a deadbolt to an unprepared door involves careful measuring, drilling, and chiseling. Either version is easier when you slow down, use the manufacturer’s template, and resist the classic DIY temptation to declare, “That looks close enough.”
This guide condenses the project into four practical steps. It covers door preparation, common measurements, strike-plate alignment, troubleshooting, and the small installation details that separate a smooth-turning lock from one that needs a shoulder check every evening.
Why Install a Deadbolt?
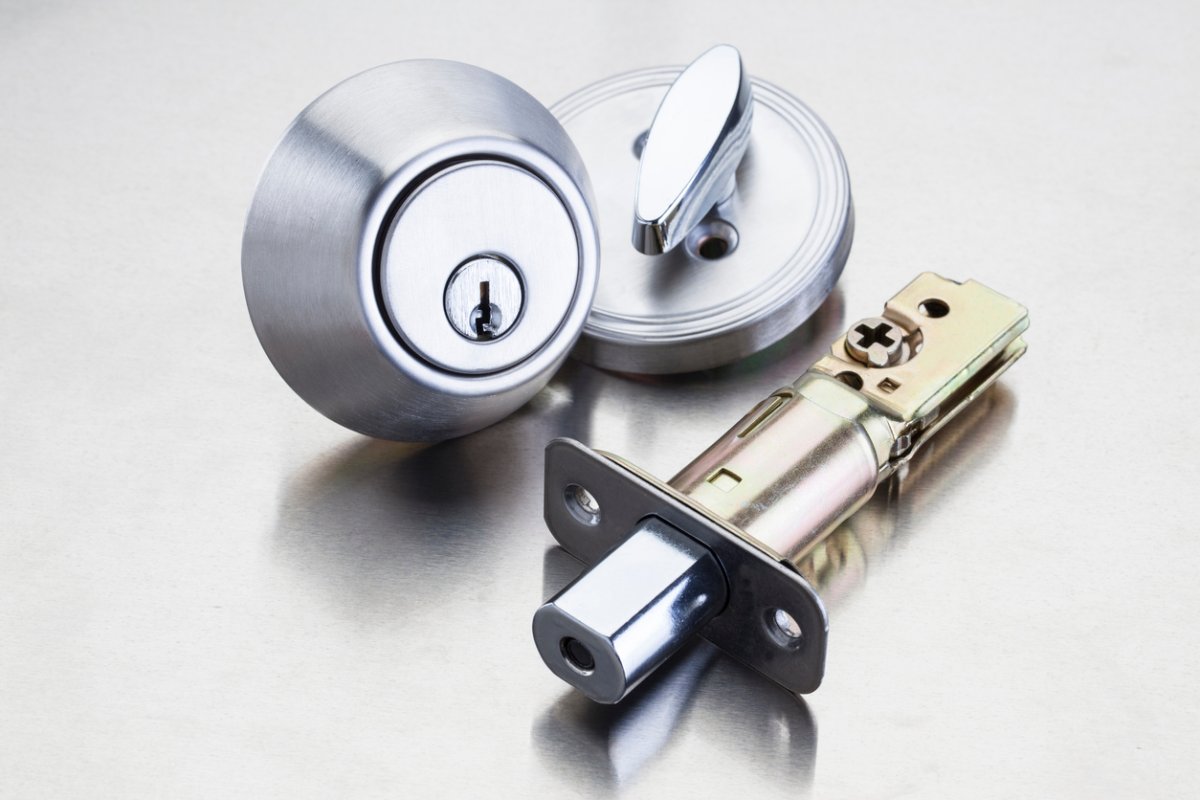
A standard spring latch can keep a closed door from swinging open, but a deadbolt adds a separate locking bolt that extends into the doorjamb. Because the bolt is moved by a key, thumb turn, keypad, or motor rather than being pushed back by the strike plate, it provides a more substantial locking point.
The lock itself is only part of the system. The door, jamb, strike plate, screws, hinges, and surrounding framing all contribute to the strength of the entry. A premium deadbolt attached to a weak, cracked jamb with tiny screws is a little like installing a bank-vault handle on a cardboard box.
When shopping, look for an ANSI/BHMA-rated product. Grade 1 represents the highest performance level, followed by Grades 2 and 3. A well-made Grade 1 or Grade 2 deadbolt is commonly chosen for an exterior residential door, although the correct product depends on the door, local requirements, and desired features.
Before You Begin
Determine Whether the Door Is Pre-Drilled
Open the door and inspect the area above the doorknob. A prepared door usually has a large circular cross bore through its face and a smaller bore through its edge. If those openings already match the new lock, the installation becomes much simpler: remove the old deadbolt, adjust the replacement latch, and assemble the new hardware.
A blank door requires drilling. This is still a realistic DIY project, but accuracy matters. A deadbolt installation kit with a clamp-on jig and hole saw removes much of the guesswork and helps keep the drill perpendicular to the door.
Measure the Door and Backset
The backset is the distance from the edge of the door to the center of the large lock hole. The two common residential backsets are 2⅜ inches and 2¾ inches. Many modern deadbolt latches adjust to either measurement, but the adjustment method varies by manufacturer.
A standard installation often uses a 2⅛-inch cross bore through the face of the door and an approximately 1-inch edge bore for the bolt assembly. Do not treat those numbers as universal commandments carved into a stone tablet. Confirm every dimension on the template packaged with your particular lock.
Choose a Suitable Installation Height
When adding a new lock, position it far enough above the existing knob or lever to leave room for both sets of trim. Many homeowners place a deadbolt roughly 6 to 12 inches above the knob, but hardware proportions and door design vary. Avoid drilling through decorative panels, glass framing, existing reinforcements, or internal components in a metal or fiberglass door.
Check the edge of a new door before drilling. Some hollow-core or specialty doors are not designed to accept an exterior deadbolt. For steel, fiberglass, unusually thick, damaged, antique, or fire-rated doors, consult the door manufacturer or a qualified locksmith.
Gather Tools and Materials
- Deadbolt with its installation template
- Drill or driver
- Deadbolt installation jig or lockset installation kit
- Correct-size hole saw and spade bit
- Phillips and flat-head screwdrivers
- Tape measure and pencil
- Combination square
- Utility knife
- Sharp wood chisel
- Hammer or mallet
- Painter’s tape
- Safety glasses and hearing protection
- Wood block for supporting the door
- Long strike-plate screws when recommended by the lock manufacturer
Keep the screws organized. Deadbolt kits often contain several lengths, and using a short trim screw where a long mounting screw belongs can turn a ten-minute assembly into an hour of muttering at innocent hardware.
How to Install a Deadbolt in 4 Easy Steps
Step 1: Mark the Door and Prepare the Lock Openings
Begin by securing the open door so it cannot move. A wedge beneath the door works well. Confirm that the lock will not interfere with the doorknob, decorative trim, weatherstripping, or internal door construction.
Fold the manufacturer’s paper template around the door edge at the chosen height. Align the template with the correct door thickness and backset, then tape it in place. Mark the center of the cross bore on both faces of the door and mark the center of the bolt hole on the door edge.
Check the measurements twice. Verify that the marks on both sides are at the same height and that the edge mark intersects the centerline of the face bore. A combination square is helpful here. The goal is not merely to create holes; it is to create holes that meet one another in the right place.
If the door already has properly sized openings, skip the large-hole drilling and test-fit the new latch. Measure the existing backset before adjusting the bolt assembly. Also check the door thickness against the new lock’s supported range.
For a blank wooden door, attach the installation jig according to its instructions. Before drilling, inspect both sides for fragile veneer or finish. Applying painter’s tape over the drilling area can reduce surface scratching and make pencil marks easier to see.
Step 2: Drill the Face Bore and Edge Bore
Put on safety glasses. Fit the drill with the hole saw specified by the deadbolt manufacturer, commonly 2⅛ inches for a standard cylindrical deadbolt.
Start drilling from one face of the door, keeping the drill level and perpendicular. Stop when the pilot bit emerges from the opposite side. Move to the other face, place the pilot bit in that small opening, and complete the cut from the second side. Drilling from both directions helps prevent the hole saw from tearing a ragged chunk out of the finished surface as it exits.
Next, install the edge-bore bit specified by the template, often a 1-inch spade bit or hole saw. Drill through the edge of the door until the smaller bore meets the large cross bore. Keep the drill centered and straight. Angling this hole can cause the bolt to bind even when the exterior trim appears perfectly level.
Remove loose chips and test-fit the bolt assembly. Its faceplate should sit flat against the edge of the door. If the deadbolt uses a rectangular faceplate, trace around it with a sharp pencil or carefully score the outline with a utility knife.
Remove the bolt and use a sharp chisel to create a shallow mortise equal to the thickness of the faceplate. Work with the grain and remove thin layers. A faceplate that protrudes can rub against the jamb; one buried too deeply can distort the assembly when its screws are tightened.
Some deadbolts use a round drive-in collar instead of a rectangular plate. Follow the instructions for the supplied configuration rather than chiseling a decorative crater that the lock never requested.
Step 3: Install the Bolt, Cylinder, and Interior Thumb Turn
Adjust the bolt assembly to match the measured backset. Depending on the model, you may need to twist, slide, rotate, or extend part of the latch. Look for an “UP” marking or arrow and orient it as directed.
Insert the bolt through the edge bore with the deadbolt retracted unless the instructions specify otherwise. Confirm that the faceplate sits flush, drill small pilot holes for its screws, and fasten it to the door. Pilot holes reduce the risk of splitting the edge of a wooden door.
From the exterior side, insert the keyed cylinder or keypad assembly. Guide its tailpiece through the correct slot in the bolt mechanism. Keep the exterior unit upright and flush against the door.
Place the interior mounting plate or thumb-turn assembly over the tailpiece. Start both long mounting screws by hand before tightening either one. Alternating between them keeps the lock centered and prevents one side from being pulled crooked.
Tighten the screws until the assemblies are secure, but do not crush the door skin or clamp the mechanism so tightly that the bolt becomes stiff. This is especially important on fiberglass and metal-clad doors. An impact driver is generally too aggressive for final tightening; a hand screwdriver provides better control.
Operate the thumb turn several times while the door remains open. The bolt should extend and retract fully without scraping, hesitation, or excessive force. Test the key from the exterior as well. If the mechanism binds, loosen the mounting screws slightly and realign the assemblies.
Smart and keypad deadbolts may require additional steps, including routing a cable beneath or beside the bolt, attaching an interior mounting plate, installing batteries, calibrating the handing direction, and creating access codes. Cable placement and bolt orientation differ among models, so product-specific instructions take priority over any general tutorial.
Step 4: Drill the Jamb and Install the Strike Plate
The strike plate is where otherwise respectable installations go to develop personality problems. If its opening is even slightly misplaced, the bolt may scrape, stick, or refuse to extend unless the door is pushed or pulled.
Close the door gently and mark where the center of the extended bolt meets the jamb. One method is to apply lipstick, chalk, graphite, or washable marker to the end of the bolt, close the door, and operate the lock to transfer the location. You can also measure carefully from the door’s edge and face.
Center the strike plate over the mark and trace its outline. Mark the center of the bolt opening and the screw locations. Drill the bolt pocket to the depth required for the bolt to extend completely. Avoid making it unnecessarily wide; the strike should guide the bolt while allowing normal seasonal door movement.
If the strike has a recessed box or reinforcement cup, enlarge and shape the opening as instructed. Use a utility knife to score the strike-plate outline, then chisel a shallow mortise so the plate sits flush with the jamb.
Drill pilot holes before installing the screws. Where the hardware and door construction permit, use the manufacturer-supplied security screws or appropriately sized long screws that reach beyond the thin jamb and into solid framing. The reinforced strike area is a critical part of the installation, not an optional decorative accessory.
Close the door and test the lock repeatedly. The bolt should extend fully without needing to lift, shove, or lean against the door. Test it using both the interior thumb turn and exterior key or keypad.
How to Fix Common Deadbolt Installation Problems
The Bolt Rubs the Strike Plate
First determine the direction of contact. Apply a small amount of chalk or marker to the end and sides of the bolt, operate it against the strike, and inspect the transferred mark.
If the contact is minor, slightly enlarging the strike opening with a metal file may solve the problem. When the alignment is substantially wrong, reposition the strike plate rather than grinding away half of it. A badly misaligned bolt may indicate loose hinges, a sagging door, swollen wood, or an out-of-square frame.
The Deadbolt Works With the Door Open but Not Closed
This almost always points to a jamb or strike alignment issue. Make sure weatherstripping is not forcing the door outward. Tighten loose hinge screws and confirm that the door closes consistently before moving the strike.
Do not accept a lock that extends only halfway. A deadbolt should be able to reach its intended projection without being stopped by wood inside the bolt pocket.
The Thumb Turn Feels Stiff
Loosen the two long mounting screws slightly and test again. If the action improves, the lock may have been overtightened or assembled off-center. Verify that the tailpiece passes through the correct slot and that the interior assembly is not upside down.
Also confirm that the backset adjustment is locked into its proper position. An incompletely adjusted latch can look correct while placing the internal components under tension.
The Faceplate Will Not Sit Flush
Remove the bolt and inspect the mortise. Trim only the high areas with a sharp chisel. Avoid deepening the entire recess automatically. The plate should be level with the door edge, not sunken beneath it.
The Door Splintered Around the Hole
Small chips may be repaired with matching wood filler or a lock reinforcement plate, depending on the damage. Large cracks, an oversized bore, or a weakened door edge can compromise the installation. Have significant damage evaluated before relying on the lock for security.
Deadbolt Installation Tips That Improve the Finished Job
- Read the instructions first: The diagrams usually explain tailpiece orientation and screw selection better than trial and error.
- Use the supplied template: Generic measurements are helpful, but the actual lock controls the final dimensions.
- Drill from both faces: This produces a cleaner cross bore on finished wooden doors.
- Make pilot holes: They reduce splitting and help long strike screws travel straight.
- Use a sharp chisel: A dull chisel crushes fibers and wanders outside the mortise outline.
- Test before closing: Verify that the bolt retracts completely before allowing the door to latch behind you.
- Do not overtighten: Mounting screws should secure the hardware without distorting the mechanism.
- Strengthen the strike area: A durable strike plate anchored according to the manufacturer’s instructions is as important as the visible cylinder.
- Keep emergency egress in mind: Choose interior operation that complies with local building and fire requirements.
When to Call a Locksmith or Door Professional
A routine replacement in standard holes is usually homeowner-friendly. Professional help becomes sensible when the door is warped, cracked, unusually thick, armored, antique, fire-rated, or made with unfamiliar internal construction.
You should also pause when the existing backset is nonstandard, the new lock does not cover old openings, the jamb has been repaired repeatedly, or the frame lacks solid material for anchoring the strike. A locksmith can recommend compatible hardware, reinforce damaged areas, and identify problems that are not obvious from the finished surface.
Smart-lock installations may need professional attention when they involve interconnected locksets, multipoint locking doors, access-control wiring, or compatibility issues with an existing alarm system.
Real-World Experience: What Installing a Deadbolt Actually Teaches You
The first surprise in a deadbolt project is that drilling the large hole is rarely the hardest part. With a decent jig, the hole saw does most of the work. The fussy part is alignment. A bolt can miss the center of the strike opening by an eighth of an inch and suddenly behave as though the door has personally offended it.
On one typical replacement project, the new deadbolt fit the existing door holes perfectly. The cylinder slid into place, the thumb turn worked smoothly, and the installer began mentally spending the money saved by not calling a locksmith. Then the door closed. The bolt struck the bottom edge of the old strike plate and stopped.
The instinctive response was to push harder on the thumb turn. That is not a repair strategy; it is merely an early audition for breaking the lock. A chalk mark showed that the door had sagged slightly over time. Tightening the upper hinge screws brought the door back into position, and only a tiny strike adjustment was needed.
That experience highlights an important lesson: troubleshoot the entire door system before cutting the jamb. The strike plate may appear guilty, but loose hinges, compressed weatherstripping, humidity, paint buildup, or a settling frame may be the real accomplices.
Another lesson arrives while chiseling the faceplate mortise. Beginners often try to reach the final depth in one heroic blow. The result can be a split edge, a wandering chisel, or a recess deep enough to rent as a basement apartment. Thin, controlled cuts are faster because they avoid repair work.
It also helps to score the outline with a utility knife before chiseling. The scored fibers create a clean boundary, especially on painted or veneered wood. Work from the perimeter toward the center and check the plate frequently. When it sits flush without rocking, stop. Woodworking rewards restraint, which is unfortunate because restraint is rarely included in the power-tool aisle.
Installing the strike plate provides another practical revelation: the screws included in a hardware package may serve different purposes. Short screws often attach a decorative faceplate or fit situations where longer screws could interfere with nearby components. Longer security screws may be intended to reach framing. Sorting and comparing the screws before installation prevents accidental substitutions.
Driving long screws also requires care. A pilot hole helps prevent the screw from wandering, splitting the jamb, or following the easiest grain path. Final tightening by hand makes it easier to stop before the strike plate bends or the screw head strips.
Smart deadbolts add their own comedy. A cable routed through the wrong side may be pinched when the mounting plate is tightened. The lock may then power on, make an unhappy mechanical sound, and report an obstruction even though the bolt moves freely by hand. Reopening the assembly and following the cable-routing diagram usually solves the mystery.
Calibration should always be performed with the door open. This prevents an incorrectly handed or misaligned motorized bolt from extending into the jamb and trapping the door closed. Keep the physical key nearby until programming, code creation, and repeated lock-unlock tests are complete.
The most useful habit is to test after every stage. Test the loose bolt in the edge bore. Test the assembled lock with the door open. Test the strike alignment gently. Test the key, thumb turn, keypad, and automatic locking feature. Small problems are easy to isolate when only one component has changed; they become far more mysterious after everything has been tightened, painted, and admired.
A successful deadbolt installation does not end with a dramatic final turn of the screwdriver. It ends with an uneventful test: the door closes naturally, the bolt glides into the strike, the key turns without resistance, and nothing scrapes. In home improvement, boring operation is often the highest compliment.
Conclusion
Installing a deadbolt is a practical way to improve an exterior door when the lock is matched to the door and installed as a complete system. The four essential stages are straightforward: mark and prepare the door, drill the required openings, assemble the deadbolt, and align and reinforce the strike area.
Accuracy matters more than speed. Measure the backset, use the product template, drill from both sides of a finished wooden door, and test the mechanism before closing the door. Give the strike plate the same attention as the lock itself, because a smooth, fully extending bolt depends on precise jamb preparation.
Note: This article synthesizes installation practices from Bob Vila, Schlage, Kwikset, The Home Depot, Lowe’s, This Old House, Family Handyman, Better Homes & Gardens, ANSI, BHMA, and other established U.S. home-improvement and hardware references. Always follow the instructions supplied with the specific deadbolt and verify local safety requirements.