Burning a CD in Ubuntu Linux may sound charmingly old-school, like carrying a flip phone or asking someone for directions instead of letting GPS narrate your life. But CDs still have their moment. Maybe you need an audio CD for an older car stereo, a data disc for offline storage, a bootable rescue disc, or a simple way to hand files to someone who treats cloud links like suspicious mushrooms.
The good news: Ubuntu can still burn CDs without turning the process into a ritual involving candles, kernel flags, and a forum post from 2008. You can use a friendly graphical app such as Brasero, K3b, or Xfburn, or you can burn from the terminal with tools like wodim. This guide focuses on the easiest path for most users: using Brasero on Ubuntu, with practical notes for ISO images, audio CDs, data CDs, troubleshooting, and real-world mistakes to avoid.
Before we start, one important distinction: burning an ISO image is not the same as copying the ISO file onto a disc. If you copy ubuntu.iso as a regular file, your disc will politely contain one large file and may not boot. To make a bootable disc, you must use a “Burn Image” or “Write Image” option. It is the difference between baking a cake and placing a recipe on a plate.
What You Need Before Burning a CD in Ubuntu
Before clicking anything, make sure you have the basics ready. You need an Ubuntu computer, an internal or USB optical burner, a blank CD-R or CD-RW, and the files or image you want to burn. A standard CD usually holds about 700 MB, so if your files are larger, use a DVD, Blu-ray, or USB drive instead. Many modern Ubuntu ISO files are too large for a CD, which means a DVD or USB stick is usually better for installing Ubuntu.
Also check the type of disc you are using. A CD-R can be written once. A CD-RW can be erased and reused, though it may be less compatible with older CD players. For audio CDs, CD-R is often the safer choice. For quick testing, CD-RW is nice because mistakes do not become shiny coasters of regret.
Step 1: Install a CD Burning App on Ubuntu
Ubuntu’s desktop documentation recommends using a disc burning application such as Brasero for writing files to a blank disc. Brasero is popular because it is simple, designed for GNOME desktops, and supports common tasks like data discs, audio CDs, disc copying, and image burning.
Open Terminal with Ctrl + Alt + T, then run:
If Ubuntu says the package cannot be found, enable the Universe repository first:
Prefer KDE-style tools? Install K3b instead:
K3b is more feature-rich and is especially loved by users who want extra control. Xfburn is another lightweight option, especially common on Xfce-based systems:
For most beginners, Brasero is the easiest starting point. It keeps the interface simple enough that you can burn a disc without needing to understand every backend tool doing the heavy lifting behind the scenes.
Step 2: Insert a Blank CD and Choose the Right Project
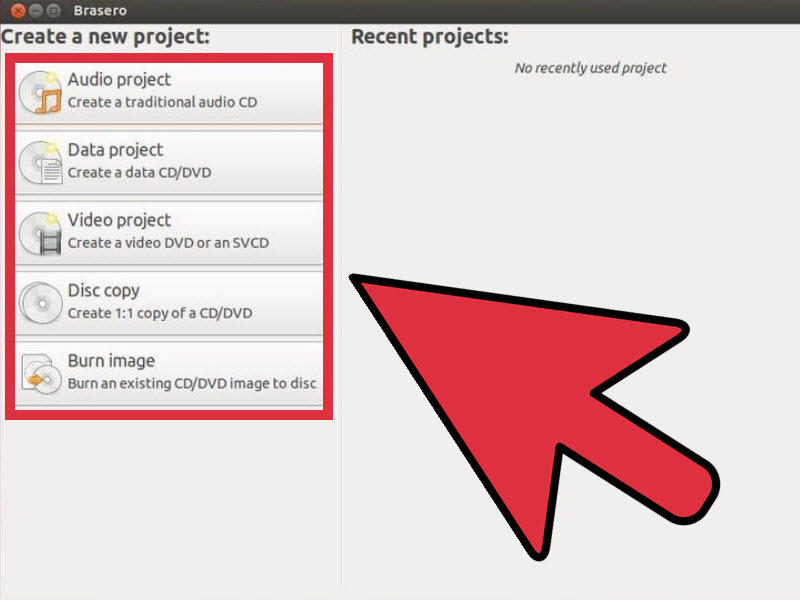
Insert a blank CD into your burner. Ubuntu may show a pop-up asking what you want to do with the disc. You can close it and open Brasero manually from the application menu. Search for “Brasero,” launch it, and you will see project choices.
Choose Data Project for Files and Folders
Select Data Project if you want to burn documents, photos, PDFs, spreadsheets, scripts, backups, or other ordinary files. This creates a disc that can be opened on Linux and usually on Windows or macOS too.
Choose Audio Project for a Music CD
Select Audio Project if you want a traditional CD that plays in older CD players or car stereos. This is different from simply burning MP3 files as data. A real audio CD converts tracks into standard audio CD format, which is why it usually holds around 74 to 80 minutes of music rather than 700 MB of random files.
Choose Burn Image for ISO Files
Select Burn Image if you have an ISO file. This is the correct option for bootable Linux discs, rescue discs, or any downloaded image file intended to become a disc. Again, do not drag the ISO into a data project unless your goal is to store the ISO itself.
Step 3: Add Files, Music, or an ISO Image
For a data CD, click the plus button or drag files and folders into the Brasero window. Watch the size indicator carefully. If your files exceed the CD limit, Brasero will not magically compress your vacation photos by sheer optimism. Remove files, use a DVD, or switch to a USB drive.
For an audio CD, add your songs in the order you want them to play. Brasero can work with common audio formats supported by your Ubuntu system, such as MP3, OGG, FLAC, or WAV. If you are making a disc for an older player, avoid fancy formats and let Brasero create a standard audio CD.
For an ISO image, click Burn Image, select the ISO file, then choose your optical drive as the target. If the ISO is larger than your disc, stop there and choose a bigger medium. Modern Ubuntu installer images generally belong on USB drives or DVDs, not CDs.
Step 4: Set Burn Options and Start Burning
Once your project is ready, click Burn. Brasero will ask you to confirm the destination drive and may offer options such as write speed, temporary files, simulation, or verification.
Here is the boring-sounding setting that matters more than people expect: burn speed. Slower speeds are often more reliable, especially with cheap blank discs or older drives. If your disc fails at 48x, try 12x, 8x, or another lower speed. Your computer may complain that you are living in the slow lane, but your finished disc will be more likely to work.
If a verification option is available, enable it. Verification checks whether the data on the disc matches what was supposed to be written. It adds time, but it also saves you from handing someone a disc full of digital confetti.
Click Burn and wait. Do not eject the disc manually while the burn is running. Do not unplug a USB burner. Do not decide this is the perfect moment to reboot. Let the process finish, and let the application eject the disc when it is done.
Step 5: Test the CD After Burning
When the burn completes, reinsert the disc and check it. For a data CD, open Files and confirm that your folders and files appear. For an audio CD, test it in the device where you plan to use it, especially if that device is an older car stereo. For a bootable ISO, restart the computer and choose the optical drive from the boot menu if you need to test bootability.
If the disc does not work, do not panic. Failed burns happen. Sometimes the blank disc is poor quality. Sometimes the speed was too high. Sometimes the drive is dusty, tired, or having a dramatic emotional arc. Try a fresh disc, a lower burn speed, and verification. If one app keeps failing, try K3b or Xfburn. If all graphical tools fail, test the command line.
How to Burn an ISO from the Ubuntu Terminal
If you prefer the terminal or your desktop app is misbehaving, you can use wodim. Install it if needed:
Find your optical drive:
On many Ubuntu systems, the burner is /dev/sr0. To burn an ISO to a CD, run:
The -v option gives verbose output, dev=/dev/sr0 points to the drive, -dao writes disc-at-once, and -eject ejects the disc when finished. Replace /path/to/image.iso with the real file path. If your terminal says permission is denied, try running the command with sudo.
Common Problems and Quick Fixes
The CD Is Blank After Burning
This often means the burn failed or the session was not finalized. Try again with a slower speed and make sure the project completes before ejecting.
The ISO Disc Will Not Boot
You may have copied the ISO as a file instead of burning it as an image. Use Brasero’s Burn Image option or the terminal command above.
The Disc Works on Ubuntu but Not Windows
Use a standard data project and avoid unusual Linux-only filenames, symbolic links, or permission-heavy backup structures. For cross-platform sharing, keep file names simple and avoid characters that Windows dislikes.
The Audio CD Will Not Play in a Car
Use an audio CD project, not a data CD full of MP3 files. Also try CD-R instead of CD-RW, because many older players are picky.
The Burner Is Not Detected
Unplug and reconnect a USB burner, try another USB port, check that the tray has power, and run lsblk or wodim --devices. If the drive never appears, the hardware or cable may be the problem.
Brasero vs. K3b vs. Xfburn: Which Should You Use?
Brasero is best for Ubuntu users who want a clean, simple app for basic CD and DVD burning. It is a great first choice for data CDs, audio CDs, and ISO images.
K3b is best for users who want more features, more visible options, and a mature disc-burning interface. It may pull in more KDE-related packages, but many users consider it worth it.
Xfburn is lightweight and practical. If Brasero gives you trouble on a newer Ubuntu setup, Xfburn is a sensible backup option.
In plain English: start with Brasero, switch to K3b if you want power, try Xfburn if you want something lean, and use wodim when the terminal is calling your name.
Best Practices for Reliable CD Burning
Use good-quality blank discs. Burn at a moderate or low speed. Close other heavy applications while burning. Keep your laptop plugged in. Verify the disc when possible. Label the disc with a soft marker, not a pen that could damage the surface. Store finished CDs away from heat, sunlight, and the mysterious drawer where cables go to form knots.
Also think about whether a CD is truly the best tool. For long-term backups, external drives and cloud storage are usually easier. For Ubuntu installation media, USB drives are faster and more reusable. But for legacy hardware, audio playback, offline handoff, or small archives, a CD still does the job surprisingly well.
Personal Experience: What Burning CDs in Ubuntu Teaches You
Burning a CD in Ubuntu feels simple once you understand the categories, but the first time can be oddly confusing. The biggest lesson is that “putting files on a disc” and “burning an image” are not the same thing. Many beginners learn this by creating a beautiful, perfectly useless boot disc containing one lonely ISO file. The disc opens fine, the file is there, and yet the computer refuses to boot from it. That is the moment Ubuntu quietly teaches you that images must be written as images.
Another real-world lesson is that speed is not always your friend. Modern computers encourage us to choose the fastest everything: fast downloads, fast charging, fast coffee, fast regret. CD burning is different. A slower burn can produce a more reliable disc, especially when the burner is old or the blank media came from a bargain spindle that has been sitting in a closet since broadband was a personality trait. If a disc fails verification, lowering the speed is often the first fix worth trying.
Audio CDs bring their own little adventure. A data CD with MP3 files may work in some newer stereos, but older players expect a true audio CD. This is why Brasero’s Audio Project option matters. It handles the conversion and layout so the disc behaves like a traditional music CD. If you are making a disc for an older car, test it in that car before declaring victory. Computer drives are forgiving. Old car stereos can be divas wearing plastic buttons.
USB optical drives are also common now because many laptops no longer include built-in burners. They work well, but they add one more thing to check. Use a reliable USB cable, avoid loose hubs, and keep the drive on a flat surface. A burn interrupted by a wobbly cable is not a technical mystery; it is a tiny tragedy with a blinking LED.
The best habit is to test every disc immediately. Do not burn a CD, label it carefully, place it in an envelope, and assume the universe has your back. Reinsert it. Open it. Check a few files. If it is bootable, boot it. If it is audio, play the first and last tracks. Five minutes of testing can prevent the classic “I gave someone a blank disc” embarrassment, which ranks somewhere between replying-all by accident and realizing your microphone was unmuted.
In the end, burning CDs in Ubuntu is not difficult. It is just precise. Pick the right project, use the right disc, burn at a sensible speed, verify when possible, and test the result. Do that, and Ubuntu will happily turn your files, music, or ISO image into a working CD without making you feel like you need a degree in optical archaeology.
Conclusion
Learning how to burn a CD in Ubuntu Linux is mostly about choosing the right tool and the right project type. Brasero is the easiest option for many users, K3b offers more advanced controls, Xfburn is a lightweight alternative, and wodim gives terminal users a dependable command-line route. Whether you are creating a data CD, an audio CD, or an ISO image disc, the winning formula is simple: prepare your files, choose the correct burn mode, use a reasonable speed, verify the result, and test the finished disc.
CDs may not be the trendiest storage format anymore, but they remain useful for older hardware, offline sharing, music playback, and small archives. Treat the process with a little patience, and your Ubuntu system can still burn discs like a prominus the smoke, sparks, and dramatic movie soundtrack.