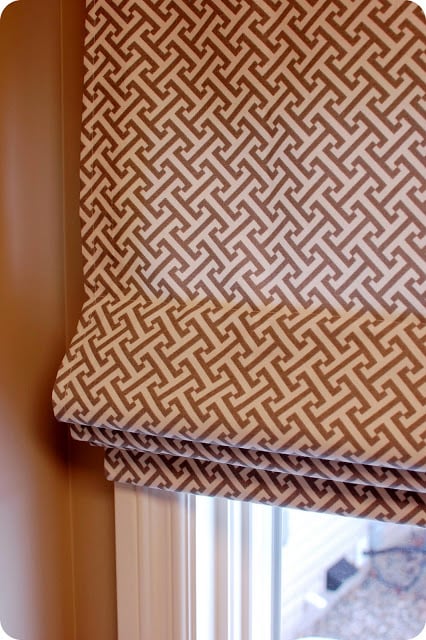
A Roman shade is the rare home project that behaves like a responsible adult while looking as polished as a boutique window treatment. When lowered, it becomes a clean fabric panel that provides privacy and light control. When raised, it gathers into neat horizontal folds instead of turning into a wrinkled fabric burrito above the window.
This fully operational Roman shade tutorial explains how to measure, sew, assemble, mount, and troubleshoot a working shade. Rather than constructing an old-fashioned exposed-cord system, the project uses a commercially manufactured cordless Roman shade mechanism. That choice produces smoother operation while avoiding the dangling cords and accessible loops associated with serious child-safety hazards.
What Makes a Roman Shade Fully Operational?
A decorative faux Roman shade remains permanently folded and does little more than sit above a window looking attractive. A fully operational Roman shade can be raised and lowered whenever you need privacy, sunlight, or a better view of the neighbor’s dog conducting its daily yard inspection.
A functional shade normally includes:
- A face-fabric panel
- A lining that supports the fabric and controls light
- Horizontal ribs or dowels that form even folds
- A bottom weight bar that keeps the panel straight
- A headrail or mounting board
- A cordless lift mechanism with enclosed or inaccessible lift components
Roman shades typically hang flat when closed and form horizontal pleats as they rise. Fabric weight, lining thickness, rib placement, and careful mounting all influence how cleanly those pleats stack.
Begin With Window-Cord Safety
Traditional Roman shade tutorials often show loose cords traveling through rings on the back of the fabric. That arrangement may create accessible loops, especially when cords are widely spaced or allowed to pull away from the shade.
The U.S. Consumer Product Safety Commission recommends cordless window coverings in homes where young children live or visit. The agency has documented strangulation hazards involving pull cords, continuous loops, and exposed inner cords on Roman shades. A loose cord is not made safe simply because it is tied to a cleat or placed behind a curtain.
For this project, purchase a cordless Roman shade lift kit, spring mechanism, or enclosed lift-band system from a window-treatment supplier. Use every safety component supplied by the manufacturer and follow its limits for shade width, weight, ring spacing, and fabric thickness. If you plan to sell or give away the finished shade, verify that the entire product complies with current window-covering safety requirements.
Choose the Right Roman Shade Style
Flat Roman Shade
A flat Roman shade has a smooth front when fully lowered. Internal ribs help it form crisp, structured folds. This is the easiest style for a first operational shade because the geometry is predictable and the finished panel works with traditional, transitional, farmhouse, and modern interiors.
Relaxed Roman Shade
A relaxed shade has a gentle curve along the bottom. It looks soft and elegant but is less forgiving. The center must sag evenly, both sides must rise at the same rate, and striped fabric can reveal every tiny alignment error.
Hobbled Roman Shade
Hobbled shades retain cascading folds even when lowered. They require additional fabric, more complicated spacing, and a lift system designed for the extra weight. Save this version for a second project unless your idea of relaxation is calculating pleat ratios at midnight.
Inside Mount or Outside Mount?
An inside-mount Roman shade sits within the window opening. It creates a tailored, built-in appearance and leaves decorative trim visible. The window recess must be deep enough for the selected headrail, brackets, and folded fabric stack.
An outside-mount shade attaches to the wall or trim around the opening. It can disguise an uneven frame, reduce light gaps, and make a small window appear larger. Outside mounting is also useful when handles, locks, tile, or shallow trim interfere with an inside installation.
For an inside mount, measure the width at the top, middle, and bottom of the opening, then design around the narrowest measurement. Measure the height at the left, center, and right, using the longest measurement unless your lift-kit instructions specify otherwise. Windows are frequently less square than they appear, so trusting a single measurement is an excellent way to create a shade that fits perfectly in an imaginary house.
Materials and Tools
Fabric and Sewing Supplies
- Medium-weight decorator fabric
- Cotton, privacy, thermal, or blackout lining
- All-purpose polyester thread
- Fabric scissors or rotary cutter
- Cutting mat and long ruler
- Sewing machine
- Iron and ironing board
- Straight pins or sewing clips
- Hand-sewing needle
- Fabric-marking pencil
Shade Hardware
- Cordless Roman shade lift kit
- Headrail or 1-by-2-inch mounting board, if required by the kit
- Roman shade ribs, fiberglass rods, or lightweight wooden dowels
- Bottom weight bar
- Roman shade tape, rib tubing, or lining fabric for channels
- Hook-and-loop tape, if the shade detaches from the headrail
- Mounting brackets and manufacturer-approved screws
Installation Tools
- Steel measuring tape
- Level
- Pencil
- Drill and drill bits
- Screwdriver
- Stud finder
- Wall anchors appropriate for the wall material
- Stable step ladder
Medium-weight fabric is generally easier to fold than bulky upholstery material. If you want stronger light control, combine a lighter decorative fabric with a suitable blackout lining instead of using two heavy layers. Testing adhesive, interfacing, and lining on a scrap is wise because some products can stiffen the fabric or show through the face.
Calculate the Finished Shade Size
Write down the finished width and height before cutting anything. Keep those finished dimensions separate from your cutting dimensions, which include seam and hem allowances.
For a straightforward lined shade, a practical starting point is:
- Face-fabric cutting width: finished width plus 4 inches
- Face-fabric cutting length: finished height plus 8 inches
- Lining width: approximately 1 to 2 inches narrower than the face-fabric cutting width
- Lining length: finished height plus enough fabric for the top and bottom finishes
These allowances create room for side hems, a bottom weight-bar pocket, and attachment at the headrail. However, the lift-kit instructions take priority because some systems require specific top allowances or finished widths.
Plan the Rib Spacing
Many flat Roman shades look balanced with visual fold intervals of approximately 7 to 9 inches. Use removable tape or chalk to mark trial lines across the lining before sewing permanent channels.
For example, a 48-inch shade can be divided into six 8-inch sections. A 55-inch shade might use seven sections of approximately 7.85 inches. Small adjustments are perfectly acceptable; consistent spacing matters more than forcing the shade to obey a suspiciously elegant number.
Do not improvise the locations of lift attachments solely from a decorative fold calculation. Mark ribs, lift bands, rings, and attachment points according to the cordless system manufacturer’s layout.
Step-by-Step Fully Operational Roman Shade Tutorial
Step 1: Prewash and Press the Fabric
Prewash washable face fabric and lining using the same method you expect to use later. This reduces the risk of one layer shrinking more than the other. Fabrics labeled dry-clean only should not be prewashed.
Press both materials before measuring. A wrinkle included in the cutting measurement will eventually disappear, taking part of your carefully calculated width with it.
Step 2: Square the Fabric
Confirm that the top and bottom edges are perpendicular to the selvages. Printed motifs, plaids, and stripes should be aligned with the finished shade rather than blindly following a crooked cut from the fabric store.
Mark the finished centerline on the wrong side. Center any prominent pattern on that line. A flower leaning three inches toward the left may not ruin the shade, but it will become the only thing you see after installation.
Step 3: Cut the Face Fabric and Lining
Cut the face fabric using your planned seam and hem allowances. Cut the lining slightly narrower so the face fabric can roll toward the back along both sides. This keeps the lining from peeking around the edges when the shade is viewed from the room.
After cutting, label the top and bottom of each piece with removable chalk. This is especially helpful when the pattern has a subtle direction.
Step 4: Join the Side Seams
Place the face fabric and lining with right sides together. Center the narrower lining across the face fabric, leaving an equal amount of face material exposed on each side. Pin the long edges.
Sew both side seams with a consistent seam allowance. Turn the panel right side out and press it so a narrow strip of face fabric wraps toward the back on each side. The front should now look like one clean panel with no lining visible.
Construction methods vary, but lined Roman shades commonly use narrow lining dimensions and pressed side returns to create a professional front with minimal visible stitching.
Step 5: Form the Bottom Weight Pocket
Turn the lower raw edge toward the back by about 1 inch and press. Fold it again deeply enough to hold the selected weight bar, then stitch across the upper edge of the fold.
Leave one end temporarily open. Insert the weight bar after the rest of the shade is assembled so it does not crash into the sewing-machine bed like a tiny curtain-themed battering ram.
The weight bar should be slightly shorter than the finished shade width. Its purpose is to keep the lower edge straight and help the panel descend evenly.
Step 6: Mark and Sew the Rib Channels
Lay the shade face down on a large, flat surface. Beginning above the bottom pocket, mark the rib locations across the lining with a ruler and washable fabric marker.
Create channels using one of these methods:
- Sew commercial Roman shade rib tape to the lining.
- Cut lining strips, fold their raw edges inward, and stitch them horizontally to form narrow casings.
- Use fabric tubing designed for Roman shade ribs.
Stitch only through the lining whenever the design allows. Hand-tacking the channels to the face fabric at selected points can reduce visible lines on the front. Insert the ribs and trim them so they sit inside the side edges without stretching the fabric.
Step 7: Attach the Cordless Lift Components
Place the cordless lift mechanism on the work surface and compare it with the manufacturer’s diagram. Systems may use enclosed bands, spring-loaded reels, shrouded lift cords, or a preassembled headrail.
Attach the lift tapes or approved connectors to the back of the shade at the specified intervals. Keep every vertical lift line perfectly straight from top to bottom. Misaligned lift points cause the shade to rise diagonally or develop uneven folds.
Do not replace enclosed components with craft cord, fishing line, ribbon, or widely spaced loose rings. Do not omit shrouds, cord stops, tension devices, clips, or other safety parts included with the mechanism.
Step 8: Finish the Top Edge
The top treatment depends on the lift kit. Some shades attach to a fabric-covered mounting board with hook-and-loop tape. Others slide into a headrail or connect with clips.
For a removable shade, sew the soft side of hook-and-loop tape across the back of the top edge. Staple or attach the matching side to the mounting board, following the kit instructions. Keep staples away from moving lift parts.
A detachable fabric panel makes future cleaning and repairs much easier. It also allows you to correct the position by a fraction of an inch without introducing your shade to a seam ripper again.
Step 9: Insert the Bottom Weight Bar
Slide the weight bar into its pocket and close the opening with hand stitches or a small removable closure. Check that the lower edge hangs straight and that the bar does not press into either side seam.
Step 10: Mount the Headrail
Mark the bracket locations with a pencil. Use a level rather than relying on the window trim, which may have been installed during a difficult afternoon several decades ago.
Drill pilot holes and fasten the brackets into solid framing whenever possible. Use anchors rated for the shade’s weight when mounting into drywall or masonry. Before tightening everything, verify that the headrail clears handles, locks, screens, and inward-opening windows.
Brackets must be level for the shade to operate correctly. A second person should steady the ladder and help support a wide headrail during installation.
Step 11: Connect and Test the Shade
Attach the fabric panel and lift components to the mounted mechanism. Lower the shade completely, then raise it slowly while watching both sides.
Confirm that:
- The bottom edge remains level.
- All lift lines engage at the same time.
- The ribs stay horizontal.
- No fabric enters the moving hardware.
- The shade stops securely at different heights.
- No hazardous loop or accessible loose cord is present.
Test the shade repeatedly before considering the job finished. The first successful lift is encouraging; the tenth successful lift is evidence.
Step 12: Train the Folds
Raise the shade one section at a time. Guide each fold by hand so the fabric stacks in the intended direction. Leave the shade raised for several hours, lower it, and repeat the process over the next few days.
Natural fibers and blackout lining may initially resist folding. Patient training helps the fabric remember where to bend. Forcing thick material into a tight stack generally produces bulk rather than obedience.
Common Roman Shade Problems and Fixes
The Shade Rises Unevenly
Check that the headrail is level, the lift components are vertical, and all attachment points match the manufacturer’s measurements. Also confirm that the bottom weight bar is centered.
The Center Sags
A wide shade may require an additional center lift line, support rib, or stronger mechanism. Never add an improvised loose cord. Consult the lift-kit weight and width chart.
The Folds Look Random
Recheck rib spacing and train the pleats manually. Heavy fabric, thick interlining, and poorly positioned pattern seams can prevent crisp folding.
The Shade Is Difficult to Raise
The complete panel may exceed the mechanism’s weight rating. Remove unnecessary interfacing, replace an overly heavy weight bar, or select a stronger cordless system.
Light Leaks Around the Edges
Small side gaps are normal with many inside mounts. An outside-mounted shade can provide greater overlap and privacy. Decorative side panels can also conceal light gaps without modifying the lift mechanism.
Cleaning and Maintenance
Dust the folds regularly using a vacuum’s upholstery attachment on low suction. Spot-test cleaning products on a hidden scrap before treating the installed shade. Do not soak a lined shade unless both materials and all internal components are specifically washable.
Kitchen grease, bathroom humidity, and condensation can shorten the life of fabric treatments. In damp rooms, choose mildew-resistant materials or a window covering specifically designed for moisture. Roman folds also collect more dust than a flat roller shade, so occasional maintenance is part of the bargain.
Every few months, inspect the brackets, lift attachments, bottom pocket, and safety components. Stop operating the shade if the headrail loosens, enclosed lift material becomes damaged, or any accessible loop appears.
Experience Notes: What This Project Teaches You
Measuring Is the Real Beginning
The most common frustration with a DIY Roman shade occurs long before the sewing machine comes out. A window may be wider at the bottom, narrower at the top, and slightly deeper on one side. Measuring in three places feels repetitive until the numbers disagree. At that moment, the extra measurements become the smartest part of the project.
A useful routine is to sketch the window and write every measurement directly on the drawing. Mark the location of handles, trim, tile, and nearby cabinets. This simple project map prevents the unpleasant discovery that a beautiful shade cannot lower because it collides with a crank handle.
Fabric Choice Can Make or Break the Folds
Bold decorator fabric often looks irresistible on the cutting table. However, a shade must move, bend, and stack. Medium-weight cotton, linen blends, and stable decorator fabrics are generally cooperative. Thick upholstery fabric may create a top stack large enough to qualify as architectural molding.
Pattern scale matters too. A giant botanical print can look dramatic when the shade is lowered but confusing when folded. Before buying fabric, fold a sample into several horizontal pleats. This five-minute test shows how the print behaves in both positions.
Blackout Lining Changes the Project
Blackout lining improves privacy and darkens bedrooms, nurseries, and media rooms. It also adds stiffness and weight. The shade may need fewer, deeper folds and a mechanism rated for the heavier panel.
Pinholes can appear when blackout material is stitched repeatedly. Sewing channels only to the lining or using manufacturer-approved tapes may reduce visible light points. Always make a sample that includes the face fabric, lining, thread, and channel material before committing to the full shade.
Perfect Folds Rarely Appear Immediately
A new Roman shade can look surprisingly awkward during its first few lifts. One fold may roll forward while another hides behind the panel. That does not automatically mean the shade was built incorrectly.
Raise it slowly and arrange each pleat by hand. Leave it stacked, lower it later, and repeat. After several cycles, many fabrics begin folding predictably. This training period is especially useful with linen blends and room-darkening linings.
Level Hardware Matters More Than Level Trim
A recurring installation lesson is that decorative trim should not be trusted as a measuring instrument. If the headrail follows crooked molding, gravity will expose the mistake every time the shade moves.
Use a true level for the mounting line. For an outside mount, temporarily hold the completed shade against the wall and step across the room before drilling. A position that looks correct from twelve inches away may appear oddly low when viewed beside the rest of the room.
Testing Should Be Deliberately Boring
The best final test is not dramatic. Lower the shade, raise it halfway, stop it, lower it again, and repeat the process. Watch the lift system instead of admiring the fabric. Listen for scraping, check that the ribs remain parallel, and confirm that the bottom edge stops level.
Then perform the same test after the shade has remained lowered overnight. A mechanism that works smoothly through repeated ordinary cycles is more valuable than one impressive grand opening.
A Cordless Kit Is Worth the Planning
Building the decorative fabric panel yourself still provides the customization that makes a DIY Roman shade appealing. You choose the print, exact dimensions, lining, trim, and fold depth. A manufactured cordless mechanism simply handles the part that should not be improvised.
This hybrid approach is usually the most practical balance: handmade where creativity matters and engineered where predictable operation and safety matter. The result feels custom without depending on dangling cords, complicated knots, or a household rule requiring everyone to stand six feet away from the window.
Conclusion
A fully operational Roman shade requires more precision than a decorative valance, but the project remains manageable when divided into clear stages. Measure the actual window, select fold-friendly fabric, construct a square lined panel, use evenly positioned ribs, and pair it with a correctly rated cordless mechanism.
Take your time during installation and testing. A beautiful shade should not merely survive its first trip up the window; it should rise evenly, lower smoothly, provide dependable privacy, and continue working through everyday use. When the folds finally stack into place, the project delivers the ideal DIY reward: something that looks expensive, performs a real job, and makes you briefly consider covering every window in the house.