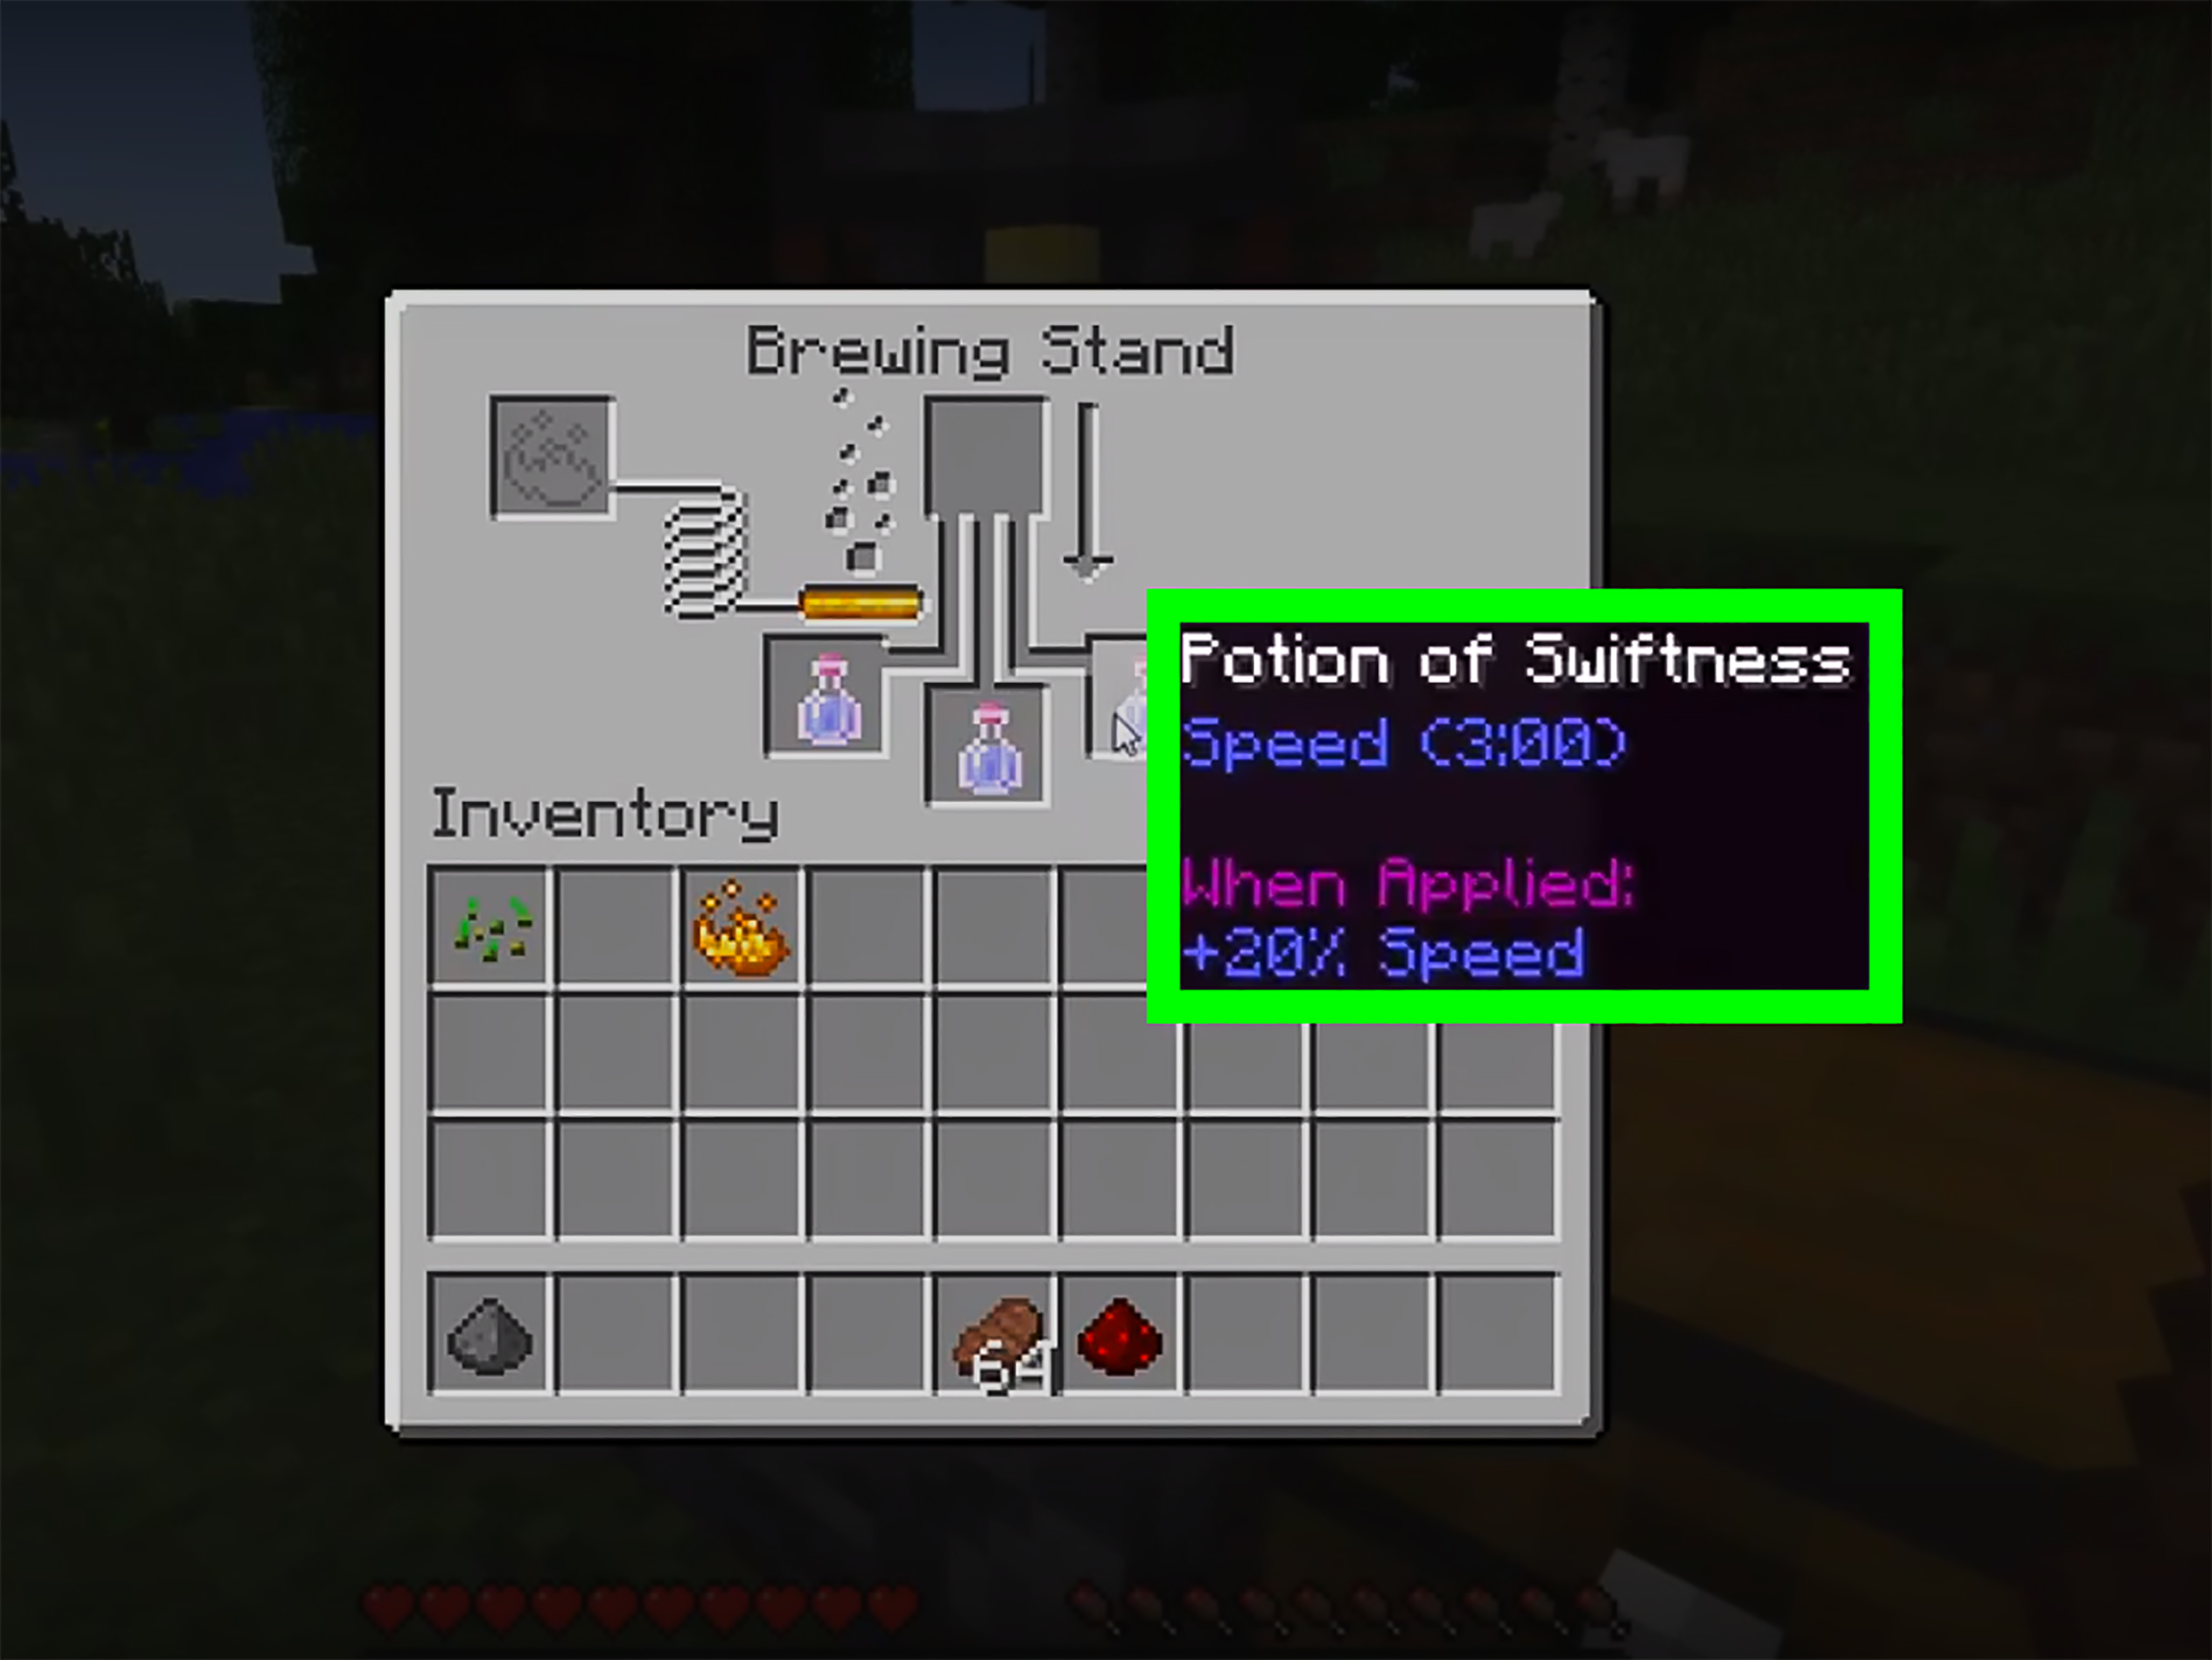
If your Minecraft character moves like they are carrying a backpack full of cobblestone, it is time to brew a Potion of Swiftness. This handy speed potion gives you the Speed effect, helping you run faster, jump farther, escape mobs, cross long distances, and generally stop feeling like a villager trying to find a bed at sunset.
The good news? Making a Potion of Swiftness in Minecraft is surprisingly simple once you understand the brewing order. You do not need rare dragon loot, enchanted gear, or a PhD in Nether chemistry. You only need a brewing stand, blaze powder, water bottles, Nether wart, and sugar. From there, you can upgrade the potion with redstone for longer duration or glowstone dust for extra speed.
This guide explains how to make a Potion of Swiftness in Minecraft in 11 clear steps, including the basic recipe, extended version, Speed II version, splash potion option, and practical survival tips for using it wisely.
What Is a Potion of Swiftness in Minecraft?
A Potion of Swiftness is a drinkable potion that gives the player the Speed status effect. The basic version increases movement speed by 20% for 3 minutes. If upgraded with glowstone dust, it becomes a Potion of Swiftness II, increasing speed by 40% for 1 minute and 30 seconds. If upgraded with redstone dust, it becomes an extended Potion of Swiftness lasting 8 minutes.
In plain Minecraft language: it makes your legs remember they have places to be.
Swiftness potions are useful in Survival mode, Hardcore mode, multiplayer servers, minigames, long-distance travel, cave escapes, Nether exploration, and boss preparation. They are especially helpful when paired with good food, armor, and a little common sensewhich, unfortunately, cannot be brewed.
Materials Needed to Make a Potion of Swiftness
Before brewing, gather the following items:
- 1 Brewing Stand
- 1 Blaze Powder for fuel
- 1 to 3 Water Bottles
- 1 Nether Wart
- 1 Sugar
- Redstone Dust, optional, for an 8-minute potion
- Glowstone Dust, optional, for Speed II
- Gunpowder, optional, for a splash potion
- Dragon’s Breath, optional, for a lingering potion
You can brew up to three potions at once in one brewing stand. Always use three water bottles when possible, because one Nether wart and one sugar can produce three Potions of Swiftness. That is not cheating; that is just efficient potion economics.
How to Make a Potion of Swiftness in Minecraft: 11 Steps
Step 1: Craft or Find a Brewing Stand
To brew any potion in Minecraft, you need a Brewing Stand. You can craft one using 1 Blaze Rod and 3 Cobblestones, Cobbled Deepslate, or Blackstone blocks. Place the Blaze Rod in the center slot of the crafting grid and the three stone blocks along the bottom row.
You can also find brewing stands naturally in some village churches, but crafting one is usually more reliable once you have visited the Nether. If you are early in the game, this is the part where Minecraft politely tells you, “Go fight a Blaze first.”
Step 2: Get Blaze Powder
Blaze Powder powers the Brewing Stand. Without it, your brewing stand is basically fancy furniture. To get Blaze Powder, defeat Blazes in a Nether Fortress and collect Blaze Rods. Place a Blaze Rod in your crafting grid to create Blaze Powder.
One Blaze Rod creates two Blaze Powder, and each powder can fuel multiple brewing operations. Keep extra Blaze Powder in your brewing area so you do not start a potion session and realize your stand has the energy level of a sleepy panda.
Step 3: Make Glass Bottles
To hold your potion, you need Glass Bottles. Smelt sand in a furnace to make glass, then place three glass blocks in a V shape in the crafting table. This creates three empty glass bottles.
Because the brewing stand has three bottle slots, it is smart to craft bottles in sets of three. Minecraft rewards batch production, and your future self will appreciate not having to run back to the furnace every five minutes.
Step 4: Fill the Bottles with Water
Take your empty glass bottles to a water source and fill them. You can use a lake, river, ocean, water bucket, or cauldron. Once filled, they become Water Bottles.
Place up to three Water Bottles in the bottom slots of the Brewing Stand. This is where the potion begins. At this stage, the bottles do nothing usefulbut be patient. Every champion starts somewhere, even if that somewhere is bottled water.
Step 5: Add Blaze Powder to the Brewing Stand
Open the Brewing Stand interface and place Blaze Powder in the fuel slot on the left. The stand will now be active and ready to brew.
If nothing happens later, check this slot first. Many brewing mistakes are not mysterious at all; the stand simply has no fuel. Think of Blaze Powder as the coffee of Minecraft alchemy.
Step 6: Add Nether Wart to Make Awkward Potions
Place Nether Wart in the top ingredient slot. After the brewing process finishes, your Water Bottles will become Awkward Potions.
Awkward Potions have no effect by themselves, but they are the base for most useful potions in Minecraft. This is a crucial step. If you add sugar directly to plain water, you do not get a Potion of Swiftnessyou get a Mundane Potion, which is about as exciting as the name suggests.
Step 7: Add Sugar to Brew the Potion of Swiftness
Now place Sugar in the top ingredient slot. When brewing finishes, your Awkward Potions will turn into Potions of Swiftness.
The standard Potion of Swiftness gives Speed for 3 minutes and increases movement speed by 20%. Sugar makes sense as the main ingredient because, apparently, even Minecraft characters respond to a little sweet energy boost.
Step 8: Choose Whether to Extend or Strengthen the Potion
At this point, you have a working Potion of Swiftness. You can drink it now, store it, or upgrade it. There are two main upgrade paths:
- Add Redstone Dust to extend the duration from 3 minutes to 8 minutes.
- Add Glowstone Dust to make Potion of Swiftness II, increasing speed by 40% for 1 minute and 30 seconds.
Choose redstone if you want longer travel time. Choose glowstone if you want maximum speed for a shorter burst. You cannot make one potion both extended and Speed II in normal vanilla brewing, so choose based on your situation.
Step 9: Make a Splash Potion of Swiftness
If you want to throw the potion instead of drinking it, add Gunpowder to the Potion of Swiftness in the Brewing Stand. This creates a Splash Potion of Swiftness.
Splash potions are great for multiplayer because you can speed up teammates, horses, dogs, or anyone standing close enough. They are also useful when you need fast activation. Drinking takes time; throwing is quicker. Just do not throw it too far away and accidentally speed-boost a zombie. That is called creating your own problem.
Step 10: Make a Lingering Potion of Swiftness
To make a Lingering Potion of Swiftness, first make a Splash Potion of Swiftness, then brew it with Dragon’s Breath. Dragon’s Breath is collected from the Ender Dragon’s purple breath attack using an empty glass bottle.
Lingering potions create a cloud that applies the potion effect to entities standing inside it. They are more advanced and less necessary for beginners, but they can be fun for multiplayer arenas, traps, team boosts, or dramatic entrances. Nothing says “I have arrived” like sprinting through a magical cloud before charging into battle.
Step 11: Store and Use Your Potion Wisely
Once your Potion of Swiftness is ready, move it into your inventory or storage chest. Keep a few near your Nether portal, mining base, raid defense area, or End portal room. You can also carry one in your hotbar for emergencies.
Drink the potion before long travel, dangerous fights, mob escapes, or timed challenges. In Hardcore mode, a speed potion can be the difference between escaping a creeper and becoming a cautionary crater.
Potion of Swiftness Recipe Summary
| Potion Type | Ingredients | Effect | Duration |
|---|---|---|---|
| Potion of Swiftness | Water Bottle + Nether Wart + Sugar | Speed +20% | 3:00 |
| Extended Potion of Swiftness | Potion of Swiftness + Redstone Dust | Speed +20% | 8:00 |
| Potion of Swiftness II | Potion of Swiftness + Glowstone Dust | Speed +40% | 1:30 |
| Splash Potion of Swiftness | Potion of Swiftness + Gunpowder | Throwable Speed effect | Varies by version and potion type |
| Lingering Potion of Swiftness | Splash Potion of Swiftness + Dragon’s Breath | Speed cloud effect | Short area effect |
Where to Find the Ingredients
How to Get Nether Wart
Nether Wart is commonly found in Nether Fortresses, usually growing near staircases on Soul Sand. It can also appear in some Bastion Remnants. Once you find Nether Wart, bring some home and grow it on Soul Sand. This gives you a renewable supply for future brewing.
How to Get Sugar
Sugar is easy to make from Sugar Cane. Sugar Cane grows near water in the Overworld. Break it, place it in your crafting grid, and you will get Sugar. You can also get sugar from witch drops, but farming Sugar Cane is far safer than waiting for a witch to donate ingredients through violence.
How to Get Redstone Dust
Redstone Dust is mined from Redstone Ore, usually found deep underground. Use it when you want a longer Potion of Swiftness. The 8-minute version is excellent for exploration, building projects, and long-distance travel.
How to Get Glowstone Dust
Glowstone Dust comes from Glowstone blocks in the Nether. Add it to a normal Potion of Swiftness to create Speed II. This version is best for short, intense moments such as PvP, boss fights, quick escapes, or dramatic “I am absolutely out of here” situations.
Best Uses for a Potion of Swiftness
The Potion of Swiftness is more than a novelty. Used correctly, it can improve your survival and efficiency in several ways.
Exploring the Nether
The Nether is full of lava lakes, hostile mobs, cliffs, and bad decisions waiting to happen. A Swiftness potion helps you move quickly between safe areas, dodge Ghast fireballs, and escape Piglin Brutes if your Bastion visit becomes socially awkward.
Running from Mobs
Skeletons, zombies, creepers, spiders, and pillagers all become less scary when you can outrun them. Speed potions are especially useful at night, during raids, or when you accidentally dig into a cave full of enemies and immediately regret your career choices.
Traveling Long Distances
If you do not have an Elytra yet, extended Potions of Swiftness are excellent for long journeys. Combine them with sprint-jumping, boats, horses, or Nether highways for faster travel.
Player-versus-Player Combat
In PvP, movement matters. Speed helps you strafe, chase, retreat, dodge arrows, and control distance. Many experienced players prefer Speed II for fights because the stronger movement boost can make them harder to hit.
Building and Resource Gathering
Swiftness potions are not just for combat. They also help when building large bases, collecting materials, lighting caves, farming trees, or running between storage rooms. A speed potion will not organize your chests, but it will help you run past the mess faster.
Common Mistakes When Brewing a Potion of Swiftness
Adding Sugar Before Nether Wart
This is the most common mistake. Sugar must be added after Nether Wart. First make Awkward Potions, then add Sugar. If you skip the Nether Wart step, you will not get the proper speed potion.
Forgetting Blaze Powder
If the brewing stand does nothing, check the fuel slot. Blaze Powder is required to power the Brewing Stand.
Using Only One Bottle
You can brew three potions at once with the same ingredients. Unless you are short on bottles, always fill all three bottom slots.
Choosing the Wrong Upgrade
Redstone extends duration. Glowstone increases strength. If you need long travel, use redstone. If you need a short burst of extra speed, use glowstone.
Pro Tips for Better Brewing
Create a small brewing station near your storage room. Keep a chest stocked with Nether Wart, Sugar, Blaze Powder, Redstone Dust, Glowstone Dust, Gunpowder, Glass Bottles, and Water Bottles. Add a water source nearby so you can refill bottles quickly.
Label your potion chests or item frames so you do not confuse Swiftness with other potions. Accidentally drinking the wrong potion before a fight is funny exactly one time.
For survival worlds, brew extended Potions of Swiftness in bulk. They are more generally useful than Speed II for travel and exploration. Save Speed II for PvP, emergency escapes, and dangerous boss situations where every second matters.
Experience Notes: What It Feels Like to Use Swiftness Potions in Real Gameplay
The first time you use a Potion of Swiftness in Minecraft, it may feel like a small upgrade. Then you go back to normal speed and suddenly your character feels like they are walking through honey while wearing iron boots. That is when you understand why experienced players keep speed potions around.
In survival gameplay, the extended 8-minute Potion of Swiftness is often the most practical version. It is perfect when you are mapping terrain, searching for villages, collecting wood, moving between farms, or running through a large base. If you have ever built a storage system on one side of your base and a crop farm on the other, you know that walking back and forth can become a full-time job. Swiftness makes those repeated trips much less painful.
In the Nether, Swiftness becomes even more valuable. The Nether is dangerous because mistakes happen quickly. You may be bridging over lava, dodging Ghasts, or sprinting away from a Wither Skeleton that has taken your presence personally. A speed potion gives you more control. It helps you retreat faster, reposition during combat, and reach shelter before a bad situation becomes a respawn screen.
For mining trips, Swiftness is useful when exploring large cave systems. You can move through tunnels faster, escape mob clusters, and cover more ground before your food supply runs low. However, speed can also make you careless. Running too quickly near ravines, lava pools, or deep drops can turn your heroic mining session into a very short tragedy. Use speed, but do not let it turn your brain off.
In multiplayer, Splash Potions of Swiftness are especially fun. Before a raid, boss fight, or group adventure, tossing a splash potion onto your team feels like starting a tiny blocky sports match. Everyone suddenly zooms around, someone runs into a wall, and someone else immediately asks for another potion. It is practical and hilarious, which is Minecraft at its best.
Speed II is the exciting version, but it is not always the best choice. The 40% speed boost feels amazing in PvP or emergencies, but the shorter duration means you need better timing. Drink it too early and the effect may run out before the fight begins. Drink it too late and you may be too busy being chased by mobs to enjoy your brilliant strategy.
One useful habit is to keep different Swiftness potions for different jobs. Store extended potions near your travel supplies, Speed II potions near your combat gear, and splash versions near your multiplayer or raid equipment. That way, you are not digging through a messy chest while zombies bang on the door like impatient delivery drivers.
Overall, the Potion of Swiftness is one of the best beginner-friendly potions in Minecraft. It is cheap, useful, easy to brew, and helpful in almost every stage of the game. Once you start brewing it regularly, plain walking begins to feel suspiciously slow.
Conclusion
Making a Potion of Swiftness in Minecraft is easy once you remember the correct brewing order: Water Bottle, Nether Wart, then Sugar. From there, you can add Redstone Dust for an 8-minute version, Glowstone Dust for Speed II, Gunpowder for a splash potion, or Dragon’s Breath for a lingering potion.
Whether you are escaping creepers, sprinting across biomes, preparing for PvP, exploring the Nether, or simply tired of jogging through your oversized base, the Potion of Swiftness is one of the most useful potions you can brew. It is affordable, flexible, and powerful enough to make your Minecraft adventures smoother, faster, and a lot more fun.
Note: Brewing behavior may vary slightly by Minecraft edition and version, but the core Potion of Swiftness recipeAwkward Potion plus Sugarremains the standard method in vanilla Minecraft.