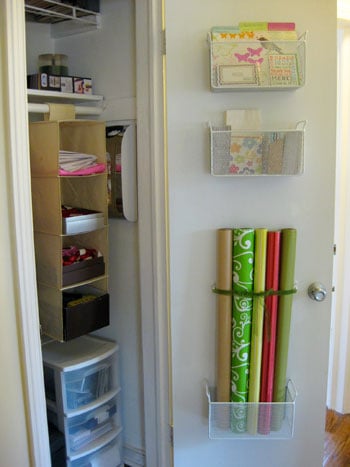
Wrapping paper is one of those sneaky household items that looks innocent at the store and immediately becomes a storage goblin at home. One minute you are buying one cheerful roll for a birthday gift; the next minute you have a leaning tower of holiday plaid, baby shower pastels, metallic dots, ribbon spools, gift bags, tissue paper, tags, tape, and one pair of scissors that disappears every December like it signed a witness protection agreement.
The good news is that you do not need a craft room, a luxury closet, or a custom cabinet worthy of a home makeover show. A simple DIY wrapping paper storage on the back of a door system can turn wasted vertical space into a neat, easy-to-use gift wrap station. It keeps rolls upright, protects paper from getting crushed, and makes all the little accessories visible before you buy duplicates. Again.
This guide walks through smart ways to build a back-of-door wrapping paper organizer, what supplies to use, how to plan the layout, and how to make the setup work for holidays, birthdays, school events, weddings, and those “Oops, I need a gift bag in 12 minutes” emergencies.
Why the Back of a Door Is Perfect for Wrapping Paper Storage
The back of a closet, pantry, laundry room, office, or spare bedroom door is often ignored. It is basically the storage equivalent of an empty parking space. While shelves and drawers fill up fast, a door offers tall vertical real estate that is ideal for long, narrow items like wrapping paper rolls.
A back-of-door storage system works especially well because wrapping supplies are usually lightweight. Paper rolls, ribbon, gift tags, bows, tissue paper, and flat gift bags do not require heavy-duty shelving. They simply need structure, visibility, and a home that is not “somewhere behind the vacuum.”
It saves floor space
Traditional wrapping paper storage often ends up in a bin under the bed, a corner of a closet, or a plastic tub in the garage. Those options work, but they can make supplies harder to reach. A door organizer lifts everything off the floor and keeps it accessible without taking up a single square foot.
It keeps supplies visible
Clear pockets, open baskets, hooks, and rods make it easy to see what you own. That means fewer duplicate rolls, fewer crushed bows, and fewer moments of holding a gift while whispering, “Where is the tape?” like the tape personally betrayed you.
It creates a mini wrapping station
Instead of hunting across three rooms, you can keep paper, scissors, tape, ribbon, gift tags, pens, and bags together. The door becomes a compact gift wrapping station that is ready whenever you are.
Best Doors for a DIY Gift Wrap Organizer
Before grabbing hooks and baskets, choose the right door. Not every door is equally suited for storage, especially if the space behind it is tight.
Closet doors
A coat closet, linen closet, craft closet, or guest room closet is usually the best option. These doors are often out of direct sight, so the organizer can stay practical without needing to look like a magazine cover. Although, if it does look cute, congratulationsyou have officially become the person who has “gift wrap energy.”
Laundry room doors
Laundry rooms are great for household overflow storage. If your laundry room has enough clearance, the back of the door can hold wrapping paper without interfering with hampers, cleaning supplies, or shelves.
Office or craft room doors
If you already keep stationery, craft tools, or school supplies in an office, adding gift wrap storage to the door makes sense. It keeps creative supplies in one zone and makes the system easier to maintain.
Pantry doors
A pantry door can work if the organizer is slim and the pantry is not already packed. Avoid storing gift wrap near anything damp, oily, or strongly scented. Nobody wants birthday paper that smells like onions and ambition.
Measure First, DIY Later
Measuring is not glamorous, but it is the step that prevents your organizer from becoming a dramatic door-stopping device. Before installing anything, check three things: door width, door height, and clearance.
Most standard wrapping paper rolls are around 30 inches long, though some holiday rolls can be longer. Measure your longest roll and make sure your layout gives it enough vertical space. Then open and close the door slowly to see how much room exists between the door and shelves, walls, clothing rods, or trim.
If you plan to use over-the-door hooks, check the top gap between the door and the frame. Thick hooks can stop a door from closing properly. If you rent or do not want holes, removable adhesive hooks or tension-style options may be better, but always follow weight limits and surface instructions.
Option 1: Over-the-Door Shoe Organizer Hack
One of the easiest DIY wrapping paper storage ideas is to repurpose a hanging shoe organizer. Choose a fabric or clear-pocket organizer that fits over the door. To hold wrapping paper rolls vertically, cut open the bottoms of several pockets, leaving the lowest pocket intact to act like a support shelf.
Slide each roll down through the opened pockets so it rests in the bottom pocket. The upper pocket sections keep the roll from flopping around, while the bottom pocket keeps it from sliding out. It is simple, affordable, and excellent for renters because many shoe organizers hang from removable over-the-door hooks.
Best for:
This method is great for small homes, apartments, dorm-style spaces, and anyone who wants a quick organizer without power tools. It also works well if you own a mix of wrapping paper, tissue paper, tape, ribbon, and gift tags.
Helpful tip:
Use the smaller pockets for scissors, tape, pens, folded tissue paper, gift tags, and small bows. Keep sharp tools in higher pockets if younger children are in the home.
Option 2: Curtain Rods or Wooden Dowels
If you prefer a clean, built-in look, use slim curtain rods, tension rods, or wooden dowels mounted horizontally across the back of the door. This creates a dispenser-style wrapping station where rolls can sit on rods and pull forward when needed.
For this setup, mount two brackets or hooks per rod, spacing them wide enough to hold a roll of wrapping paper. Use one rod for everyday paper, one for holiday paper, and another for ribbon spools if space allows. You can also mount a small basket below the rolls for tape and tags.
Best for:
This system works well for people who wrap gifts often and want paper to be easy to unroll and cut. It is especially handy in a craft room or home office where the door can stay open while you work.
Helpful tip:
Do not overload the rods. Wrapping paper is light, but too many rolls can strain adhesive hooks or lightweight hardware. If you use screws, make sure they are appropriate for your door type.
Option 3: Wire Rack Door System
A wire door rack is a more structured solution. Many over-the-door rack systems include baskets, hooks, and adjustable components. Some are designed specifically for gift packaging, while others are pantry or utility racks that can be adapted for wrapping paper storage.
The benefit of a wire rack is flexibility. Tall lower baskets can hold wrapping paper rolls, medium baskets can hold gift bags and tissue paper, and small baskets can corral tags, tape, ribbon, and cards. Hooks can hold scissors or reusable gift totes.
Best for:
This method is ideal for households with lots of gift wrap supplies or anyone who wants a long-term organizer that feels sturdy and polished.
Helpful tip:
Choose a rack with adjustable baskets if possible. Gift wrap supplies change with seasons, and flexibility prevents the system from becoming useless the moment you buy one extra-large roll with snowmen wearing sunglasses.
Option 4: Pegboard on the Back of the Door
A small pegboard panel can turn the back of a door into a customizable craft and wrapping zone. Pegboard hooks can hold scissors, tape, ribbon, small baskets, tags, twine, and even lightweight rods for paper rolls.
This option looks organized because every item has a defined spot. It also makes it easy to rearrange the system as your supplies change. If you like labeling, color-coding, or making your storage look suspiciously satisfying, pegboard is your friend.
Best for:
Pegboard is great for craft lovers, teachers, parents, home office users, and people who want a storage system that can expand beyond wrapping paper.
Helpful tip:
Use shallow baskets for tape, gift tags, and mini cards. Add a small clip or hook for a measuring tape so you can size ribbon or paper without guessing.
Option 5: DIY Fabric Pocket Organizer
If you sew or enjoy simple fabric projects, a custom hanging pocket organizer can be made to fit your exact door and supply collection. Use sturdy canvas, denim, or upholstery fabric, then create long vertical channels for rolls and smaller pockets for accessories.
This option takes more effort, but it gives you total control over size, color, pocket depth, and layout. You can add labels, elastic bands, ribbon loops, or clear vinyl pockets. It is also a smart way to use leftover fabric from other projects.
Best for:
A fabric organizer works well for narrow doors, unusual spaces, or anyone who wants storage that looks soft and decorative rather than industrial.
Helpful tip:
Reinforce the top edge with a wooden dowel or flat strip so the organizer does not sag in the middle. Sagging is cute on a sleepy dog, not on your storage system.
What to Store in a Back-of-Door Wrapping Station
A great wrapping paper organizer should hold more than rolls. The goal is to create a complete station so you can wrap a gift without wandering through the house like a confused holiday elf.
Wrapping paper rolls
Sort rolls by occasion: holidays, birthdays, weddings, baby showers, neutral designs, and kids’ themes. Neutral paper is especially useful because it can work year-round with different ribbons or tags.
Gift bags
Store gift bags flat by size. Use a file holder, magazine holder, or wide pocket to keep them upright. Put small bags in front and large bags behind so you can see your options quickly.
Tissue paper
Keep tissue paper folded in a clear pocket, shallow basket, or document sleeve. Sort by color if you want a cleaner look. Or sort by “not crumpled” and “still technically usable,” which is also valid.
Ribbon and bows
Ribbon spools can hang on a small dowel or sit in a basket. Bows should be stored where they will not get smashed. Clear pockets are helpful because you can see colors at a glance.
Tools and extras
Add scissors, tape, double-sided tape, pens, markers, gift tags, cards, twine, stickers, and a small ruler. If you use batteries for light-up cards or small gifts, keep them somewhere separate and safe, not loose with sharp tools.
Step-by-Step: Build a Simple Back-of-Door Wrapping Paper Organizer
Here is a practical beginner-friendly plan using a hanging shoe organizer, adhesive hooks, and a few small baskets. It does not require drilling, and it can be completed with common supplies.
Step 1: Declutter your wrapping supplies
Pull everything out first. Toss torn paper, dried-out tape, crushed bows, wrinkled tissue you truly will not reuse, and tiny scraps that are too small for anything except wrapping a single grape. Keep the supplies you actually like and use.
Step 2: Sort by category
Make piles for rolls, bags, tissue, ribbon, bows, tags, cards, and tools. Sorting first helps you choose the right pocket layout instead of stuffing items randomly and hoping for emotional support from gravity.
Step 3: Prepare the hanging organizer
If using a shoe organizer, cut the bottoms from the upper pockets where the wrapping paper rolls will slide through. Leave the bottom row intact to support the rolls. Use sharp scissors and make clean cuts so the fabric or plastic does not rip further.
Step 4: Hang and test the organizer
Place the organizer over the door and slowly close the door. Check that the hooks fit, the door shuts fully, and the organizer does not scrape the wall or shelving behind it.
Step 5: Load the wrapping paper rolls
Slide rolls vertically through the modified pockets. Put taller or heavier rolls near the sides or center where the organizer hangs most evenly. Keep seasonal rolls together so you can rotate them easily.
Step 6: Add accessories
Use the remaining pockets for tape, scissors, ribbon, tags, tissue paper, cards, and bows. Keep the most-used items at eye level. Store less-used items higher or lower.
Step 7: Label the pockets
Labels are not required, but they make maintenance easier. Simple labels like “Tape,” “Tags,” “Ribbon,” “Bows,” and “Birthday Bags” help everyone in the house return items to the right place. In theory. We remain hopeful.
How to Keep Wrapping Paper From Unrolling
Loose wrapping paper can quickly become wrinkled and messy. To keep rolls tight, use gentle paper bands, reusable elastic bands, small fabric ties, or cut cardboard tubes. Avoid regular tape directly on decorative paper because it can tear the design.
A clever low-cost trick is to cut a slit along an empty paper towel or toilet paper tube and slip it around the roll like a sleeve. This keeps the paper from unrolling without damaging the surface. It also gives a second life to cardboard tubes, which is the kind of tiny household victory we should absolutely celebrate.
Safety and Door Protection Tips
Back-of-door storage is simple, but it still needs to be installed thoughtfully. Avoid making the organizer too heavy, especially on hollow-core doors. Check weight limits for adhesive hooks and over-the-door systems. If drilling, use hardware that suits the material of the door.
Add felt pads or soft bumpers where baskets or rods touch the door to prevent scratches. If the door swings quickly, use a doorstop so the organizer does not slam into the wall. Also, keep scissors and sharp tools secure, especially in homes with children or pets.
Small-Space Ideas for Apartments and Rentals
Renters can still create excellent wrapping paper storage without permanent damage. Over-the-door organizers, removable hooks, slim hanging racks, and tension-style rods are all useful options. The key is choosing lightweight supplies and checking that the door closes properly.
If space is extremely tight, use the door for accessories and store rolls in a tall basket nearby. Another smart option is to keep everyday wrapping paper on the door and seasonal paper in a flat under-bed container. That way, the door organizer stays useful without becoming overloaded.
How to Make It Look Pretty
Function comes first, but a door organizer does not have to look chaotic. Choose a consistent color palette for baskets, labels, and hooks. Clear pockets are practical, while woven baskets or white wire racks look cleaner. Matching ribbon spools and sorting paper by color can make the whole setup feel intentional.
For a polished look, place the tallest rolls at the bottom, medium supplies in the middle, and small accessories at the top. Keep labels simple and use the same style throughout. You can even add a small clip-on light if the closet is dark.
Common Mistakes to Avoid
Overloading the organizer
The fastest way to ruin a door storage system is to treat it like a garage shelf. Keep it light. Store only the wrapping supplies you use regularly and move bulky extras elsewhere.
Forgetting door clearance
Always test the door after loading the organizer. A setup that closes when empty may not close once filled with rolls and baskets.
Mixing everything together
If ribbon, bows, tags, and tape all live in one pocket, you have not created organization; you have created a small festive swamp. Give each category its own space.
Keeping damaged supplies
Old crushed bows, torn paper, and sticky tape clutter the system. A good organizer works best when it holds items you will actually use.
Budget-Friendly Supply List
You can build a basic DIY back-of-door wrapping station with affordable materials. Consider using an over-the-door shoe organizer, removable hooks, small baskets, binder clips, labels, elastic bands, cardboard tube sleeves, and a pair of dedicated scissors.
For a sturdier version, use a wire door rack, adjustable baskets, wooden dowels, curtain rod brackets, pegboard accessories, or shallow file holders. Many of these items can be repurposed from home office, pantry, or closet storage supplies you may already own.
Maintenance: The Five-Minute Reset
The secret to keeping wrapping paper storage neat is a quick reset after every wrapping session. Put scissors back immediately. Return tape to its pocket. Slide paper sleeves back onto rolls. Flatten gift bags before storing them. Toss scraps that are too small to reuse.
At the end of each holiday season, do a deeper reset. Remove empty rolls, recycle damaged paper, sort leftover supplies, and move seasonal designs to the back or bottom. This makes the organizer ready for the next birthday, graduation, housewarming, or “I forgot the party was today” moment.
Real-Life Experience: What You Learn After Using a Back-of-Door Gift Wrap Station
After living with a DIY wrapping paper storage system on the back of a door, the first thing you notice is how much calmer gift wrapping becomes. That may sound dramatic, but anyone who has wrapped a present on the floor at midnight with dull scissors understands the emotional range of this activity. A door organizer turns the process from a scavenger hunt into a simple routine.
One practical lesson is that visibility changes buying habits. When supplies are hidden in bins, it is easy to forget what you have. You buy another roll of birthday paper, another bag of bows, and another pack of gift tags because you cannot remember what is buried in the closet. Once everything is visible on the door, you naturally shop less and use what you already own. The organizer becomes a polite little inventory manager.
Another experience is that categories matter more than perfection. At first, you may want every pocket to look beautiful. Then real life happens. Someone wraps a gift quickly. A ribbon spool gets tossed into the tag pocket. A gift bag comes home from a party and needs a place to land. The system works best when categories are obvious and forgiving. Big sections for paper, bags, tissue, ribbon, and tools are easier to maintain than tiny micro-categories that require museum-level discipline.
It is also helpful to keep neutral wrapping paper in the easiest spot. A roll of kraft paper, white paper, or simple striped paper can handle birthdays, weddings, thank-you gifts, teacher gifts, and holidays with a change of ribbon. Neutral paper is the jeans-and-white-shirt of gift wrapping: not flashy, but it always shows up and does the job.
Door movement matters too. If the door is opened ten times a day, the organizer needs to be secure and slim. A frequently used pantry door may not be the best place for bulky baskets. A closet door in an office or guest room usually works better because it moves less often. If the organizer swings or bumps, small felt pads and tighter hooks can make a big difference.
You also learn that the best scissors should live with the wrapping supplies. Not the kitchen scissors. Not the mystery scissors from the junk drawer. A dedicated pair of sharp scissors makes gift wrapping easier and keeps paper edges cleaner. Attach them with a hook, ribbon loop, or labeled pocket. This one detail prevents an absurd amount of household wandering.
Finally, a back-of-door wrapping paper organizer makes gifting feel more enjoyable. When everything is easy to reach, you are more likely to add a ribbon, reuse a nice bag, write a thoughtful tag, or wrap a gift before the last possible second. The setup does not have to be fancy. It just has to remove friction. And honestly, any storage project that saves money, reduces clutter, and prevents a wrestling match with a rogue roll of snowflake paper deserves a round of applause.
Conclusion
A DIY wrapping paper storage on the back of a door is one of the smartest small-space organizing projects because it uses an area most people overlook. Whether you choose a shoe organizer hack, a wire rack, a pegboard, dowels, or a custom fabric pocket system, the goal is the same: keep gift wrap supplies visible, protected, and easy to use.
The best setup is not the most expensive one. It is the one that fits your door, your supplies, and your habits. Measure carefully, keep the system lightweight, sort items by category, and reset it after each wrapping session. Do that, and your gift wrap collection will stop acting like a decorative landslide and start behaving like an organized little department store.