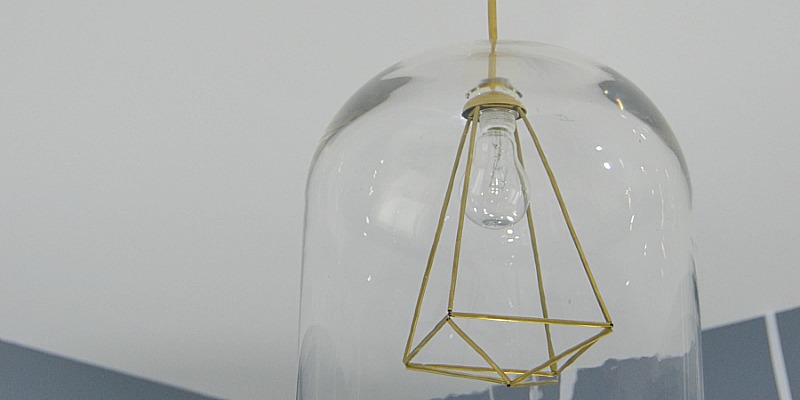
A DIY glass and Himmeli pendant light is what happens when Scandinavian geometry walks into a hardware store and says, “Make me glow.” It combines the airy, faceted look of traditional Himmeli craft with the clean sparkle of glass and the practical magic of a pendant light kit. The result is modern, handmade, and just dramatic enough to make guests ask, “Where did you buy that?” while you casually sip coffee and pretend you did not spend twenty minutes looking for the tiny tube that rolled under the sofa.
This project is perfect for anyone who loves modern farmhouse lighting, Nordic home decor, geometric pendant lights, or affordable DIY lighting upgrades. Instead of buying a pricey designer fixture, you create a custom light using a glass hurricane shade, metal tubing or brass straws, thin wire, and a safe pendant light kit. It looks elegant over a reading corner, kitchen island, breakfast nook, bedside table, hallway, or small entryway.
Before we begin, one bright little warning: electricity is not the place to freestyle. You can absolutely build the decorative Himmeli shade yourself, but any hardwired ceiling installation should follow local electrical codes. Use UL-listed or safety-certified electrical parts, turn power off at the breaker, test wires before touching them, and hire a licensed electrician if you are unsure. Your light should be charming, not spicy.
What Is a Himmeli Pendant Light?
A Himmeli is a traditional Finnish geometric mobile, historically made from straw and hung as a festive decoration. Its signature beauty comes from repeated triangles, diamonds, and octahedron-like forms that create delicate shadows. Modern makers now recreate the same airy shapes with brass tubing, copper pipe, plastic straws, metal rods, and other lightweight materials.
A Himmeli pendant light borrows that geometric structure and turns it into a decorative cage around a bulb or glass shade. When paired with glass, the design gets even better. The glass softens the bulb, protects the visual center, and adds a polished “real fixture” look. The Himmeli frame adds architectural lines, so the pendant feels sculptural without becoming bulky.
Why Make a DIY Glass and Himmeli Pendant Light?
It Looks Expensive Without Being Expensive
Designer geometric pendant lights can cost far more than most of us want to admit, especially when the word “artisan” enters the chat. A DIY version can deliver a similar modern look using accessible supplies: a pendant kit, glass hurricane cylinder or globe, brass tubing, floral wire, and basic hand tools. The finished light can feel boutique, but your wallet will not need a support group.
It Works With Many Decor Styles
This light fits beautifully into Scandinavian, modern farmhouse, boho, industrial, Japandi, minimalist, and transitional interiors. Brass tubing warms up white walls. Black metal tubing makes the fixture feel graphic and modern. Copper adds a rosy vintage touch. Clear glass keeps things airy, while seeded or frosted glass creates a softer glow.
It Is Customizable
You choose the size, finish, shade shape, bulb warmth, and hanging height. Want a small pendant over a nightstand? Make a compact frame. Need a statement over a dining table? Go wider and taller. Prefer a renter-friendly option? Use a plug-in pendant kit with a ceiling hook rather than hardwiring.
Materials You Will Need
Gather everything before starting. This is one of those projects where having the right supplies makes you feel like a calm craft wizard instead of a person yelling at a spool of wire.
- Glass hurricane vase, glass cylinder, or glass globe shade
- UL-listed pendant light kit or plug-in pendant cord kit
- LED bulb that fits the socket and shade clearance
- Brass tubing, copper tubing, aluminum tubing, or sturdy metal craft straws
- Thin-gauge wire, jewelry wire, or strong nylon cord for joining tubes
- Pipe cutter, mini hacksaw, or tube cutter
- Needle-nose pliers
- Measuring tape or ruler
- Marker
- Sandpaper or metal file
- Ceiling hook, canopy, or mounting hardware depending on your pendant kit
- Safety glasses and work gloves
Choosing the Right Glass Shade
The glass element is the heart of this project. A straight hurricane cylinder gives a clean modern look and is easy to center inside the frame. A round globe feels softer and more midcentury. Seeded glass adds texture and hides dust better than clear glass, which is a blessing for anyone who believes cleaning light fixtures is a twice-a-decade ceremony.
Check the opening size before buying. The pendant socket and bulb must fit comfortably inside the glass. The glass should not touch the bulb, and there should be enough airflow to prevent heat buildup. For that reason, an LED bulb is the smart choice. LEDs use far less energy than incandescent bulbs and run cooler, making them better suited for decorative fixtures.
Planning the Himmeli Frame
Start With a Simple Diamond Shape
The easiest Himmeli-inspired frame is a long diamond or double-pyramid form. Imagine two pyramids joined base to base, with the glass shade suspended through the center. This shape gives the pendant height, symmetry, and that classic geometric silhouette.
For a small pendant, cut twelve equal tube pieces for the main diamond. For a more elongated fixture, use shorter pieces around the middle and longer pieces for the upper and lower points. Keep the design balanced so the frame hangs evenly.
Use a Paper Mockup First
Before cutting metal tubing, sketch the pendant on paper. Mark the height, width, glass shade size, and cord path. You can even make a quick mockup with drinking straws and string. It may look like a school science project, but it will save you from cutting twelve perfect brass pieces that create a pendant the size of a hamster condo.
How to Make a DIY Glass and Himmeli Pendant Light
Step 1: Measure the Glass Shade
Measure the height and widest diameter of your glass shade. Your Himmeli frame should be wider than the glass by at least one to two inches on each side. This keeps the glass from scraping the metal frame and gives the fixture visual breathing room.
Step 2: Cut the Tubing
Use a tube cutter or mini hacksaw to cut your metal tubing into equal sections. For a balanced diamond frame, cut twelve pieces of the same length. For a taller, more dramatic pendant, cut eight longer pieces for the top and bottom angles and four shorter pieces for the center belt.
After cutting, smooth the ends with sandpaper or a small file. This matters because sharp tube edges can fray wire, scratch glass, or poke your fingers with the confidence of a tiny medieval weapon.
Step 3: Thread the First Triangle
Cut a long piece of wire or strong cord. Thread three tubes onto it and twist or tie the ends to form a triangle. This triangle is the building block of the whole Himmeli frame. Keep the connection snug, but do not crush the tubing.
Step 4: Build the Geometric Cage
Add more tubes one at a time, creating connected triangles until the frame forms a diamond or lantern shape. The goal is symmetry. If one side looks slightly wonky, adjust the wire tension before locking everything down. Himmeli designs are forgiving, but only up to the point where “handmade charm” becomes “possibly attacked by a raccoon.”
Step 5: Test Fit the Glass
Slide the glass shade into the center of the frame. It should sit naturally without forcing the tubing apart. If it is too tight, rebuild the center section with longer tube pieces. If it is too loose, add small interior support wires or a discreet ring to keep the glass centered.
Step 6: Add the Pendant Kit
Feed the pendant cord through the top opening of the Himmeli frame and through the glass shade according to the pendant kit design. Some kits use a socket ring to hold a shade in place. Others are designed for open decorative bulbs. Make sure the socket is secure, the bulb hangs straight, and the glass is supported by hardware rated for that purpose.
Step 7: Choose the Bulb
Use an LED bulb with the correct base size and wattage equivalent for your pendant kit. A warm white bulb around 2700K creates a cozy glow for dining areas and bedrooms. A 3000K bulb feels slightly cleaner and works well in kitchens or work zones. Clear Edison-style LEDs look attractive in transparent glass, while frosted LEDs reduce glare.
Step 8: Hang the Fixture Safely
For a plug-in pendant, install a sturdy ceiling hook into a joist or appropriate anchor, then swag the cord neatly to an outlet. For a hardwired pendant, follow the manufacturer’s instructions and local code. Confirm the electrical box is rated to support the fixture. If the wiring, grounding, box support, or canopy installation feels unfamiliar, call an electrician. There is no shame in outsourcing the part that can bite.
Design Ideas for Your Pendant Light
Brass and Clear Glass
Brass tubing with clear glass is the classic combination. It feels warm, modern, and elegant. Use it over a marble countertop, white dining table, or wood nightstand for instant polish.
Black Metal and Smoked Glass
For a moodier look, pair matte black tubing with smoked glass. This version works well in industrial kitchens, modern lofts, and masculine bedroom designs. Add a warm LED bulb so the fixture does not feel too cold.
Copper and Seeded Glass
Copper tubing and seeded glass create a vintage-meets-modern look. This combination is excellent for cozy breakfast nooks, cottage kitchens, and warm neutral interiors.
White Frame and Frosted Glass
A white Himmeli frame with frosted glass feels soft and Scandinavian. It is ideal for small rooms because it adds shape without visual heaviness.
Where to Use a DIY Glass and Himmeli Pendant Light
This pendant is surprisingly versatile. Hang one over a small entry table to create a welcoming glow. Use a pair over bedside tables to free up nightstand space. Install three in a row above a kitchen island for a custom designer look. Place one in a reading corner with a plug-in kit and suddenly your chair becomes a “reading nook,” not just the place where laundry waits for its destiny.
Scale matters. A small pendant can disappear over a large dining table, while an oversized one can overwhelm a narrow hallway. As a general rule, let the fixture feel proportional to the furniture below it. In multiples, leave enough space between pendants so each shape can be appreciated.
Common Mistakes to Avoid
Using the Wrong Bulb
A bulb that runs too hot, sticks out awkwardly, or exceeds the pendant kit rating can ruin the project. Choose an LED bulb that fits the socket, respects the fixture rating, and leaves space around the glass.
Skipping the Mockup
Metal tubing looks simple until you cut it. A quick straw mockup helps you test proportions before committing to the final material.
Ignoring Weight
Glass adds weight. Make sure your pendant cord, socket ring, ceiling hook, canopy, and electrical box can handle the load. Decorative wire should not be the only thing holding heavy glass overhead.
Making the Frame Too Tight
The Himmeli cage should frame the glass, not squeeze it. Glass can crack under pressure, especially if the fixture shifts during installation.
Forgetting Maintenance
Dust will find your pendant. It always does. Choose a design that lets you remove the glass or reach inside for cleaning. Future you will be grateful, and future you is already dealing with enough.
Safety Tips for DIY Pendant Lighting
DIY lighting should be beautiful, but it also needs to be safe. Use a pendant light kit from a reputable manufacturer. Look for listed or certified electrical components. Do not modify electrical parts unless the kit instructions allow it. Keep wire connections enclosed in an approved junction box or canopy. Turn off power at the breaker before any installation work, and verify with a voltage tester.
If you are installing the light in a kitchen, bathroom, laundry room, or damp location, choose components rated for that environment. Avoid placing a glass pendant where it can be bumped by cabinet doors, tall people, enthusiastic children, or anyone gesturing wildly during dinner.
Budget Breakdown
A DIY glass and Himmeli pendant light can be affordable, especially if you already own basic tools. A glass hurricane vase may cost $10 to $30. A pendant kit can range from $15 to $60 depending on whether it is plug-in or hardwired. Brass or metal tubing may cost $10 to $40. Wire, hooks, and small supplies usually add another $5 to $15.
That means many versions can be made for under $100, although premium glass, solid brass, or professional installation will increase the cost. Even then, the result can still be less expensive than buying a designer geometric glass pendant.
My Experience With DIY Glass and Himmeli Pendant Lights
The first time I tried making a Himmeli-style pendant light, I learned two things very quickly. First, geometric lighting looks effortless only after you have measured everything twice, cut once, and then quietly recut the piece you were absolutely sure was “close enough.” Second, brass tubing has a secret talent for rolling off tables at the exact moment you need it.
My project started with a clear glass hurricane vase from a home store and a simple pendant light kit. I wanted a fixture that looked modern but not cold, handmade but not “summer camp with electricity.” The glass gave the design a polished center, while the Himmeli frame made it feel custom. I used brass tubing because it added warmth and looked great against white walls. The plan was a long diamond shape, tall enough to feel elegant but narrow enough to hang in a small breakfast nook.
The mockup stage saved the whole project. I used paper straws and thread to test the shape before cutting the brass. At first, the frame was too squat and made the glass look like it was wearing a tiny geometric hat. Cute? Maybe. Pendant-worthy? Not quite. I lengthened the upper and lower tubes, and suddenly the proportions looked intentional. That is the magic of Himmeli design: small changes in tube length can completely change the personality of the piece.
Threading the tubing was calming once I stopped rushing. The frame came together triangle by triangle, and each new connection made the shape stronger. I found that keeping gentle tension on the wire helped the pendant stay crisp. Too loose, and the frame looked sleepy. Too tight, and the angles twisted. The sweet spot was firm but flexible.
The glass fit was the most important test. I wanted the shade centered, not clanking against the frame every time someone opened a window. A few discreet support wires helped keep it aligned without being obvious. Once the LED bulb went in, the pendant changed completely. The brass caught the warm light, the glass softened the glow, and the frame cast subtle lines on the ceiling. It looked far more expensive than it was, which is the highest compliment a DIY project can receive.
The biggest lesson? Do not rush the hanging height. I adjusted mine three times. Too high, and the fixture lost drama. Too low, and it felt like it wanted to join breakfast. Over a table or island, the pendant should feel connected to the surface below without blocking conversation or sightlines. In a corner, it can hang lower and create a cozy pool of light.
Maintenance has been easy. I dust the frame with a microfiber cloth and remove the glass occasionally for a deeper clean. The LED bulb keeps heat low, and the open geometric frame allows airflow. Best of all, the pendant still gets compliments. People notice the shape first, then the glass, then the warm light. When they ask where it came from, saying “I made it” feels wonderfully satisfyinglike winning a tiny home decor trophy, but with better lighting.
Conclusion
A DIY glass and Himmeli pendant light is a smart project for anyone who wants custom lighting without paying custom-lighting prices. It blends traditional Finnish-inspired geometry, modern glass, warm metal finishes, and practical pendant lighting into one eye-catching fixture. The project is flexible enough for renters, homeowners, beginners, and experienced makers, as long as safety stays at the top of the list.
Use quality materials, choose an LED bulb, plan your proportions carefully, and respect the electrical side of the project. Build the decorative frame yourself, but bring in a professional when hardwiring is beyond your comfort zone. The final result is more than a light. It is a handmade sculpture that glows, which is basically the home decor equivalent of having a personality and a job.