Every great hardware conference needs three things: smart people, caffeine, and a badge that quietly whispers, “You were planning to sleep this weekend? Adorable.” The Hackaday Superconference badge is not the little plastic rectangle your dentist’s convention hands out. It is a working electronic playground, a conversation starter, a puzzle box, a development board, and occasionally a tiny source of panic when firmware meets a deadline wearing roller skates.
Building the Hackaday Superconference Badge is a story about hardware ambition under conference-pressure conditions. The badge has evolved across different Superconference years, but the 2017 camera badge remains one of the most memorable examples of what happens when a team decides that an attendee credential should also be a programmable gadget with a camera, display, games, storage, and hackable expansion potential. In other words, it is what a name tag becomes after spending too much time around solder fumes and extremely confident engineers.
This article explores how a badge like this is imagined, designed, manufactured, tested, hacked, and loved by the badgelife community. Along the way, we will look at practical design choices, production risks, firmware drama, and the strange joy of turning a conference pass into a tiny embedded system people actually want to wear.
What Makes a Hackaday Superconference Badge Different?
A normal event badge says, “Hello, my name is.” A Hackaday Superconference badge says, “Hello, my name is also an embedded development platform.” That difference matters. The Superconference has long attracted hardware hackers, embedded developers, circuit designers, makers, reverse engineers, and people who can identify an unmarked voltage regulator from across the room. Giving this crowd a flat printed badge would be like serving instant noodles at a barbecue competition.
The badge is part ticket, part challenge, and part community ritual. It gives attendees something to explore immediately. Before the first talk begins, people are already comparing headers, poking through firmware menus, scanning PCBs, and asking the sacred question: “What happens if I connect this pin to that thing?” Ideally, the answer is “something delightful,” not “smoke,” though the line between the two has occasionally been thin enough to require magnification.
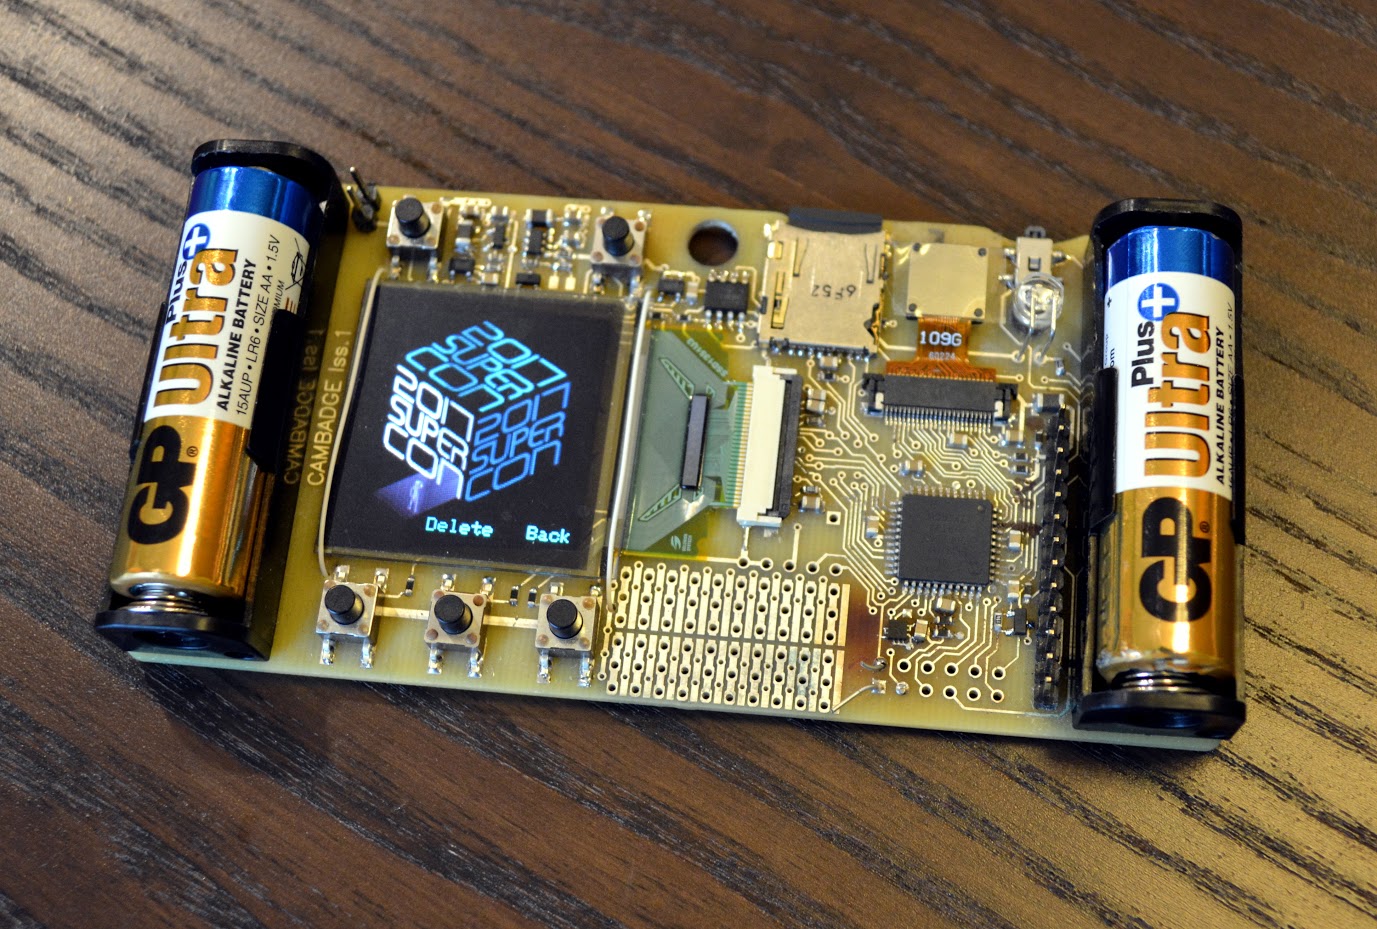
The 2017 Hackaday Superconference badge captured this spirit beautifully. Designed by Mike Harrison of Mike’s Electric Stuff, it included a PIC32 microcontroller, an OV9650 camera module, a crisp 128 x 128 color OLED display, microSD storage, buttons, an accelerometer, and firmware that supported features such as video capture, games, puzzles, and self-testing. That is a lot of personality for something hanging from a lanyard.
The Big Idea: Build a Badge People Can Actually Hack
The strongest conference badges are not just finished products. They are invitations. The design needs enough built-in functionality to be exciting on day one, but it also needs enough exposed possibility that attendees can make it their own. A perfectly sealed, fully polished gadget might look impressive, but if nobody can modify it, the fun drops faster than a lithium coin cell in a badge with every LED enabled.
For the Hackaday Superconference, hackability is not a bonus feature. It is the whole meal. Earlier badges experimented with LEDs, bootloaders, USB programming, and puzzle layers. Later badges leaned into retro computing, FPGA exploration, vector displays, MicroPython, Simple Add-Ons, and cartridge-style expansions. Each year had its own flavor, but the design philosophy stayed consistent: give the community a tool, not a trophy.
Design Goals That Matter
A badge builder has to balance several competing goals. It should be visually memorable, affordable enough to build in hundreds of units, rugged enough to survive a weekend in backpacks and hotel rooms, and open enough to reward curiosity. It should also be buildable on a schedule that is usually shorter than anyone wants to admit.
For the 2017 camera badge, the initial design process reportedly considered ideas such as large LED matrices and custom segmented displays. Those concepts had charm, but they also came with manufacturing risks. A huge LED matrix can create a beautiful wall of blinkiness, but assembly time and part count can become brutal. A custom LCD can look incredible, but tooling and lead times can turn one mistake into an expensive souvenir. The camera-based badge offered a stronger balance: ambitious, interactive, software-friendly, and possible to manufacture.
Core Hardware: Tiny Board, Big Personality
At the heart of the 2017 badge was a PIC32 microcontroller. This choice gave the badge enough processing power to coordinate camera input, display output, storage, buttons, and application logic. The camera module brought the obvious headline feature: attendees could capture images and video directly from the badge. The OLED display made the badge feel alive. The microSD card added room for media and data. The accelerometer opened the door to motion-based interaction. The buttons made menus and games practical without requiring everyone to carry a keyboard around the conference like a cyberpunk court stenographer.
This mix of parts matters because it turned the badge into a complete embedded product rather than a novelty PCB. A display without input is a sign. Input without output is a guessing game. A camera without storage is a magic trick with commitment issues. The Superconference badge combined these pieces into a device that could do things immediately and still leave plenty of room for attendee creativity.
Why the Camera Was Such a Clever Choice
A camera badge is playful in a way that LEDs alone are not. It invites instant experiments: take a picture, record a clip, process pixels, create visual filters, build puzzles, or turn the badge into a strange wearable art machine. Because the badge also had a display, the feedback loop was immediate. You could point, capture, view, modify, and repeat.
That feedback loop is gold for a conference. People learn faster when they can see results quickly. A badge that requires a complicated toolchain before doing anything interesting may thrill advanced developers, but it can scare away beginners. A badge with built-in camera demos and games says, “Start here. Break it later.” That is friendly design wearing hacker boots.
Firmware: Where the Badge Becomes a Character
Hardware gives the badge a body. Firmware gives it a personality. The 2017 badge firmware included application behavior, media features, menus, and a manufacturing self-test. That self-test was not glamorous, but it was essential. In production, every assembled board needs to prove that its major components work. A self-test that displays a clear pass or fail result can save hours of manual inspection.
During production, this became especially important. The first batch revealed an accelerometer issue caused by a difference between prototype and production parts. The production accelerometer used a different I2C address than expected. Fortunately, the fix was handled in firmware by updating the address in the relevant code. This is exactly why good test firmware is not optional. It is the difference between “we found the problem” and “everyone please stare at these boards until one of them confesses.”
The Last-Minute Nature of Real Badge Development
Conference badge firmware is famous for being “almost done” right until someone is packing boxes. The 2017 badge was no exception. Sleep behavior, bootloader details, power-control quirks, and final feature polish all had to be solved under pressure. One especially memorable fix involved dealing with sleep mode and power regulation noise by using software control to help the badge shut down properly.
This is not unusual in embedded work. A schematic can look perfect, a prototype can behave nicely, and then the production version can introduce tiny differences that become loud at scale. A trace is slightly longer. A replacement part has a different default address. A regulator behaves differently when the battery is low. Firmware becomes the negotiator between what the hardware promised and what reality delivered.
Manufacturing Hundreds of Badges Is Not Just “Make One, But More”
One of the biggest misconceptions in hardware is that a production run is just a prototype multiplied by quantity. It is not. Building one badge on a bench is engineering. Building hundreds for a conference is logistics, purchasing, assembly, testing, packaging, documentation, and emotional cardio.
The Hackaday Superconference badge had to be built on a compressed timeline and in a quantity large enough for attendees. That meant the team had to think about bill of materials availability, assembly house workflow, programming steps, SD card preparation, inspection, rework, and shipping. Every part needed to be real, orderable, and compatible. Every test had to be fast enough to run repeatedly. Every manual step had to be questioned, because a five-minute task becomes a serious problem when multiplied by hundreds of boards.
Design for Assembly, Not Just Design for Awesomeness
Badge designers love creative shapes, exposed copper, weird displays, custom connectors, and board outlines that make PCB fabs sigh deeply. Creativity is welcome, but production has opinions. Components need sensible placement. Connectors need enough clearance. Test points need to be reachable. Firmware programming should not require a ritual involving three hands and a lucky screwdriver.
The 2017 badge benefited from a hardware self-test that simplified production verification. A programmer could be connected, firmware loaded, and the screen would show whether the board passed. That kind of clarity is invaluable. A production team should not need to know the entire badge architecture to verify that a unit works. The board should tell them.
The Role of Open Documentation
Documentation turns a badge from a mysterious artifact into a platform. The 2017 badge had official project documentation on Hackaday.io, including descriptions of the hardware, firmware, bootloader, and hacking possibilities. This matters because attendees arrive with different experience levels. Some can read a schematic like a bedtime story. Others need a gentle map before they start poking registers.
Good documentation should explain what the badge does, where the buttons and headers are, how to build firmware, how to add applications, and what not to short unless you enjoy troubleshooting under fluorescent lighting. It should also point out safe expansion options. The best badge docs do not just say “here is the schematic.” They say, “Here is where to begin, here is how not to get lost, and here is where the fun starts.”
Why Headers and Expansion Matter
Expansion is where the badge community becomes visible. Once headers, pads, or add-on connectors are available, attendees can build shields, Simple Add-Ons, sensors, lights, radios, keyboards, displays, or entirely unreasonable contraptions. The 2017 badge encouraged people to arrive with expansion boards ready to go, which is exactly the kind of friendly challenge that turns a conference into a hardware jam session.
Later Superconference badges continued this idea in different ways. The 2019 badge used an FPGA and a cartridge-style expansion system. The 2023 Vectorscope badge leaned into analog visual creativity with an RP2040-powered board. The 2024 badge culture placed major emphasis on SAOs, showing how small add-ons can become their own art form. The lesson is simple: when you expose interfaces, people bring imagination.
Badgelife: The Community Behind the Circuit Boards
“Badgelife” is the informal culture around electronic conference badges, especially in hacker and security communities. It includes official badges, unofficial badges, add-ons, puzzles, art boards, collectible PCBs, and hacks created during or before events. It is part engineering, part social game, part wearable art gallery, and part “I stayed up until 3 a.m. because the I2C bus was being dramatic.”
The Hackaday Superconference badge fits naturally into this world because it rewards participation. Attendees do not just receive hardware; they respond to it. They write firmware, attach boards, create games, build cases, make accessories, solve puzzles, and present badge hacks. This turns the badge into a shared language. You can walk up to someone, point at their modification, and instantly have a conversation.
Why Badge Hacking Works So Well at Conferences
Badge hacking works because it lowers the social barrier. Talking to strangers can be awkward. Talking to strangers about a blinking board around their neck is much easier. “What did you add to your badge?” is a better icebreaker than “So, do you also have strong opinions about solder mask color?” although, to be fair, many attendees do.
The badge also creates a deadline-driven playground. You have a weekend, a community of experts nearby, access to workshops, and a reason to finish something small enough to demonstrate. That combination is powerful. It encourages experimentation without demanding perfection. A funny hack, a clever add-on, or a weird visual effect can be just as memorable as a technically polished project.
Building Your Own Hackaday-Style Badge: Practical Lessons
If you want to build a badge inspired by the Hackaday Superconference, start with the experience, not the parts list. Ask what you want attendees to do in the first five minutes, the first hour, and by the end of the event. Should they play a game? Solve a puzzle? Program a demo? Connect add-ons? Learn a protocol? Trade data? Create art?
Once the experience is clear, choose hardware that supports it without making the badge too expensive or fragile. A microcontroller with USB support is useful. A display adds personality. Buttons make interaction approachable. LEDs provide instant feedback. Storage helps with apps, assets, or logging. A standard expansion connector gives the community room to grow. A bootloader or drag-and-drop programming flow can dramatically increase participation.
Keep the Toolchain Friendly
A badge can be technically impressive and still fail as a community project if the toolchain is miserable. People should be able to modify something quickly. That might mean MicroPython, CircuitPython, Arduino-compatible tooling, USB mass storage updates, a documented C SDK, or prebuilt examples. Advanced users will always find a way to go deeper. Beginners need a door that is not guarded by a 400-page datasheet and a compiler error from 1998.
Plan Testing Before You Need It
Testing should be designed into the badge from the beginning. Add test points. Include a manufacturing self-test. Make the pass/fail result obvious. Verify display, buttons, sensors, storage, battery measurement, USB, and expansion pins. If the badge has a camera, speaker, radio, or special analog section, create repeatable tests for those too.
Also test the things people forget: battery insertion, cable clearance, lanyard attachment, connector orientation, silkscreen readability, and whether the badge survives being placed in a backpack with three dev boards, a laptop charger, and a snack that should have stayed sealed.
Common Mistakes in Conference Badge Design
The first mistake is overdesigning. It is tempting to include every feature: display, LEDs, audio, sensors, wireless, storage, expansion, games, puzzles, and a tiny espresso machine. Resist. Every feature increases cost, firmware complexity, testing time, and failure points. A focused badge with three well-executed features is usually better than a chaotic badge with twelve features and a personality disorder.
The second mistake is ignoring power. Wearable electronics live in the land of batteries, regulators, sleep modes, and current draw. A badge that drains itself before lunch becomes a necklace-shaped disappointment. Power budgeting, sleep behavior, brightness control, and battery accessibility deserve early attention.
The third mistake is hiding the fun. If users cannot discover what the badge can do, many will never hack it. Include demo apps, clear menus, labeled connectors, example code, and simple starter challenges. The badge should reward curiosity at every level.
The Experience of Building The Hackaday Superconference Badge
There is a special kind of electricity around building a conference badge, and not just the kind you accidentally measure with your finger. It starts with optimism. The first prototype powers up, the display glows, and everyone briefly believes the schedule is under control. Then reality walks in holding a clipboard.
Maybe the camera module behaves differently under production lighting. Maybe the OLED supplier changes availability. Maybe the accelerometer answers at the wrong address. Maybe the bootloader works beautifully on one laptop and acts like it has never heard of USB on another. None of these problems are glamorous, but they are the real texture of hardware development. The badge becomes a collection of solved surprises.
One of the best experiences related to the Hackaday Superconference badge is watching how quickly individual curiosity becomes group problem-solving. Someone notices a bug. Someone else has a scope. A third person has a cable. A fourth person appears with a theory, a laptop, and the confidence of a wizard who has already broken this exact thing before. Within minutes, a small circle forms. Nobody planned a workshop, but suddenly there is one.
That is the secret magic of these badges. They create temporary laboratories. Hotel tables become benches. Lobbies become debugging zones. Hallways become demo galleries. People who arrived as strangers end up comparing firmware patches, sharing add-on boards, swapping batteries, and laughing over errors that would be annoying anywhere else. In the badge world, a problem is often just a conversation wearing a disguise.
Building a badge also teaches humility. A board can pass design review, look gorgeous in KiCad, and still find a new way to be ridiculous when hundreds of copies are assembled. The smallest assumption can become the loudest issue. Did you verify the exact production part? Did you check the bootloader path on different operating systems? Did you make the battery connector impossible to reverse? Did you label ground clearly? Did you remember that attendees will absolutely plug in accessories you did not imagine? The badge will ask these questions. Sometimes politely. Sometimes with heat.
At the same time, the reward is enormous. Seeing attendees wear and modify something you helped build is different from shipping a normal product. A normal product is used. A badge is adopted. People give it names. They design cases for it. They make add-ons that are funnier than the original concept. They find hidden features, exploit exposed interfaces, and push the hardware into uses the design team never expected. That is not scope creep; that is success.
The Hackaday Superconference badge also shows why constraints can be creative fuel. A fixed event date forces decisions. A budget forces prioritization. A limited board area forces elegant layout. A mixed audience forces better documentation. A public demo culture forces the badge to be interesting quickly. Instead of weakening the project, those constraints shape it into something lively and memorable.
For anyone building a badge today, the most important experience to borrow is not a specific microcontroller or display. It is the attitude. Build something that invites hands-on exploration. Make the first hack easy and the tenth hack deep. Leave a few doors open. Document the weird parts. Add test firmware before panic requires it. Make the board sturdy enough for a weekend of joyful abuse. And most importantly, remember that the badge is not just electronics. It is a social object.
When a Hackaday Superconference badge works well, it does more than blink. It pulls people into the same orbit. It turns waiting in line into show-and-tell. It turns a workshop into a collaboration. It turns a small PCB into a shared memory. That is why building one is worth the late nights, the supply-chain scavenger hunts, and the final firmware commits made with one eye on the clock. A great badge does not merely identify the attendee. It identifies the spirit of the event.
Conclusion: A Badge Worth More Than Its Lanyard
Building The Hackaday Superconference Badge is a lesson in ambitious embedded design, community-centered hardware, and deadline-powered creativity. The best version of this badge is not simply a board with components. It is a compact playground that encourages people to learn, modify, connect, and show off just enough to make the person next to them say, “Wait, how did you do that?”
From the 2017 camera badge to later Superconference experiments with retro computing, FPGA design, vectorscope art, and SAO ecosystems, the core idea remains strong: a conference badge can be more than a credential. It can be a tiny platform for invention. It can be a teaching tool. It can be a conversation starter. It can even be a gentle reminder that hardware is hard, firmware is sneaky, and the best projects usually contain at least one problem that sounds funny after it is fixed.
For makers, engineers, and event organizers, the takeaway is clear. Build the badge around participation. Give people a reason to plug in, compile, solder, draw, debug, and laugh. Make it useful enough to start and open enough to surprise you. Do that, and your badge will not just hang around someone’s neck. It will become part of the conference story.
Note: This publication-ready article is based on real historical and technical information from Hackaday, Hackaday.io, Microchip-related documentation, MacroFab manufacturing context, Raspberry Pi/RP2040 ecosystem references, KiCad-style PCB design practices, and common U.S. electronics maker resources. Source links are intentionally omitted from the article body for clean web publishing.