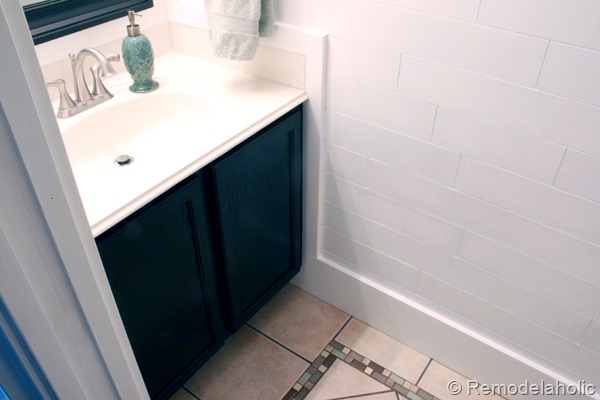
A half bathroom may be the smallest room in the house, but it has no obligation to be boring. In fact, its compact footprint makes it the perfect place to take a decorating risk, install a dramatic wall treatment, or finally use that faucet you have been admiring online at midnight.
This beautiful half bathroom reveal proves how much personality can fit into a few square feet. The makeover centers on painted plank walls, which introduce texture, architectural character, and a relaxed cottage-inspired feeling without crowding the room. Paired with a streamlined vanity, an oversized mirror, warm metal accents, and carefully chosen lighting, the finished powder room feels polished rather than precious.
More importantly, the transformation was achieved through thoughtful decisions rather than an unlimited budget. Every material had to justify the space it occupied. There was simply nowhere for a decorative freeloader to hide.
From Forgettable Half Bath to Welcoming Powder Room
Before the renovation, the half bath was functional but visually flat. It had plain walls, basic fixtures, limited lighting, and the slightly apologetic atmosphere common to rooms that were decorated lastor never. Nothing was technically wrong, but nothing made the room memorable.
The goal was to create a brighter, warmer space that felt connected to the rest of the home. Because a powder room is frequently used by guests, it also needed to look finished from every angle. There would be no shower curtain to distract from a crooked outlet cover or a suspiciously empty corner.
The design plan focused on five elements:
- Painted horizontal plank walls for texture and architectural interest
- A compact vanity that provided storage without dominating the room
- A large mirror to reflect light and visually expand the space
- Layered lighting with a soft, flattering glow
- Simple accessories that added character without creating clutter
Why Plank Walls Became the Star of the Makeover
Plank walls can change the proportions and personality of a room without changing its footprint. That makes them especially useful in a small half bathroom, where knocking down a wall is usually less practical than making the existing walls look better.
Horizontal planks guide the eye around the room and can make a narrow space feel wider. Their shadow lines create subtle movement, even when the wall color is a simple white or soft neutral. Unlike a bold patterned wallpaper, painted planks add interest without demanding constant attention.
Shiplap, Nickel-Gap, or Simple Wood Planks?
The term “shiplap” is often used for almost any wall made from horizontal boards, but traditional shiplap has overlapping rabbeted edges. Nickel-gap paneling creates a consistent recessed line between boards, while basic square-edge planks can be installed with spacers to produce a similar effect.
Any of these options can work in a half bath. The best choice depends on budget, desired appearance, installation experience, and room conditions. Real wood offers natural character but expands and contracts as humidity changes. Engineered products can provide straighter lines, although materials not rated for damp locations should be avoided where splashes or persistent moisture are possible.
Because this room contains a toilet and sink but no shower or tub, it experiences less steam than a full bathroom. Even so, the planks still needed a properly prepared surface, sealed edges, durable primer, and a washable finish.
Choosing the Right Plank Direction
Horizontal boards were selected to make the compact room feel broader and more relaxed. They also complemented the width of the vanity and mirror, creating long visual lines rather than a collection of disconnected rectangles.
Vertical plank walls would have produced a different effect. They can emphasize ceiling height and create a cleaner, slightly more contemporary appearance. In a room with a low ceiling, vertical installation may be the better visual trick. In a particularly narrow room, horizontal boards often provide more balance.
The decision should be made before buying material because direction affects cuts, framing locations, seams, waste, and the number of times someone will stare at the wall while holding a level and questioning every life choice that led to renovation day.
Preparing the Room for a Clean Installation
The most photogenic part of a plank-wall project is the finished wall. The most important part is everything that happens before the first board goes up.
Inspecting and Repairing the Existing Walls
The walls were checked for loose drywall, water stains, mildew, peeling paint, and major unevenness. Planks can hide minor cosmetic flaws, but they should never be used to conceal an active leak or moisture problem. Any plumbing issue must be corrected before the wall is covered.
High spots were sanded, damaged areas were repaired, and the walls were cleaned. The locations of studs, pipes, outlets, and switches were marked. Photographing the open wall layout or marked stud locations can also help later when installing mirrors, shelves, and accessories.
Planning the Board Layout
Before cutting, the wall height was divided by the combined height of each plank and its visible gap. This revealed whether the final row would become an awkwardly thin strip at the ceiling.
A small adjustment at the first row prevented an unattractive sliver at the top. This step required a few minutes of arithmetic, which was still preferable to spending years looking at a one-inch board and pretending it was intentional.
Accounting for Expansion
Wood products can move as temperature and humidity change. Small perimeter gaps were left where appropriate and later concealed with trim. The manufacturer’s installation instructions determined the required spacing, fasteners, adhesive, and acclimation period.
The material was brought into the house before installation so it could adjust to the indoor environment. Skipping acclimation may save time on day one and create mysterious gaps or buckling later, which is the home-improvement equivalent of borrowing trouble with interest.
Installing Plank Walls Around Bathroom Obstacles
A blank wall is easy. A bathroom wall contains supply lines, drain pipes, switches, outlets, baseboards, a vanity, and a toilet positioned precisely where a tool needs to go.
The installation began with a perfectly level reference line. Floors and ceilings are not always level, particularly in older houses, so using them as the only guide can cause each row to drift. The first plank established the alignment for everything above it.
Boards were cut carefully around electrical boxes and plumbing penetrations. Outlet and switch extensions may be necessary when wall paneling increases the finished wall thickness. Electrical work should comply with applicable codes, and a qualified electrician should handle any change beyond simple, permitted finish work.
End joints were staggered when full-length boards could not span the wall. Each seam was positioned intentionally so the finished surface looked balanced. Nail holes were filled, rough edges were sanded, and trim was added at corners and transitions for a built-in appearance.
The Paint Color That Made the Planks Feel Fresh
The plank walls were finished in a warm off-white rather than a stark, blue-toned white. The subtle warmth softened the shadows between boards and coordinated with the flooring, vanity, and metal finishes.
In a windowless half bath, paint should always be tested under the actual light fixture. A sample that looks creamy in daylight can appear yellow under a warm bulb or gray under a cool one. Large sample areas were viewed in the morning, afternoon, and evening before the final color was selected.
Using a Bathroom-Appropriate Finish
A durable, washable coating was chosen because sink splashes, fingerprints, and enthusiastic hand washing are facts of powder-room life. Bathroom-rated paints are formulated to perform better in humid conditions and may offer improved resistance to mildew growth on the paint film.
The cut ends, grooves, and exposed edges of the boards received careful coverage. Pre-priming or pre-painting the planks can make it easier to coat the narrow gaps evenly. After installation, the wall received final coats for consistent color and easier cleaning.
Paint was allowed to cure according to the manufacturer’s directions before the room returned to regular use. Dry-to-the-touch paint is not necessarily fully cured paint, a distinction often discovered immediately after someone leans a ladder against it.
A Compact Vanity with Useful Storage
The vanity needed to be narrow enough to preserve comfortable circulation but substantial enough to anchor the room. An oversized cabinet would have made the half bath feel cramped, while a pedestal sink would have eliminated practical storage.
A compact furniture-style vanity provided the right compromise. Its doors concealed extra toilet paper, hand towels, cleaning supplies, and the emergency soap refill nobody remembers buying until the dispenser is empty.
The vanity’s simple silhouette prevented it from competing with the plank walls. A slightly darker finish added contrast against the pale paneling and gave the room visual depth. The countertop remained mostly clear, with only soap and one small decorative item on display.
The Mirror and Lighting Made the Room Feel Larger
A generously sized mirror was installed above the vanity to bounce light around the room. In a small half bathroom, a mirror that is too small can look timid and leave valuable reflective space unused. The selected mirror nearly matched the width of the vanity while leaving enough breathing room for the wall planks to remain visible.
Its frame introduced another finish without becoming fussy. Repeating that finish in the faucet, cabinet hardware, or light fixture helped the room feel coordinated rather than assembled from unrelated sale items.
Choosing Flattering Bathroom Lighting
The original lighting created shadows and made the room feel smaller. The replacement fixture provided broader, warmer illumination while contributing to the design. A dimmer added flexibility, allowing bright task lighting during cleaning and softer light when guests were using the space.
The bulb color temperature was selected with the wall color in mind. Extremely cool bulbs made the warm white planks look dull, while excessively amber bulbs distorted the finishes. A balanced, comfortable light produced the most accurate and welcoming result.
Finishing Details That Completed the Reveal
The final accessories were intentionally restrained. Plank walls already provide pattern through their horizontal lines, so the room did not need several competing prints.
A framed piece of artwork introduced color, while a simple hand towel added softness. A small tray organized soap and a subtle room fragrance. The toilet-paper holder, towel ring, faucet, and mirror frame shared related finishes, creating continuity.
Natural texture came from a woven basket placed beneath or beside the vanity where space allowed. The basket concealed spare supplies while preventing the room from feeling overly polished. A powder room should look finished, but it should not appear to have a security system protecting the hand towel.
How to Keep Plank Walls Practical in a Half Bathroom
Although a half bathroom produces less humidity than a full bath, moisture management still matters. Plumbing leaks, condensation, and sink splashes can damage improperly finished wood products.
The room should have suitable ventilation, especially when it lacks an operable window. An exhaust fan helps control odors and remove excess moisture from the air. The fan should vent outdoors rather than into an attic, wall cavity, or other enclosed space.
Splashes should be wiped promptly, and caulk around the sink and countertop should be inspected periodically. The wall surface can be dusted with a soft cloth or vacuum brush because the horizontal ledges between boards naturally collect dust. Fortunately, the powder room is small, so cleaning every plank does not require provisions for an overnight expedition.
Common Plank-Wall Mistakes to Avoid
Starting Without a Level Reference Line
Never assume the floor, ceiling, vanity, or existing trim is perfectly level. A small error in the first row becomes increasingly obvious as the boards climb the wall.
Ignoring Material Restrictions
Not every plank product is approved for bathrooms. Confirm where the material can be installed and whether it requires sealing, ventilation, or a specific adhesive. Products vulnerable to swelling should not be placed near direct water exposure.
Forgetting About Electrical Box Depth
Adding wall thickness can leave switches and outlets recessed behind the new surface. Plan for approved box extensions and correctly fitted cover plates.
Painting Before Cleaning and Priming
Dust, construction residue, grease, and glossy old paint can interfere with adhesion. Preparation may not produce exciting reveal photographs, but neither does peeling paint.
Adding Too Many Decorative Elements
A small room can become visually crowded quickly. Allow one or two elementssuch as the plank walls and vanityto lead. Everything else should support them.
What This Half Bathroom Makeover Taught Us
The finished photographs make the renovation appear calm and orderly. The actual experience included scattered tools, several trips to the hardware store, and at least one moment when a cutout for an outlet was measured from the wrong end of the board.
The first lesson was that small rooms are not automatically small projects. A compact half bath may require fewer square feet of material, but nearly every board still needs a special cut. Corners, pipes, electrical boxes, trim, and the tight space behind the toilet slow progress considerably. There is also limited room to maneuver, so every tool placed on the floor becomes an obstacle five seconds later.
The second lesson involved wall imperfections. Once the first few planks were installed, it became clear that the room was not as square as it appeared. One corner leaned slightly, the ceiling dipped, and the floor had its own independent interpretation of level. Rather than forcing the boards to follow those lines, we maintained a level installation and used trim to create clean transitions. The result looked intentional, which is the highest compliment available to a renovation involving an old house.
Cutting around the plumbing was the most intimidating part. Cardboard templates saved several boards by allowing us to test the location of holes before touching the finished material. The template looked crude, but it performed with the confidence of an expensive specialty tool. Once the opening was correct, it was transferred to the plank and cut slightly oversized so the plumbing escutcheon could conceal the edge.
Painting also took longer than expected. The grooves between boards created beautiful shadow lines, but they were not interested in being coated quickly. A brush was used to work paint into gaps and corners before a small roller covered the faces. Inspecting the wall from several angles revealed missed spots that were invisible when viewed straight ahead.
Another important lesson was to install accessories only after seeing the completed room. The original plan included two shelves, several framed prints, and a decorative wall basket. Once the plank walls, mirror, and vanity were in place, most of those items felt unnecessary. One piece of artwork and a towel ring were enough. Editing the accessories allowed the architecture to remain the focus.
The lighting decision had an equally dramatic effect. We initially tested a bulb that was too cool, making the wall color appear flat and slightly gray. Switching to a warmer, more balanced bulb restored the creamy tone and made the metal finishes feel richer. The room did not need more decoration; it needed better light.
Perhaps the most satisfying experience was watching visitors notice the texture before identifying exactly what had changed. The planks made the room feel established, as though they belonged to the house rather than arriving in several dusty packages. That quiet sense of permanence was the goal from the beginning.
The project also reinforced the value of completing one room carefully instead of spreading a budget across several unfinished spaces. A half bathroom is manageable enough for a focused makeover, yet visible enough to deliver a rewarding transformation. Every time the door opens, the room feels intentional, welcoming, and completely different from the plain space that came before it.
Final Thoughts on the Beautiful Half Bathroom Reveal
This beautiful half bathroom reveal shows that limited square footage does not require limited imagination. Painted plank walls turned a basic powder room into a warm, character-filled space while a compact vanity, oversized mirror, improved lighting, and restrained accessories kept the design functional.
The most successful part of the makeover is its balance. The wall treatment is noticeable without being overwhelming. The color palette is light without feeling sterile. Decorative details are present, but the countertop remains usable. Nothing shouts for attention, although the plank walls are clearly pleased with themselves.
For homeowners considering a half bath makeover, this type of project offers substantial visual impact without requiring a larger footprint. Careful preparation, bathroom-appropriate materials, good ventilation, accurate layout work, and a durable finish are what separate a quick decorative update from a wall treatment that continues to look beautiful.
A tiny room can still tell a complete design story. In this one, the plank walls provide the opening line, the fixtures keep the plot moving, and the finished reveal delivers a very satisfying ending.