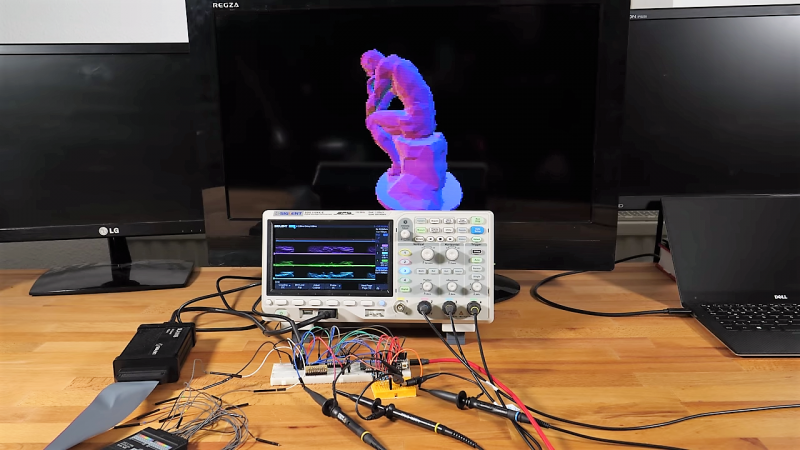
There is something wonderfully rebellious about plugging a modern Wi-Fi microcontroller into an old VGA monitor. In a world obsessed with 4K panels, OLED contrast ratios, and HDMI handshakes that sometimes feel like diplomatic negotiations, the humble VGA connector still has a lot to teach us. It is simple, analog, visible, and refreshingly honest: send red, green, blue, horizontal sync, and vertical sync at the right time, and the screen lights up. Send them badly, and the monitor gives you the silent treatment.
That is why building an ESP32 VGA display is such a satisfying project. The ESP32 was not designed as a graphics card, yet with careful timing, DMA tricks, resistor ladders, and libraries such as FabGL or ESP32Lib, it can generate a real video signal for a standard VGA monitor. The result is part retro-computing lesson, part electronics workout, and part “wait, this tiny board is doing that?” moment.
This guide goes back to video basics. We will look at how VGA works, why the ESP32 can drive it, what hardware you need, which libraries make life easier, and what kinds of projects become possible when a microcontroller suddenly gets a full-size screen.
Why VGA Still Matters in an HDMI World
VGA may be old, but old does not mean useless. Unlike HDMI or DisplayPort, VGA is an analog video standard. It does not require encryption, complex negotiation, or a high-speed digital transceiver. That makes it surprisingly friendly for learning. A VGA signal is built from a few understandable pieces: three analog color channels and two digital synchronization signals.
For makers, that simplicity is gold. You can probe VGA timing with an oscilloscope, calculate pixel clocks by hand, and build a working video output using resistors and general-purpose pins. It is the difference between learning to cook by cracking eggs yourself and ordering a mystery meal through an app. Both may feed you, but only one teaches you why the kitchen smells like victory.
What Makes the ESP32 a Good Candidate for VGA?
The ESP32 is popular because it combines a capable microcontroller with wireless connectivity, flexible GPIO, timers, SPI, I2S, DMA support, and enough processing power for ambitious projects. A classic ESP32 development board is inexpensive, widely available, and supported by the Arduino ecosystem as well as Espressif’s ESP-IDF.
For VGA, the important ingredients are timing and data movement. Video output is demanding because the display does not politely wait while your code thinks about lunch. It expects pixel data at a fixed rhythm. Miss that rhythm and you get shimmer, rolling images, blank screens, or modern art that nobody asked for.
The ESP32 can help by using hardware peripherals to stream data instead of bit-banging every pixel in a tight loop. Libraries often use techniques involving I2S-style parallel output, DMA buffers, carefully chosen clocks, and GPIO routing. The CPU prepares frames, characters, sprites, or scan lines while hardware handles much of the repetitive output.
VGA Signal Basics: The Five-Wire Magic Trick
A basic VGA output depends on five main signals:
- Red: analog brightness for the red channel
- Green: analog brightness for the green channel
- Blue: analog brightness for the blue channel
- HSYNC: horizontal synchronization pulse
- VSYNC: vertical synchronization pulse
The RGB lines are analog. A typical VGA monitor expects each color channel to vary from black to full brightness, commonly around 0 to 0.7 volts into a 75-ohm input. The sync lines are digital timing signals that tell the monitor when each row and frame begins.
Resolution and Timing
The classic beginner-friendly VGA mode is 640×480 at about 60 Hz. It uses more than the visible 640 by 480 pixels because every line and frame includes blanking intervals. These pauses come from the CRT era, when electron beams needed time to return to the start of the next line or frame. LCD monitors no longer use electron beams, but the timing tradition remains. Technology loves history almost as much as it loves adapters.
A common 640×480 VGA mode uses around 800 total pixel clocks per line and 525 total lines per frame. Only part of that area is visible. The rest is front porch, sync pulse, and back porch timing. These terms sound like a tiny house plan, but they are simply timing gaps that keep the monitor synchronized.
The Resistor DAC: Turning GPIO Into Color
An ESP32 GPIO pin is digital, meaning it normally outputs either low or high. VGA color wants analog brightness. The simple solution is a resistor DAC, short for digital-to-analog converter. Instead of using an expensive video DAC chip, you combine GPIO pins through resistors so their voltages add up to different brightness levels.
For example, one pin per color gives you eight colors: black, red, green, blue, cyan, magenta, yellow, and white. Add more pins per channel and you can create more shades. A common ESP32 VGA circuit may use multiple bits for red, green, and blue, giving a palette that is good enough for terminals, games, dashboards, and chunky retro graphics.
This is where hardware gets charmingly physical. The values of your resistors matter. The monitor’s termination matters. Cable quality can matter. Breadboards can work, but long jumper wires may introduce noise or fuzzy edges. VGA is forgiving enough to experiment with, but not so forgiving that it will tolerate complete electrical chaos. It is friendly, not magical.
Popular ESP32 VGA Libraries
FabGL
FabGL is one of the most useful libraries for ESP32 video experiments. It supports VGA output, composite video modes, PS/2 keyboard and mouse input, terminal emulation, GUI elements, sound features, and retro-computing style projects. For many builders, FabGL turns the ESP32 into a tiny computer platform rather than just a blinking LED board with ambition.
FabGL is especially attractive when your project needs text, menus, a terminal, keyboard input, or a vintage computer feel. You can build serial terminals, BASIC-style computers, simple games, control panels, and diagnostic displays without writing every low-level timing routine from scratch.
bitluni’s ESP32Lib
ESP32Lib, associated with bitluni’s well-known ESP32 VGA experiments, focuses on high-performance graphics, sprites, audio, game controller support, and playful visual demos. It helped popularize the idea that an inexpensive ESP32 board could drive a VGA monitor with surprisingly lively results.
If your goal is learning how video generation works, bitluni-style projects are excellent because they expose the beautiful compromise at the heart of microcontroller video: resolution, color depth, memory, timing, and CPU workload all wrestle in the same tiny arena.
Basic Hardware Needed for an ESP32 VGA Display
You do not need a warehouse full of parts to begin. A simple ESP32 VGA setup usually includes:
- An ESP32 development board
- A VGA connector or breakout board
- Resistors for RGB output levels
- Wires or a small PCB
- A VGA monitor that accepts standard timings
- Optional PS/2 keyboard or mouse for computer-like projects
- A stable USB power source
The cleanest builds use a small PCB or shield. A breadboard is fine for experiments, but once you see a stable picture, you may want something sturdier. Nothing ruins a retro display demo faster than bumping one jumper wire and turning your screen into a digital snowstorm.
How the ESP32 Generates a VGA Image
At a high level, the ESP32 prepares pixel or character data in memory. A peripheral then pushes that data out through GPIO pins at a controlled rate. Sync pulses are generated with careful timing so the monitor knows where each line and frame begins.
The exact implementation depends on the library. Some approaches create frame buffers; others build scan lines on the fly. Some favor text modes because they use less RAM. Others lower the resolution or color depth to make animated graphics possible. This is the core tradeoff: the ESP32 is powerful for a microcontroller, but VGA video can be greedy.
Frame Buffer vs. Text Mode
A full graphical frame buffer stores pixel data for the screen. That is flexible, but it consumes memory quickly. A text mode stores characters and attributes, then converts them to pixels during output. This is much more memory-efficient and perfect for terminals, dashboards, and retro interfaces.
For example, an 80×25 text display feels like a classic computer terminal and needs far less memory than storing every pixel individually. That is one reason ESP32 VGA projects often feel delightfully old-school. The limitations naturally guide you toward elegant, efficient design.
Great Project Ideas for an ESP32 VGA Display
1. Retro Terminal
Connect a PS/2 keyboard and create a standalone serial terminal. Use it to monitor microcontroller logs, interact with a Linux server, or give an old monitor a second life as a command-line dashboard. Bonus points if you use green text and pretend you are in a 1980s computer lab.
2. IoT Dashboard
The ESP32 already has Wi-Fi, so it can fetch or receive data and show it on a VGA screen. Weather, server status, stock tickers, sensor readings, home automation data, or workshop temperature logs all make sense. A spare VGA monitor can become a wall-mounted information board instead of gathering dust in a closet.
3. Educational Video Timing Demo
Few projects explain digital timing better than generating VGA yourself. Students can see how clocks, sync pulses, blanking intervals, and RGB signals combine to make an image. It is far more memorable than staring at a diagram and wondering why the word “porch” keeps appearing in a video lecture.
4. Simple Game Console
With sprites, buttons, and sound support, the ESP32 can become a tiny retro game console. Keep expectations reasonable: this is not a PlayStation hiding under a breadboard. But for tile games, Pong-like experiments, platformer prototypes, and retro demos, it is surprisingly fun.
5. Standalone BASIC Computer
Several maker projects use ESP32 VGA output with keyboard input to create small BASIC computers. These are not just toys. They are excellent learning tools because they combine programming, hardware, text display, memory constraints, and interactive input in one compact build.
Common Problems and Practical Fixes
The Monitor Shows No Signal
First, check the timing mode. Some monitors are picky, especially modern LCDs pretending to understand old VGA manners. Try a standard 640×480 mode before experimenting with unusual resolutions. Also confirm HSYNC and VSYNC pins, ground connections, and the VGA connector pinout.
The Picture Is Too Dim
Dim output often points to resistor values that are too high or incorrect voltage division. VGA inputs are typically terminated, so the circuit must account for that load. Use proven schematics from established libraries or projects before inventing your own resistor network at midnight.
The Image Flickers or Tears
Flicker can come from unstable timing, memory contention, wireless activity, or code that interrupts video generation. Disable unnecessary tasks, reduce resolution, use library examples first, and avoid heavy work during active display periods.
Colors Look Wrong
Check RGB pin order. Reversed color channels are common. If your blue sky is red and your red alert is green, the monitor is not being artistic. Your wires are probably swapped.
Design Tips for a Better ESP32 VGA Build
Start simple. Generate text first, then basic shapes, then animation. Use a known-good library example before modifying pins or timing. Keep VGA wires short, connect all relevant grounds, and move to a soldered board if the project becomes permanent.
Choose your display mode based on the project. A sensor dashboard does not need high color depth. A game may benefit from lower resolution and smoother animation. A terminal needs sharp text more than fancy gradients. The best ESP32 VGA projects do not fight the hardware; they make smart compromises.
Also, remember that Wi-Fi and video timing can compete for attention. The ESP32 can do both, but real-time video output prefers consistency. If your project fetches data online, update the screen at controlled intervals instead of constantly redrawing everything while networking tasks run wild.
Why This Project Is More Than Nostalgia
Yes, an ESP32 VGA display is retro. Yes, it looks fantastic next to a beige keyboard and a pile of cables that may or may not be plotting against you. But the real value is educational. This project teaches timing, analog levels, digital output, memory management, embedded graphics, and system design.
Modern display systems hide enormous complexity. VGA exposes enough of the process that you can actually understand it. When you generate a sync pulse and see a stable picture appear, the screen stops being a black box. It becomes a conversation between hardware and timing.
Experience Notes: What Building With an ESP32 VGA Display Feels Like
Working with an ESP32 VGA display feels different from connecting a ready-made SPI or I2C screen. With a small LCD module, you usually wire power, ground, data, clock, maybe chip select, install a library, and start drawing. With VGA, you feel closer to the metal. The monitor is not a passive module waiting for commands. It is a timing-hungry display that expects a continuous video signal. That changes how you think.
The first practical lesson is patience. It is normal to begin with a blank screen. Then you check the VGA pinout, swap a sync line, fix a ground connection, upload the example again, and suddenly the monitor wakes up. That moment is fantastic. It feels less like “the code compiled” and more like “I have successfully spoken ancient video language.”
The second lesson is that examples matter. Starting from a working FabGL or ESP32Lib demo saves hours of confusion. Once the example runs, changes become safer. You can adjust text, draw shapes, modify colors, or experiment with input devices. Without that baseline, every problem looks identical: no picture. Debugging a blank screen is like interviewing a very quiet witness.
The third lesson is that VGA rewards clean wiring. A messy breadboard can work, but the display may show noise, unstable colors, or occasional flicker. Shorter wires, solid grounds, and correct resistor values make a visible difference. If the project is meant to live longer than one afternoon, soldering the circuit or using a VGA shield is worth it.
The fourth lesson is about expectations. The ESP32 is impressive, but it is not a desktop GPU. High resolution, many colors, Wi-Fi, animation, and complex logic all compete for limited resources. The smartest projects embrace retro constraints. Use bold text, simple graphics, tile maps, efficient redraws, and limited palettes. Instead of treating limitations as failure, treat them as the design language.
The fifth lesson is that full-size displays change how microcontroller projects feel. A sensor value on a tiny OLED is useful. The same information on a 17-inch VGA monitor becomes a dashboard. A serial log becomes a terminal. A blinking demo becomes a little computer. The scale makes the project more inviting, especially for workshops, classrooms, and public demos.
Finally, an ESP32 VGA build is fun because it connects generations of technology. A modern wireless microcontroller drives an analog display standard from the personal computer era. The result is practical, educational, and slightly ridiculous in the best possible way. It reminds us that “obsolete” hardware often becomes the best classroom. Sometimes the road back to basics is exactly where the most interesting ideas begin.
Conclusion
Back To Video Basics With An ESP32 VGA Display is more than a clever hardware trick. It is a hands-on lesson in how video works, how timing shapes images, and how much creativity can fit inside a tiny microcontroller. With an ESP32, a few resistors, a VGA connector, and the right library, an old monitor can become a terminal, dashboard, game screen, classroom demo, or retro computer.
The project also proves that learning electronics does not always require the newest display or the most polished module. Sometimes the best teacher is an old VGA monitor that demands proper sync pulses and rewards you with a crisp, glowing result. For makers who enjoy understanding the “why” behind the picture, ESP32 VGA is a beautifully nerdy place to start.