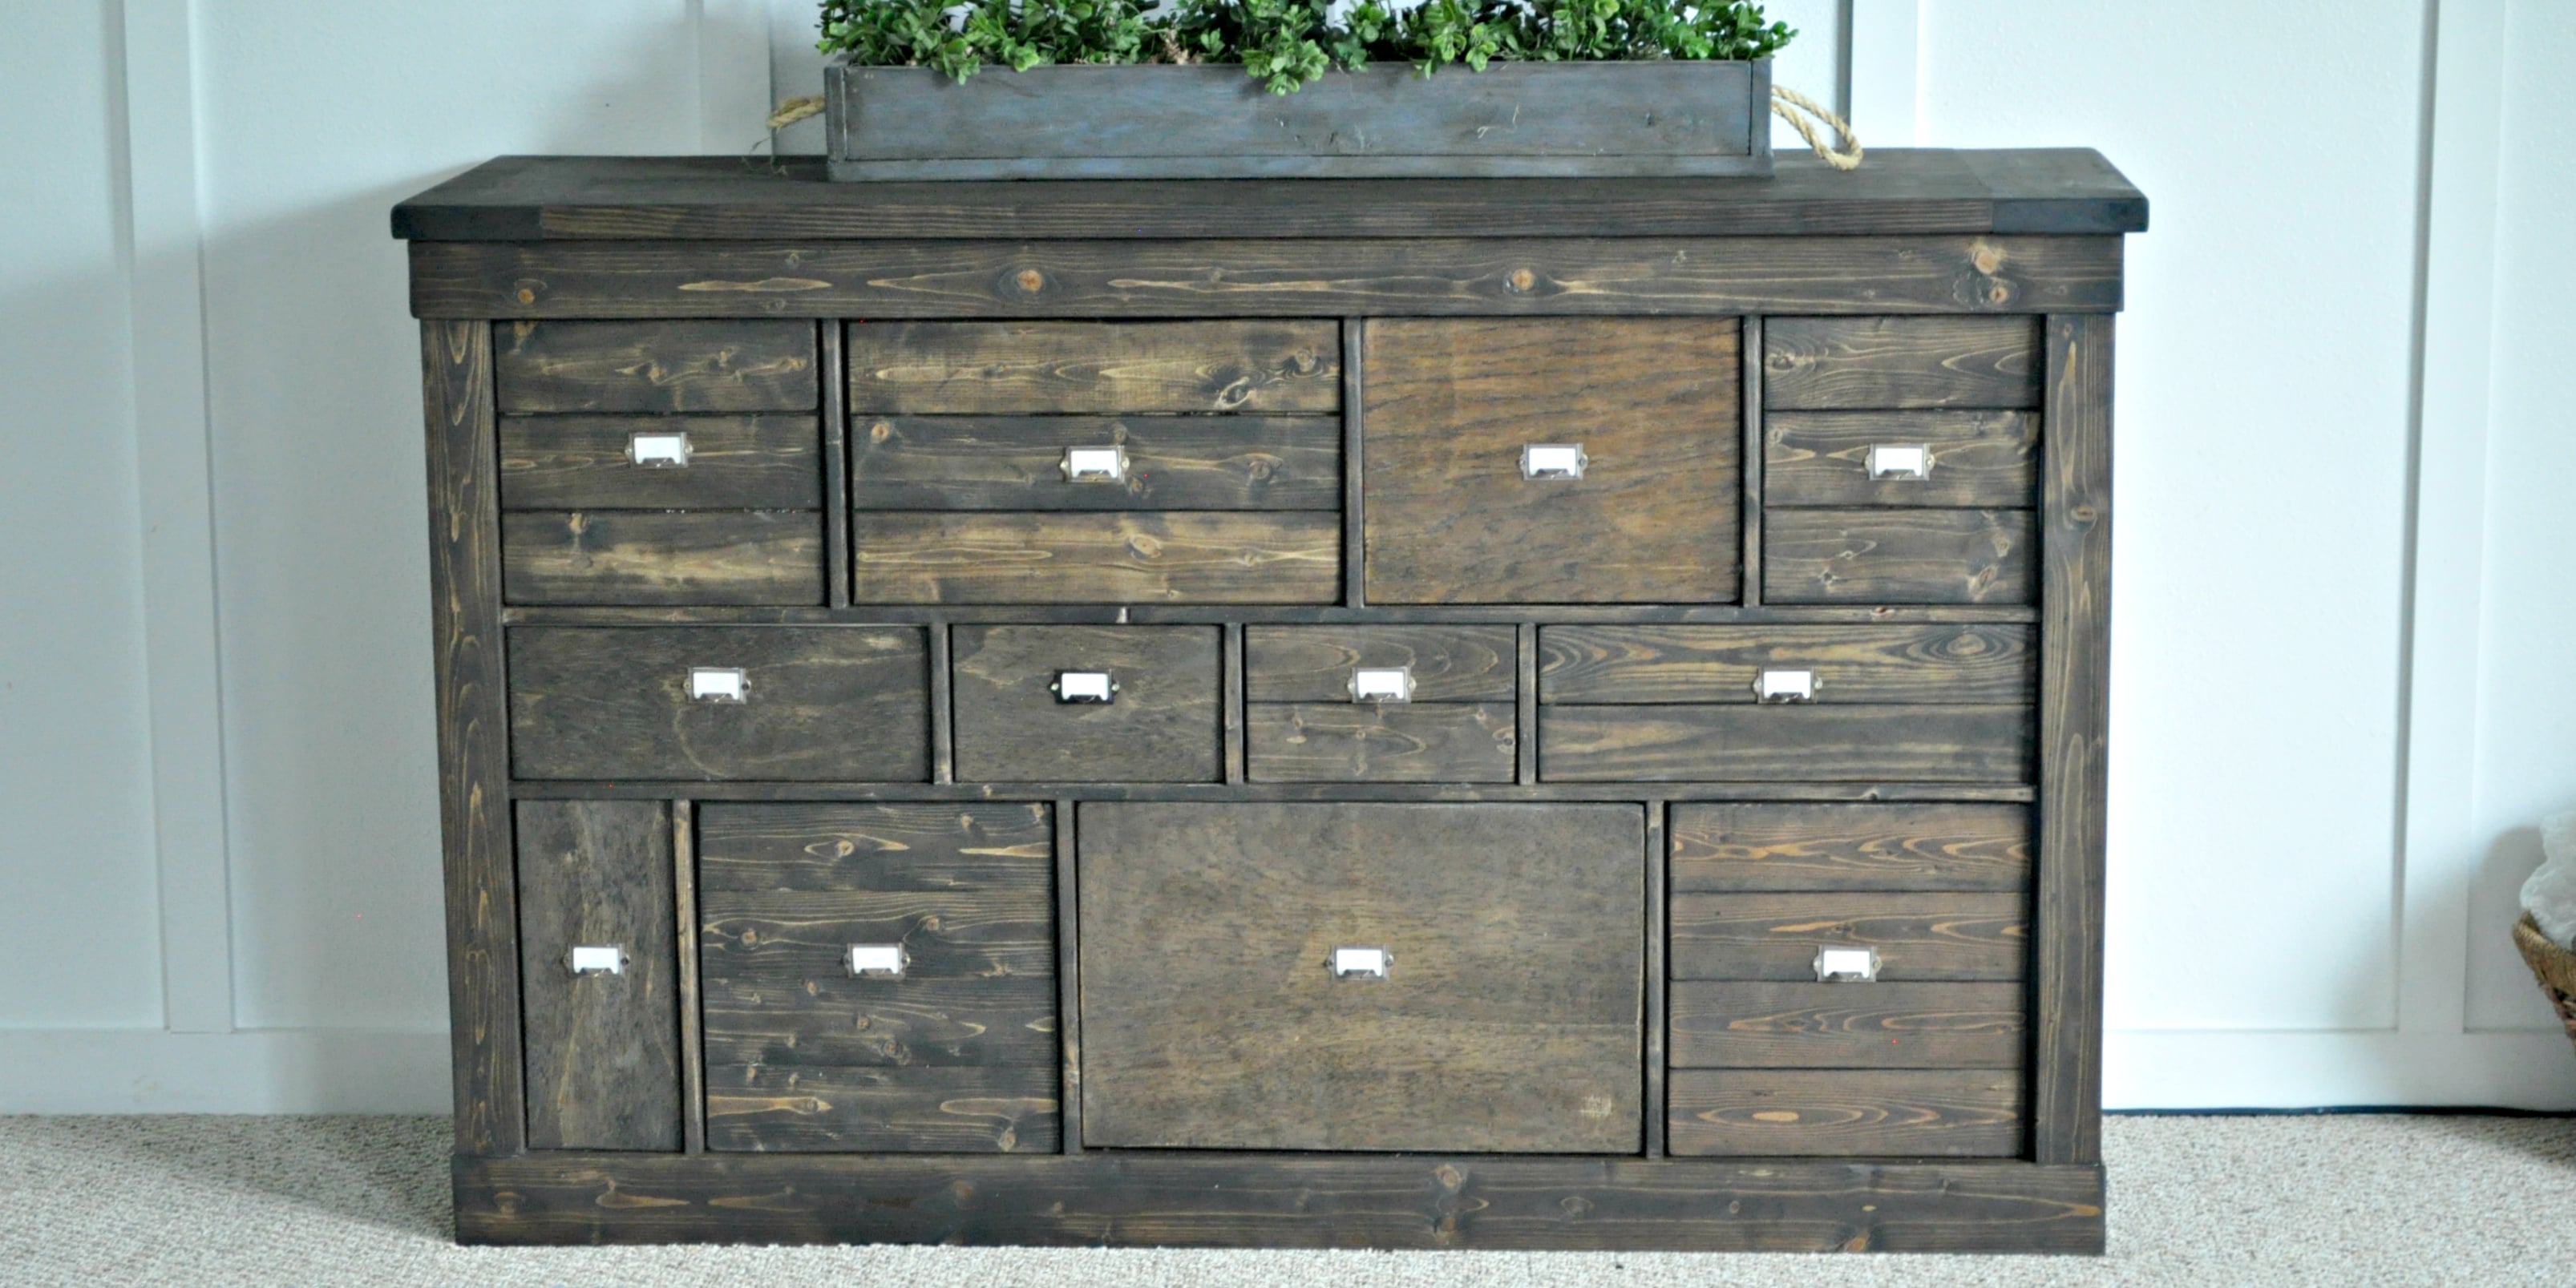
There are two types of people in this world: people who walk past an IKEA cubby unit and see simple storage, and people who squint at it like a detective in a home makeover mystery and whisper, “Wait… could this become a Pottery Barn-style console?” Good news: yes, it absolutely can. Better news: you do not need a trust fund, a professional workshop, or a reality TV renovation crew named Chip, Skip, or Barnaby.
This DIY project turns a basic IKEA cubby shelfmost commonly a KALLAX-style unitinto a polished console table with the warm, custom look of a high-end entryway console, media cabinet, or apothecary-inspired storage piece. The secret is not magic. It is trim, a real wood top, thoughtful hardware, paint or stain, and the patience to sand something without making it your entire personality.
A Pottery Barn-inspired console usually has a few signature features: substantial proportions, warm wood tones, visible texture, drawers or faux drawer fronts, classic hardware, and a finished silhouette that looks intentional from every angle. IKEA cubbies already give you the bones: open compartments, a sturdy rectangular form, and plenty of space for baskets, doors, drawers, books, shoes, board games, or the mysterious household category known as “random cords.”
In this guide, you will learn how to transform IKEA cubbies into a Pottery Barn console with practical steps, design ideas, material suggestions, styling tips, and real-world lessons from DIYers who have learned that caulk hides many sinsbut not all of them.
Why IKEA Cubbies Make the Perfect Console Base
The reason this IKEA cubby hack works so well is simple: the unit is already a box. Furniture building often begins with creating a square, level, stable carcass. IKEA has done that part for you, politely packed it flat, and asked you to interpret illustrated instructions like ancient cave drawings.
A popular choice is the IKEA KALLAX shelf unit because it can be used horizontally or vertically, and the cubby layout makes it easy to create a console with open and closed storage. The 2-by-4 KALLAX, when laid on its side, creates a low media-console profile. A taller configuration can work for an entryway, dining room, playroom, office, or craft area.
The standard KALLAX design includes particleboard, fiberboard, acrylic paint, recycled honeycomb paper filling, and plastic edging. That matters because it affects how you attach trim, paint the surface, and add weight. It is not solid oak. Do not treat it like a lumberyard hero. Treat it like a clever budget base that needs a good outfit and a little structural respect.
The Pottery Barn Look: What You Are Actually Copying
When people say “Pottery Barn console,” they usually mean a timeless, substantial piece that looks relaxed but expensive. Think wood grain, chunky tops, classic drawer pulls, framed fronts, gray wash or natural oak finishes, lower shelves, adjustable-looking feet, and that “I casually inherited this from a coastal farmhouse” energy.
Many high-end consoles use kiln-dried wood, veneers, reclaimed-style finishes, drawers, fixed shelves, metal accents, and levelers for stability. Your DIY version does not need to reproduce those details exactly. The goal is to borrow the design language: thicker visual lines, warm texture, framed panels, quality hardware, and a finish that says “furniture,” not “dorm room storage cube that survived three moves and one questionable roommate.”
Best IKEA Cubbies for This DIY Console Hack
1. IKEA KALLAX 2×4 Shelf Unit
This is the classic choice for a low console, TV stand, or behind-the-sofa table. When horizontal, it offers eight cubbies and a long surface. Add a wood top, base, legs, and drawer-style fronts, and it can look impressively custom.
2. IKEA KALLAX 1×4 Shelf Unit
This slimmer option works well in hallways, small apartments, kids’ rooms, and entryways where depth matters. It is also easier to lift, move, and modify if your DIY confidence is still wearing training wheels.
3. Older IKEA Expedit Units
If you have an older IKEA Expedit shelf, you can often use the same general makeover strategy. Measure carefully before cutting trim or ordering inserts because older IKEA units may not match current KALLAX dimensions exactly.
Materials You Will Need
Your exact supply list depends on the final style, but this project commonly uses the following:
- IKEA cubby unit, such as a KALLAX shelf
- 1×2 boards for face framing
- 1×3 or 1×4 boards for a base or apron
- Plywood, project panel, pine board, or butcher block for the top
- Wood lattice strips or thin molding for faux drawer details
- Furniture legs, bun feet, or a simple plinth base
- Wood glue or construction adhesive
- Brad nails, screws, or pocket-hole screws where appropriate
- Wood filler and paintable caulk
- Sandpaper, ideally 220-grit or finer for laminate prep
- Bonding primer for slick laminate surfaces
- Paint, stain, polyurethane, or furniture wax
- Drawer pulls, knobs, cup pulls, or label holders
- Optional: IKEA KALLAX doors, drawers, baskets, or storage boxes
- Furniture anchor kit for safety
If you are aiming for a rustic console, choose a stained wood top and darker hardware. For a modern farmhouse console, try a painted body with a natural top. For a vintage apothecary console, add faux drawer fronts with cup pulls and tiny label holders. Your console does not need to store ancient herbs, but it should look like it could.
Tools That Make the Project Easier
You can complete this IKEA console hack with basic tools, but a few upgrades will make the work cleaner and faster:
- Measuring tape
- Speed square
- Pencil
- Miter saw or circular saw
- Drill and driver bits
- Brad nailer, if available
- Orbital sander or sanding block
- Clamps
- Paint roller and angled brush
- Level
- Stud finder for anchoring
A nail gun is helpful, but not mandatory. If you do not own one, wood glue, clamps, and careful pilot holes can still get the job done. The project may take longer, but so does assembling IKEA furniture while pretending you do not need the manual.
Step-by-Step: How to Transform IKEA Cubbies into a Pottery Barn Console
Step 1: Decide the Final Function
Before cutting anything, decide what the console needs to do. Is it an entryway table for keys, shoes, baskets, and mail? A living room media console for a TV, game systems, and remotes? A dining room sideboard for linens and serving pieces? A playroom cabinet for toys that multiply after midnight?
Function determines height, base style, storage layout, and finish. A TV console should be stable and low. An entryway console can be taller and more decorative. A dining room console benefits from closed storage. A craft-room console may need durable paint and wipeable surfaces.
Step 2: Measure Everything Twice
Measure the full width, height, and depth of your cubby unit. Then measure each cubby opening. Do not assume online dimensions are enough, especially if the unit is older or already assembled. Tiny differences matter when cutting trim and drawer fronts.
Write the measurements down. Not on a receipt. Not in your memory. Not in the mysterious mental filing cabinet where “that one password” also lives. Use actual paper or your phone.
Step 3: Build a Wood Top
A real wood top is one of the fastest ways to make IKEA cubbies look expensive. You can use pine boards, oak plywood with edge banding, a butcher block panel, or a project board from a home improvement store. For the Pottery Barn-inspired look, allow a slight overhang on the front and sidesabout half an inch to one inch usually looks intentional without becoming awkward.
Sand the top smooth, soften sharp edges, and stain or seal it before attaching if that is easier. For a rustic finish, use a medium brown, gray wash, weathered oak, or walnut-toned stain. For a coastal look, try a light natural finish. If the body will be painted white, black, navy, or greige, a stained wood top adds contrast and warmth.
Step 4: Add Face Framing
IKEA cubbies look modern because the openings are simple and flat. Pottery Barn-style consoles look more built-in and finished because the fronts often have framed details. Adding 1×2 trim around the face of the unit gives it more dimension and makes it look less like a basic storage cube.
Cut trim pieces to fit around the outside edges and between cubbies if desired. Attach them with wood glue and brad nails, or use clamps and construction adhesive if you are avoiding nail holes. Keep everything level and flush. This is where a speed square becomes your best friendthe kind who tells you the truth before guests arrive.
Step 5: Create Faux Drawer Fronts or Real Doors
For an apothecary-style console, add faux drawer fronts to some or all of the cubby openings. You can cut thin plywood panels to fit over the fronts, then add lattice strips to create the illusion of smaller drawers. Finish with cup pulls or small knobs.
If you want actual storage access, attach doors with hinges, use IKEA KALLAX door inserts, or create lift-off panels held with magnetic catches. Faux drawer fronts are easier. Real doors are more functional. The best choice depends on whether you want to store things or simply impress people who will never open the cabinet.
Step 6: Add a Base or Legs
A base changes everything. Without one, the cubby unit can still look like a shelf lying down. With a base, it starts looking like furniture. You can build a simple plinth from 1×4 boards, add short turned legs, install metal legs for an industrial style, or use IKEA’s compatible underframe when appropriate.
For a Pottery Barn-inspired console, a chunky wood base usually works best. It visually grounds the piece and gives it that substantial, heirloom-style look. If you add legs, make sure the unit remains stable and does not wobble. Wobble is charming in toddlers, not furniture.
Step 7: Prep the Surface for Paint
Painting IKEA laminate requires prep. The surface is smooth and nonporous, so paint needs help sticking. Clean the unit thoroughly, lightly sand the glossy surface to dull it, wipe away every bit of dust, and apply a quality bonding primer. Do not aggressively sand through the laminate; the outer layer is thin, and underneath is not a magical hardwood surprise.
Use thin coats of primer and paint rather than one thick coat. Thick paint seems faster until it drips, bubbles, peels, and ruins your weekend like a tiny home improvement villain.
Step 8: Paint or Stain for a High-End Finish
For the painted body, classic choices include soft white, warm greige, charcoal, matte black, navy, sage green, or mushroom beige. These colors pair beautifully with brass, black, bronze, or antique nickel hardware.
For the wood top, stain and seal it separately. If using pine, consider a pre-stain conditioner to reduce blotchiness. Pine is affordable and easy to work with, but it can absorb stain unevenly. Conditioner helps it behave like it attended finishing school.
Step 9: Install Hardware
Hardware is jewelry for furniture. Choose wisely. Cup pulls create an apothecary or vintage library-card-catalog look. Round knobs feel classic. Long bar pulls look modern. Brass warms up dark paint. Matte black adds contrast to white or natural wood. Antique bronze works beautifully with rustic finishes.
Use painter’s tape as a guide before drilling. Mark every hole carefully and step back to check spacing. Crooked hardware will stare at you forever. It will not blink first.
Step 10: Seal and Protect
A console takes daily abuse: keys, cups, bags, remotes, shoes, mail, and the occasional mystery object from a child’s pocket. Protect painted surfaces with a durable topcoat if needed. Seal stained wood with polyurethane, polycrylic, hard wax oil, or another furniture-safe finish.
Let the finish cure before heavy use. Dry and cured are not the same thing. Paint can feel dry to the touch but still be soft underneath. Give it time, even if you are emotionally ready to decorate immediately.
Step 11: Anchor the Console
If the piece is tall, heavy, used around children, or holding a TV, anchor it securely to the wall. Furniture tip-over prevention is not optional decor advice; it is basic home safety. Use suitable wall anchors and follow manufacturer instructions. When in doubt, ask a professional.
Design Ideas for a Pottery Barn-Inspired Finish
Modern Farmhouse Console
Paint the body warm white, add a stained pine or oak top, install black cup pulls, and use woven baskets in the lower cubbies. This look works beautifully in entryways and family rooms.
Rustic Apothecary Console
Create faux small drawers across the front using thin plywood and lattice strips. Stain everything a deep brown or paint it charcoal. Add antique brass label holders for a vintage storage-cabinet feel.
Coastal Pottery Barn Console
Choose a light gray or soft blue-gray body with a natural wood top. Add rope baskets, ceramic lamps, linen textures, and a large round mirror above it. Bonus points if you can casually mention “seagrass” in conversation.
Moody Library Console
Paint the unit deep green, navy, or black. Add brass knobs, leather pulls, or aged bronze cup pulls. Style it with books, framed art, and a table lamp. Suddenly your cubbies have read more classic literature than most college freshmen.
Common Mistakes to Avoid
Skipping Primer
Laminate furniture needs bonding primer. Skipping it is the DIY equivalent of building a house on pudding. The paint may look fine at first, but it will chip or peel faster than you can say, “Maybe I should have prepped.”
Using Too Much Adhesive
Construction adhesive is helpful, but more is not always better. Too much can squeeze out around trim and create messy ridges. Use a controlled bead, clamp pieces firmly, and wipe excess before it dries.
Ignoring Weight Limits
IKEA cubbies are practical, but they have limits. Avoid overloading shelves or placing an oversized TV on a unit not designed for it. A DIY console should be beautiful and sensible, not a dramatic physics experiment.
Forgetting the Back
If the console will float behind a sofa or sit where the back is visible, finish the rear side too. Add a thin plywood back panel, beadboard, or painted hardboard for a cleaner look.
Choosing Hardware Too Small
Tiny knobs can make a large console look underdressed. For a substantial Pottery Barn-inspired look, choose hardware with enough scale to match the piece.
Styling Your Finished Console
Once the build is complete, styling brings the project home. Start with a large anchor piece above the console, such as a mirror, framed art, or wall-mounted TV. Then add height with a lamp, vase, or tall branches. Layer smaller items like books, trays, bowls, candles, and framed photos.
Use baskets inside open cubbies to hide clutter. Mix open shelves and closed storage so the console feels balanced. Too many open cubbies can look busy; too many closed panels can look heavy. The sweet spot is usually a mix of doors, baskets, books, and decorative objects.
For an entryway, add a tray for keys, a bowl for sunglasses, and baskets for shoes or dog leashes. For a living room, add media baskets, remote storage, and cable management. For a dining room, store napkins, candles, placemats, and serving trays. For a playroom, label baskets so kids can ignore them with greater precision.
Budget Breakdown
The total cost depends on what you already own and how fancy you get with hardware and wood. A simple makeover using an existing cubby unit, basic trim, paint, and affordable pulls can be very budget-friendly. A more elaborate version with a hardwood top, custom doors, premium hardware, and turned legs will cost more but still often lands far below the price of a high-end console.
Here is a realistic budget range:
- Used IKEA cubby unit: $25 to $100
- New cubby unit: often under the cost of most ready-made consoles
- Trim and boards: $30 to $120
- Wood top: $25 to $200 depending on material
- Primer and paint: $30 to $80
- Hardware: $20 to $150
- Legs or base materials: $20 to $100
- Topcoat and supplies: $15 to $60
The biggest visual upgrades are the wood top, face frame, base, and hardware. If you need to save money, spend on those first. Fancy baskets can wait. They will still be there later, looking expensive and judging your laundry.
Is This IKEA Hack Beginner-Friendly?
Yes, with a few conditions. If you can measure accurately, cut straight trim, sand patiently, and paint in thin coats, you can handle this project. Beginners should keep the design simple: add a top, add a base, paint the body, and install baskets or ready-made inserts. Intermediate DIYers can add faux drawer fronts, custom doors, legs, and more detailed molding.
The most challenging parts are getting trim aligned, making the finish durable, and attaching pieces securely without damaging the particleboard. Use pilot holes when screwing into manufactured wood. Avoid overtightening screws. When adding structural weight, attach into solid edges where possible rather than thin panels or hollow sections.
of Real-World Experience: What This Project Teaches You
The biggest lesson from transforming IKEA cubbies into a Pottery Barn console is that furniture does not need to start expensive to end beautifully. What matters most is proportion. A thin cubby shelf suddenly looks custom when you add a thicker top, a real base, and trim that creates shadows. Those shadows are the secret sauce of high-end furniture. Flat surfaces look basic; layered surfaces look designed.
Another experience worth sharing: painting is not the quick part. Everyone wants painting to be the fun finale, but with IKEA laminate, painting is a relationship. You must clean, sand lightly, prime, wait, paint, wait again, sand between coats if needed, and then protect the finish. Rush it and the console may look good for a week, then chip the first time someone tosses keys on it. A durable finish is built slowly, like trust or a really good lasagna.
Hardware also changes the entire personality of the piece. The same cubby console can look coastal with brushed nickel knobs, vintage with antique brass cup pulls, modern with black bar pulls, or rustic with leather tabs. Before drilling, tape the hardware in place and live with it for a few minutes. Take a photo. Photos reveal crooked spacing and weird proportions better than your eyes do in the moment.
One practical tip: decide early whether your faux drawer fronts need to open. Many DIYers fall in love with the apothecary look, then realize they have created a beautiful wall of fake drawers hiding very real storage. If the console is decorative, faux fronts are fine. If it is for an entryway, kids’ toys, office supplies, or media equipment, make at least some sections functional with hinges, magnetic catches, or IKEA inserts.
Do not underestimate the base. Adding legs may seem like a small detail, but it changes the height, balance, and style. A low plinth base makes the console feel built-in and substantial. Turned feet make it traditional. Metal legs make it modern. Taller legs can make storage underneath easier to clean, but they may also affect stability. Always test the piece before loading it with books, electronics, or a ceramic lamp you bought because a design blog made you emotional.
Finally, styling should not fight the storage. If the cubbies are full of everyday items, use baskets or doors to calm the visual noise. If you want open shelves, repeat materials: two woven baskets, a stack of books, a ceramic bowl, and one plant. Repetition makes budget furniture look intentional. Random clutter makes even expensive furniture look like it gave up.
The charm of this project is that it gives you a custom-looking console without requiring custom furniture money. It is practical, flexible, and surprisingly satisfying. You start with a humble cubby unit and end with a piece that looks like it belongs in an entryway reveal, complete with a lamp, a mirror, and someone saying, “Wait, that was IKEA?” That question alone is worth the sawdust.
Conclusion
Transforming IKEA cubbies into a Pottery Barn console is one of the smartest DIY furniture upgrades because it uses an affordable, accessible storage piece as the foundation for something stylish and functional. By adding a wood top, face trim, a base or legs, paint, stain, and well-chosen hardware, you can create a console that feels custom without paying custom furniture prices.
The key is to think like a furniture designer: improve the proportions, add depth, mix open and closed storage, and finish every visible surface. Whether you want a modern farmhouse entryway table, a rustic apothecary cabinet, a media console, or a dining room sideboard, IKEA cubbies offer the flexible structure. Your creativity supplies the character.
Just remember the golden rules: measure carefully, prep laminate properly, use the right primer, do not overload the unit, and anchor furniture when safety calls for it. Do those things, and your once-basic cubby shelf can become the kind of console guests compliment before asking where you bought it. Smile politely. Then decide whether to reveal your DIY secret or simply say, “Oh, this old thing?”
Note: This article is written for informational DIY guidance. Always follow product instructions, use appropriate safety gear, and anchor furniture securely when required.