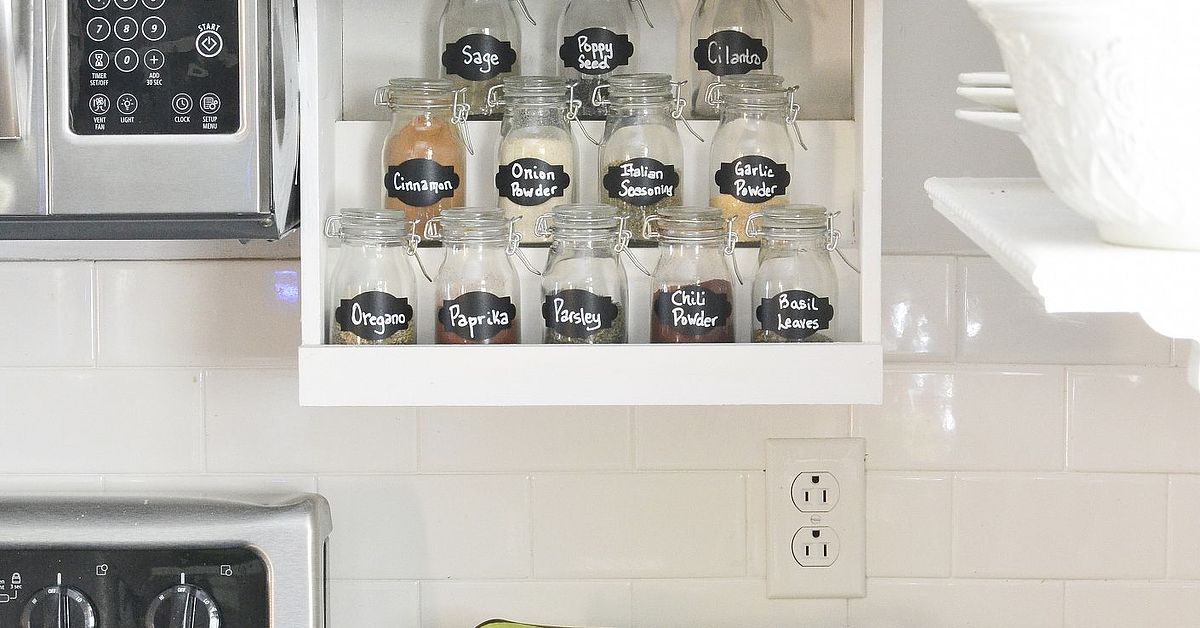
A DIY under the cabinet spice rack is one of those kitchen upgrades that sounds tiny until you actually use it. Suddenly, cumin is not hiding behind the vanilla extract, paprika is not rolling into the pasta shelf, and you are no longer buying your fourth jar of garlic powder because the first three formed a secret society in the back of the cabinet. This project turns wasted space beneath an upper cabinet into a neat, reachable, good-looking storage zone for everyday seasonings.
The best part? You do not need a full kitchen remodel, a cabinetmaker on speed dial, or the emotional strength required to assemble a 47-piece mystery organizer from a box. With basic lumber, screws, careful measuring, and a little weekend patience, you can build a sturdy under cabinet spice rack that keeps your spices visible, organized, and close to your prep area.
Why Build an Under Cabinet Spice Rack?
Most kitchens have more unused storage space than they appear to. The underside of upper cabinets is a perfect example. It is usually empty, yet it sits right where you need quick access while cooking. An under cabinet spice rack uses this overlooked area without stealing counter space, drawer space, or prime cabinet real estate.
This kind of spice storage is especially useful in small kitchens, apartments, galley kitchens, RVs, and busy family kitchens where every inch has a job. Instead of stacking jars two rows deep and hoping for the best, you create a dedicated home for your favorite seasonings. The result is faster cooking, fewer duplicates, and a cabinet that no longer looks like a tiny tornado visited taco night.
Best Design for a DIY Under the Cabinet Spice Rack
There are several ways to design an under cabinet spice rack. The simplest version is a shallow wooden shelf mounted directly beneath a cabinet. A more advanced version uses hinges so the rack folds down. Another option uses drawer slides so the rack pulls out like a small tray. For most DIYers, the fixed shallow shelf is the easiest, strongest, and most budget-friendly choice.
Recommended Beginner-Friendly Design
The best beginner design is a slim, two-rail wooden rack that holds one row of standard spice jars. It should be shallow enough that jars do not disappear into the back, but deep enough to keep them secure. A front lip prevents bottles from sliding out, while side pieces give the rack a finished, built-in look.
A typical rack might be 18 to 24 inches wide, 3 to 4 inches deep, and about 2.5 to 3 inches tall. Before cutting anything, measure the actual spice jars you use most. Standard jars are often around 1.5 to 2 inches wide and 4 to 5 inches tall, but specialty jars, grinders, and bulk containers can be bigger. The measuring tape is your friend. It is also cheaper than rebuilding the rack after discovering your cinnamon is built like a lighthouse.
Tools and Materials You Will Need
You can build this project with common supplies from a home improvement store. Choose straight lumber, smooth plywood, or poplar boards if you plan to paint. Pine works well for a rustic look, while maple or oak creates a more polished finish.
Materials
- One 1×4 board or plywood strip for the base
- One 1×2 board for the front rail and back support
- Two small side pieces cut from matching wood
- Wood screws, usually 1 inch to 1 1/4 inches depending on cabinet thickness
- Wood glue
- Sandpaper, 120-grit and 220-grit
- Paint, stain, or clear polyurethane
- Optional adhesive labels or matching spice jars
Tools
- Tape measure
- Pencil
- Miter saw, circular saw, or handsaw
- Drill and drill bits
- Screwdriver bit
- Clamps
- Level
- Stud finder or small inspection tool, if needed
- Safety glasses
Before You Build: Measure Twice, Avoid Regret Once
Start by choosing the cabinet where the rack will live. The most practical spot is near the stove or food prep area, but avoid placing spices directly over intense heat, steam, or a toaster oven. Spices last longer when stored in a cool, dry, dark place, so the goal is convenience without turning your oregano into fragrant dust.
Check the underside of the cabinet. Some cabinets have a recessed bottom, while others are flat. If the underside is recessed, you may need mounting blocks so the rack sits level and the screws bite into solid material. Also check door clearance. Open the cabinet doors and make sure hinges, handles, and trim will not interfere with the rack.
Next, count your everyday spices. This rack does not need to hold your entire spice collection, including the mysterious jar labeled “holiday blend” from 2018. Focus on the jars you actually use: salt blends, pepper, garlic powder, onion powder, chili powder, cumin, paprika, oregano, cinnamon, and maybe crushed red pepper if your household enjoys living dangerously.
Step-by-Step: How to Make a DIY Under the Cabinet Spice Rack
Step 1: Decide the Rack Size
Measure the width of the cabinet underside. Leave at least half an inch of clearance on both sides so the rack does not look crammed in. If your cabinet is 24 inches wide, a 22- or 23-inch rack usually looks balanced. For depth, 3.5 inches is a good target for many standard spice jars.
Step 2: Cut the Base Board
Cut your base board to the desired width. If you are using a 1×4, the actual depth will be about 3.5 inches, which is nearly perfect for a single row of spice jars. Sand the cut edges until they feel smooth. This is not just about looks; smooth edges are easier to paint and less likely to snag a dish towel or your sleeve while you are cooking.
Step 3: Cut the Front Rail
Cut a narrow front rail from a 1×2 board. This piece keeps jars from sliding forward. You can mount it flush with the bottom of the base for a clean boxy look, or raise it slightly so the jar labels remain visible. A rail height of about 1 inch is usually enough to stop standard jars without hiding the entire label.
Step 4: Add Side Pieces
Cut two small side pieces to match the depth of the rack. These create a finished tray shape and add strength. Dry-fit everything before gluing. Place a few spice jars inside the loose pieces to confirm the fit. If the jars wobble too much, deepen the rack slightly or add a thin back rail.
Step 5: Glue and Clamp
Apply a thin line of wood glue where the front rail and side pieces meet the base. Clamp the pieces in place. Wipe away extra glue with a damp cloth before it dries. Glue is not a substitute for screws in this project, but it helps prevent shifting and gives the rack a stronger, cleaner build.
Step 6: Pre-Drill Screw Holes
Pre-drilling is the difference between a neat project and a board that splits while you stare at it in betrayal. Drill small pilot holes through the front rail and side pieces before driving screws. Use short screws that secure the pieces without poking through the visible surface.
Step 7: Sand and Finish
Sand the entire rack with 120-grit sandpaper, then finish with 220-grit for a smoother touch. Paint it to match your cabinets, stain it for warmth, or seal it with clear polyurethane for a natural wood look. If your kitchen gets humid, sealing the wood is a smart move. A sealed finish is easier to wipe clean when a spice jar decides to shed turmeric like confetti.
Step 8: Mark the Mounting Location
Hold the rack under the cabinet and mark where it should sit. Use a level so it does not tilt. A slightly crooked spice rack may still work, but every time you look at it, your brain will whisper, “We know.” Mark screw locations through the back support or base, depending on your design.
Step 9: Attach the Rack Under the Cabinet
Pre-drill into the cabinet underside carefully. Do not drill all the way through the cabinet floor unless you want surprise ventilation inside your cabinet. Use screws that are long enough to hold but short enough to avoid breaking through. If the cabinet bottom is thin, use mounting blocks or screw into thicker side rails where possible.
Step 10: Load and Test
Add your spice jars and gently tug the rack to test stability. Open and close nearby cabinet doors. Reach for a few jars as if you are cooking. If everything feels solid, congratulations: your spices now have better real estate than most office supplies.
Smart Layout Ideas for Your Spice Rack
Organization matters as much as construction. A beautiful spice rack becomes less useful if it turns into a tiny wooden junk drawer. Arrange jars in a way that matches how you cook.
Organize by Frequency
Place everyday spices in the center or easiest-to-reach area. Garlic powder, black pepper, chili flakes, Italian seasoning, and cinnamon deserve prime placement if you use them often. Less common spices can go toward the ends.
Organize by Cuisine
Group taco-night spices together, baking spices together, and grilling seasonings together. This method works well if you cook in routines. It also keeps you from grabbing nutmeg instead of cumin, which is a culinary plot twist nobody requested.
Organize Alphabetically
Alphabetical order is simple and reliable, especially if several people cook in the same kitchen. It removes guesswork and makes restocking easier. Just be honest with yourself about whether smoked paprika belongs under “S” or “P” before your household forms factions.
Design Variations You Can Try
Fold-Down Under Cabinet Spice Rack
A fold-down rack uses hinges so the spice tray tucks up under the cabinet and pulls down when needed. This is a clever option if you want spices hidden most of the time. It requires more precise hardware placement and a reliable stop mechanism so the rack does not swing too far down.
Pull-Out Under Cabinet Spice Drawer
A pull-out design uses small drawer slides mounted under the cabinet. This works best for deeper cabinets and lightweight jars. Choose smooth, full-extension slides if possible, and make sure the cabinet bottom can support the load. This style feels fancy, but it needs careful alignment.
Magnetic Spice Jar Strip
Magnetic jars can attach to a metal plate mounted under the cabinet. This option looks modern and saves space, but it depends on strong magnets and lightweight containers. It is best for small quantities of spices, not oversized glass jars.
Two-Tier Mini Rack
If you have enough vertical clearance, you can build a two-tier under cabinet rack. Keep it shallow and sturdy. Two tiers increase capacity, but they also add weight and may make the lower row easier to bump. For most kitchens, one clean row is more practical.
Common Mistakes to Avoid
The first mistake is building the rack too deep. A deep rack sounds useful until jars hide in the back and you are back to spice archaeology. Keep it shallow so every label is visible.
The second mistake is using screws that are too long. Cabinet bottoms are not always thick. Measure carefully and choose hardware that will not pierce through the cabinet floor. If in doubt, test on scrap wood with similar thickness.
The third mistake is placing spices too close to heat. A rack mounted near your prep space is excellent. A rack mounted directly over a heat-producing appliance can shorten the life of your spices. Heat, light, and moisture are the villains of flavor.
The fourth mistake is overloading the rack. A DIY spice rack is not meant to hold cooking oils, vinegar bottles, canned goods, or that giant container of cinnamon you bought during a baking phase. Keep it light and intentional.
Budget-Friendly Tips
You can keep this project inexpensive by using scrap wood, leftover cabinet paint, and jars you already own. If your spice containers are mismatched, do not panic. Matching jars look lovely, but they are not required. Labels can create a unified look even when the bottles are different sizes.
If you do want matching jars, choose square or flat-sided containers because they sit neatly in a row and waste less space. Add waterproof labels to the lids or fronts. Include purchase dates or refill dates if you want to stay ahead of stale spices.
Cleaning and Maintenance
A spice rack lives in a hardworking part of the kitchen, so plan for easy cleaning. Wipe the rack with a slightly damp cloth during regular kitchen cleanup. Avoid soaking unfinished wood. If you cook often, remove all jars once a month and vacuum or wipe away crumbs, spice dust, and the mysterious powder that somehow appears even when every lid is closed.
Check screws every few months, especially if the rack gets daily use. If anything feels loose, unload the jars before tightening. This takes two minutes and prevents the dramatic crash scene where oregano, paprika, and thyme all make a break for the floor.
Real-Life Experience: What I Learned Building and Using an Under Cabinet Spice Rack
The biggest lesson from building a DIY under the cabinet spice rack is that convenience beats complexity. It is tempting to design a rack with hinges, sliding parts, hidden compartments, and enough engineering to impress a spaceship mechanic. But in daily use, the simplest rack often wins. A shallow fixed shelf under the cabinet keeps spices visible, easy to grab, and easy to put back. That last part matters more than people think. If an organizer is annoying to use, the kitchen will reject it like a bad habit.
Another experience worth sharing is the importance of testing with real spice jars before final assembly. At first glance, most spice jars look similar. In reality, they are a chaotic little family of different heights, lid widths, glass shapes, and label placements. A rack that fits one brand perfectly may squeeze another brand too tightly. Before gluing the front rail, line up your actual jars on the base board. Leave enough finger room to lift each bottle out without knocking over its neighbor. That tiny gap makes the rack feel custom instead of cramped.
Placement also changes everything. A rack near the prep zone feels natural. A rack too close to the stove may seem convenient, but steam and heat are not kind to spices. The best spot is usually under a cabinet beside the cooking area rather than directly above a burner. This keeps seasonings within reach while protecting their flavor. If your kitchen is small, even moving spices one cabinet away from heat can make a difference.
Labeling turned out to be more useful than expected. Front-facing labels are great when the rack sits at eye level. If the rack is slightly lower or tucked under a cabinet lip, lid labels can help too. For households with multiple cooks, clear labeling prevents comedy and chaos. Nobody wants to discover that the “cinnamon” sprinkled over oatmeal was actually cayenne. That is not breakfast; that is a wake-up call with consequences.
Finishing the wood is another detail that pays off. Raw wood can look charming for about three days, then cooking grease, dust, and spice residue begin their slow takeover. A painted, stained, or sealed surface is much easier to clean. Semi-gloss paint works well if you want the rack to blend with existing cabinets. Clear polyurethane is a good choice if you like the natural wood grain. Either way, sealing the rack helps it survive real kitchen life.
Finally, the best spice rack is not the one that holds the most jars. It is the one that holds the right jars. After using an under cabinet rack for a while, it becomes obvious which spices deserve the front row. The everyday favorites stay; the once-a-year spices can live elsewhere. This small decision keeps the rack tidy and useful. A DIY under the cabinet spice rack should make cooking smoother, not become another overstuffed storage zone. Build it with restraint, mount it securely, and let it serve the way good kitchen storage should: quietly, efficiently, and without demanding applause.
Conclusion
A DIY under the cabinet spice rack is a small project with a big payoff. It frees up cabinet space, clears counter clutter, and keeps your favorite seasonings exactly where you need them. With a few pieces of wood, basic tools, and careful measuring, you can create a custom spice storage solution that looks built-in without the built-in price tag.
Whether you choose a simple fixed shelf, a fold-down version, or a pull-out design, the key is to build around your actual kitchen habits. Store only the spices you use often, keep the rack away from heat and moisture, and label everything clearly. Do that, and your kitchen will feel more organized every time you cook. Your spices may not thank you out loud, but your future self will.
Note: This article is written as original, publish-ready web content based on widely used DIY woodworking, cabinet organization, spice storage, and small-kitchen storage practices.