Moving photos from one iPhone to another sounds like the kind of task that should take 30 seconds and a single dramatic tap. Sometimes it does. Sometimes it turns into a mild emotional journey involving Wi-Fi, storage warnings, and a camera roll so large it deserves its own ZIP code.
The good news is that transferring photos from iPhone to iPhone is usually pretty simple once you pick the right method. The best option depends on what you are trying to do. Want to send a handful of pictures from one phone to another? AirDrop is your fast lane. Want both iPhones to stay updated with the same photo library? iCloud Photos is the smooth operator. Setting up a new iPhone and want to move your entire photo collection in one go? Quick Start and iCloud restore are your best friends.
In this guide, you will learn three easy ways to transfer photos from iPhone to iPhone, when to use each one, what can go wrong, and how to avoid the usual headaches. Let’s get your memories moved without turning this into a tech support soap opera.
Before You Transfer Anything
Before you start moving pictures to a new iPhone, spend two minutes on basic prep. It can save you 20 minutes of muttering later.
Check these first
- Make sure both iPhones are charged or plugged into power.
- Turn on Wi-Fi and Bluetooth.
- Confirm both devices are updated enough to support the transfer method you want to use.
- Sign in with the correct Apple Account if you plan to use iCloud Photos or Quick Start.
- Check that the receiving iPhone has enough free storage for the photos or the full library.
If you skip those basics, your transfer may still work. It may also act like a tired raccoon and refuse to cooperate.
Method 1: Use AirDrop for a Fast, One-Time Photo Transfer
Best for: sending selected photos and videos from one iPhone to another nearby iPhone.
If you only need to transfer a few pictures, AirDrop is usually the easiest way to transfer photos from iPhone to iPhone. It is quick, wireless, and does not require a cable, a computer, or a deep spiritual commitment to cloud storage.
How AirDrop works
AirDrop lets Apple devices share files with nearby Apple devices over a direct wireless connection. In plain English, it is the “here, take these photos” button for people in the same room.
How to transfer photos with AirDrop
- On both iPhones, turn on Wi-Fi and Bluetooth.
- Open Control Center and make sure AirDrop is enabled.
- Choose whether the receiving iPhone is visible to Contacts Only or Everyone for 10 Minutes.
- On the sending iPhone, open the Photos app.
- Select the photos you want to move.
- Tap the Share button, then tap AirDrop.
- Select the other iPhone when it appears.
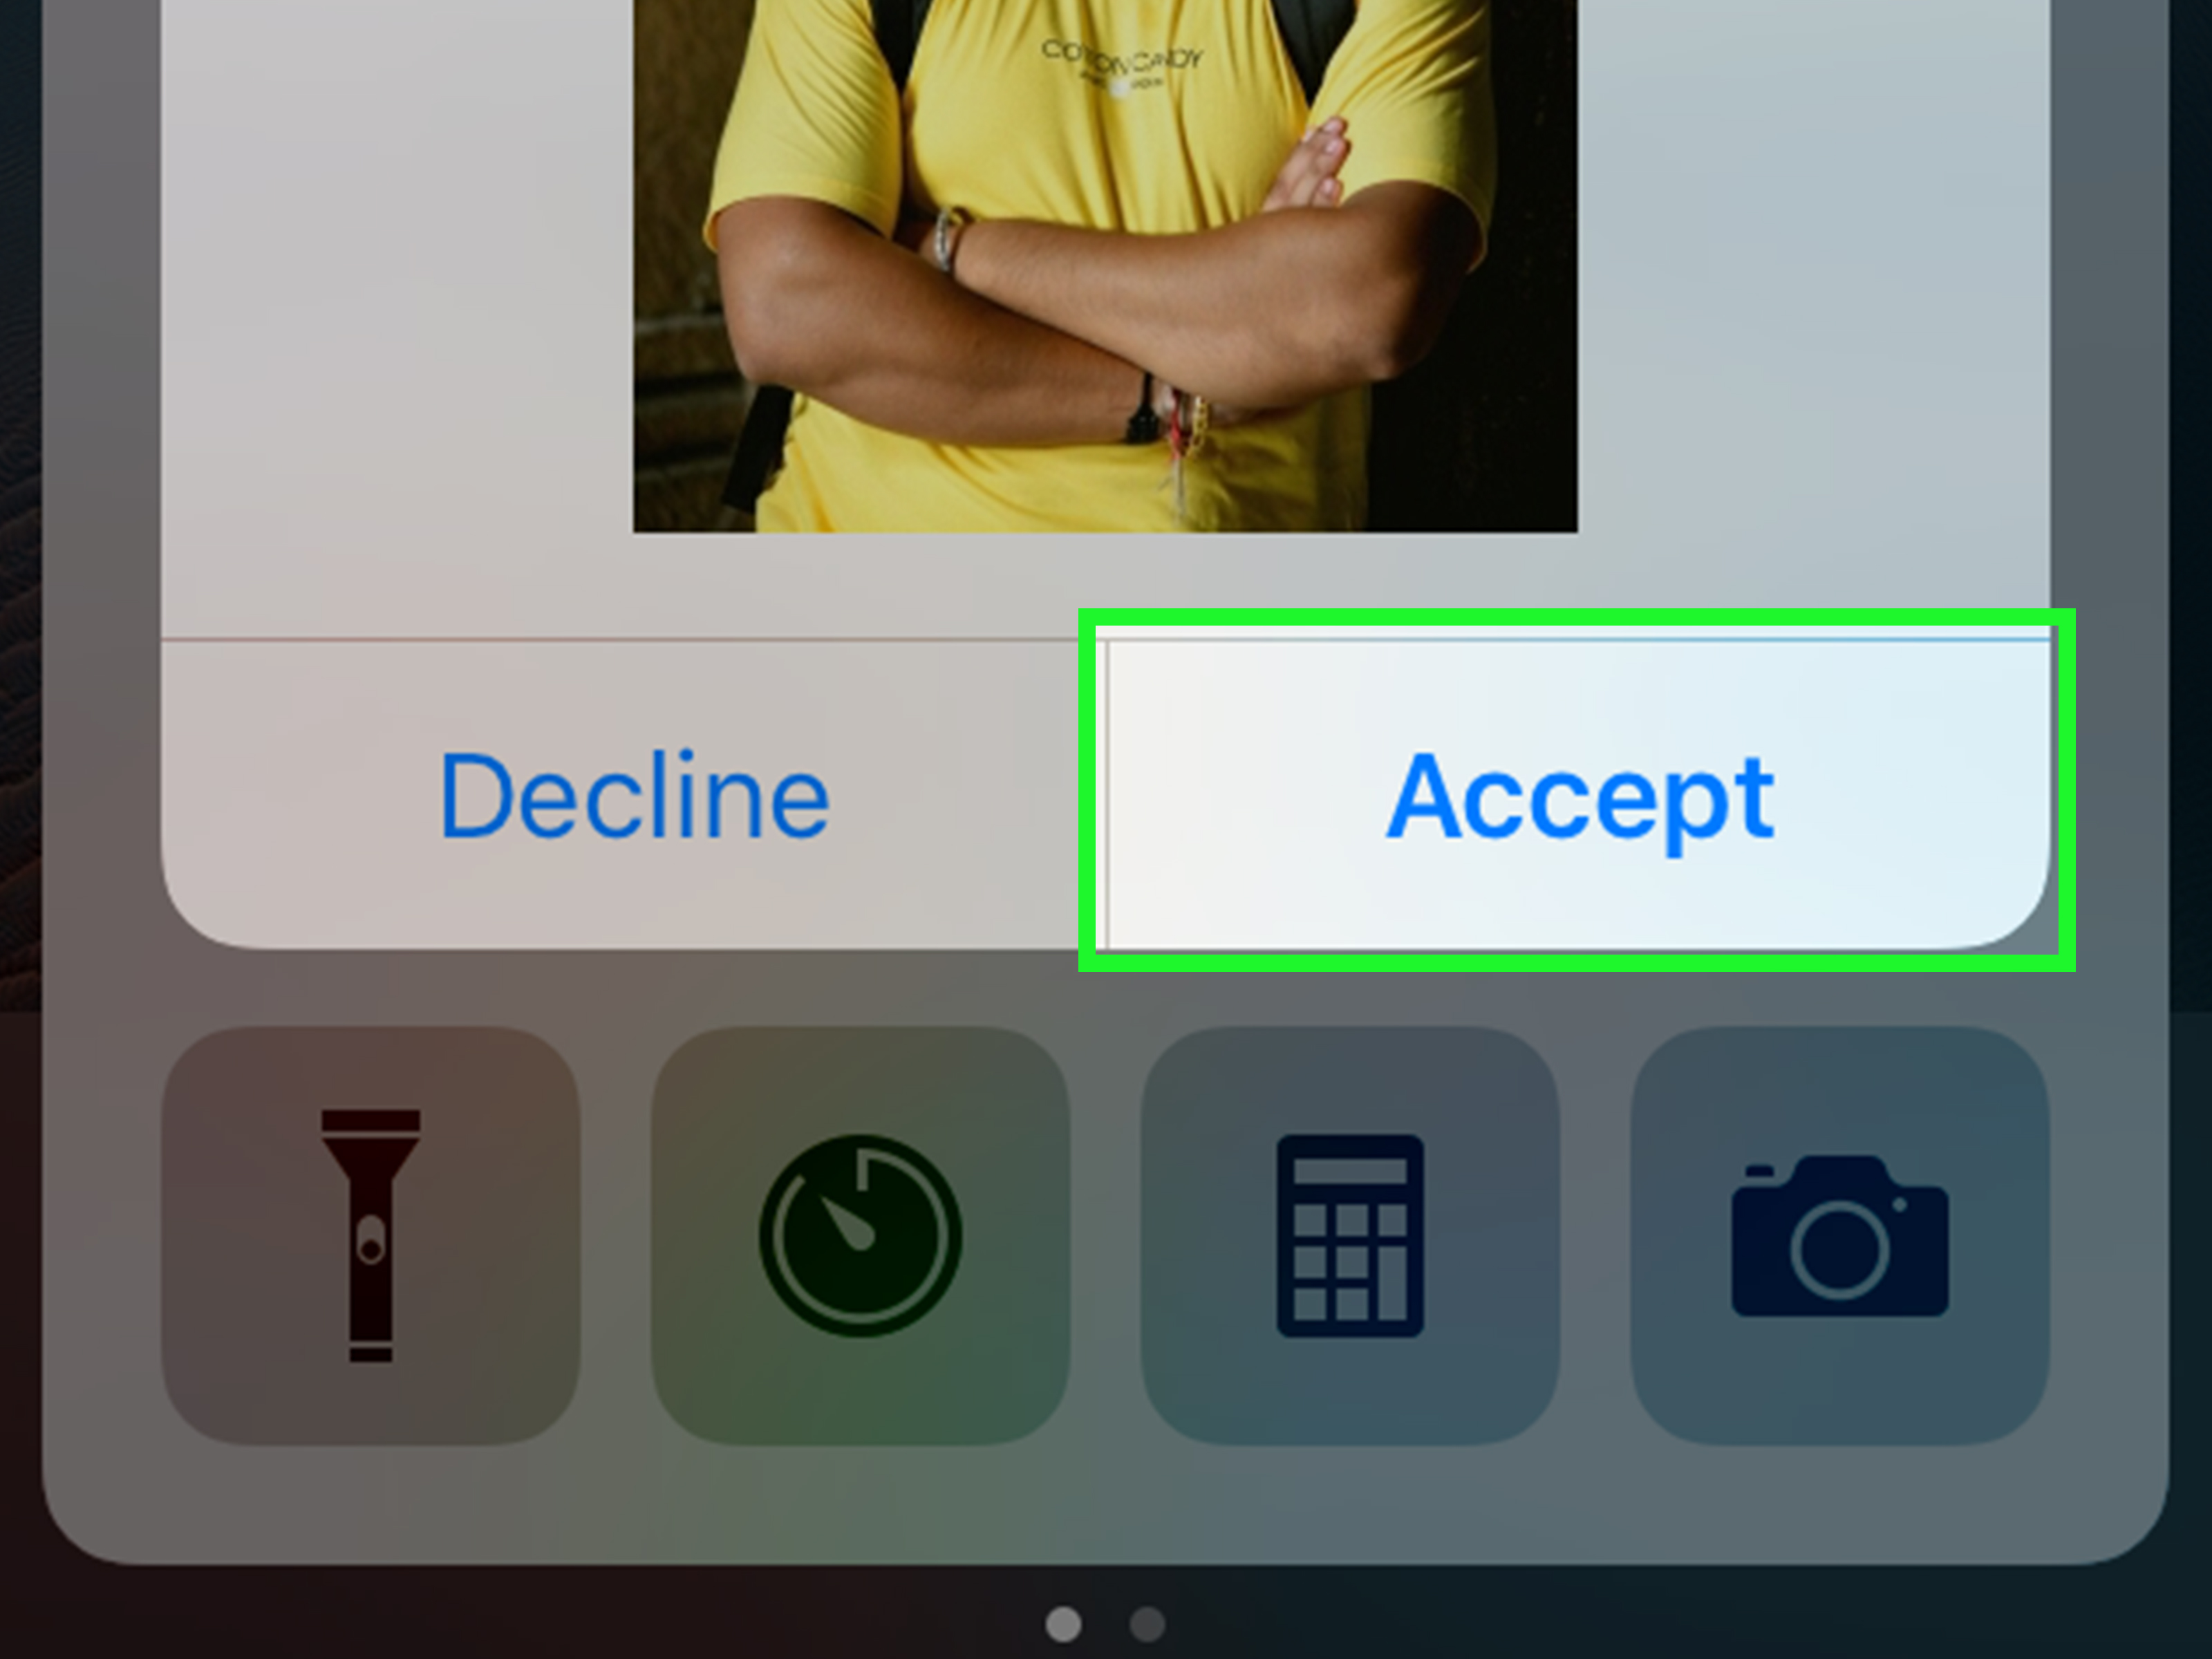
- On the receiving iPhone, tap Accept.
Why people love this method
- It is fast for small or medium batches.
- No cable or computer is needed.
- You can send specific photos instead of your entire library.
- It works great when both iPhones are right next to each other.
When AirDrop is not the best pick
AirDrop is not ideal if you are moving tens of thousands of photos or setting up a brand-new iPhone with your full camera roll. It can do the job, but that is like using a teaspoon to empty a swimming pool. Technically possible. Emotionally unwise.
Quick AirDrop troubleshooting tips
- Move the phones closer together.
- Make sure the receiving phone is discoverable.
- Keep both screens awake during the transfer.
- Try sending a smaller batch if a huge selection stalls.
Method 2: Use iCloud Photos to Sync Your Entire Photo Library
Best for: keeping photos available on both iPhones with the same Apple Account.
If AirDrop is the courier, iCloud Photos is the automatic warehouse system. Once you turn it on, your photos and videos upload to iCloud and become available across Apple devices signed in to the same Apple Account.
This method is excellent if you want your photo library to appear on your new iPhone without manually sending pictures one by one. It is also handy if you use multiple Apple devices and want them all to stay in sync.
How to turn on iCloud Photos
- On the old iPhone, open Settings.
- Tap your name, then go to iCloud and Photos.
- Turn on iCloud Photos.
- Wait for your photos and videos to finish uploading.
- On the new iPhone, sign in with the same Apple Account.
- Go to Settings > your name > iCloud > Photos.
- Turn on iCloud Photos there too.
After that, your photos should begin appearing on the second iPhone. Depending on your library size and internet speed, this may happen quickly or take a while. A 200-photo vacation album can be speedy. A decade of pet photos, screenshots, and receipts from 2018 may take longer.
Why iCloud Photos is so useful
- It syncs your full library instead of selected images.
- You do not need both iPhones side by side once syncing starts.
- It is ideal for long-term photo access across Apple devices.
- It can help save local storage if you use optimized storage settings.
What to watch out for
The catch is storage. If your photo library is larger than your available iCloud storage, syncing may stop until you free space or upgrade your plan. This is the moment many people discover just how many blurry dinner pictures they have been emotionally carrying for years.
Also, iCloud Photos is best when both iPhones belong to you and use the same Apple Account. If you are sending photos to someone else’s iPhone, AirDrop is usually easier.
Use this method when…
- You want the same photos on both devices.
- You are upgrading and plan to keep using Apple services.
- You do not want to manually transfer individual albums.
Method 3: Use Quick Start or iCloud Backup When Moving to a New iPhone
Best for: transferring your entire photo library while setting up a new iPhone.
If you are switching from an old iPhone to a new iPhone, this is often the smartest route. Instead of thinking only about photos, this method transfers your broader device data during setup, including your photo library.
There are two common versions of this approach: a direct Quick Start transfer from iPhone to iPhone, or restoring your new iPhone from an iCloud backup.
Option A: Quick Start direct transfer
Quick Start is ideal when you have both iPhones with you and the new one has not been fully set up yet.
- Turn on the new iPhone and place it near the old one.
- Make sure the old iPhone has Wi-Fi and Bluetooth turned on.
- Follow the Quick Start prompt that appears on the old iPhone.
- Use the old iPhone to help authenticate the new one.
- Choose the option to transfer data from your current iPhone.
- Keep both iPhones near each other and connected to power until the transfer finishes.
This is a strong option if you want your new iPhone to feel like your old iPhone’s younger, slightly shinier twin.
Option B: Restore from iCloud backup
If your old iPhone is not nearby, or if you prefer using the cloud, restoring from an iCloud backup can transfer your photos as part of the setup process.
- On the old iPhone, make a fresh iCloud backup.
- Turn on the new iPhone.
- Follow the setup prompts until you reach the transfer screen.
- Select From iCloud Backup.
- Sign in to your Apple Account.
- Choose the most recent backup from the old iPhone.
- Wait for the restore process to begin.
This method is especially useful if your old device is damaged, far away, or already wiped clean of daily life and snack photos.
When this method makes the most sense
- You are moving to a new iPhone, not just sharing a few pictures.
- You want your photos, settings, and other content transferred together.
- You prefer a setup-time solution instead of managing photos later.
Which Method Is Best for You?
Here is the short version without the tech drama:
- Use AirDrop if you want to send selected photos to another nearby iPhone.
- Use iCloud Photos if you want both iPhones to show the same photo library over time.
- Use Quick Start or iCloud backup restore if you are moving everything to a new iPhone during setup.
If you choose the method that matches your situation, the process is usually painless. Most transfer issues happen when people try to use the wrong tool for the job. AirDropping 9,000 photos is ambitious. Syncing with iCloud when you only wanted to send three screenshots is overkill. Use the scalpel, not the chainsaw.
Common Mistakes to Avoid
1. Forgetting about storage
Your new iPhone needs room for your photo library, and iCloud needs enough space if you are syncing or restoring from backup.
2. Using the wrong Apple Account
If your photos do not appear on the second iPhone with iCloud Photos, double-check the Apple Account on both devices.
3. Starting Quick Start when you are in a hurry
Direct device-to-device transfers can take time, especially with large libraries. Pick a moment when you do not need either phone for a while.
4. Sending too many files at once with AirDrop
If a huge batch gets stuck, try transferring in smaller groups. Your sanity will appreciate the smaller bite sizes.
5. Assuming everything happens instantly
Some transfers are fast, but full libraries and cloud syncing can take time. A little patience goes a long way, even if your thumb is hovering over the refresh instinct like a caffeinated squirrel.
Real-World Experiences: What It Actually Feels Like to Transfer Photos Between iPhones
On paper, transferring photos from iPhone to iPhone sounds wonderfully simple. In real life, the experience depends on why you are doing it.
If you are just sending a few photos to your spouse, friend, or your own second iPhone, AirDrop feels almost magical. You tap a few pictures, hit Share, and the other device pops up like it was waiting backstage. It is one of those rare tech moments where you think, “Wow, that actually worked exactly like the ad.” For quick handoffs, it is hard to beat.
Things feel different when you are upgrading to a new iPhone. That is when the emotional weight of your photo library shows up. Suddenly you are not transferring “photos.” You are transferring baby pictures, old vacations, screenshots of recipes you never cooked, memes that were hilarious in 2021, and approximately 900 accidental pocket shots. Quick Start is great for this because it feels like moving house with professionals instead of carrying everything in grocery bags.
iCloud Photos creates a different kind of experience. It is less dramatic and more quiet. You turn it on, sign in, and then your pictures begin appearing across devices as if they have always lived there. It is convenient, especially for people deep in the Apple ecosystem. The only emotional plot twist is usually storage. Nothing humbles a person faster than learning their camera roll is too large for their iCloud plan.
Many users also discover that “transfer” means different things. Sometimes people want a one-time move. Sometimes they want a permanent sync. Sometimes they want the new iPhone to look exactly like the old one, down to the same wallpaper and 47 open Safari tabs. Choosing the right method matters because it changes the whole experience. Pick the wrong one, and you can end up doing extra work you never needed to do.
There is also the patience factor. AirDrop can feel instant. iCloud syncing can feel slow if you keep checking every two minutes. Quick Start can be smooth, but only if both phones stay charged, nearby, and unbothered. This is not the ideal moment for one phone to hit 5% battery and stage a protest.
The best experience usually comes from matching the method to the moment. AirDrop is for quick sharing. iCloud Photos is for ongoing syncing. Quick Start is for full migration to a new iPhone. Once that clicks, the process feels much less like a mystery and much more like routine digital housekeeping. Not glamorous, perhaps, but deeply satisfying when your favorite pictures appear where they should.
Final Thoughts
If you are wondering how to transfer photos from iPhone to iPhone, the answer is simpler than it first appears. AirDrop is perfect for fast sharing, iCloud Photos is great for syncing your library, and Quick Start or iCloud backup restore works best when setting up a new iPhone.
The trick is not finding a method. Apple gives you several. The trick is picking the one that matches your real goal. Once you do that, moving your pictures can be quick, painless, and refreshingly low on drama. And that is exactly what a photo transfer should be: more memories, less chaos.