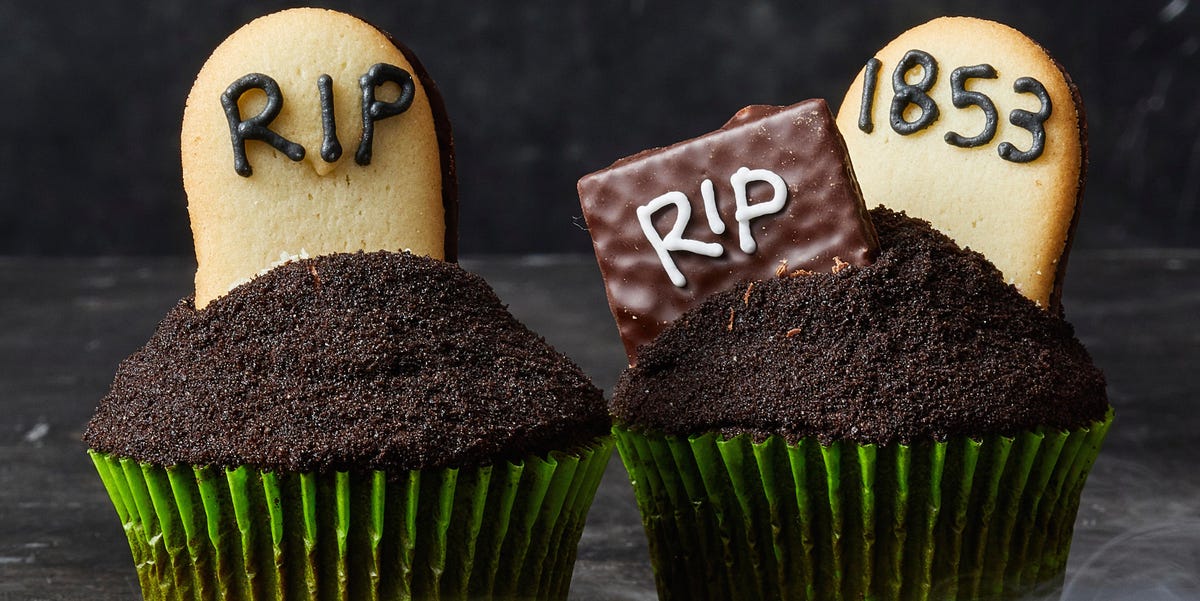
If Halloween had an official dessert mascot, graveyard cupcakes would be standing near the front of the line, probably holding a tiny cookie tombstone and looking suspiciously delicious. These spooky little treats are rich, chocolatey, easy to decorate, and dramatic enough to make guests say, “Wait, did you make those?” The answer, of course, is yeswhile acting humble and pretending the crushed cookie dirt did not end up on your counter, your shirt, and possibly the family dog.
This best graveyard cupcakes recipe combines moist chocolate cupcakes, creamy chocolate frosting, crushed sandwich cookies, and edible tombstones for a Halloween dessert that looks impressive but does not require professional baking skills. You do not need fondant sculpting experience, a haunted mansion, or a culinary degree from the School of Very Serious Cupcakes. You just need a muffin pan, a few pantry-friendly ingredients, and a willingness to write “RIP” on cookies like a tiny dessert undertaker.
Whether you are planning a Halloween party, a school bake sale, a scary movie night, or a kitchen project with kids, these graveyard cupcakes are the kind of festive treat that delivers maximum spooky charm with minimal panic. They are portable, customizable, and easy to make ahead, which means you can spend less time stressing and more time deciding whether gummy worms count as décor or emotional support candy.
Why You’ll Love This Graveyard Cupcakes Recipe
The magic of Halloween graveyard cupcakes is that they are part dessert, part edible craft project. The cupcake itself provides the base, the frosting acts like soft soil, the cookie crumbs become dirt, and the tombstone cookies bring the whole spooky scene together. It is simple, clever, and just chaotic enough to feel properly seasonal.
This recipe is also flexible. You can bake cupcakes from scratch or use a boxed chocolate cake mix if your schedule is scarier than the decorations. You can pipe the frosting beautifully or spread it with a butter knife and call it “rustic cemetery texture.” You can decorate with candy pumpkins, gummy worms, bone sprinkles, candy eyes, chocolate skulls, or whatever Halloween candy survived the snack raid.
Most importantly, these cupcakes taste as good as they look. The chocolate-on-chocolate base gives them a rich, fudgy flavor, while the crushed cookies add crunch. The tombstone cookies are sweet and crisp, and the candy decorations add playful texture. Every bite feels like a mini Halloween partyminus the awkward costume small talk.
Ingredients for the Best Graveyard Cupcakes
This recipe makes about 12 standard cupcakes. You can double it easily for parties, classrooms, office events, or any gathering where people pretend they are “just having one” and then mysteriously return to the dessert table three times.
For the Chocolate Cupcakes
- 1 cup all-purpose flour
- 1 cup granulated sugar
- 1/3 cup unsweetened cocoa powder
- 1 teaspoon baking powder
- 1/2 teaspoon baking soda
- 1/2 teaspoon salt
- 1 large egg, room temperature
- 1/2 cup buttermilk, room temperature
- 1/4 cup vegetable oil
- 1 teaspoon vanilla extract
- 1/2 cup hot coffee or hot water
For the Chocolate Frosting
- 1/2 cup unsalted butter, softened
- 1 3/4 cups powdered sugar
- 1/4 cup unsweetened cocoa powder
- 2 to 3 tablespoons heavy cream or milk
- 1 teaspoon vanilla extract
- Pinch of salt
For the Graveyard Decorations
- 12 oval or rectangular cookies for tombstones, such as Milano-style cookies, graham cracker pieces, or vanilla sandwich cookies
- 1 cup crushed chocolate sandwich cookies, filling included or removed
- Black decorating gel or melted chocolate for writing
- Gummy worms, candy pumpkins, bone sprinkles, candy eyes, or Halloween sprinkles
- Optional: green frosting for grass, white chocolate bones, or small marshmallow ghosts
How to Make Graveyard Cupcakes
Making graveyard cupcakes is easier than it looks. The trick is to build the scene in layers: bake the cupcakes, cool them completely, frost generously, add cookie crumbs, then press in the tombstones and decorations. Do not rush the cooling step. Warm cupcakes melt frosting faster than a vampire in a tanning bed.
Step 1: Prepare the Cupcake Batter
Preheat the oven to 350°F. Line a 12-cup muffin pan with paper cupcake liners. Black, orange, purple, or Halloween-patterned liners make the cupcakes look extra festive, but plain liners work perfectly well. The cupcakes will be dressed up soon enough.
In a large mixing bowl, whisk together the flour, sugar, cocoa powder, baking powder, baking soda, and salt. In a separate bowl, whisk the egg, buttermilk, vegetable oil, and vanilla extract until smooth. Pour the wet ingredients into the dry ingredients and stir until just combined.
Slowly add the hot coffee or hot water, stirring gently. The batter will look thin, and that is exactly what you want. A thinner chocolate batter often bakes into a soft, moist cupcake. Coffee does not make the cupcakes taste like coffee; it simply deepens the chocolate flavor. If you prefer, hot water is a fine substitute.
Step 2: Bake the Cupcakes
Divide the batter evenly among the cupcake liners, filling each about two-thirds full. Do not overfill them, or the cupcakes may rise too high and make tombstone placement tricky. A slightly flatter top is actually helpful for decorating.
Bake for 17 to 20 minutes, or until a toothpick inserted into the center comes out clean or with a few moist crumbs. Let the cupcakes cool in the pan for about 5 minutes, then transfer them to a wire rack. Allow them to cool completely before frosting.
Step 3: Make the Chocolate Frosting
Beat the softened butter until creamy. Add powdered sugar, cocoa powder, vanilla extract, salt, and 2 tablespoons of cream or milk. Beat on low speed at first so your kitchen does not experience a powdered sugar snowstorm. Once combined, increase the speed and whip until fluffy. Add more cream or milk, one teaspoon at a time, until the frosting is spreadable but still thick enough to hold decorations.
The frosting is the “soil” that supports the graveyard scene, so do not make it too runny. A sturdy chocolate buttercream keeps the tombstone cookies upright and gives the crushed cookie dirt something to cling to.
Step 4: Make the Cookie Dirt
Place chocolate sandwich cookies in a zip-top bag and crush them with a rolling pin until they resemble coarse dirt. You can also pulse them in a food processor. Some fine crumbs help cover the frosting, while a few larger pieces add texture. Basically, you want the top of each cupcake to look like a haunted garden bed, not a perfectly polished ballroom floor.
Step 5: Create the Tombstones
Use black decorating gel, melted chocolate, or a food-safe edible marker to write “RIP” on each cookie tombstone. You can also write funny names or spooky phrases such as “Boo,” “Too Sweet,” “Here Lies My Diet,” or “Gone Snacking.” Keep the writing simple so it stays readable.
If your cookies are too tall, trim the bottoms slightly with a sharp knife. A flat base helps them stand upright in the cupcake. If you are using graham crackers, cut them into rounded or rectangular tombstone shapes. Do this gently, because graham crackers can be dramatic and crumble when least expected.
Step 6: Decorate the Graveyard Cupcakes
Spread or pipe a generous layer of chocolate frosting onto each cooled cupcake. Immediately sprinkle crushed chocolate cookies over the frosting, pressing lightly so the crumbs stick. Insert one tombstone cookie near the back of each cupcake, pushing it gently into the frosting and cake for stability.
Add gummy worms crawling out of the dirt, candy pumpkins near the tombstones, bone sprinkles across the top, or candy eyes peeking out like tiny dessert goblins. If you want extra detail, pipe green frosting around the tombstone to look like grass. For a creepy-cute finish, add a small marshmallow ghost or a white chocolate bone.
Expert Tips for Perfect Graveyard Cupcakes
Cool the Cupcakes Completely
This is the golden rule of cupcake decorating. If the cupcakes are warm, the frosting will melt, the cookie crumbs will slide, and your graveyard may look like it survived a chocolate mudslide. Cool cupcakes are easier to frost and decorate neatly.
Use Thick Frosting for Better Structure
Thin frosting tastes fine, but it does not support tombstone cookies well. Keep the buttercream thick and fluffy. If it feels too soft, add a little more powdered sugar. If it is too stiff, add a tiny splash of cream or milk.
Insert Tombstones at a Slight Angle
Press the tombstone cookies into the cupcake at a slight backward angle. This helps them stay upright and gives the design a natural, old-cemetery look. Nobody expects a haunted graveyard to have perfect zoning regulations.
Decorate Close to Serving Time
You can bake the cupcakes a day in advance and make the frosting ahead, but add the cookie tombstones and gummy candies closer to serving time when possible. Cookies can soften if they sit in frosting for too long, and gummy candy can become sticky in humid kitchens.
Flavor Variations and Creative Ideas
The classic version uses chocolate cupcakes, chocolate frosting, and crushed chocolate cookies, but there are plenty of ways to customize this Halloween cupcakes recipe.
Cookies and Cream Graveyard Cupcakes
Fold crushed chocolate sandwich cookies into the cupcake batter or frosting for a cookies-and-cream twist. Top with extra cookie dirt and a tombstone cookie. This variation is especially popular with kids, although adults tend to hover nearby pretending they are “just checking the decorations.”
Pumpkin Spice Graveyard Cupcakes
Use pumpkin cupcakes instead of chocolate and frost them with cream cheese frosting tinted gray, brown, or dark chocolate. The warm spices pair beautifully with Halloween candy and make the cupcakes feel cozy as well as spooky.
Peanut Butter Graveyard Cupcakes
Add a peanut butter frosting under the cookie dirt, or place a mini peanut butter cup in the center of each cupcake before baking. Chocolate, peanut butter, and cookie crumbs are a dangerous trioin the best possible way.
Black Cocoa Graveyard Cupcakes
For a darker, more dramatic cupcake, replace part of the cocoa powder with black cocoa. It gives the cupcakes an Oreo-like flavor and a deep haunted-house color. Pair it with vanilla tombstones for strong visual contrast.
Kid-Friendly Decorating Station
Set out plain frosted cupcakes, crushed cookies, tombstone cookies, gummy worms, candy pumpkins, and sprinkles. Let kids decorate their own edible graveyards. Expect creativity, laughter, and at least one cupcake that looks like a candy tornado hit a cemetery.
How to Store Graveyard Cupcakes
Store decorated cupcakes in an airtight container at room temperature for up to 1 day, or in the refrigerator for up to 3 days. If refrigerated, let them sit at room temperature for 20 to 30 minutes before serving so the frosting softens and the chocolate flavor comes through.
For the best texture, store the cupcakes and decorations separately if making them ahead. Bake the cupcakes and prepare the frosting one day early. Crush the cookies and decorate the tombstones in advance, then assemble everything shortly before the party.
Can You Make Graveyard Cupcakes Ahead of Time?
Yes, and your future self will thank you. Bake the cupcakes up to 24 hours ahead and keep them covered at room temperature. Frosting can also be made ahead and refrigerated in an airtight container. Let it soften, then re-whip before using.
The tombstone cookies can be written on a day or two in advance. Lay them flat on parchment paper until the writing dries. Keep them in a dry container so they stay crisp. Assemble the cupcakes the day you plan to serve them for the cleanest, freshest look.
Common Mistakes to Avoid
Overfilling the Cupcake Liners
Overfilled liners create domed cupcakes, which can make decorations slide off. Fill each liner about two-thirds full. If your cupcakes dome slightly, you can still decorate them; just use frosting to create a level surface.
Using Too Much Cookie Crumb
Cookie dirt is delicious, but piling on too much can hide the decorations and make the cupcakes messy to eat. A generous sprinkle is enough. Think “spooky soil,” not “landslide at midnight.”
Writing Tombstones Too Late
Decorating gel needs a little time to set. Write on the cookies before you frost the cupcakes so the letters do not smear during assembly.
Skipping the Stability Check
After inserting each tombstone, gently wiggle it. If it feels unstable, push it deeper into the cupcake or add a little extra frosting behind it. Nobody wants a tombstone collapse before dessert makes its grand entrance.
Serving Ideas for Halloween Parties
Graveyard cupcakes look fantastic on a black serving tray, cake stand, or wooden board sprinkled with extra cookie crumbs. You can arrange them in rows like a tiny cemetery or scatter them among Halloween props such as plastic spiders, mini pumpkins, or battery-operated candles. Just make sure anything non-edible stays clearly away from the cupcakes.
For a dessert table, pair these cupcakes with caramel apples, Halloween cookies, popcorn balls, chocolate bark, or a bowl of candy. They also make a fun centerpiece because each cupcake has its own personality. Some are creepy, some are cute, and some look like the decorator got into a battle with the gummy worms and lost.
Best Graveyard Cupcakes Recipe Card
Prep Time
35 minutes
Cook Time
18 minutes
Total Time
About 1 hour, plus cooling time
Servings
12 cupcakes
Ingredients
- Chocolate cupcakes, baked and cooled
- Chocolate buttercream frosting
- Crushed chocolate sandwich cookies
- 12 tombstone cookies
- Black decorating gel or melted chocolate
- Halloween candies and sprinkles
Directions
- Preheat oven to 350°F and line a muffin pan with cupcake liners.
- Whisk dry cupcake ingredients in one bowl and wet ingredients in another.
- Combine wet and dry ingredients, then stir in hot coffee or hot water.
- Fill liners two-thirds full and bake for 17 to 20 minutes.
- Cool cupcakes completely on a wire rack.
- Beat frosting ingredients until creamy, fluffy, and spreadable.
- Crush chocolate sandwich cookies into coarse crumbs.
- Write “RIP” or spooky messages on tombstone cookies.
- Frost cupcakes, sprinkle with cookie dirt, and add tombstones.
- Finish with gummy worms, candy pumpkins, bones, eyes, or sprinkles.
Experience Notes: What Makes Graveyard Cupcakes So Fun to Make
One of the best things about making graveyard cupcakes is that perfection is not required. In fact, a little mess makes them better. A cupcake with uneven cookie dirt looks more like a spooky graveyard. A tilted tombstone looks old and haunted. A gummy worm hanging over the edge looks like it has chosen drama as a lifestyle. This is the rare baking project where flaws become personality.
In my experience, these cupcakes are especially fun because they invite people to participate. Adults who claim they “are not creative” suddenly become deeply invested in tombstone placement. Kids treat each cupcake like a tiny Halloween diorama. Someone always gives a tombstone a ridiculous name, and someone else always eats too many decorations before they make it onto the cupcakes. This is not a problem. This is tradition.
The most practical lesson is to set up a decorating station before you begin. Put the crushed cookies in one bowl, the tombstone cookies on a plate, and the candy decorations in small dishes. Have a spoon for crumbs, a small spatula for frosting, and paper towels nearby. Once decorating starts, things move fast. Chocolate crumbs have a way of spreading like spooky confetti, and black decorating gel waits for no one.
Another helpful tip is to make extra tombstones. Cookies break. Decorating gel smears. Someone may “accidentally” eat one. Having a few backups keeps the mood fun instead of turning the kitchen into a crime scene investigation, although that would be thematically appropriate.
If you are making these for a party, transport them in a cupcake carrier or a shallow box with a non-slip liner. Add the tallest decorations after arrival if possible. Tombstones are sturdy once inserted, but they are still cookies, not structural engineering miracles. If a tombstone falls, just press it back in and sprinkle more cookie dirt around the base. The graveyard aesthetic is very forgiving.
For school parties or kid-friendly events, keep the decorations simple and avoid anything too hard or sharp. Soft gummy worms, candy pumpkins, and sprinkles work well. For adult Halloween parties, you can make the design more dramatic with black cocoa cupcakes, dark chocolate ganache, edible glitter, or funny tombstone phrases. A little humor goes a long way. “RIP Calories” has never failed to get a laugh.
The real charm of this recipe is that it turns basic ingredients into something memorable. Chocolate cupcakes are already beloved, but once you add cookie dirt and tombstones, they become a conversation starter. Guests remember them because they are playful. They photograph well, they look great on a dessert table, and they taste like chocolate, cookies, and Halloween nostalgia all teamed up for one delicious little haunting.
So if you want a dessert that is easy, festive, and guaranteed to disappear faster than candy on October 31, these best graveyard cupcakes are the answer. They are spooky without being difficult, cute without being fussy, and tasty enough to raise spiritseven if the spirits are technically the theme.
Conclusion
Graveyard cupcakes are the perfect Halloween dessert because they combine rich chocolate flavor with creative, kid-friendly decorating. With moist cupcakes, fluffy frosting, crunchy cookie dirt, and adorable edible tombstones, this recipe turns a simple batch of cupcakes into a spooky party centerpiece. You can make them from scratch, use a cake mix shortcut, customize the decorations, and prepare several parts ahead of time. Whether you are hosting a haunted bash or just want a fun October baking project, these cupcakes prove that dessert can be creepy, cute, and completely irresistible.