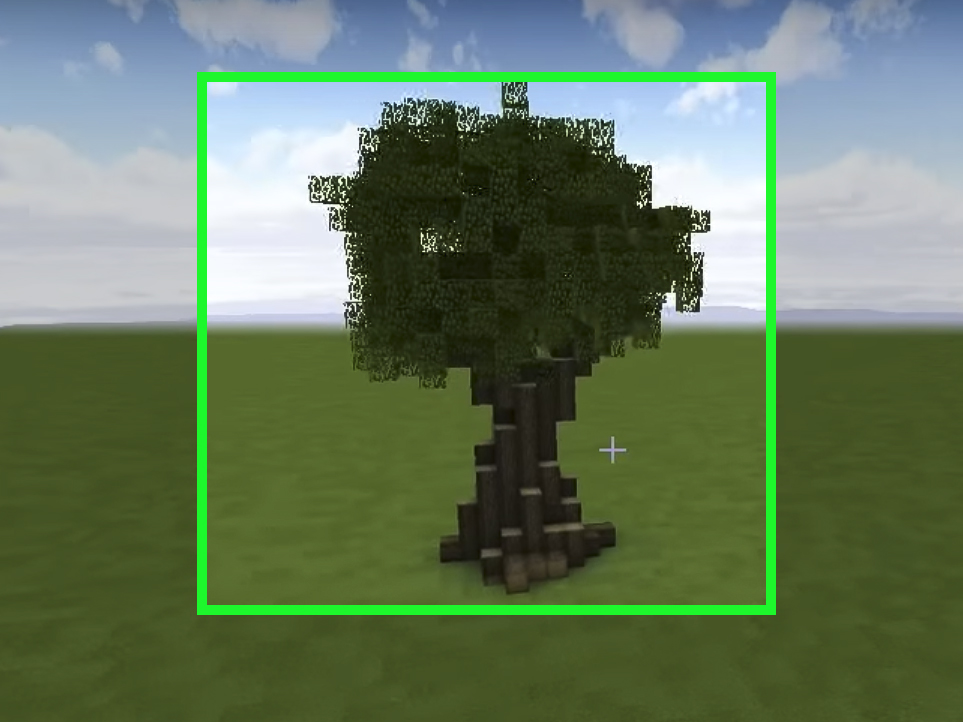
Building trees in Minecraft sounds simple until your “majestic ancient oak” turns into a wooden broccoli tower with confidence issues. The good news? Custom trees are one of the fastest ways to make a Minecraft world look alive, polished, and handcrafted. Whether you are decorating a survival base, designing a fantasy forest, building a cozy cottagecore village, or trying to make your starter house look less like a rectangular apology, learning how to build trees in Minecraft is a skill worth having.
Vanilla Minecraft trees are useful, charming, and sometimes perfect. Oak, birch, spruce, jungle, acacia, dark oak, mangrove, cherry, and pale oak wood each bring a different personality to a build. But when you want a tree that frames a pathway, shades a pond, supports a treehouse, or becomes the centerpiece of a fantasy landscape, you usually need to build it by hand. This guide walks you through 14 practical steps for making natural-looking Minecraft trees with logs, leaves, roots, branches, and details that do not scream, “I was assembled during a snack break.”
Why Build Custom Trees in Minecraft?
Custom trees give your world scale, atmosphere, and direction. A tall spruce can make a mountain base feel colder and more dramatic. A twisting oak can make a medieval village look older. A pink cherry tree can soften a garden, shrine, or lakeside path. Even a small hand-built tree beside a starter house can make the whole area feel less flat.
There are two main ways to make trees in Minecraft. The first is growing them from saplings with enough space, proper blocks, and timeor a little bone meal if patience is not your strongest enchantment. The second is building custom trees block by block. This article focuses on the custom method, while still using real Minecraft tree mechanics to help you choose blocks, leaves, and natural shapes wisely.
Materials You Need to Build a Minecraft Tree
Before you start, gather a simple palette. For most custom trees, you will need logs or wood blocks for the trunk, leaves for the canopy, stairs or slabs for roots and texture, fences or walls for smaller branches, and optional decorative blocks such as moss, vines, lanterns, flowers, trapdoors, hanging roots, or glow berries.
A beginner-friendly oak tree might use oak logs, oak leaves, spruce trapdoors, moss carpet, and azalea leaves. A fantasy tree might combine dark oak logs, cherry leaves, flowering azalea leaves, lanterns, and vines. A swamp tree might use mangrove roots, oak logs, mud, vines, and waterlogged leaves. The secret is not using every block you own. The secret is choosing a theme and sticking to it before your tree starts looking like a yard sale in leaf form.
How to Build Trees in Minecraft: 14 Steps
Step 1: Choose the Tree Style
Start by deciding what kind of tree you want to build. Is it a small backyard tree, a giant fantasy tree, a windswept acacia, a thick jungle tree, a snowy spruce, or a peaceful cherry blossom? The style affects everything: trunk height, branch angle, canopy shape, and block palette.
For example, oak trees usually look best with rounded crowns and strong side branches. Spruce trees look better when tall and narrow, with leaf layers that taper upward. Acacia trees often have bent trunks and flat, umbrella-like tops. Cherry trees look soft, wide, and decorative. Dark oak trees feel heavier and older, so they can handle thick trunks and sprawling roots.
Step 2: Pick the Right Location
A tree should feel like it belongs where it stands. Place tall trees near cliffs, paths, rivers, houses, farms, and village centers. Use smaller trees around gardens, fences, and starter homes. Avoid building a giant tree too close to a tiny house unless you want the house to look like it is being bullied by landscaping.
Look at the space from all sides. A tree beside a road should frame the road, not block it. A tree near a house should improve the silhouette, not hide the front door. In survival mode, also think about lighting. A thick canopy can create dark patches where hostile mobs may spawn, so use hidden torches, lanterns, glow berries, or light blocks where appropriate.
Step 3: Plan the Height and Scale
Scale is where many Minecraft trees go wrong. A trunk that is too tall with too few leaves looks like a broom. A short trunk with a giant canopy looks like a mushroom wearing a disguise. As a simple rule, small trees can be 5 to 8 blocks tall, medium trees 9 to 15 blocks tall, and large fantasy trees 20 blocks or higher.
Match the height to nearby builds. A tree next to a one-story cottage should not always be gigantic. A tree beside a castle, mountain base, or fantasy town can be much larger. When in doubt, build the skeleton in temporary blocks first, then step back and check the shape before replacing anything with logs.
Step 4: Build a Temporary Trunk Guide
Use dirt, scaffolding, or another easy-to-break block to sketch the trunk. This is especially useful for large trees. Start with a vertical column, then shift it slightly left or right as it rises. Natural trees are rarely perfect poles. A small bend instantly makes the tree feel more organic.
For a medium custom tree, build a trunk guide around 8 to 12 blocks tall. For a giant tree, widen the base and make the trunk curve as it climbs. Do not worry if it looks ugly at this stage. Temporary tree skeletons are supposed to look suspicious. That is their job.
Step 5: Thicken the Base
The base should be wider than the middle of the trunk. Add extra logs around the bottom two or three blocks, especially on larger trees. This gives the tree weight and makes it look rooted into the ground instead of politely placed on top of it.
For small trees, a one-block trunk can work. For medium trees, use a two- or three-block-wide base. For large trees, create an uneven base with logs extending outward in several directions. Avoid perfect squares unless you are building a stylized tree. Nature loves asymmetry, and Minecraft builders should occasionally let nature win.
Step 6: Add Roots
Roots are one of the easiest ways to make a custom Minecraft tree look better. Place logs, stairs, slabs, fences, or mangrove roots around the base. Run them along the ground for two to five blocks, then taper them down or hide the ends with grass, moss carpet, coarse dirt, podzol, flowers, or leaf litter.
Roots should not all be the same length. Make one root long, one short, one slightly buried, and one wrapping around a rock or path. Around fantasy trees, roots can even form arches, benches, or tunnel entrances. Around swamp trees, roots can dip into water or mud for a more natural wetland look.
Step 7: Shape the Main Branches
Branches are the skeleton of a good tree. Add three to five main branches from the upper trunk. They should point in different directions and start at different heights. If every branch begins on the same level, your tree may look like a wooden ceiling fan.
Use logs for thick branches and place them horizontally, diagonally, or slightly upward. In Java Edition, directional logs help the bark face the right way, which makes branches look cleaner. For smaller branches, use fences, walls, or stripped logs. Branches should usually get thinner as they move away from the trunk.
Step 8: Add Secondary Branches
Once the main branches are placed, add smaller branches near the ends. These support leaf clusters and make the canopy feel layered. Secondary branches do not need to be long. Two or three blocks is often enough.
Think of the tree as a collection of uneven arms holding leaf clouds. Some branches can point upward, some outward, and a few downward. This variation helps the final tree look alive instead of copied and pasted from one angle.
Step 9: Create Leaf Clusters
Now add leaves around the ends of branches. Instead of making one huge cube of leaves, build several small clusters. Start with rough spheres, ovals, or disks. A leaf cluster might be three blocks wide on one side, five blocks wide on another, and slightly taller in the middle.
Place leaves above, below, and beside the branch tips. Leave a few small gaps so the tree has depth. A perfectly solid canopy can look heavy and artificial. A canopy with controlled gaps lets light pass through and makes the shape easier to read.
Step 10: Build the Overall Canopy Shape
After you have several leaf clusters, connect them lightly. The goal is to create a canopy silhouette. Oak and cherry trees usually look good with rounded canopies. Spruce trees need stacked layers that become narrower near the top. Acacia trees often look best with flatter, wider leaf platforms.
Walk around the tree while building. Minecraft trees can look great from the front and terrible from the back if you only build from one viewpoint. Check the top, sides, and underside. If the canopy looks too square, break corner leaves. If it looks too empty, add small clusters near branch intersections.
Step 11: Mix Leaf Types Carefully
Mixing leaves can add depth, but use restraint. Oak and azalea leaves work well together for lush green trees. Spruce leaves can darken the underside of a canopy. Cherry leaves can blend with flowering azalea leaves for a soft garden look. Pale oak and pale moss details can create eerie or mystical designs.
Do not mix every leaf type in one tree unless you are intentionally building a magical rainbow tree. Two or three leaf types are usually enough. Use the darker leaves underneath and lighter or brighter leaves near the outside or top, where sunlight would naturally hit.
Step 12: Add Texture to the Trunk
A plain trunk can work for small trees, but larger trees need texture. Add stripped logs, stairs, slabs, fences, buttons, trapdoors, or signs to create bark variation. You can also place a few logs slightly outside the trunk line to create knots and bumps.
For old trees, use darker blocks near the base. For fantasy trees, add lanterns, vines, mushrooms, or moss. For a dead tree, reduce the leaves and use stripped logs, fences, and pointed branch shapes. For a jungle tree, add vines and cocoa beans if your block palette supports it.
Step 13: Detail the Ground Around the Tree
A good tree does not stop at the trunk. Decorate the ground around it with grass, flowers, moss carpet, coarse dirt, podzol, mushrooms, stones, roots, or water. This makes the tree feel planted in the world.
For a forest, vary the ground with paths, fallen leaves, rocks, shrubs, and smaller saplings. For a garden, use lanterns, benches, fences, and flower beds. For a fantasy build, add glowing blocks hidden under carpets or leaves. The ground is your tree’s stage, and even the best actor needs decent lighting.
Step 14: Step Back, Edit, and Improve
The final step is editing. Fly, climb, or walk around the tree and look for awkward shapes. If the canopy is too round, cut holes. If one side is too flat, add a branch. If the trunk looks skinny, thicken the base. If the top looks heavy, remove leaves from the underside.
Custom trees usually improve after one round of trimming. Do not be afraid to break blocks. Minecraft trees are forgiving. Unlike real trees, they do not judge you, drop branches on your car, or require a permit.
Best Tree Types to Build in Minecraft
Oak Trees
Oak trees are the best starting point for beginners. They work in villages, forests, gardens, and starter bases. Use oak logs, oak leaves, azalea leaves, and mossy ground details. Keep the canopy rounded and the branches balanced.
Spruce and Pine Trees
Spruce trees are ideal for mountains, cabins, snowy biomes, and medieval builds. Make the trunk tall and straight, then add leaf layers that widen near the bottom and narrow toward the top. Use spruce logs, spruce leaves, campfires for smoke nearby, and snow layers if the biome fits.
Cherry Blossom Trees
Cherry trees are excellent for gardens, temples, bridges, ponds, and romantic-looking paths. Use cherry logs, cherry leaves, flowering azalea leaves, and pink petals on the ground. Their canopies should feel soft and slightly drooping, not like pink cubes glued to sticks.
Mangrove and Swamp Trees
Mangrove-style trees look best with exposed roots, water, mud, vines, and dense leaves. Use mangrove roots around the base and let some branches lean over water. These trees are great for swamp huts, fishing docks, and mysterious wetland builds.
Fantasy Trees
Fantasy trees can be oversized, glowing, twisted, or colorful. Start with a thick trunk, add dramatic roots, build long branches, and use layered leaves. Add lanterns, glow berries, amethyst, mushrooms, or hidden lighting. The bigger the tree, the more important the silhouette becomes.
Common Mistakes When Building Minecraft Trees
The first common mistake is symmetry. Perfectly even branches and leaf clusters make trees look artificial. The second mistake is building leaves as a single cube or sphere. Realistic Minecraft canopies need variation, holes, and layers. The third mistake is ignoring the trunk. A beautiful canopy on a boring pole still looks unfinished.
Another mistake is forgetting scale. If your tree is huge, the roots and branches must also be huge. If your tree is tiny, do not overload it with too many details. A small tree can look great with only one trunk, three branches, and a few leaf clusters. The goal is not complexity. The goal is believability.
Survival Mode Tips for Building Trees
In survival mode, custom trees take more planning because you need real materials. Use shears or Silk Touch tools to collect leaves. Bone meal can help grow saplings quickly for wood and leaf farming. Oak and birch are easy beginner choices because their trees are simple to harvest and their leaves work in many builds.
Build scaffolding before placing leaves high above the ground. Keep extra dirt blocks for temporary supports. Use an axe with Efficiency if you plan to reshape logs often. Most importantly, build the tree in sections. Finish the trunk first, then branches, then leaves, then details. Trying to do everything at once is how you end up lost inside your own canopy, questioning your life choices.
Creative Mode Tips for Better Custom Trees
Creative mode is perfect for practicing shapes. Build three versions of the same tree: small, medium, and large. Compare them from a distance. You will quickly learn which shapes look natural and which ones look like vegetables wearing bark.
Use reference images from real trees if you want realism. Look at how branches split, how leaves cluster, and how trunks widen near the ground. You do not need to copy every detail. Minecraft is blocky by nature, so aim for the feeling of the tree rather than a perfect botanical model.
Experience Notes: What Actually Makes a Minecraft Tree Look Good?
After building many custom trees, the biggest lesson is that trees are less about perfect block placement and more about rhythm. A good Minecraft tree has a rhythm of thick and thin, full and empty, straight and curved. The trunk should feel strong, the branches should feel supported, and the leaves should feel like they grew around the branches rather than being pasted on at the end.
One of the most useful habits is building with temporary blocks first. Dirt scaffolding may not look glamorous, but it lets you test height, angle, and balance without wasting logs. I like to build the rough trunk and main branches in dirt, walk around the tree, and ask one simple question: “Does this already feel like a tree?” If the answer is no, leaves will not magically fix it. Leaves can hide mistakes, but they cannot save a bad skeleton forever.
Another practical experience is that smaller trees often look better than oversized ones. Giant trees are impressive, but they demand good proportions. If the trunk is too narrow, the canopy feels heavy. If the roots are too small, the tree looks unstable. If the branches are too straight, the whole build feels mechanical. When practicing, start with trees around 8 to 12 blocks tall. That size is large enough to include branches and details, but small enough that mistakes are easy to fix.
Leaf placement is also more important than beginners expect. Instead of covering every branch with a giant ball, make small clusters and connect them loosely. Leave little windows through the canopy. These gaps create shadows, depth, and a more natural shape. If you are building a tree near a house, leave space where the roofline can still be seen. A tree should improve the composition, not swallow the build like an overenthusiastic hedge.
Block variety helps, but too much variety can make a tree messy. A strong custom tree usually has one main log type, one secondary bark detail, and two leaf types at most. For example, oak logs, stripped oak logs, oak leaves, and azalea leaves create a clean natural tree. Dark oak logs, spruce fences, spruce leaves, and moss create an older forest look. Cherry logs and cherry leaves are already colorful, so they often need fewer extra blocks.
The final experience tip is to decorate around the tree, not just the tree itself. Add moss, flowers, stones, roots, paths, fences, or lanterns nearby. A tree standing on plain grass can look fine, but a tree surrounded by thoughtful ground detail looks intentional. In Minecraft building, context is the magic sauce. Even a simple tree becomes beautiful when it belongs to a garden, shades a bench, bends over a river, or marks the entrance to a hidden base.
Conclusion
Learning how to build trees in Minecraft is one of the best ways to upgrade your worlds. Start with a clear tree style, build a strong trunk, add roots, shape uneven branches, place leaf clusters carefully, and finish with ground details. The process may feel awkward at first, but every custom tree teaches you something about scale, shape, and natural design.
Remember: perfect symmetry is not your friend, temporary blocks are secretly heroic, and leaves should be shaped like living foliagenot emergency green concrete. With these 14 steps, you can build oak trees, spruce trees, cherry blossoms, swamp trees, fantasy trees, and forest details that make your Minecraft world feel richer, warmer, and far more alive.