Note: This guide is written for creative inspiration and general educational use. Always follow the instructions, safety data, cure times, and electrical guidance for the exact resin, pigments, mold, and LED parts you use.
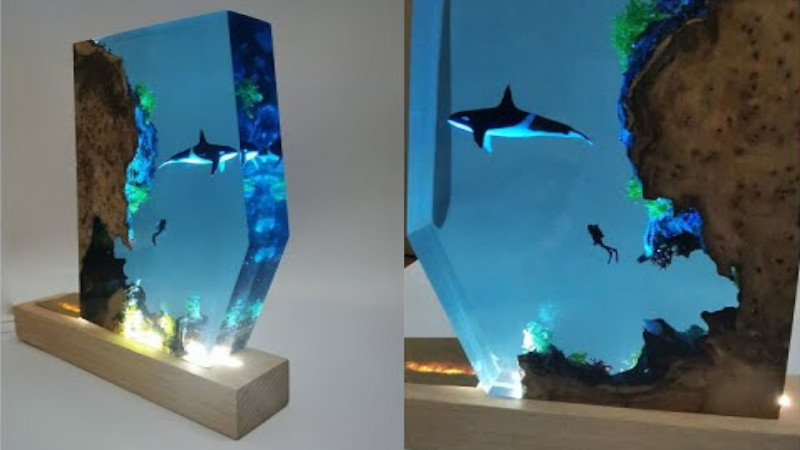
An epoxy resin night light already sounds charming, but make it ocean-themed and suddenly it becomes a tiny glowing vacation for your nightstand. Instead of a plain plastic lamp that looks like it was emotionally assembled in a warehouse, this project creates a miniature sea scene with transparent resin, blue pigments, white wave effects, sand-like textures, shells, and a soft LED glow. The result can look like moonlight hitting shallow water, a glowing tide pool, or a frozen slice of beach magic.
The appeal is easy to understand. Epoxy resin has depth. LEDs bring the glow. Ocean colors bring instant calm. Put them together and you get a handmade decorative light that feels more personal than anything grabbed from a clearance shelf while pretending you only went into the store for batteries.
This article explores how an ocean-themed epoxy resin night light works, what materials make it successful, how to design it safely, and why small details like bubble control, pigment choice, layering, and LED placement can turn a simple craft into a memorable build.
Why an Ocean-Themed Resin Night Light Works So Well
The ocean theme is one of the most popular styles in resin art because resin naturally mimics water. Clear epoxy catches light, creates depth, and can suspend color in a way that looks fluid even after it hardens. Add transparent blue dye, mica powder, pearl pigment, or alcohol ink, and the resin starts to resemble tropical water, deep sea currents, or rolling waves.
A night light adds another layer of drama. During the day, the piece looks like a decorative resin sculpture. At night, the LED shines through the layers and reveals hidden details: tiny shells, glittering sand, pearly foam, darker blue gradients, or even miniature sea creatures. It is basically a beach scene with a secret identity.
Understanding the Build: Resin, Light, and Layering
An epoxy resin night light usually combines three main parts: a resin body, an LED light source, and a base or housing. The resin body is the decorative ocean scene. The LED provides illumination from below, behind, or inside a cavity. The base holds everything together and hides the wiring or battery compartment.
The best designs think about light before the first drop of resin is mixed. Clear areas allow the LED to pass through. Dark pigments block light. Metallic mica reflects light. White pigment creates wave foam but can also become too opaque if overused. A good ocean night light balances transparency and color so the final piece glows instead of turning into a mysterious blue brick.
Common design styles
One popular style is the beach-slice night light, where resin is poured into a rectangular or circular mold with sandy tones at one end and blue-green ocean tones at the other. Another style is the standing wave lamp, where a vertical slab of resin sits on an LED base. A third option is a small cube or dome with embedded shells, miniature coral shapes, or layers of blue resin that look like deep water.
For beginners, a shallow mold or small silicone lamp mold is easier than a large deep pour. Smaller projects cure more predictably, use less material, and make mistakes less expensive. In resin crafting, “small mistake” is a charming learning moment. “Large mistake” is usually a very shiny paperweight.
Materials That Make the Project Shine
The heart of the project is a clear two-part epoxy resin. For a night light, choose a resin intended for casting, art, or small decorative pours. Tabletop resin can work for shallow layers, while deep-pour resin is better for thicker molds. Always check the product’s recommended pour depth, mix ratio, pot life, working temperature, and cure time.
You will also need silicone molds, mixing cups, stir sticks, nitrile gloves, eye protection, pigments, and an LED light source. For the ocean effect, common color choices include transparent blue, teal, turquoise, navy, pearl white, sand beige, and a little gold or bronze mica for beach texture. A heat gun or small torch may help move pigment and pop surface bubbles, but it must be used carefully and briefly.
Useful ocean-themed additions
Small shells, crushed glass, sand, faux pearls, tiny starfish decorations, and miniature sea-life charms can add personality. However, every embedded object should be dry, clean, and compatible with resin. Moisture is not your friend here. It can cause cloudiness, bubbles, or curing problems. The beach belongs near the ocean, but water droplets do not belong inside your epoxy cup.
Safety First: The Less Glamorous but Very Important Part
Epoxy resin is beautiful, but uncured resin and hardener should be handled with respect. Work in a well-ventilated area, wear nitrile gloves, protect your eyes, and avoid skin contact. Do not use kitchen cups, food utensils, or your favorite cereal bowl unless you enjoy explaining craft decisions to your future self.
Ventilation matters because resin systems can release fumes while mixed and curing. Skin protection matters because repeated exposure may cause irritation or sensitization in some people. Keep resin away from children and pets while working and curing. Once the resin is fully cured according to the manufacturer’s instructions, it is generally much safer to handle as a finished decorative object.
Electrical safety also matters. Use low-voltage LED components designed for craft lighting, night lights, or display bases. LEDs are preferred because they are energy-efficient and emit very little heat compared with incandescent bulbs. Still, LEDs and power supplies can warm up, so avoid sealing unknown electronics permanently inside resin unless the parts are designed for that purpose. A removable LED base is usually the smarter choice.
Planning the Ocean Scene Before Pouring
Before mixing anything, sketch the design. Decide where the “shoreline” sits, where the light will shine through, and which direction the waves will move. If the night light is vertical, think about what viewers will see from the front. If it is a dome or cube, think in layers.
A simple layout might include sand-colored resin at the bottom, translucent turquoise in the middle, deeper blue near the top, and white wave foam where the water meets the shore. For a more dramatic look, place the LED behind the darkest blue area so the light fades through the resin like sunlight underwater.
Test your colors first
Pigments look different in the cup than they do in cured resin. They also look different with light behind them. Mix a tiny test batch if possible. A color that looks perfect in daylight may become too dark when lit from below. Transparent dyes usually let more light through, while heavy mica and opaque pigments create stronger visual texture but reduce glow.
Step-by-Step Overview of the Build
1. Prepare the workspace
Cover the table with a silicone mat, plastic sheet, or disposable protective layer. Level the work surface because resin follows gravity like it has a personal grudge against uneven tables. Set out all materials before mixing, including pigments, molds, gloves, paper towels, and tools.
2. Prepare the mold and decorative elements
Make sure the silicone mold is clean and dry. If you are adding shells, sand, or charms, arrange them first. Some objects may float once resin is poured, so consider securing them with a thin first layer of resin before adding more depth.
3. Mix the resin carefully
Measure resin and hardener according to the exact ratio listed by the manufacturer. Do not guess. Resin chemistry is not a cooking show where “a splash of this” makes things better. Stir slowly, scraping the sides and bottom of the cup. Fast stirring adds bubbles, and bubbles are the tiny gremlins of resin art.
4. Divide and tint the resin
Separate the mixed resin into smaller cups for different colors. Use transparent blue or teal for water, pearl or opaque white for wave foam, and tan or gold tones for sand. Add pigment gradually. Too much pigment can affect curing or make the piece too opaque for a night light.
5. Pour the background layers
Start with the lightest or clearest layer if your design needs maximum glow. Pour slowly and close to the mold surface to reduce bubbles. For a beach scene, pour sand-colored resin at one edge and blue resin beside it. Let the colors touch slightly so they blend naturally.
6. Create wave foam
Add a thin line of white-tinted resin where the water meets the shore. Use a heat gun on low or a gentle air tool to push the white into the blue. This creates the lacing effect that resembles sea foam. Move carefully. Too much heat can overwork the resin, distort the mold, or turn your elegant wave into a suspicious white blob.
7. Remove bubbles
Allow bubbles to rise for a few minutes, then use a heat gun or torch lightly over the surface if your resin instructions allow it. Keep the tool moving. For deeper casts, prevention is better than correction: warm the resin bottles slightly in a safe warm-water bath if the manufacturer permits it, mix slowly, and pour in layers.
8. Cure fully
Cover the mold to protect it from dust and let the piece cure undisturbed. Cure time varies by resin, temperature, humidity, and pour thickness. Do not demold early. Resin that feels firm on the surface may still be soft inside.
9. Sand and polish if needed
After demolding, rough edges can be sanded carefully. Wet sanding with progressively finer grits can smooth cloudy edges, and polishing compound can restore shine. Wear appropriate protection when sanding cured resin and avoid breathing dust.
10. Add the LED base
Place the resin piece on a low-voltage LED base or install it into a prepared lamp housing. Test the glow in a dark room. If the light is too intense, add a diffuser. If it is too weak, adjust the placement or use a brighter LED base designed for display pieces.
What Makes the Ocean Effect Look Realistic?
The most convincing ocean resin night lights use depth, not just color. Real water is not one flat shade of blue. It shifts from clear aqua to deep navy, reflects light, and turns white where waves break. To recreate that, use transparent layers and vary the color intensity.
For example, the bottom layer might be pale turquoise with a little shimmer. The next layer can include deeper blue around the edges. A final top layer can hold the white wave foam. This layered approach creates the illusion of movement, especially when LED light passes through the resin.
White pigment is powerful
White pigment creates the foam effect, but it should be controlled. Too little disappears. Too much blocks light and looks like spilled paint. A good technique is to apply white resin in narrow lines, then push it gently with air so it spreads into soft cells and lace patterns.
Common Mistakes and How to Avoid Them
The first common mistake is using too much pigment. Night lights need transparency. If the resin is overloaded with color, the LED glow will struggle. The second mistake is rushing the cure. Resin rewards patience. It does not care that you want to see the finished piece before bedtime.
The third mistake is ignoring temperature. Resin that is too cold may become thick, trap bubbles, and level poorly. A room around the manufacturer’s recommended working temperature usually gives better results. The fourth mistake is placing electronics where they cannot be repaired or replaced. A removable LED base makes the project easier to maintain.
Another mistake is adding real beach sand without drying or sealing it. Sand can contain moisture, salt, dust, and tiny organic material. Craft sand or thoroughly dried decorative sand is more predictable. If you want to use real sand from a meaningful beach trip, dry it completely and test it in a small resin sample first.
Creative Variations for a More Personal Night Light
An ocean-themed epoxy resin night light does not have to look like everyone else’s project. You can make it tropical with bright aqua and pearly white waves. You can make it moody with dark navy resin, silver shimmer, and a moon-shaped LED glow. You can create a “shipwreck” style with miniature driftwood and bronze tones, or a calm tide pool with tiny shells and soft green-blue layers.
For a child’s room, keep the design playful with pastel water colors and friendly sea shapes. For an adult bedroom or office, use a minimalist vertical slab with elegant wave lines and a warm white LED. For a coastal home, create a matching set: one night light, one coaster set, and one wall art piece using the same pigment palette.
Why This Build Makes a Great Gift
A handmade resin ocean night light works well as a gift because it feels custom without being overly complicated. It can fit beach lovers, surfers, ocean photographers, coastal homeowners, dorm rooms, kids’ rooms, meditation spaces, and anyone who wants their desk to look less like a tax document came to life.
You can personalize it with colors from a favorite beach, a tiny charm, initials, or a meaningful date embedded in a clear layer. Just keep personalization tasteful. The goal is “thoughtful handmade keepsake,” not “souvenir shop snow globe after three energy drinks.”
Hands-On Experience: What It Feels Like to Build an Ocean Resin Night Light
The first thing you learn while making an epoxy resin ocean night light is that preparation is half the project. The actual pouring may take less time than setting up the space, choosing colors, leveling the table, checking the LED base, and convincing yourself not to add seven more shells just because they are cute. Resin has a funny way of punishing chaos, so a clean, organized workspace makes the experience calmer and the result better.
Mixing the resin is where the project starts to feel real. At first, the clear liquid may look simple, but as soon as pigment touches it, the ocean theme appears. A drop of teal spreads like shallow water. A little navy deepens the scene. Pearl mica catches the light and suddenly the cup looks like a tiny storm under glass. It is tempting to keep adding color, but restraint matters. The best night lights leave room for light to travel.
The wave stage is usually the most exciting and the most nerve-racking. You place a thin line of white resin along the edge of the blue, pick up the heat gun, and hope for elegant sea foam instead of abstract mayonnaise. When it works, the white blooms into delicate cells and soft lace. It looks alive for a moment, moving across the blue resin like a real wave. That is the addictive part of ocean resin art: it feels controlled and unpredictable at the same time.
Bubbles are part of the experience too. Some rise and pop easily. Others appear like they paid rent in the mold. Slow mixing, careful pouring, and light heat help, but perfection is not always necessary. In an ocean scene, a few tiny bubbles can even look like underwater air. The trick is knowing the difference between “natural sea texture” and “I stirred this like pancake batter during an earthquake.”
The waiting period is the true test. Resin curing teaches patience with the emotional force of a locked cookie jar. You want to touch it. You want to demold it. You want to hold it up to the LED every ten minutes. Do not. Let it cure. The final reveal is much better when the piece is fully hardened, glossy, and ready to handle.
The best moment comes when the resin piece finally meets the light. In normal room lighting, the build may already look pretty. But when the LED turns on in a dim room, the whole scene changes. The blues become deeper, the white foam glows, the shells cast tiny shadows, and the resin gains a sense of depth that photos rarely capture. It feels less like a craft project and more like a miniature ocean trapped in a dream.
That is why this build is so satisfying. It combines art, patience, color theory, safety awareness, and a little practical engineering. It is decorative, useful, and personal. Even if the first version is not perfect, it usually teaches enough to make the second version better. And honestly, even an imperfect glowing ocean is still better than a boring night light shaped like a beige mushroom.
Conclusion
An epoxy resin night light is an amazing ocean-themed build because it uses the natural clarity and depth of resin to create a glowing coastal scene. With the right resin, careful pigment choices, slow mixing, safe handling, and smart LED placement, a small handmade lamp can feel like a piece of the beach brought indoors.
The secret is balance. Keep enough transparency for the light to shine, use white pigment carefully for wave foam, build layers for depth, and avoid rushing the cure. Whether you make a soft turquoise beach light, a dramatic deep-sea slab, or a tiny glowing tide pool, the finished piece can bring calm, personality, and a little ocean magic into any room.