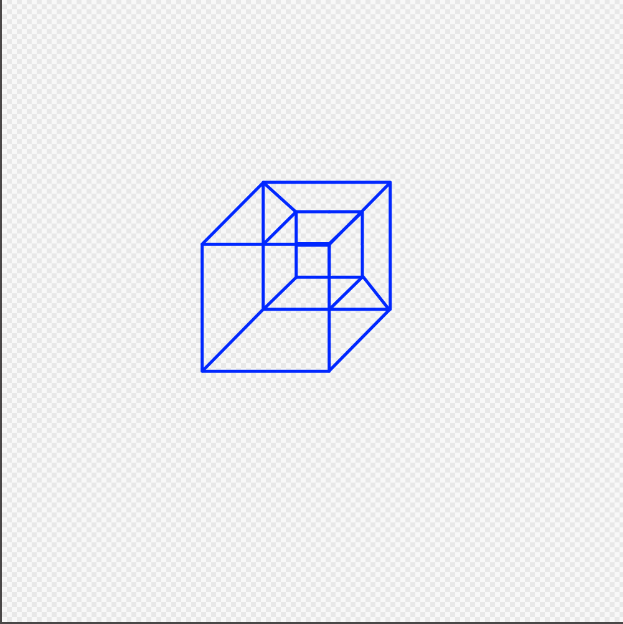
Drawing a tesseract sounds like something a wizard would assign for homework right after “turn this toaster into a dragon.” But the idea is surprisingly approachable once you stop trying to literally see the fourth dimension and start thinking in projections. A tesseract, also called a 4D cube or hypercube, is the four-dimensional cousin of the cube. Since our paper is tragically two-dimensional and our hands are not currently equipped with fourth-dimensional pencils, what we draw is not the tesseract itself. We draw its shadow, diagram, or simplified projection.
That is not a flaw. It is exactly how cube drawings work, too. When you draw a cube on paper, you are not creating an actual 3D object. You are drawing a 2D representation that suggests depth. A tesseract drawing does the same trick one level higher: it shows a 4D object through a 2D visual shortcut. In this guide, you will learn how to draw a tesseract in 7 steps using simple geometry, clean lines, and a little patience. No advanced math degree required, although your notebook may start looking suspiciously intelligent.
What Is a Tesseract?
A tesseract is the four-dimensional version of a cube. Think of the pattern this way: a point stretches into a line, a line stretches into a square, a square stretches into a cube, and a cube stretches into a tesseract. Each new shape adds one more dimension. Because we live in three spatial dimensions, we cannot see a true tesseract directly. Instead, we use projections, just as a shadow helps us understand the shape of something more complex than the flat surface it lands on.
Mathematically, a tesseract has 16 vertices, 32 edges, 24 square faces, and 8 cubic cells. Those numbers may sound like someone spilled a calculator into a geometry textbook, but they are useful when drawing. They tell you what your final figure should suggest: not just one cube, but two cube-like forms connected at matching corners.
Supplies You Need
You do not need fancy art tools to draw a tesseract. A pencil, eraser, ruler, and sheet of paper are enough. If you want a cleaner final version, use a fine-tip pen after sketching. Graph paper can help beginners keep edges aligned, especially if you are still negotiating peace terms with straight lines.
Recommended Materials
- A sharp pencil for light construction lines
- A ruler for clean edges
- An eraser for adjustments
- Blank or graph paper
- A pen or marker for the final outline
- Optional colored pencils to separate front, back, and connecting edges
How to Draw a Tesseract in 7 Steps
Step 1: Draw a Large Outer Cube
Start by drawing a simple cube in perspective. The easiest way is to draw a square first, then draw a second square slightly up and to the right, and connect the matching corners. This gives the familiar 3D cube shape. Keep your lines light because this outer cube is only the beginning.
Try to make the cube large enough to leave space inside it. If it is too small, the final tesseract will look cramped, like a 4D apartment with no closet space. A medium-sized cube centered on the page works best.
Step 2: Draw a Smaller Cube Inside the First Cube
Inside the outer cube, draw a second cube with the same general orientation. This inner cube should be smaller and centered within the first one. It does not need to be mathematically perfect, but the more carefully you align it, the cleaner your tesseract drawing will look.
This “cube inside a cube” arrangement is one of the most common ways to represent a tesseract. The outer cube can be understood as one projected part of the tesseract, while the inner cube represents another. The difference in size is a visual trick that helps your flat drawing suggest depth and higher-dimensional structure.
Step 3: Match the Corners of Both Cubes
Now identify the eight corners of the outer cube and the eight matching corners of the inner cube. This is where accuracy matters. Each corner of the inner cube should correspond to one corner of the outer cube: top front to top front, bottom back to bottom back, and so on.
If you are using graph paper, lightly mark the corner pairs before drawing the connecting lines. This prevents the classic beginner problem: one corner wanders off like it has a separate career plan.
Step 4: Connect Corresponding Vertices
Draw straight lines from each outer corner to its matching inner corner. You should add eight connecting lines total. These lines are what transform the drawing from “two cubes hanging out” into a recognizable tesseract projection.
At this stage, the shape may look busy. That is normal. A tesseract projection contains many edges, and your brain may need a moment to sort out what is happening. The key is consistency: every vertex on the outer cube connects to the same relative vertex on the inner cube.
Step 5: Clean Up the Structure
Look over the drawing and lightly erase any messy construction marks. Keep all cube edges and connecting edges visible. If two lines overlap visually, do not panic. Tesseract drawings often contain visual ambiguity because they are projections of a higher-dimensional object. In other words, the confusion is not a bug; it is part of the magic trick.
You can improve readability by making the front-facing lines slightly darker than the back-facing lines. This is not required, but it helps viewers understand the structure faster. Artists often use line weight to guide the eye, and tesseracts need all the help they can get.
Step 6: Add Depth With Line Weight or Shading
Once the basic tesseract is correct, add visual depth. Use thicker lines for the edges you want to appear closer and thinner lines for edges that recede. You can also shade the inner cube lightly or color the connecting edges differently.
For a clean educational diagram, use three styles: bold lines for the outer cube, medium lines for the inner cube, and thin lines for the connectors. For a more artistic version, use gradients, colored edges, or even a glowing center. A tesseract already looks like science fiction; you might as well let it dress the part.
Step 7: Review the Final Tesseract Drawing
Count the structure visually. You should see two cube-like shapes and eight lines connecting matching corners. The final drawing should feel balanced, centered, and symmetrical. It may not look like something you could build with wooden blocks, because a real tesseract cannot exist fully in ordinary 3D space. What you have drawn is a projection, similar to a cube’s shadow on paper.
If the drawing feels uneven, redraw it using lighter guide lines and a ruler. Most tesseract mistakes come from misaligned cubes or mismatched corner connections. Once those are corrected, the image becomes much easier to read.
Understanding the Geometry Behind the Drawing
A cube has 8 vertices, 12 edges, and 6 square faces. A tesseract doubles the vertex count to 16 and expands the edge count to 32. It also contains 8 cubic cells, which are the 4D equivalent of how a cube contains square faces. When you draw a cube inside a cube and connect the corresponding corners, you are giving the viewer a simplified map of those relationships.
One useful comparison is the square-to-cube analogy. To draw a cube, you can draw two squares and connect their matching corners. To draw a tesseract, you draw two cubes and connect their matching corners. The logic is beautifully consistent. The only problem is that your brain eventually notices it is being asked to imagine a direction perpendicular to length, width, and height. That is usually when it requests a snack break.
Common Mistakes When Drawing a Tesseract
Mistake 1: Making the Inner Cube Too Small
If the inner cube is tiny, the tesseract will look like a box swallowing a postage stamp. Keep the inner cube smaller than the outer cube, but not so small that the connecting lines dominate the drawing.
Mistake 2: Connecting the Wrong Corners
The most important rule is to connect matching vertices. A top-left outer corner should connect to the top-left inner corner in the same orientation. Random connections can create an interesting abstract design, but it will not read clearly as a tesseract.
Mistake 3: Using Heavy Lines Too Early
Draw lightly first. A tesseract has enough lines to make corrections likely, especially on the first attempt. Save the bold pen lines for the final version, after the structure is working.
Mistake 4: Expecting It to Look “Real”
A tesseract projection is not supposed to look like a normal object sitting on a table. It is a visual representation of a four-dimensional shape. If it feels slightly impossible, congratulations: that means the drawing is doing its job.
Tips for Making Your Tesseract Look Better
Symmetry is your best friend. Keep the inner cube centered, maintain consistent angles, and use a ruler when possible. If you want a more dynamic drawing, rotate the cube orientation slightly or experiment with a “skewed” perspective. You can also draw multiple tesseracts with different inner cube sizes to see how the projection changes.
Color can make the structure easier to understand. For example, use one color for the outer cube, another for the inner cube, and a third for the connecting lines. This is especially useful if you are explaining the shape to students, creating a geometry poster, or trying to convince a friend that your doodle is not just a haunted window.
Why Drawing a Tesseract Helps You Understand 4D Geometry
Drawing a tesseract is more than a fun optical puzzle. It teaches an important idea: higher-dimensional objects can be studied through lower-dimensional representations. Scientists, mathematicians, designers, and data visualization experts use projections all the time to make complex information visible.
Even though the drawing is simplified, it gives you a practical way to think about dimension-building. A line becomes a square by moving in a new direction. A square becomes a cube by moving in another new direction. A cube becomes a tesseract by extending into a fourth spatial direction. You cannot point to that direction in ordinary space, but you can represent its relationships with a diagram.
Creative Variations to Try
Draw a Transparent Tesseract
Keep every edge visible, including the back edges. This creates the classic wireframe look and makes the drawing feel mathematical and precise.
Draw a Shaded Tesseract
Add light shading to one side of the outer cube and a different tone to the inner cube. This helps separate the layers visually.
Draw a Rotating Tesseract Sequence
Create several tesseract drawings in a row, changing the size and placement of the inner cube each time. This can suggest motion, similar to an animation frame sequence.
Draw a Neon Tesseract
Use dark paper and bright gel pens or digital brushes. The tesseract’s geometric structure works beautifully with glowing lines, making it look like a portal that charges rent in another dimension.
Experience Notes: What It Feels Like to Learn How to Draw a Tesseract
The first time you draw a tesseract, expect your brain to argue with you. At first, it may look like two cubes connected by random lines. Then, after a few minutes, the structure begins to make sense. The best approach is not to force yourself to “see” the fourth dimension. Instead, focus on relationships: corner to corner, edge to edge, cube to cube.
One practical experience is that drawing slowly works much better than trying to sketch the whole figure in one dramatic burst. A tesseract rewards patience. Start with a clean outer cube, then take extra care with the inner cube. If those two parts are balanced, the final connecting lines almost draw themselves. If they are crooked, the final image becomes confusing no matter how boldly you outline it.
Another useful lesson is that line weight matters more than beginners expect. When all lines are equally dark, the tesseract can look visually crowded. When the front edges are darker and the rear edges are lighter, the drawing becomes easier to read. This is the same principle artists use when drawing transparent cubes, technical diagrams, or architectural sketches.
Graph paper is also surprisingly helpful. It keeps angles consistent and makes it easier to center the smaller cube inside the larger one. If you are drawing digitally, turn on a grid or use snapping tools. Clean alignment makes the tesseract look intentional rather than like a cube that had too much coffee.
Many people also discover that the tesseract becomes easier to understand after drawing a square-to-cube comparison first. Draw one square. Draw a second square beside it. Connect the corners. That creates a cube projection. Then repeat the same logic with cubes: draw one cube, draw another cube inside or beside it, and connect matching corners. Suddenly the tesseract feels less like mystery math and more like a pattern continuing one step further.
For teaching or explaining the concept, color is extremely effective. Use blue for the outer cube, red for the inner cube, and gray or green for the connecting edges. Viewers can immediately see the two cube structures and how they relate. This simple choice can turn a confusing wireframe into a clear visual lesson.
Finally, do not worry if your first tesseract does not look perfect. Almost nobody draws a clean one on the first try. The shape is simple in construction but complex in interpretation. After two or three attempts, your hand learns the pattern, and your eyes start recognizing the structure. That moment is rewarding because you are not just copying lines. You are learning how a higher-dimensional idea can be translated into a drawing anyone can see.
Conclusion
Learning how to draw a tesseract is a great way to explore geometry, perspective, and higher-dimensional thinking without needing advanced equations. The process is simple: draw an outer cube, place a smaller cube inside it, connect matching corners, clean the structure, and use line weight or shading to improve depth. The result is a clear 2D projection of a 4D cube, a shape that is mathematically fascinating and visually unforgettable.
A tesseract drawing reminds us that art and math are not enemies forced to sit together at an awkward dinner party. They are partners. Geometry gives the structure; drawing gives it a visual voice. With a ruler, pencil, and a little curiosity, you can turn a blank page into a doorway toward the fourth dimension.