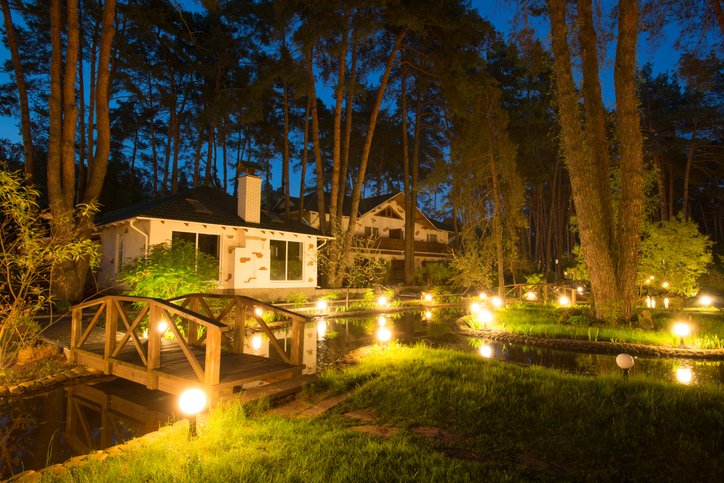
When the sun goes down,s a second design life. Uplighting can make brick look richer, tree bark more sculptural, columns taller, and an ordinary flower bed surprisingly theatrical. Done well, it improves nighttime curb appeal and helps guests understand the shape of the property. Done badly, it turns the front yard into a miniature car dealership.
The difference is not simply buying brighter fixtures. Effective landscape uplighting depends on choosing a worthwhile focal point, matching the beam to the subject, controlling glare, and preserving areas of shadow. The goal is to reveal the house and landscape, not interrogate them.
What Is Uplighting?
Uplighting is an outdoor lighting technique in which a fixture near ground level sends light upward toward a vertical surface or feature. Common targets include facades, columns, stone walls, trees, sculptures, fences, and layered garden beds. Spotlights produce concentrated beams, floodlights cover broader areas, wash lights create softer illumination, and recessed well lights nearly disappear into the ground.
Most residential systems use low-voltage power. A transformer reduces household current to the voltage required by compatible landscape fixtures, while a GFCI-protected outdoor receptacle helps protect the system. Solar fixtures offer a wire-free alternative, though their brightness and run time depend heavily on panel exposure, battery quality, and weather.
Plan the Nighttime View Before Installing Anything
Walk around the property after dark with a bright, adjustable flashlight. Test possible fixture positions from the street, front walk, patio, and main indoor windows. This simple rehearsal reveals whether a beam flatters a feature, shines into someone’s eyes, spills through a bedroom window, or misses the target completely.
Choose a small number of visual anchors rather than lighting every shrub. Combine narrow and wide beams, but keep the color temperature reasonably consistent. Warm white light around 2700K usually feels inviting on brick, wood, red foliage, and outdoor living areas. A slightly crisper 3000K can reveal silver-blue foliage or cool-toned stone, but very cool light often makes a residential yard feel institutional.
Responsible outdoor lighting should be useful, targeted, no brighter than necessary, controlled with timers or sensors, and warm-colored when possible. Those principles reduce glare, wasted energy, light trespass, and unnecessary sky glow.
9 Uplighting Techniques for a Better-Looking House and Landscape
1. Wash the Facade With Soft, Overlapping Light
A broad facade is rarely improved by one painfully bright spotlight. Instead, use two or more low-output wash lights to create overlapping areas of illumination. Position them far enough from the wall for the beams to spread, then aim them so the brightest zones do not land directly under windows.
This technique is especially effective on siding, stucco, and large wall planes that need gentle definition rather than intense drama. Add one narrower accent beam at the front door, gable, or another signature detail. The contrast creates a focal point while the wash lighting keeps the rest of the elevation visually connected.
View the result from across the street. If the house looks flat, reduce the general wash or move one fixture closer to produce more shadow. If it resembles a stadium, congratulations: you have discovered the dimmer switch’s true purpose.
2. Graze Brick, Stone, and Textured Surfaces
Grazing places a fixture close to a textured wall and directs light steeply upward across the surface. Because the beam skims raised edges, it produces small highlights and shadows that emphasize brick joints, rough stone, stacked masonry, wood grain, or deeply textured stucco.
Keep the fixture close to the wall for stronger texture. Moving it farther away softens the effect and begins to resemble wall washing. A narrow or medium beam usually works better than a broad flood because it gives the surface more shape.
Grazing is powerful, so use it selectively. One textured chimney, entry wall, or garden retaining wall can become a memorable nighttime feature. Lighting every stone surface at full output may leave the property looking less like a home and more like a medieval fortress preparing for inspection.
3. Accentuate Columns, Posts, and Vertical Lines
Columns naturally invite uplighting because the beam reinforces their height. Place a compact spotlight at the base and aim it straight enough to follow the column without overshooting the roofline. A moderate beam can reveal the face of a wide masonry column, while a narrower beam works well for a slim post or architectural pilaster.
For a balanced entry, light paired columns at similar intensities. If one column is near a wall, check for distracting hot spots or awkward shadows behind it. Slightly changing the fixture angle can create attractive shadow patterns without throwing excessive light into the porch or nearby windows.
This technique also works on pergola posts, porch supports, and tall planters. The repeated vertical rhythm helps guide the eye toward the entrance and makes a low-slung home appear more dimensional after dark.
4. Cross-Light a Specimen Tree From Two Sides
A single uplight can make a tree appear flat, especially when viewed from only one direction. Cross-lighting uses two fixtures placed on different sides of the trunk. Their beams overlap through the trunk, branching structure, and lower canopy, producing depth and revealing the tree as a three-dimensional form.
Start with medium beam angles and modest output. Aim one fixture toward the trunk and primary branches; direct the second toward the opposite side of the canopy. Mature trees may need additional fixtures, but more light is not automatically better. Darkness between branches is what makes the illuminated structure legible.
Cross-lighting is particularly effective for multi-trunk trees, live oaks, maples, crape myrtles, and sculptural evergreens. For younger trees, adjustable-output fixtures are useful because their brightness can be changed as the canopy expands.
5. Light Both the Trunk and Canopy
When a bright canopy floats above a black trunk, the tree can look disconnected from the ground. Prevent that effect by giving the trunk and canopy separate attention. One fixture may graze the bark while another, positioned farther back, reaches into the branches.
For a smaller tree, a single well-placed medium flood may cover both zones. Larger trees usually benefit from multiple fixtures or different beam angles. A narrow beam can reach high into the crown, while a wider beam fills the lower branches. Match beam angle and lumen output to the height, width, foliage density, and obstructions of the target rather than using one setting everywhere. l adjustment matters. A deciduous tree that looks perfect in July may expose the fixture beam in January. Re-aiming the light twice a year is easier than pretending the bare branches were supposed to resemble a giant illuminated whisk.
6. Create Depth With Layered Garden Uplighting
A garden appears larger at night when lighting reveals foreground, middle-ground, and background elements. Use low-output uplights on one or two shrubs near the viewing area, a stronger accent on a small tree farther back, and a soft wash on a fence or wall at the rear boundary.
Avoid evenly spaced fixtures. Uniform placement creates a commercial “every plant gets a lamp” effect. Instead, establish a visual rhythm with illuminated features separated by pockets of darkness. Choose plants with distinctive forms, such as ornamental grasses, Japanese maples, agaves, clipped evergreens, or flowering shrubs.
Consider growth and maintenance before placing fixtures. Leave enough clearance for pruning, mulch, irrigation, and seasonal planting. A light hidden behind foliage produces little useful effect, while a fixture placed in front of a lawn mower produces a very brief one.
7. Use Well Lights for a Clean, Discreet Look
Well lights sit partly or fully below grade, allowing the lighting effect to take center stage instead of the fixture. They are useful near facades, walls, flagpoles, large trees, and places where a stake-mounted spotlight would be visually distracting or vulnerable to damage.
Choose fixtures specifically rated for the intended outdoor location and drainage conditions. Do not place an ordinary fixture in a depression that collects water. In gravel or planting beds, provide stable support and keep mulch, leaves, and soil away from the lens. Near driveways or walkways, use products designed for the expected foot or vehicle load.
Well lights are discreet, not maintenance-free. Clean the lenses periodically, trim plants away from the beams, and check that soil movement has not changed their aim. A buried light cannot do its job while wearing a hat made of wet leaves.
8. Uplight Fences and Garden Walls for Structure
Fences and boundary walls define the size of a yard after dark. A series of carefully spaced uplights can create depth, highlight a repeating pattern, and make an outdoor seating area feel more enclosed. Wide, low-output beams suit long flat surfaces; narrower beams can emphasize posts, panels, masonry piers, or climbing plants.
Perfectly even spacing is not always necessary. Let the architecture guide the rhythm. Align fixtures with posts, wall sections, or planting groups rather than measuring arbitrary intervals. Keep beams below the top edge when possible so light does not spill into neighboring properties.
On a small patio, a softly illuminated rear wall can make the space feel deeper without adding overhead glare. For privacy screens or decorative metal panels, uplighting can cast patterned shadows and turn a practical boundary into evening artwork.
9. Highlight Sculptures, Water Features, and Outdoor Focal Points
Uplighting is most convincing when it celebrates something worth seeing. A sculpture, large urn, boulder, fountain, arbor, or dramatic plant can anchor the nighttime composition. Use a narrow beam for precision, then adjust its angle to reveal form without showing the fixture or sending light into viewers’ eyes.
For sculpture, lighting from one side often creates more dimension than aiming directly from the front. For fountains, position the light so moving water catches highlights while nearby surfaces remain relatively dark. Around ponds or pools, illuminate landscape elements beyond the water so their reflections add depth. Any fixture used in or immediately around water must be specifically listed and installed for that application.
Resist adding colored light unless it supports a deliberate event or design concept. Warm white usually gives stone, bronze, wood, and foliage a timeless appearance. Color-changing effects can be fun, but a quiet garden does not always need to audition for a Las Vegas residency.
Choosing Fixtures, Beam Angles, and Controls
Match the fixture to the visual job. Bullet lights are adjustable and precise. Floodlights cover wide trees or walls. Wash lights produce soft, even illumination. Well lights hide the fixture. Start with a medium beam of roughly 35 degrees when uncertain, then use narrower beams for tall, slender targets and wider beams for broad conifers, walls, or spreading canopies.
LED fixtures are well suited to landscape lighting because they combine low energy use with long service life and flexible control. Timers, photocells, motion sensors, and smart zones prevent lights from operating all night at full output. Advanced controls can reduce operating costs beyond fixture efficiency alone. ow-voltage DIY system, verify transformer capacity, cable size, total fixture load, and voltage drop. Use outdoor-rated components, weatherproof connectors, and a GFCI-protected receptacle. Test every fixture before closing cable trenches. Higher-voltage work, hardwired circuits, complex water-feature lighting, or installations subject to local permit requirements belong with a qualified electrician.
Common Uplighting Mistakes to Avoid
- Using too many fixtures: A few intentional highlights usually look more sophisticated than uniform brightness.
- Aiming into windows: Check the view from bedrooms, neighboring homes, sidewalks, and the street.
- Ignoring glare: Hide or shield the light source and aim the beam at the feature, not at people.
- Mixing random color temperatures: Keep most fixtures within the same warm-white family.
- Forgetting plant growth: Trees and shrubs will change the beam path, sometimes faster than expected.
- Running lights all night: Use schedules, dimming, or motion activation after normal outdoor hours.
Experience-Based Lessons From Real-World Uplighting Projects
The most useful lessons often appear after the fixtures are installed and the yard has been lived in for a few weeks. A common first attempt is to place one spotlight beneath every tree and another beneath every architectural bay. On installation night, the result feels exciting because everything is visible. By the third evening, however, the property can feel overexposed and oddly flat. Removing or dimming several fixtures usually improves the scene immediately. The eye needs dark areas to understand distance, texture, and hierarchy.
Another recurring lesson is that daytime placement is deceptive. A fixture may look perfectly aligned at noon but throw its beam past the tree after dark. Testing with a flashlight or temporarily connecting fixtures above ground saves hours of digging and repositioning. It also catches unexpected problems: a beam reflecting off a pale soffit, light shining through a second-story window, or a spotlight silhouetting the garden hose instead of the prized hydrangea.
Tree lighting frequently requires the most adjustment. One project might begin with a single powerful light pressed close to a mature oak. The trunk becomes brilliant, but the canopy disappears. Moving that fixture back and adding a softer second light from the side can reveal both bark and branches. On a multi-trunk crape myrtle, two modest cross-lights often outperform one high-output fixture because the changing shadows make the tree look dimensional rather than pasted onto the darkness.
Facade lighting teaches a similar lesson about restraint. Broad wash lights usually need less output than expected, especially on pale siding or reflective stone. A surface that looks dim during aiming may appear much brighter once the eyes adapt to the night. It is wise to set the initial scene, walk away for ten minutes, and then look again from the street. That pause often prevents the classic mistake of increasing brightness simply because the installer has been staring into the beam.
Maintenance is another part of the experience that glossy product photos politely ignore. Mulch shifts, grass grows, spiders build ambitious condominiums across lenses, and irrigation nudges stake lights off target. A seasonal inspection keeps the system looking intentional. Clean lenses, tighten connections, straighten fixtures, prune foliage, and reconsider the timer as sunset changes. In snowy or storm-prone climates, mark recessed fixtures so they are not damaged by shovels, equipment, or cleanup work.
Finally, the best projects evolve. Start with the front entry, one important tree, and one background element. Live with that composition before adding more. Separating fixtures into zones makes future adjustments easier: facade lights can turn off earlier, entertaining-area lights can dim after guests leave, and motion-activated safety lights can operate independently. The finished result should feel calm and effortless, even though achieving that effortless look may involve several evenings of moving a light six inches, stepping back, and muttering, “Nope, still too dramatic.”
Conclusion
Uplighting can transform a house and landscape without changing a brick, branch, or garden bed. The strongest designs focus on a few meaningful features, use the right beam for each target, preserve shadow, and keep brightness under control. Wash the facade gently, graze texture, reinforce columns, cross-light trees, layer garden depth, and use discreet fixtures where the visual effect matters more than the hardware.
Plan the view after dark, choose warm and efficient LEDs, protect neighbors and wildlife from spill light, and automate the schedule. With those habits, landscape uplighting becomes more than decorationit becomes a nighttime composition that makes the property safer to navigate, more inviting to use, and much harder to ignore from the curb.
Editorial note: This original article synthesizes established guidance from Bob Vila, This Old House, DarkSky International and the Illuminating Engineering Society, the U.S. Department of Energy, Kichler, FX Luminaire, VOLT Lighting, Lowe’s, Lumens, and other U.S.-focused landscape-lighting resources. e>