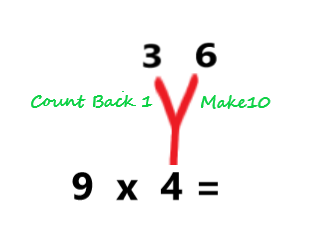
Learning the 9’s on the multiplication table can feel like trying to teach a squirrel to organize tax receipts: possible, but not immediately relaxing. The good news? The 9 times table is one of the most pattern-friendly parts of multiplication. Once students notice the hidden structure, the facts stop looking like random numbers and start behaving like a neat little math parade.
Whether you are a student, parent, tutor, or teacher, the best way to learn the 9’s on the multiplication table is not to chant facts until everyone in the room begins questioning their life choices. Instead, use smart patterns, visual tricks, and short practice routines that build real multiplication fact fluency. In this guide, we will cover three effective ways to master the 9s: the digit-pattern method, the finger trick, and the practice-and-connection method.
These strategies work because they combine memory with meaning. Students learn not only that 9 × 6 = 54, but also why the answer makes sense, how to check it, and how to recall it quickly later. That is the difference between memorizing math and actually owning it.
Why the 9 Times Table Is Easier Than It Looks
The 9 times table has a secret: it is full of patterns. In fact, the products from 9 × 1 through 9 × 10 follow a beautiful order:
- 9 × 1 = 9
- 9 × 2 = 18
- 9 × 3 = 27
- 9 × 4 = 36
- 9 × 5 = 45
- 9 × 6 = 54
- 9 × 7 = 63
- 9 × 8 = 72
- 9 × 9 = 81
- 9 × 10 = 90
Look closely. The tens digits go up: 0, 1, 2, 3, 4, 5, 6, 7, 8, 9. The ones digits go down: 9, 8, 7, 6, 5, 4, 3, 2, 1, 0. It is like an elevator where one side is going up and the other side is politely going down.
Another helpful pattern: for most 9s facts, the digits in the answer add up to 9. For example, 9 × 4 = 36, and 3 + 6 = 9. For 9 × 8 = 72, 7 + 2 = 9. This pattern gives students a built-in way to check their work.
Way 1: Use the Digit Pattern Method
The digit pattern method is one of the fastest ways to learn the 9’s on the multiplication table because it turns the entire table into a predictable sequence. Instead of memorizing ten separate facts, students learn one pattern that organizes all of them.
How the Digit Pattern Works
Write the numbers 1 through 10 in a vertical list. These are the numbers being multiplied by 9:
- 1 × 9 =
- 2 × 9 =
- 3 × 9 =
- 4 × 9 =
- 5 × 9 =
- 6 × 9 =
- 7 × 9 =
- 8 × 9 =
- 9 × 9 =
- 10 × 9 =
Now fill in the tens digits from top to bottom. Start with 0 for 9, then continue 1, 2, 3, 4, 5, 6, 7, 8, and 9:
- 09
- 18
- 27
- 36
- 45
- 54
- 63
- 72
- 81
- 90
Next, fill in the ones digits from 9 down to 0. Now the whole 9 times table appears almost magically. No wand required, though a pencil with a good eraser is always welcome.
Example: Solving 9 × 7
To solve 9 × 7 using the digit pattern, remember that the seventh answer in the 9s sequence is 63. You can also think of it this way: the tens digit is one less than 7, which is 6. Then ask, “What number goes with 6 to make 9?” The answer is 3. So 9 × 7 = 63.
This works for 9 × 2 through 9 × 9. For 9 × 8, the tens digit is one less than 8, which is 7. Then 7 + 2 = 9, so the answer is 72.
Why This Method Helps
The digit pattern method strengthens number sense. Students are not just repeating answers; they are seeing how multiplication facts connect. This makes the 9s easier to remember and easier to rebuild if a student forgets one answer during a quiz.
It also supports mental math. If a child forgets 9 × 6, they can quickly reason: one less than 6 is 5, and 5 needs 4 to make 9. The answer is 54. That is much better than staring at the ceiling and hoping the answer floats down like a math balloon.
Way 2: Try the 9 Times Table Finger Trick
The finger trick is a classic strategy for learning the 9s, and yes, this is one of those rare school moments when using your fingers is not only allowed but celebrated. It is especially useful for visual and kinesthetic learners because it turns multiplication into something students can see and touch.
How to Do the Finger Trick
Hold both hands in front of you with your palms facing down. You should have ten fingers lined up from left to right. Each finger represents a number from 1 to 10.
To multiply 9 by a number, fold down the finger that matches that number. The fingers to the left of the folded finger show the tens digit. The fingers to the right show the ones digit.
Example: Solving 9 × 4
Line up your ten fingers. Count from the left and fold down the fourth finger. You now have three fingers standing on the left and six fingers standing on the right. That gives you 36. So 9 × 4 = 36.
Example: Solving 9 × 8
Count to the eighth finger and fold it down. There are seven fingers on the left and two fingers on the right. The answer is 72. Suddenly, the 9s table looks less like a monster and more like a friendly hand puppet with excellent arithmetic skills.
When to Use the Finger Trick
The finger trick is great for early practice, quick checks, and building confidence. However, students should eventually move from finger support to automatic recall. The goal is not to depend on the trick forever. The goal is to use it as a bridge until the facts become familiar.
Parents and teachers can make this transition gentle. First, let students use their fingers. Then ask them to say the answer before folding the finger. Finally, mix the 9s facts with other multiplication facts so students learn to recall answers without needing a visual prompt every time.
Way 3: Practice With Patterns, Games, and Real-Life Connections
The third way to learn the 9’s on the multiplication table is to practice in short, meaningful bursts. Multiplication fact fluency grows when students see facts often, use them in different ways, and connect them to real situations. Long, boring drills can make math feel like eating plain oatmeal with a side of cardboard. Short, focused practice works much better.
Use Skip Counting by 9
Skip counting is one of the simplest ways to build the 9s table. Students say the multiples of 9 in order:
9, 18, 27, 36, 45, 54, 63, 72, 81, 90.
To make it more active, have students clap, tap, march, or bounce a ball while saying each number. This adds rhythm and movement, which can help the facts stick. A child who chants “9, 18, 27” while tossing a ball may remember the sequence more easily than one who only stares at a worksheet.
Color the Multiples on a 100 Chart
A 100 chart is a powerful visual tool. Ask students to color every multiple of 9: 9, 18, 27, 36, and so on. They will see a diagonal pattern across the chart. This helps students understand that multiplication is not a pile of disconnected answers. It is a pattern machine.
After coloring the multiples, ask questions such as:
- What do you notice about the digits?
- How do the tens digits change?
- How do the ones digits change?
- What happens when you add the digits in each answer?
These questions encourage students to analyze the 9 times table instead of simply memorizing it. Analysis builds confidence because students can explain the pattern in their own words.
Play Quick Multiplication Games
Games make multiplication practice less stressful. Try a simple flash-card race, but keep it friendly. The goal is progress, not panic. You can also play “Find the Match,” where one card shows a fact such as 9 × 6 and another card shows 54. Students match facts with products.
Another easy game is “Beat Your Own Score.” Give the student one minute to answer as many 9s facts as possible. Record the score, then try again later in the week. The competition is against yesterday’s score, not against another student. This keeps practice motivating and low-pressure.
Connect 9s Facts to Real Life
Multiplication becomes easier when students see why it matters. Use everyday examples:
- If one pack has 9 pencils, how many pencils are in 4 packs?
- If a game gives 9 points per round, how many points are earned in 7 rounds?
- If 9 students each bring 3 stickers, how many stickers are there?
Real-life problems help students understand multiplication as equal groups. This is especially important for children who can recite facts but struggle to apply them. Knowing that 9 × 5 = 45 is useful; understanding that it means five groups of nine is even better.
Common Mistakes Students Make With the 9s
Even with great strategies, students may make mistakes while learning the 9 times table. The most common one is reversing digits. For example, a child may say 9 × 6 = 45 instead of 54. This happens because 45 and 54 are both in the 9s pattern, but they belong to different facts.
To fix this, connect the answer to the multiplier. For 9 × 6, the tens digit should be one less than 6. One less than 6 is 5, so the answer must start with 5. That gives 54, not 45.
Another mistake is relying only on memorization. Memorization is helpful, but if students do not understand the pattern, they may freeze when they forget a fact. Teaching the digit pattern, finger trick, and skip-counting sequence gives them multiple ways to recover the answer.
How Parents Can Help at Home
Parents do not need to turn the kitchen table into a miniature testing center. In fact, please do not. The kitchen table has suffered enough. Instead, use small moments throughout the day. Ask one or two 9s facts while walking, cooking, driving, or setting the table.
Keep the tone light. If your child gets an answer wrong, say, “Let’s rebuild it.” Then use a pattern. For example, if the problem is 9 × 8, remind them that the tens digit is one less than 8. That gives 7. Then 7 + 2 = 9, so the answer is 72.
Praise strategies, not just speed. Say, “I like how you used the pattern,” or “Great job checking the digits.” This teaches children that math is about thinking, not just blurting out answers like a calculator wearing sneakers.
How Teachers Can Make the 9s Stick
Teachers can support students by presenting the 9 times table in several formats: equations, arrays, number lines, 100 charts, flash cards, and word problems. Different students connect with different models. A child who does not respond to flash cards may suddenly understand the pattern on a chart.
Anchor charts are also helpful. A classroom chart can show the 9s facts, the digit pattern, and the finger trick. Students can refer to it during practice until they internalize the facts. Over time, remove parts of the chart or cover answers so students rely more on memory.
Mixed review is important, too. Once students can answer the 9s in order, mix them up. Many children can say “9, 18, 27, 36” but hesitate when asked 9 × 7 out of sequence. Random practice helps facts become flexible and automatic.
Extra Experience: What Learning the 9s Feels Like in Real Life
Learning the 9’s on the multiplication table often begins with a little drama. A student looks at 9 × 7 and reacts as if the worksheet has personally insulted them. This is normal. The 9s look intimidating because the answers are larger than the 2s, 5s, and 10s. But once students notice the pattern, their attitude usually changes from “I cannot do this” to “Wait, that is kind of cool.”
One helpful experience is to let students discover the pattern before explaining it. Instead of saying, “Here is the trick,” ask them to write the answers from 9 × 1 to 9 × 10. Then ask what they notice. Many students spot the descending ones digits first. Others notice that the digits add up to 9. That moment of discovery matters because the student feels like a math detective, not just a person receiving instructions.
Another useful experience is practicing the 9s in tiny sessions. Five minutes after breakfast, two minutes in the car, or three questions before screen time can be more effective than one long session filled with sighs. The brain likes repetition, but it also enjoys not being trapped. Short sessions keep the mood positive.
Some students learn best by saying the facts out loud. Others need to write them. Some need to move. A student might learn 9 × 8 = 72 by folding fingers, coloring a 100 chart, and then solving a word problem about 8 boxes with 9 crayons each. Each method adds another layer of understanding.
It also helps to celebrate small wins. If a child only knows three facts today and five facts tomorrow, that is progress. If they stop reversing 45 and 54, that is progress. If they use a pattern instead of guessing wildly, that is definitely progress. Learning multiplication is not a magic switch; it is a staircase. The 9s just happen to have a very stylish railing.
For parents and teachers, patience is the secret ingredient. Students may forget a fact they knew yesterday. That does not mean they are failing. It means the memory is still forming. Bring the strategy back, practice again, and keep the atmosphere calm. Math confidence grows when mistakes are treated as clues, not disasters.
In real classrooms and homes, the best results usually come from combining all three methods. Use the digit pattern for logic, the finger trick for visual support, and games or real-life examples for practice. Together, these approaches turn the 9 times table from a memorization mountain into a manageable path. And yes, there may still be a few groans along the way. That is okay. Even mathematicians probably groaned at homework once.
Conclusion
The easiest way to learn the 9’s on the multiplication table is to use patterns, visual tools, and consistent practice. The digit pattern method helps students understand how the answers are organized. The finger trick gives them a quick visual strategy. Games, skip counting, 100 charts, and real-life problems help turn short-term practice into long-term multiplication fact fluency.
Most importantly, students should learn that multiplication is not about being “fast” right away. It is about noticing relationships, building confidence, and practicing in ways that make sense. Once the 9s click, students often feel more prepared to tackle the rest of the multiplication table. And that is a win worth multiplying.