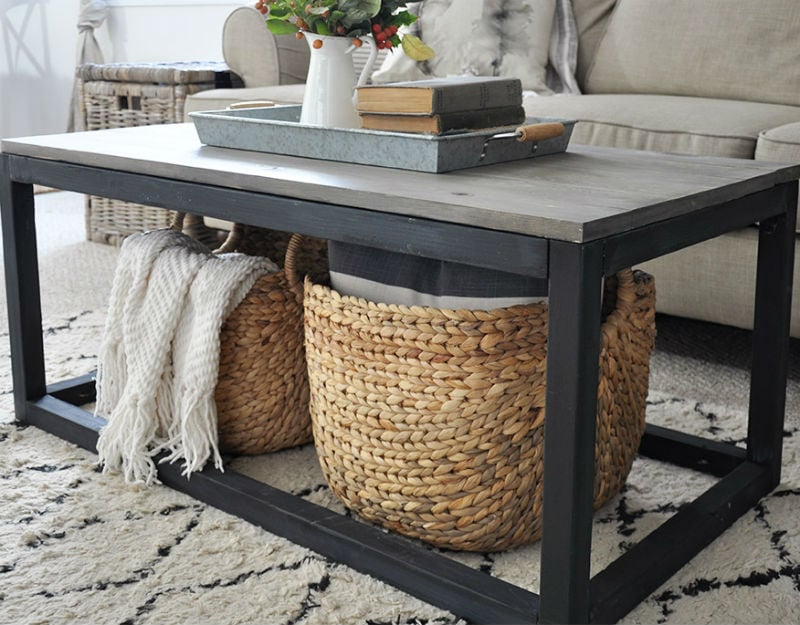
A coffee table may be shorter than nearly everything else in your living room, but it still manages to become the center of attention. It holds drinks, books, remotes, snacks, board games, decorative objects, and, despite repeated household negotiations, somebody’s feet. Building your own lets you create a table that fits all those jobs without settling for a mass-produced design that is almostbut not quiteright.
The best DIY coffee table ideas combine personality with practical construction. Some begin with ordinary lumber and simple pocket-hole joints. Others transform pallets, crates, doors, stone remnants, or forgotten flea-market finds into functional furniture. Whether your style is rustic, modern, industrial, coastal, or proudly difficult to categorize, there is a project here worth measuring twice and building once.
Before You Start Building a Coffee Table
Begin by measuring the available floor space rather than choosing a design based only on a glamorous photograph. Your table should leave comfortable walking room around the sofa and chairs. Its height should generally feel close to the height of the surrounding seat cushions, while its length should remain proportional to the sofa.
Next, consider how the table will be used. A household that regularly plays games may need a broad, durable surface. A small apartment may benefit from hidden storage or a lift-top mechanism. Homes with young children might favor rounded corners, while frequent entertainers may appreciate casters, nesting sections, or a built-in beverage compartment.
Basic tools for many beginner projects include a tape measure, square, drill, saw, sander, clamps, wood glue, screws, and suitable personal protective equipment. More advanced designs may require a router, pocket-hole jig, tile cutter, or specialized hardware. Always choose fasteners and finishes appropriate for the material and intended location.
20 Creative DIY Coffee Table Ideas to Transform Your Living Room
1. Build a Minimalist Hairpin-Leg Coffee Table
A wood top paired with metal hairpin legs is one of the easiest ways to create a mid-century-inspired table. Glue several boards edge to edge, or use a furniture-grade plywood panel for an even simpler build. Sand the top carefully, soften the edges, and attach the legs with properly sized screws.
The design works especially well in small rooms because the slender legs keep the furniture visually light. Try a warm walnut stain for a classic appearance or a pale natural finish for a Scandinavian look. It is proof that four stylish legs can do most of the design work while you accept the compliments.
2. Turn Reclaimed Wood Into a Rustic Centerpiece
Weathered boards bring texture, history, and natural variation that new lumber often lacks. Old fencing, barn wood, shelving, or responsibly sourced architectural salvage can become a distinctive tabletop when cleaned and stabilized properly.
Remove nails, inspect for rot or insect damage, and sand enough to eliminate splinters without erasing every mark. Attach the boards to a sturdy frame and finish them with a clear protective coating. Existing holes and scratches can remain visible as characteran extremely convenient design philosophy when your sanding enthusiasm begins to fade.
3. Create a Rolling Pallet Coffee Table
A pallet table is an approachable upcycling project, but the pallet should be clean, dry, structurally sound, and marked as safe for reuse. Avoid questionable wood with chemical stains, strong odors, or unknown treatment history.
After cleaning and sanding, add reinforcing boards underneath and install locking casters. The spaces between the pallet boards can remain open for a rustic appearance or be filled for a smoother surface. A lower pallet layer creates convenient storage for baskets, books, or blankets.
4. Make a Storage Table From Wooden Crates
Arrange four sturdy wooden crates with their openings facing outward and a square space in the center. Fasten them to a plywood base, reinforce the corners, and add legs or casters. The outward-facing compartments become instant storage for magazines, toys, craft supplies, or gaming equipment.
The center opening can hold a removable planter, decorative tray, or lidded storage box. Paint all the crates one color for a unified look, or use different stains for a casual patchwork effect. This project is particularly useful when your living room needs storage but refuses to admit it.
5. Design a Lift-Top Coffee and Work Table
A lift-top design allows part of the tabletop to rise toward the sofa, creating a comfortable surface for a laptop, meal, puzzle, or paperwork. The cavity below the moving top also provides hidden storage.
Purchase hardware made specifically for lift-top furniture and follow its installation requirements carefully. The table frame must be strong, square, and deep enough to accommodate the mechanism. This project requires more precision than a basic four-legged table, but the result can replace a desk in a compact apartment.
6. Tile an Existing Coffee Table
Give a tired square-edged table a dramatic makeover with ceramic, porcelain, glass, or mosaic tile. Small tile sheets are easier to fit around corners and can create the blocky, retro look often seen in contemporary interiors.
Prepare the surface thoroughly before applying the appropriate adhesive. Keep grout lines consistent, allow everything to cure, and seal the grout when necessary. Remember that tile adds significant weight, so confirm that the original table and floor can support the finished project.
7. Build a Live-Edge Slab Table
A live-edge wood slab provides an organic shape that becomes the main decorative feature. Select a properly dried, relatively flat slab and stabilize cracks before finishing it. Remove loose bark, sand progressively, and use a clear oil or durable topcoat to highlight the grain.
Simple steel legs provide an appealing contrast to the natural edge. Because slabs can be heavy and may move slightly as humidity changes, use suitable mounting hardware that allows for normal wood movement rather than trapping the top too rigidly.
8. Transform a Vintage Suitcase
A hard-sided vintage suitcase can become a conversation-starting coffee table with remarkably little construction. Reinforce the interior with plywood, attach furniture legs through a solid internal base, and secure the lid if it opens too easily.
The suitcase still provides storage for throws, board games, or seasonal decorations. Choose a case with working hardware and a reasonably flat exterior. The finished table adds travel-inspired charm without requiring you to explain why you bought luggage despite having no vacation plans.
9. Repurpose an Old Door
A solid wood door can be trimmed into a spacious tabletop, particularly if it has decorative panels or interesting hardware. Remove loose paint safely, fill unwanted openings, and reinforce the underside to prevent sagging.
Add a simple wood frame or metal base. A glass panel placed over deeply recessed sections can create a level surface while keeping the original details visible. This is an excellent way to preserve architectural character that might otherwise end up in a landfill.
10. Construct a Fluted Drum Table
Curved drum tables have a sculptural appearance that works in modern and transitional rooms. Create a cylindrical base from flexible bending plywood, a concrete form tube, or a carefully built faceted frame. Cover the exterior with half-round molding, narrow dowels, or pole wrap to produce a fluted texture.
Add circular panels at the top and bottom, then paint the entire structure or finish it with wood stain. Ensure the base is wide and properly weighted so the table remains stable. A single warm color can make an inexpensive structure look surprisingly high-end.
11. Create a Faux-Stone Plinth Table
A plinth coffee table is essentially a low rectangular box with clean lines and substantial visual weight. Build the hollow form from plywood or medium-density fiberboard, reinforce it internally, and conceal the seams with filler.
Apply textured paint, limewash-style layers, microcement, or a carefully painted faux-stone finish. The hollow construction keeps it lighter than real stone, although “lighter” remains a relative term when you are carrying it through a narrow doorway.
12. Use a Stone Remnant for the Top
Stone fabricators sometimes have marble, granite, or quartz remnants left from larger projects. A properly sized remnant can become a luxurious tabletop for much less than a custom slab.
Pair it with a strong wood or metal base designed to carry the weight. Plan how the stone will be transported, supported, and secured before bringing it home. Seal natural stone when recommended, and use coasters to reduce staining or etching from acidic drinks.
13. Build an Industrial Pipe Table
Combine a thick wood top with black steel pipe fittings for a sturdy industrial-style coffee table. Assemble the pipe base on a flat surface, checking each connection so the frame sits level. Clean factory residue from the metal and protect it with a suitable finish.
A reclaimed or distressed top complements the mechanical-looking base, while a smooth top creates a cleaner modern contrast. Pipe components can become expensive, so sketch the frame and count every flange, tee, cap, and elbow before shopping.
14. Make a Shadow-Box Display Table
A shadow-box coffee table allows collections to be displayed beneath a glass top. Build a shallow compartmented box, add strong legs, and order tempered glass with finished edges from a professional supplier.
Use the interior for travel souvenirs, vintage postcards, shells, model cars, photographs, or rotating seasonal displays. Keep the arrangement shallow enough that objects do not touch the glass. This design turns the coffee table into a personal exhibit instead of another flat surface covered with mail.
15. Create a Herringbone Wood Top
A herringbone pattern can make inexpensive lumber appear custom-made. Begin with a stable plywood substrate and mark a precise centerline. Cut uniform wood strips, arrange them in opposing diagonal rows, and attach them with glue and small fasteners.
Trim the edges after the pattern is complete and add a border to frame the design. Contrasting stains can emphasize the geometry, although one natural finish often looks more timeless. Accuracy matters because tiny alignment errors become increasingly adventurous as the pattern expands.
16. Build a Round Pedestal Coffee Table
Round tables improve traffic flow in tight seating areas and eliminate sharp corners. Cut the top from plywood using a router circle jig or jigsaw, then sand the edge until it is smooth and even.
The base can be built from stacked plywood rings, a central wood column, or a faceted hollow pedestal. Make the bottom wide enough to resist tipping. A painted pedestal paired with a natural wood top creates an attractive two-tone design.
17. Add a Built-In Planter
Incorporate a removable planter box into the center or one end of a wood coffee table. The container should lift out easily and include a watertight liner or separate plant pots to prevent moisture from reaching the furniture.
Choose low-growing plants that suit the available light and will not block conversation across the room. Artificial greenery is a sensible alternative for dark spaces or households where every living plant eventually becomes a botanical memorial.
18. Make an Outdoor Coffee Table With a Cooler
Build a slatted cedar or pressure-treated lumber table with a removable center panel. Beneath the panel, install a supported bucket or weather-resistant container that can hold ice and beverages during outdoor gatherings.
Provide drainage, use corrosion-resistant hardware, and apply an exterior finish. When the cooler is not needed, replace the center panel or insert a planter. This two-in-one idea saves patio space and reduces trips to the kitchen.
19. Build a Nesting Coffee Table Set
Instead of one large table, construct two or three smaller tables that slide together. Each can be moved beside a chair, separated for entertaining, or stacked into a compact arrangement when floor space is limited.
Keep the designs visually related by using the same material, finish, or leg style. Carefully calculate the height and width differences so each smaller table clears the one above it. Nesting tables are flexible, practical, and excellent at making guests believe you planned the room professionally.
20. Create a Coffee Table From Stacked Books and Glass
For an unconventional temporary design, form four stable supports from carefully stacked oversized books and place a professionally cut tempered-glass top above them. Arrange the heaviest, widest books at the bottom of each stack and keep all four supports equal in height.
This concept works best as a decorative, lightly used table in an adult space. The glass must have polished edges and adequate thickness, and the stacks should not wobble. Valuable or frequently read books are poor candidates unless you enjoy dismantling furniture whenever inspiration strikes.
How to Choose the Best DIY Coffee Table Idea
The right project depends on your tools, experience, budget, and everyday habits. Beginners may prefer a hairpin-leg, crate, pallet, or simple wood-frame table. Builders with intermediate skills can explore lift-top hardware, tile, herringbone patterns, round pedestals, or integrated storage. Projects involving large stone slabs, complicated joinery, or glass require more careful planning and may need professional fabrication.
Material choice also affects maintenance. Solid wood can be repaired and refinished, but it responds to changes in humidity. Tile resists heat and everyday spills but creates grout lines that require cleaning. Glass keeps a room visually open yet displays fingerprints with almost supernatural efficiency. Outdoor tables need weather-resistant lumber, fasteners, adhesives, and finishes.
Do not forget the table’s visual weight. A thick plinth or drum base anchors a large room, while narrow metal legs suit a smaller space. Round and oval shapes make movement easier around compact seating arrangements. Rectangular tables pair naturally with long sofas, and square tables often complement sectional arrangements.
Lessons Learned From Building and Refinishing DIY Coffee Tables
The most important lesson from hands-on furniture projects is that preparation determines how professional the finished table looks. Exciting steps such as staining, painting, or attaching stylish legs receive most of the attention, but accurate measuring, straight cuts, careful sanding, and dry-fitting usually make the greater difference. A beautiful finish cannot persuade crooked legs to cooperate.
One particularly useful habit is to assemble the project temporarily before applying glue or permanent fasteners. Set the base on a flat floor, place the top in position, and inspect the table from several directions. A frame can appear square on a workbench yet wobble when moved. Measuring both diagonals helps confirm that a rectangular structure is square before the joints are locked together.
Material selection deserves more time than many first-time builders expect. Construction lumber may look straight in the store but twist as it dries. Examining each board from end to end helps identify bowing, cupping, knots, and damaged edges. Allowing wood to acclimate indoors before construction can also reduce unpleasant surprises. When reclaimed lumber is used, cleaning and inspecting it thoroughly is more important than preserving every rustic imperfection.
Sanding is another stage where patience pays. Jumping directly from coarse paper to a very fine grit can leave visible scratches beneath the finish. Working gradually through several grits produces a smoother, more consistent surface. Dust should be removed before applying stain, paint, or clear coating. Otherwise, the final texture may resemble a table finished during a small indoor sandstorm.
Testing finishes on scrap material prevents expensive disappointment. The same stain can appear dramatically different on pine, oak, plywood veneer, or reclaimed wood. Wood conditioner may help produce a more even result on blotch-prone species. Paint samples are equally valuable because colors change under warm lamps, daylight, and surrounding furnishings.
Another recurring lesson is that hidden structural details matter more than decorative shortcuts. A tabletop needs support against sagging, heavy stone needs a properly engineered base, and casters require strong mounting points. Screws should enter substantial material rather than thin edges. Adhesives must be suitable for the surfaces being joined. When children may climb on the furnitureand somebody eventually willthe table should tolerate more than its intended decorative load.
Functional features should also be tested before the final finish is applied. Lift-top mechanisms need clearance. Drawers require room to open without hitting knees. Storage baskets must fit through their openings. A planter insert should be removable without disturbing the entire tabletop. Building around the actual hardware and accessories is safer than trusting measurements from an optimistic product description.
Finally, successful DIY furniture does not need to be flawless. Small gaps can often be filled, uneven color can become a distressed finish, and minor changes may improve the original design. The goal is not to imitate factory production. It is to create a durable, useful piece that fits the room and reflects the builder’s taste. Every table also improves the next project by teaching better measuring, safer tool use, smarter material choices, and the deeply practical value of owning more clamps.
Conclusion
A homemade coffee table can solve practical problems while adding an unmistakably personal feature to a living room. The project might involve a clean wood slab and hairpin legs, a storage-packed crate arrangement, an outdoor cooler, or an unapologetically unusual stack of books. What matters is choosing a design that suits the space, using materials safely, and building a stable structure before focusing on decorative details.
Start with an achievable idea, verify every measurement, and give adhesives and finishes enough time to cure. Your completed table may not be absolutely perfect, but it will be useful, original, and supported by a far better story than “it was on sale near the checkout aisle.”
Research basis: This original guide synthesizes practical ideas and building principles published by This Old House, HGTV, Better Homes & Gardens, The Spruce, Family Handyman, Bob Vila, Popular Mechanics, Lowe’s, Apartment Therapy, Martha Stewart, The Home Depot, Kreg Tool, Ana White, and WOOD Magazine.
SEO Information
Note: Wear appropriate eye, hearing, respiratory, and hand protection, and obtain professional assistance when working with heavy stone, tempered glass, electrical tools, or unfamiliar structural hardware.