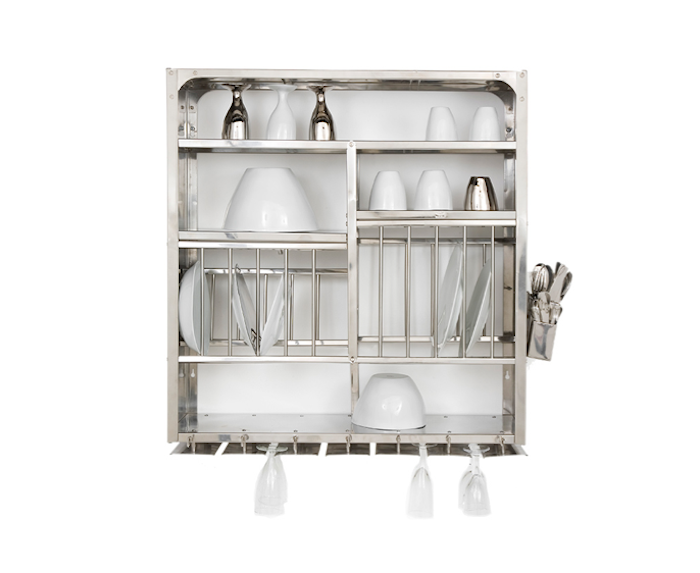
A traditional dish rack has one irritating habit: it occupies someups, and utensils upward, where unused wall space can finally earn its keep.
Mounted above or beside the sink, a well-designed rack can serve as a drying station, everyday storage system, or combination of both. Water can drip directly into the sink or collect in a removable drainboard, while frequently used dishes remain visible and easy to reach. The result is a cleaner countertop, a more efficient dishwashing routine, and fewer plates playing an unstable game of Jenga beside the faucet.
However, wall-mounted dish racks are not all created equal. Stainless grade, mounting hardware, drainage, spacing, capacity, and cleaning access can determine whether a rack becomes a kitchen hero or an expensive place to grow water spots. This guide explains what to look for, how to install one safely, and what daily use is really like.
Why Stainless Steel Wall Dish Racks Make Sense
They reclaim valuable countertop space
The clearest benefit is space. A countertop dish drainer may occupy an area that could otherwise be used for preparing food, setting down groceries, or operating a small appliance. Moving the drying zone to the wall creates a less crowded work surface without eliminating the rack entirely.
This is especially useful in apartments, galley kitchens, studio homes, recreational vehicles, and older houses with limited counter space. In a larger kitchen, a wall rack can still improve organization by creating a dedicated washing and drying station instead of allowing wet dishes to migrate across every available surface.
They create a more natural washing workflow
A rack installed directly above the sink supports a simple sequence: wash, rinse, place, and walk away. There is no need to carry dripping plates across the counter or place a towel beneath a freestanding drainer. Gravity directs moisture toward the sink, assuming the rack is positioned and designed correctly.
Some models include sloped drip trays, drainage tubes, or adjustable spouts. Others use open wire shelves that allow water to fall directly into the basin. A rack without either option should be treated as storage rather than a true drying station unless you enjoy wiping puddles as a recreational activity.
They can double as everyday dish storage
In many households, the same plates and bowls are used repeatedly. Storing them in a wall rack eliminates the cycle of drying them, putting them in a cabinet, and taking them out again several hours later. Open storage also makes it easy to see what is available.
This approach works best with coordinated everyday dishes that look tidy when displayed. A collection containing one holiday plate, three plastic dinosaur bowls, and a promotional mug from 2009 will still function perfectly, although the visual effect may be more “family documentary” than “designer kitchen.”
Common Types of Wall-Mounted Dish Racks
Single-tier plate racks
A single-tier rack is the simplest option. It usually includes vertical slots for plates, a shallow shelf for bowls, or a combination of both. Its compact size makes it suitable for a small household, a coffee station, or a kitchen where only a few hand-washed items need to dry at once.
Because the rack stays relatively close to the wall, it is less visually dominant than a large multi-level model. The trade-off is limited capacity, particularly for deep bowls, large dinner plates, and cookware.
Two-tier and three-tier systems
Multi-tier stainless steel wall dish racks provide separate zones for plates, bowls, cups, utensils, cutting boards, and kitchen tools. They are practical for households without a dishwasher or for people who cook frequently and generate an impressive mountain of dishes from what was supposedly a “quick dinner.”
Look for adequate vertical clearance between tiers. Promotional photographs may show every shelf filled beautifully, but a bowl that is taller than the available gap will not negotiate with the laws of physics. Measure your actual dishes before choosing a rack.
Modular rail-mounted racks
Modular designs attach baskets, shelves, cup holders, utensil containers, and hooks to a horizontal rail. This allows the arrangement to change as kitchen habits evolve. A household can begin with a plate basket and cutlery cup, then add a cutting-board holder or mug hooks later.
Removable modules are also easier to clean than permanently welded compartments. Confirm that each component locks securely into position and cannot be lifted accidentally when a heavy plate is removed.
Folding wall racks
A folding rack can be opened during dishwashing and collapsed when not in use. This design is helpful in narrow kitchens where even a permanently projecting shelf may interrupt traffic. It can also work in laundry rooms, outdoor kitchens, or multipurpose utility areas.
The hinges deserve close inspection. They should move smoothly without feeling loose, and the rack should lock firmly in its working position. A folding shelf that unexpectedly folds while holding wet glassware provides excitement, but not the desirable kind.
Commercial slanted or tubular shelves
Commercial kitchens often use heavy-duty stainless steel wall shelves with tubular bars or slanted surfaces. Some are designed to hold full dish or glass racks rather than individual plates. They may include support brackets, integrated drains, and substantially higher load ratings than typical residential products.
These shelves are durable and easy to clean, but they can appear industrial in a home kitchen. Their depth and weight also demand careful mounting. A commercial capacity rating is useful only when the wall, brackets, and fasteners can support the same load.
Choosing the Right Stainless Steel
304 stainless steel is a strong all-around choice
Type 304 stainless steel is widely used in kitchen and food-service equipment because it combines corrosion resistance, durability, and cleanability. For a rack that will be exposed to water every day, clearly identified 304 stainless steel is generally preferable to a product described only as “premium metal.”
That vague phrase can cover many materials, including lower-grade steel protected by a thin coating. A coated rack may perform well, but chips and scratches can expose the underlying metal. Product specifications are more informative than glamorous adjectives.
316 stainless steel offers added chloride resistance
Type 316 contains molybdenum, which improves resistance to chloride-related corrosion. It can be beneficial in coastal environments or locations where salty moisture is common. For most household kitchens, however, 304 stainless steel offers an effective balance of performance and price.
Even 316 stainless steel is not magic armor. Salt residue, harsh chemicals, trapped moisture, and neglected grime can still cause staining or corrosion over time.
201 and 430 stainless steel can be budget alternatives
Some affordable wall racks use 201 or 430 stainless steel. These grades can provide adequate service indoors, particularly when the rack is cleaned and dried regularly. They may not offer the same corrosion resistance as 304 in a constantly damp environment.
When comparing products, check whether the entire rack is stainless steel. Manufacturers sometimes use stainless shelves with ordinary steel screws, hooks, or brackets. The main frame may remain spotless while a tiny fastener develops an orange halo worthy of its own weather forecast.
How to Select the Best Rack for Your Kitchen
Measure dishes as well as wall space
Begin by measuring the available wall width, vertical clearance, and safe projection from the wall. Check for cabinet doors, windows, outlets, faucets, lighting, and anything else that could interfere with the rack.
Then measure the diameter and depth of your largest everyday plates and bowls. Plate slots should be wide enough to accept thicker stoneware without allowing thin dishes to wobble. If you use oversized dinner plates, confirm that they will not strike an upper cabinet or rest against the wall.
Choose a realistic capacity
Capacity should reflect how many dishes are normally washed in one session. A compact rack may be perfect for two people who use a dishwasher for large loads. A family that hand-washes breakfast, lunch, dinner, cookware, and sixteen mysterious cups will need more room.
Do not evaluate capacity using plate count alone. Bowls consume more volume, pots can block multiple slots, and utensils require a container that allows air to circulate around them. Large households often benefit from separate zones rather than one oversized basket.
Inspect the drainage system
The best drainage arrangement depends on rack position. When installed directly over the sink, an open-bottom design may be sufficient. When mounted beside the sink, the rack needs a drain tray, spout, or tube capable of returning water to the basin.
A removable tray should slide out without requiring the rack to be unloaded. It should also have enough slope to prevent stagnant puddles. Check that the drain outlet will point toward your sink after installation; “adjustable” is much more useful than “surprisingly committed to draining left.”
Look for removable accessories
Utensil cups, knife holders, cup hooks, cutting-board baskets, and drip trays collect residue in corners. Removable parts simplify cleaning and allow the rack to be configured for different loads.
A good utensil holder has drainage holes and separate sections that prevent forks and spoons from collapsing into a damp metal bouquet. Knife storage should protect exposed edges and keep handles easy to grasp.
Check the published load rating
Wet dishes are heavier than they appear. Add ceramic bowls, glassware, cookware, and the rack itself, and the total load can become substantial. Use the manufacturer’s stated capacity rather than estimating by optimism.
Commercial wall shelves may advertise capacities exceeding 150 pounds, while residential racks are usually designed for much lighter loads. Never assume commercial-looking construction automatically provides commercial strength.
Safe Installation Matters
Mount into studs whenever possible
For drywall construction, fastening the brackets into wall studs usually provides the strongest installation. Use a stud finder and verify the locations before drilling. The bracket spacing on the rack should align with the available structural support whenever possible.
If the rack cannot be aligned with studs, use anchors specifically rated for the wall material and expected loaded weight. Ordinary plastic plugs intended for lightweight decorations may not be appropriate for a dish rack filled with breakable objects.
Match hardware to the wall material
Drywall, plaster, brick, concrete, tile, and solid wood require different fasteners and drilling methods. Tile installations require particular care because incorrect pressure or drill bits can crack the surface. The fastener must ultimately engage a suitable substrate behind the tile rather than relying on the tile itself.
When plumbing or electrical lines may be hidden behind the mounting area, investigate before drilling. The most memorable kitchen installations are not always memorable for good reasons.
Level the rack and test drainage
Use a level before tightening the hardware fully. A slight unintended tilt may cause glasses to lean, dishes to slide, or water to pool at one end. If the rack includes a sloped drain tray, follow the manufacturer’s intended orientation rather than attempting to make every component perfectly horizontal.
After installation, pour a small amount of water into the tray and observe the path. Correct any leaks, backward slopes, or poorly positioned spouts before loading dishes.
Load the rack gradually
Begin with a few lightweight items and inspect the brackets, anchors, and wall surface. Add weight gradually while watching for movement, separation, or unusual sounds. Recheck all fasteners after several days of normal use.
A wall rack should feel completely stable when a plate is inserted or removed. Wobbling is not a charming personality trait in something holding glassware above a porcelain sink.
Cleaning and Maintaining Stainless Steel Wall Dish Racks
Keep the rack clean and dry
Stainless steel resists corrosion, but regular moisture and food residue can still create stains. Empty standing water from trays after each use, wipe visible puddles, and allow air to circulate around the rack.
Once a week, remove accessories and wash them with warm water and mild dish soap. A soft cloth, nonabrasive sponge, or small soft-bristled brush can reach joints and drainage holes. Rinse thoroughly and dry with a clean microfiber cloth.
Avoid harsh and abrasive cleaners
Steel wool, aggressive scouring powders, and hard metal brushes can scratch the finish and leave behind particles that later rust. Chlorine bleach and chloride-heavy cleaners can also damage stainless steel when used improperly or allowed to remain on the surface.
Follow the rack manufacturer’s care instructions, especially when the stainless steel has a colored, anti-fingerprint, or protective coating. A cleaner suitable for an uncoated sink may be too harsh for a finished rack.
Address hard-water deposits early
Hard water can leave cloudy white mineral deposits on wires and trays. Regular drying limits buildup. For persistent residue, use a manufacturer-approved descaling method, rinse thoroughly, and dry the surface afterward.
Do not allow cleaning solution to collect inside hollow tubes, seams, or mounting points. Trapped liquid can create discoloration in places that are difficult to inspect.
Inspect joints and hardware
Every few months, examine screws, welds, hooks, brackets, and anchors. Tighten loose fasteners and replace any component showing severe corrosion or deformation. If an accessory coating begins to peel, stop placing dishes directly against the damaged area until the part can be replaced.
Common Buying and Installation Mistakes
One frequent mistake is selecting a rack based only on its outside dimensions. A wide rack may still have narrow plate slots, shallow bowl shelves, or poorly arranged accessories. Internal usable space matters more than the dramatic number printed in the product title.
Another error is mounting the rack too high. The top shelf may look wonderfully streamlined until a shorter household member needs barbecue tongs to retrieve a cereal bowl. Test the proposed height with the people who will actually use it.
Mounting too low creates different problems. Tall faucets may strike the rack, dishes may crowd the washing area, and users may bump their heads while leaning over the sink. Temporary painter’s tape can outline the rack on the wall before drilling and help reveal clearance issues.
Ignoring drainage is equally risky. A beautiful rack positioned over a wood counter can cause repeated water exposure, staining, swelling, or damaged seams. Direct dripping toward the sink or use a reliable removable tray.
Finally, do not overload hooks with pans or cutting boards unless they were designed for that purpose. Small accessory hooks may support mugs and utensils but not cast-iron cookware with ambitions of becoming a wrecking ball.
Real-World Experience: Living With a Stainless Steel Wall Dish Rack
The first noticeable change after installing a stainless steel wall dish rack is not how the rack looks. It is how much larger the countertop suddenly feels. The space previously occupied by a plastic drainer becomes available for chopping vegetables, setting down a hot pan, or simply enjoying one clear surface in a room where objects reproduce overnight.
During the first few days, loading the rack may feel slightly unfamiliar. Plates must be placed into vertical slots rather than dropped casually into a basket. Bowls need to face a direction that allows water to escape. Cups should be positioned so they do not trap small indoor swimming pools. After a week, these movements become automatic, and the washing process feels more organized.
Placement turns out to be more important than expected. A rack centered directly above the sink provides excellent drainage, but it must be high enough to preserve faucet clearance and low enough for comfortable access. In one practical setup, raising the rack by only two inches prevented large plates from touching the faucet while keeping the upper shelf reachable. Small measurements can have a surprisingly large effect on daily convenience.
The utensil holder often becomes the hardest-working accessory. It collects forks, spoons, peelers, bottle brushes, and the single chopstick whose partner has apparently started a new life elsewhere. A holder with divided sections keeps sharp knives separate and improves airflow, but it also requires frequent cleaning because food particles settle around the drainage holes.
The drip tray reveals whether a product was thoughtfully designed. A tray with a strong slope empties quickly and needs little attention. A nearly flat tray develops standing water along its edges and must be wiped after every load. Removability matters just as much. If the tray cannot be removed while dishes are on the rack, cleaning it becomes a miniature furniture-moving project.
Water spots are visible on polished stainless steel, particularly under bright under-cabinet lighting. A brushed finish disguises fingerprints and mineral marks more effectively. Wiping the rack with a microfiber cloth takes less than a minute and keeps it looking presentable. Leaving it wet for several days does not necessarily cause immediate damage, but it creates dull residue that becomes harder to remove later.
Noise is another small but real consideration. Ceramic plates placed against bare metal make a sharp clink, especially early in the morning. Silicone-tipped slots or removable protective sleeves soften contact and reduce the chance of chipped edges. They should be easy to remove because moisture and debris can collect beneath them.
A two-tier rack tends to change how dishes are stored. Everyday plates may remain on the rack permanently, while less frequently used pieces stay in cabinets. This saves time and frees cabinet space, but it also means displayed dishes collect airborne grease in kitchens with heavy frying. Good ventilation and regular washing prevent the rack from becoming open storage for a fine layer of cooking history.
The greatest practical lesson is that more capacity is not always better. A very large rack encourages overloading and can dominate a small wall visually. A moderately sized rack that holds one normal washing session often produces a cleaner, safer routine. When it fills up, dry items are put away instead of being buried under the next load.
After several weeks, the rack becomes less noticeable because it blends into the workflow. The sink area stays clearer, dishes dry with better airflow, and the countertop no longer has a permanently damp corner. The installation effort feels worthwhile, provided the rack is sturdy, correctly positioned, and easy to clean. A poorly mounted version creates anxiety every time a dinner plate is added; a properly mounted one feels like part of the kitchen architecture.
Conclusion
Stainless steel wall dish racks offer a practical combination of drying, storage, and space management. They are particularly valuable in compact kitchens, but any household can benefit from a clearer countertop and a more organized washing zone.
For the best long-term result, choose a rack made from a clearly identified stainless grade, measure your dishes and wall carefully, verify the drainage path, and install the brackets with hardware suited to the wall and loaded weight. Removable trays and accessories will make routine cleaning much easier.
The ideal rack is not necessarily the largest or most elaborate model. It is the one that fits your dishes, directs water safely, remains stable, and makes the kitchen easier to use every day. Get those details right, and an empty patch of wall can become one of the hardest-working areas in the room.