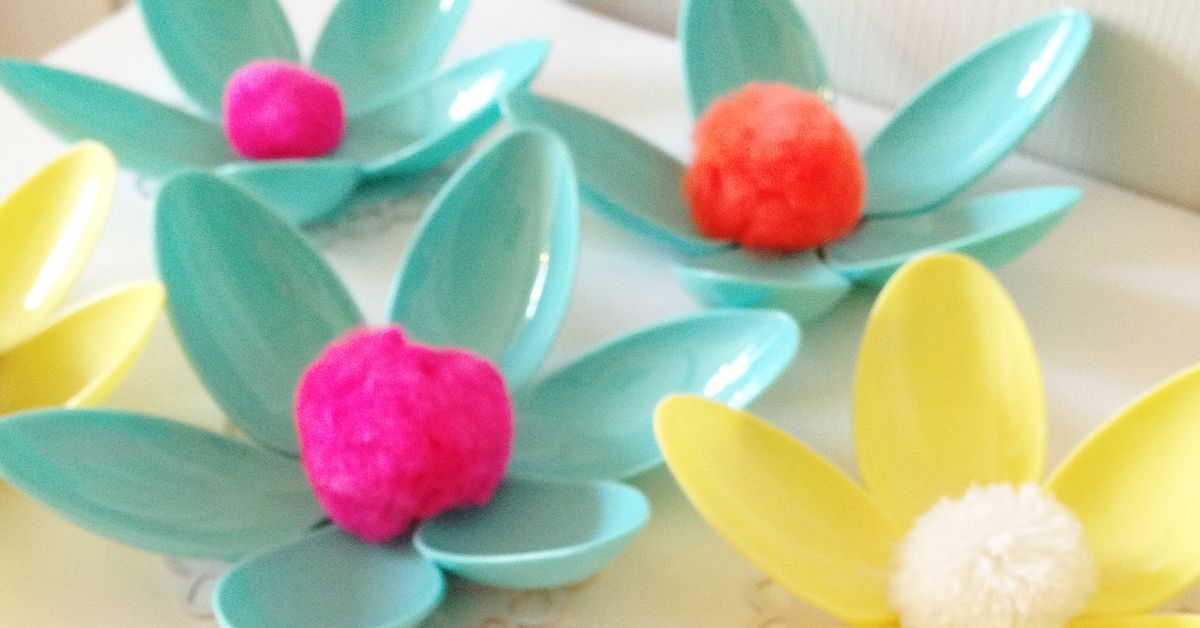
Spring has a funny way of making everyone want flowers. Real flowers on the porch, printed flowers on throw pillows, maybe even one ambitious floral tablecloth that says, “I own a glue gun and I’m not afraid to use it.” But what if the prettiest blooms in your home this season came from something hiding in the back of your party-supply drawer? Yes, we are talking about plastic spoons: the humble picnic utensil, the yogurt companion, the accidental craft superstar.
Spring flowers made using plastic spoons are cheerful, inexpensive, surprisingly stylish, and perfect for anyone who loves DIY spring decor without needing a professional florist, a greenhouse, or a trust fund at the craft store. With a few plastic spoons, floral tape, paint, pipe cleaners, cardboard, felt, or a small pot, you can create tulips, crocuses, daisies, layered blossoms, bouquet gifts, classroom projects, and whimsical table decorations that do not wilt by Tuesday.
This project also fits beautifully into the upcycled craft movement. Instead of tossing extra disposable spoons after a party, you can transform them into colorful spring flower crafts. It is budget-friendly, beginner-friendly, and just fancy enough to make guests say, “Wait, those are spoons?” which is the highest compliment in the world of recycled craft projects.
Why Plastic Spoon Flowers Are the Perfect Spring Craft
Plastic spoon flowers work because the shape already does half the job. The rounded bowl of a spoon naturally looks like a petal. The handle becomes a stem, support, or hidden structure. In other words, the spoon has been quietly preparing for its second career as a flower all along.
These DIY spoon flowers are especially popular for spring because they match the season’s mood: bright colors, fresh starts, handmade gifts, and a little bit of creative chaos on the kitchen table. They are also flexible. You can make one flower in 15 minutes, or create an entire bouquet while pretending the laundry does not exist.
For kids, plastic spoon flower crafts develop fine motor skills through wrapping, painting, arranging, and gluing. For adults, they offer a relaxing way to create spring home decor without needing expensive supplies. For teachers, they make excellent classroom projects for Earth Day, Mother’s Day, spring bulletin boards, or art lessons about reusing everyday materials.
Materials You Need for Spring Flowers Made Using Plastic Spoons
The best thing about this project is that the supply list is simple. You may already have most of it at home, especially if your kitchen drawer contains mysterious leftover utensils from three birthdays ago.
Basic Supplies
- Plastic spoons in white, clear, pastel, or bright colors
- Acrylic craft paint or permanent markers
- Green floral tape, painter’s tape, or washi tape
- Pipe cleaners, floral wire, paper straws, or wooden skewers for stems
- Pom-poms, buttons, beads, or crumpled tissue paper for flower centers
- Small cups, mini flower pots, jars, or recycled containers
- Cardboard circles, felt, or construction paper for layered flower bases
- Low-temperature glue gun or strong craft glue
- Scissors and a protected work surface
For children, choose washable paints, non-toxic craft materials, and age-appropriate tools. If glue guns are used, adults should handle or closely supervise that step. Low-temperature glue guns are safer than high-temperature versions, but they still get hot enough to cause an unpleasant surprise. Nobody wants a craft day that ends with someone yelling, “The daisy bit me!”
How to Make Simple Plastic Spoon Tulips
The easiest version of this craft is a plastic spoon tulip. It uses three spoons to form a closed flower shape, similar to a crocus or tulip bud. This style is neat, elegant, and ideal for spring bouquets.
Step 1: Choose and Prepare the Spoons
Select three plastic spoons for each flower. Colored spoons are convenient because they already look festive, but white spoons are wonderful if you want to paint custom shades. Soft pink, lavender, sunny yellow, coral, and robin’s egg blue all feel very spring-like. If the spoons are glossy, lightly roughing the back with fine sandpaper can help paint stick better.
Step 2: Paint the Petals
Paint the rounded backs of the spoons. Let the first coat dry, then add a second coat if needed. For a realistic effect, brush a slightly darker shade near the base of each spoon bowl. For a playful effect, add polka dots, stripes, or tiny white highlights. This is your garden; if you want purple tulips with gold freckles, nature will simply have to cope.
Step 3: Arrange the Flower Head
Hold the three spoons so the bowls face inward toward one another, creating a bud shape. The handles should meet and point downward like stems. Wrap the neck area with floral tape to secure the spoons together. Floral tape stretches and sticks best when pulled gently as you wrap, so give it a little tension.
Step 4: Add the Center and Leaves
Insert a yellow pipe cleaner or small pom-pom into the middle of the spoons to create a flower center. Wrap a green pipe cleaner around the stem area and twist the ends into leaves. You can also cut leaves from green felt or construction paper and glue them to the handle.
Step 5: Plant the Flower
Place the flower into a small cup, jar, or mini pot. Fill the container with pebbles, shredded brown paper, tissue paper, floral foam, or crumpled recycled paper to hold the stem upright. The result is a tiny spring flower pot that looks charming on a desk, windowsill, classroom shelf, or breakfast table.
How to Make a Plastic Spoon Daisy
If tulips are sweet and tidy, spoon daisies are cheerful little extroverts. They spread their petals wide and seem to say, “Good morning! I have glitter!”
To make a daisy, cut the handles off several plastic spoons, leaving only the rounded bowls. Arrange the spoon bowls in a circle around a cardboard disk, with the rounded ends pointing outward. Glue each spoon bowl in place, then add a second smaller layer if you want a fuller bloom. Cover the center with a button, pom-pom, painted bottle cap, or a circle of felt.
This method works beautifully for wall art, wreaths, garlands, party decorations, and spring classroom displays. Use white spoons for a classic daisy, yellow spoons for a sunflower-inspired look, or mixed pastel spoons for a flower that clearly shops in the Easter aisle.
Creative Variations for DIY Spoon Flowers
Plastic Spoon Crocuses
Crocuses are among the earliest signs of spring, and plastic spoons are perfect for recreating their cupped shape. Use three or four purple, yellow, or white spoons, wrap them tightly into a bud, and add thin green leaves made from paper or pipe cleaners. Place several in a small pot for a “first day of spring” centerpiece.
Felt and Spoon Flowers
For a softer look, combine plastic spoons with felt petals. Paint the spoon bowl yellow and the handle green. Cut a flower shape from felt, make a small slit near the bottom, and slide the spoon handle through it. Glue the spoon in place so the painted bowl becomes the flower center. Add felt leaves to the stem for a polished handmade look.
Plastic Spoon Flower Wreath
Use a cardboard ring, foam wreath form, or recycled paper plate as the base. Glue spoon petals around the circle in layers, then paint everything in spring colors. Add ribbon, paper leaves, or faux moss. Hang it on a door, above a craft table, or anywhere that needs a cheerful reminder that winter has finally stopped being dramatic.
Mini Spoon Flower Bouquet
Create several tulips, daisies, and crocuses, then gather them into a bouquet. Wrap the stems with ribbon or place them in a decorated jar. This makes a thoughtful handmade gift for Mother’s Day, Teacher Appreciation Week, birthdays, or “I made this because I had spoons and feelings” day.
Tips for Making Plastic Spoon Flowers Look Beautiful
Small details can turn a simple plastic spoon craft into something that looks intentional, not like a cafeteria drawer exploded. Start with a color palette. Choose three or four colors that work together, such as blush pink, mint green, cream, and yellow. This keeps the finished arrangement looking cohesive.
Layering also helps. Real flowers have depth, so use multiple spoons, paper petals, or felt accents to create dimension. Bendable materials like pipe cleaners make excellent leaves because you can shape them naturally. For a more elegant style, wrap stems completely with green floral tape so the plastic handles disappear.
Texture matters too. Add tissue paper, shredded kraft paper, pebbles, faux moss, or painted cardboard to the flower pot. A simple spoon flower becomes much more convincing when it is “planted” in a finished container instead of leaning sadly in an empty cup like it missed the bus.
Safety Notes for Kids and Families
Plastic spoon flower crafts are generally simple, but a few safety habits make them better for everyone. Use blunt scissors for younger children when possible, and let adults handle cutting thick plastic. Broken plastic edges can be sharp, so trim carefully and discard scraps right away.
Avoid melting plastic spoons over candles, lighters, stovetops, or open flames. Some online projects shape petals with heat, but melting plastic can create fumes and burn risks. For a safer spring craft, rely on painting, layering, wrapping, and gluing instead. Your flowers will still look lovely, and your kitchen will not smell like a science experiment gone rogue.
When choosing paints and glues, look for labels that identify products as appropriate for children or non-toxic when used as directed. Cover the work area with newspaper, cardboard, or a washable mat. Keep small decorations such as beads and buttons away from very young children.
Eco-Friendly Crafting: Reuse First, Buy Thoughtfully
Spring flowers made using plastic spoons are often described as recycled crafts, but the most eco-friendly approach is to reuse what you already have. If you have leftover disposable spoons from a party, picnic, office lunch, or takeout order, this project gives them a longer life as decor instead of sending them straight to the trash.
That said, the goal is not to buy piles of new plastic just to make an “eco” craft. Use existing materials whenever possible. Mix in recycled cardboard, jars, paper scraps, bottle caps, fabric remnants, and old gift ribbon. A beautiful plastic spoon flower arrangement can become a mini lesson in resourcefulness: creativity is not always about having more supplies; sometimes it is about seeing more possibility in the supplies you already have.
For classrooms, ask families to send in clean leftover spoons, small yogurt cups, paper tubes, or tissue paper scraps. This keeps costs down and turns the project into a community collection effort. It also teaches kids that everyday objects can have second lives, especially when imagination shows up wearing a paint-smudged apron.
Where to Use Plastic Spoon Spring Flowers
These handmade flowers are more versatile than they first appear. A single potted spoon tulip makes a sweet desk decoration. A row of spoon crocuses can brighten a windowsill. A bouquet can become a centerpiece for Easter brunch, spring parties, or garden-themed birthdays. Spoon daisies can be glued to a banner, wreath, picture frame, or gift bag.
They also make excellent handmade gifts because they last. Real flowers are beautiful, but they eventually droop. Plastic spoon flowers stay colorful, lightweight, and easy to store. They are especially meaningful when children make them for parents, grandparents, teachers, or neighbors. The charm comes from the handmade imperfections: the slightly wobbly stem, the enthusiastic paint stroke, the leaf that looks more like a green mustache. That is where the personality lives.
Common Mistakes and How to Fix Them
The Paint Peels Off
Glossy spoons can resist paint. Lightly sand the surface before painting, use acrylic craft paint, and let each coat dry fully. A clear acrylic sealer can help protect finished flowers used indoors.
The Flower Head Falls Apart
Use floral tape first to bind the spoon handles tightly, then reinforce with glue. If you are making a daisy or wreath, glue spoon petals to a sturdy cardboard circle rather than directly to one another.
The Stem Looks Too Plastic
Wrap the handle with green floral tape, ribbon, or paper. Add leaves to distract the eye. This is the craft equivalent of putting on a nice jacket before a video call.
The Flower Pot Tips Over
Add weight to the container with pebbles, dry beans, rice, or clean sand sealed under paper filler. A stable base makes the whole arrangement look more professional.
Experience Notes: What Making Plastic Spoon Flowers Teaches You
After making a batch of spring flowers with plastic spoons, one thing becomes obvious: this craft is far more forgiving than it looks. The first flower may feel awkward. The spoons slide, the tape sticks to itself, and one petal may point in a direction that suggests it has personal goals. But by the second or third flower, the rhythm becomes easy. Wrap, adjust, paint, glue, laugh, repeat.
The best experience comes from setting up the project like a tiny flower workshop. Put spoons in one cup, pipe cleaners in another, paint in a tray, and finished flowers in a jar. This makes the process feel organized and fun instead of chaotic. It also helps kids and beginners see the steps clearly. When everyone can choose their own colors, the flowers become personal. One person may make soft pastel tulips; another may create neon orange daisies that look ready to headline a spring music festival.
One useful lesson is that simple materials often create the most satisfying crafts. Plastic spoons are not precious, so people are less afraid to experiment. If a petal looks odd, make another. If the paint color is too bright, add dots or stripes. If a flower leans, call it “windswept” and move on with confidence. The low cost removes pressure, which is exactly why the project works so well for classrooms, family craft nights, and rainy afternoons.
Another pleasant surprise is how giftable these flowers are. A small potted spoon flower made by a child can mean more than an expensive decoration because it carries time, effort, and a tiny fingerprint of personality. Teachers can use them as spring bulletin board accents. Parents can display them on kitchen windowsills. Grandparents will almost certainly keep them forever, possibly beside a school photo and a mysterious ceramic turtle from 2009.
The project also encourages better observation of real flowers. Once you start shaping spoon petals, you notice how tulips cup inward, daisies spread outward, and crocuses cluster low and bright. Crafting becomes a quiet study of nature, even though the main material came from a picnic pack. That contrast is part of the magic: something ordinary becomes something seasonal, cheerful, and decorative.
From a practical standpoint, the best results usually come from using fewer colors, cleaner stems, and sturdy bases. Too many decorations can make the flowers look busy. A neat green stem, a bright center, and a simple pot often look better than five ribbons fighting for attention. Let the spoon shape shine. It has waited its whole plastic life for this moment.
In the end, making spring flowers from plastic spoons is not just about creating decor. It is about slowing down, reusing materials, and enjoying the kind of hands-on creativity that makes a table messy in the best possible way. The finished flowers are cute, but the experience is the real bouquet: shared laughter, small discoveries, and the proud moment when someone holds up a spoon and says, “Look, I made spring.”
Conclusion
Spring flowers made using plastic spoons prove that beautiful DIY decor does not need to be expensive, complicated, or fresh from a boutique craft aisle. With a handful of spoons, paint, tape, pipe cleaners, and imagination, you can create tulips, crocuses, daisies, wreaths, bouquets, and gifts that bring cheerful spring energy into any space.
This craft is perfect for families, teachers, beginner crafters, upcycling fans, and anyone who enjoys turning ordinary objects into something unexpectedly delightful. It is simple enough for kids with supervision, creative enough for adults, and flexible enough to match any spring color palette. Best of all, these flowers do not need watering, sunlight, or emotional support. They simply sit there looking cute, which is honestly more than we can say for some houseplants.
If you have extra plastic spoons waiting in a drawer, give them a second life. Paint them, wrap them, plant them, gift them, or turn them into a full spring bouquet. Sometimes the sweetest flowers are not found in the garden. Sometimes they are hiding next to the napkins.