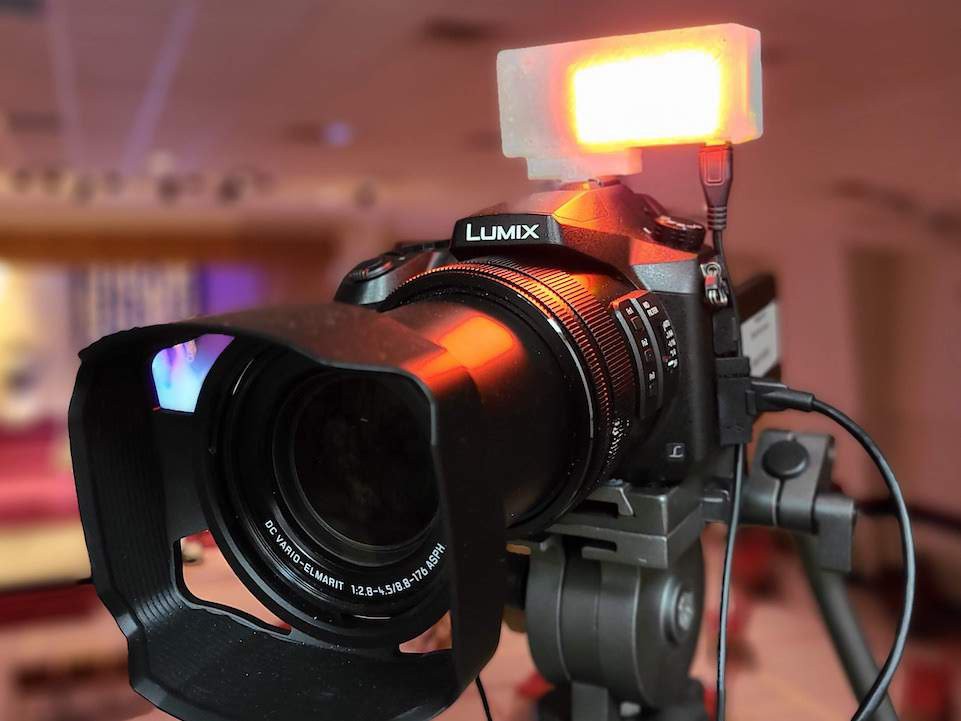
In live video production, confusion has a special talent for arriving at the exact moment the host says, “And now, camera two.” A camera operator blinks. The guest smiles at camera one. The producer whispers something that sounds like a weather alert. Suddenly, everyone remembers why tally lights exist.
Raspberry Pi tally lights solve a simple but critical problem: they show which camera is live, which camera is next, and sometimes which camera should quietly stop pretending it is invisible. Whether you are running a church livestream, podcast studio, school broadcast, corporate webinar, esports show, or DIY multi-camera YouTube setup, a Raspberry Pi can turn a handful of LEDs into a surprisingly professional camera cue system.
The beauty of this idea is that it sits in the sweet spot between “broadcast engineering” and “weekend maker project.” You get network control, flexible software, GPIO pins, Python-friendly programming, and affordable hardware in one tiny board. Add OBS Studio, vMix, Blackmagic ATEM, Bitfocus Companion, or a custom web API, and your tally system can grow from one blinking light to a whole studio language.
What Are Raspberry Pi Tally Lights?
A tally light is a visual indicator that tells people which video source is currently active. In traditional broadcast studios, red usually means “program” or “live on air,” while green often means “preview” or “you are next.” Some systems add amber, blue, white, or flashing states for recording, standby, stream status, muted audio, or “the producer is panicking but doing it elegantly.”
A Raspberry Pi tally light system uses a Raspberry Pi board to receive status information from a video switcher or production app, then turns physical lights on and off. The Pi might connect through Wi-Fi or Ethernet, listen for WebSocket messages from OBS, poll the API from vMix, receive HTTP commands from a control script, or integrate with a hardware switcher workflow.
The Raspberry Pi is especially useful because it is both a small Linux computer and a physical-computing platform. Its GPIO pins can control LEDs, relays, MOSFETs, LED strips, RGB matrices, or small display modules. In plain English: it can understand the software side of your livestream and still boss around real-world lights like a tiny stage manager with a 40-pin hat.
Why Use a Raspberry Pi Instead of Buying Tally Lights?
Commercial tally systems are excellent, but they can be expensive or locked into specific switchers. Raspberry Pi tally lights are attractive because they are affordable, customizable, and friendly to mixed production setups. Many creators now use hybrid workflows: OBS for streaming, ATEM for switching, NDI cameras on the network, vMix for replay or remote guests, and Companion for button control. A DIY Raspberry Pi tally light system can adapt to these workflows instead of demanding that the workflow adapt to it.
The biggest advantage is flexibility. You can build one Raspberry Pi per camera, one central Raspberry Pi that controls multiple lights, or a web-controlled system where each tally node sits near a camera. A Raspberry Pi Zero W or Zero 2 W is small enough to mount near a tripod. A Raspberry Pi 4 or Raspberry Pi 5 can handle more complex dashboards, control panels, and multiple network services. A Raspberry Pi Pico W can work for simpler Wi-Fi lighting nodes, although it is a microcontroller rather than a full Linux computer.
Another advantage is transparency. When something breaks, you can inspect the code, logs, wiring, and network connection. That is not always relaxing, but it is empowering. It also means you can add exactly the features your studio needs: camera labels, brightness control, preview/program colors, silent mode, web configuration, PoE power, battery operation, or a giant red “LIVE” sign that makes interns stand up straighter.
How a Raspberry Pi Tally Light System Works
Most Raspberry Pi tally light projects follow the same basic pattern. First, production software or a switcher knows which camera is active. Second, a script or service exposes that status over the network. Third, the Raspberry Pi receives the status and maps it to a light state. Fourth, the LED turns red, green, off, or whatever color your production grammar requires.
Program and Preview States
The two most common tally states are program and preview. Program means the source is live in the final output. Preview means the source is queued to go live next. In a two-camera interview, red tells the guest where to look now, while green tells the operator to prepare for the next cut. This is small, humble information, but it prevents large, theatrical mistakes.
Network Communication
For OBS Studio, modern setups often use obs-websocket, which allows external tools to communicate with OBS over a WebSocket server. A Raspberry Pi script can watch scene changes, detect which source is active, and light the corresponding LED. For vMix, the system may read status through vMix’s API or TCP-based control features. For Blackmagic ATEM workflows, tally data can come from ATEM software/control protocols, third-party tools, Companion, or bridge scripts that translate switcher status into something the Pi can understand.
Physical Output
On the hardware side, a simple tally light may use one red LED with a resistor connected to a GPIO pin. A more useful version may use a red/green LED module, RGB LED, addressable LED strip, or small panel mounted above the lens. For larger lights, the Raspberry Pi should not power the LED load directly from GPIO. Instead, use a transistor, MOSFET, relay module, LED driver, or external power supply. The GPIO pin sends the command; the power circuit does the heavy lifting. Think of the Pi as the director, not the camera crew carrying the sandbags.
Essential Parts for a Raspberry Pi Tally Light Build
A beginner-friendly Raspberry Pi tally light can be built with modest parts. The exact list depends on whether you want one light, multiple camera lights, wireless operation, or a rugged studio installation.
Basic Hardware List
- Raspberry Pi Zero W, Zero 2 W, Raspberry Pi 3, 4, or 5
- MicroSD card with Raspberry Pi OS
- Reliable USB power supply or PoE solution
- Red and green LEDs, RGB LED, or addressable LED module
- Current-limiting resistors for standard LEDs
- Jumper wires, breadboard, or soldered perfboard
- Enclosure or 3D-printed case
- Optional: MOSFETs, level shifter, external LED power supply, diffuser, camera shoe mount
For small indicators, standard LEDs are enough. For visibility across a bright room, addressable LEDs or 12V LED modules work better. If you use NeoPixel-style LEDs or other 5V addressable strips, include proper power planning and consider level shifting from the Pi’s 3.3V data signal to a 5V logic signal. This improves reliability, especially when cables get longer or the studio becomes electrically noisy.
Best Raspberry Pi Models for Tally Lights
The best Raspberry Pi for tally lights depends on the size of your system. For one light near one camera, a Raspberry Pi Zero W can be enough. It is small, wireless, inexpensive, and easy to mount. A Raspberry Pi Zero 2 W gives better performance while keeping the same compact spirit.
For a central controller that drives multiple wired lights, a Raspberry Pi 4 or Raspberry Pi 5 is more comfortable. It offers more processing headroom, better networking, and smoother operation if you are also running a web dashboard, local database, Companion instance, or monitoring service. If the system only needs to receive a simple HTTP command and turn on an LED, even lightweight boards are plenty.
The Raspberry Pi Pico W is worth mentioning because it is inexpensive and wireless, but it runs microcontroller firmware rather than Raspberry Pi OS. It can be excellent for simple Wi-Fi tally nodes, especially when paired with a main controller, but it will not run typical Linux packages the same way a Raspberry Pi Zero or Pi 4 will.
Software Options: OBS, vMix, ATEM, and Companion
Raspberry Pi tally lights become useful when they can understand your production software. The most common paths are OBS Studio, vMix, Blackmagic ATEM, and Bitfocus Companion.
OBS Studio Tally Lights
OBS is popular for livestreaming, online teaching, podcast production, and small studios. With obs-websocket, a script can connect to OBS, listen for scene changes, and determine which sources are active. If camera one appears in the current program scene, the camera one tally light turns red. If camera two is in a queued or preview-related workflow, it can turn green depending on how the system is designed.
Many OBS tally projects use Python because the Raspberry Pi ecosystem is comfortable with Python, GPIO libraries, and background services. A good script should reconnect if OBS restarts, turn the light off if the connection is lost, and avoid false positives when a camera source appears hidden inside nested scenes.
vMix Tally Lights
vMix is a Windows-based live production tool used for streaming, recording, replay, virtual sets, calls, and multi-camera work. A Raspberry Pi tally light for vMix commonly reads vMix status over the network and maps input numbers to LEDs. This is useful for event producers who want physical camera indicators without buying a proprietary tally kit.
Blackmagic ATEM Tally Lights
Blackmagic ATEM Mini switchers are widely used for small and mid-sized live productions. ATEM workflows already understand program and preview states, which makes them a natural match for tally lights. A Raspberry Pi may receive ATEM status through community libraries, middleware, Companion, or a custom bridge. For practical installations, many teams use the ATEM as the switcher, Companion as the control layer, and Raspberry Pi nodes as the physical tally endpoints.
Bitfocus Companion
Bitfocus Companion is popular in AV and broadcast environments because it connects many pieces of gear into one control surface. It can act as a powerful glue layer. Instead of writing a custom integration for every switcher and app, you can create buttons, triggers, variables, and feedback states, then send commands to a Raspberry Pi over HTTP, TCP, UDP, or another supported pathway. For studios with mixed gear, Companion can save your sanity and possibly your coffee budget.
A Practical Example: Four-Camera OBS Tally System
Imagine a small podcast studio with four cameras, OBS Studio, and one Raspberry Pi Zero 2 W mounted near each camera. Each Pi controls a small RGB LED panel above the lens. The OBS computer runs obs-websocket. Each Pi runs a Python service that connects over Wi-Fi, authenticates with OBS, and checks whether its assigned camera source is currently active.
Camera one is assigned to source name “CAM_1.” Camera two is “CAM_2,” and so on. When OBS switches to a scene containing CAM_1, the first Pi turns its LED red. If the scene containing CAM_2 is selected as the next preview source in a studio-mode workflow, camera two turns green. All other lights remain off. If OBS disconnects, every tally light turns off instead of lying to the talent, which is a valuable moral position for electronics to take.
For reliability, each Raspberry Pi service should start automatically on boot using systemd. The Wi-Fi network should be stable, ideally separate from guest traffic. Each camera node should have a clear hostname, such as tally-cam-1.local, tally-cam-2.local, and so forth. The LED should be bright enough for talent to see but not so bright that it turns the guest’s forehead into a red traffic signal.
Wiring and Safety Tips
The Raspberry Pi GPIO pins operate at 3.3V logic. That is fine for signaling, but not for powering ambitious lighting loads. A single LED with a resistor is beginner-friendly. A bright LED strip, panel, or 12V camera light requires an external power source and a switching component such as a logic-level MOSFET.
Always use current-limiting resistors with standard LEDs. Double-check polarity. Share ground between the Raspberry Pi and the external LED power supply when using MOSFET switching. Avoid feeding 5V into a GPIO pin. Mount electronics in an enclosure so stray wires do not perform interpretive dance during a livestream. Label everything, because future-you will not remember which red wire is the emotionally important one.
For addressable LEDs, keep data wires short when possible, use adequate power injection for longer strips, and add a diffuser so the light is visible without being harsh. A camera tally should communicate clearly, not interrogate people like a tiny police siren.
Design Ideas for Better Tally Lights
A Raspberry Pi tally light does not have to be a naked LED taped to a tripod, although we honor every prototype that has lived bravely under electrical tape. A polished build can include a 3D-printed enclosure, cold-shoe mount, frosted acrylic diffuser, camera number label, brightness control, and a small web setup page.
For front-of-camera talent, place the light near the lens so eye contact naturally follows the active camera. For camera operators, add a rear-facing indicator as well. In stage or church production, use larger diffused lights that remain visible from a distance. In a podcast room, use softer LEDs so the studio does not feel like mission control during reentry.
Color conventions matter. Red should almost always mean live. Green usually means preview. Off means inactive. Flashing can mean recording, error, stream live, connection lost, or warning. Do not make flashing red mean “preview,” unless your goal is to create a studio culture based entirely on adrenaline.
Troubleshooting Common Problems
The Light Does Not Turn On
Check the wiring first. Confirm the GPIO pin number in the code matches the physical or BCM numbering mode you intended to use. Test the LED with a simple blink script before connecting it to OBS, vMix, or ATEM logic. If the LED works in the test but not in the final system, the problem is probably software, network, authentication, or source-name mapping.
The Light Stays On
This often happens when the script does not receive scene-change updates or when it identifies a source as active even though it is hidden inside a scene collection. Review how your production software reports active sources. For OBS, nested scenes and duplicated camera sources can create surprises. Use consistent naming and keep your scene structure tidy.
The Light Flickers
Flicker may come from unstable power, weak Wi-Fi, poor LED signal integrity, or code that updates the LED too often. Add debouncing logic, reduce unnecessary updates, improve the power supply, and check logs for disconnects. If using addressable LEDs, level shifting and proper grounding can make the difference between “professional indicator” and “haunted Christmas decoration.”
The Network Connection Drops
Use static DHCP reservations, strong Wi-Fi coverage, or wired Ethernet when possible. For serious productions, Power over Ethernet can be a wonderful upgrade because it combines power and data into one cable. A tally light that fails because someone microwaved lunch near the router is not the kind of drama most producers want.
Performance and Reliability Best Practices
A good Raspberry Pi tally light system should boot automatically, reconnect automatically, fail safely, and be understandable by someone who did not build it. That means documentation matters. Keep a simple map of camera numbers, IP addresses, GPIO pins, source names, and power supplies. Store code in a repository. Add comments where the logic is not obvious.
Use systemd services so the tally script starts after boot. Log connection failures. Turn lights off when the control connection is lost. Avoid hard-coding passwords directly into public repositories. Use a dedicated production network if possible. Test the whole system before the event, not three minutes before the keynote speaker walks on stage holding a wireless mic and destiny.
For multi-camera productions, also test edge cases. What happens when OBS changes scene collections? What if vMix input numbers move? What if the ATEM switcher restarts? What if two sources share one camera feed? These details are boring until they save the show.
Raspberry Pi Tally Lights for Different Use Cases
Church Livestreams
Church production teams often work with volunteers, rotating operators, and limited setup time. Raspberry Pi tally lights help camera operators know when they are live and help speakers look at the correct camera. Wireless nodes can reduce cable clutter, while larger diffused indicators are easier to see in bright rooms.
Podcast Studios
Video podcasts benefit enormously from tally lights because guests rarely know which camera is active. A small red light near the lens makes multi-camera conversation feel natural. It also reduces the producer’s need to whisper, point, and develop a second career in hand signals.
Education and Training
Schools and universities can use Raspberry Pi tally lights as both production tools and learning projects. Students learn networking, Python, electronics, video production, and troubleshooting in one practical build. The payoff is immediate: a real studio tool, not just another blinking LED named “lab exercise three.”
Corporate Events
For webinars, town halls, and hybrid meetings, tally lights help presenters know where to focus. They also make small production teams look more polished. A clean Raspberry Pi-based system can integrate with existing OBS, vMix, or ATEM setups without blowing the equipment budget.
Field Notes: Real-World Experiences With Raspberry Pi Tally Lights
The first thing you learn from building Raspberry Pi tally lights is that the light itself is the easy part. The LED will blink. It is almost eager to blink. The real work is making the system behave politely in a live production environment where networks hiccup, scene names change, cables wander off, and someone always asks, “Can we add one more camera?” approximately nine minutes before showtime.
In one typical small-studio setup, the first prototype starts on a breadboard with a red LED and a resistor. It works beautifully on the desk. Then it gets moved near a camera, where the Wi-Fi signal is weaker, the power cable is too short, and the LED is facing the ceiling like it is trying to contact satellites. That is when the project becomes less about code and more about mounting, visibility, power, and human behavior.
A useful lesson is to design for the person looking at the light, not for the person building it. A tiny LED may be obvious to you from six inches away, but a guest under studio lighting may not notice it at all. A diffused panel or small RGB module near the lens works better. It should be bright enough to catch the eye, but not so bright that it paints the subject’s face red. Adjustable brightness is not a luxury; it is the difference between helpful and mildly theatrical.
Another experience: source naming matters more than expected. In OBS, a camera may appear in multiple scenes, nested scenes, or duplicated sources. If your script simply searches for “Camera 1,” it may turn on the tally at strange times. A cleaner approach is to create predictable source names, keep camera layers organized, and document the scene structure. Your future self will thank you, probably while drinking cold coffee during a rehearsal.
Wireless tally lights are wonderfully convenient, but wired connections win when reliability matters most. Wi-Fi can work very well in a podcast room or classroom, especially with a good router and stable power. For events, PoE is often the grown-up choice. It reduces wall adapters, avoids battery surprises, and keeps the system easy to deploy. One Ethernet cable per camera is not glamorous, but neither is explaining why camera three’s tally light disappeared during the CEO’s opening remarks.
The best Raspberry Pi tally systems also fail gracefully. If the control app disconnects, the light should turn off or display a clear error state. It should not freeze in red and convince everyone that camera two is live forever. A good reconnect loop, sensible logging, and automatic startup on boot make the system feel less like a science project and more like dependable studio gear.
Finally, the real charm of Raspberry Pi tally lights is that they invite iteration. Version one blinks. Version two adds preview green. Version three gets a 3D-printed case. Version four has a web dashboard, brightness slider, camera labels, and rear operator indicators. Before long, you have built a custom production tool that fits your workflow better than many off-the-shelf options. That is the Raspberry Pi magic: it starts as a board on a desk and ends up making the whole show look sharper.
Conclusion
Raspberry Pi tally lights are one of the most practical DIY upgrades for live video production. They are affordable enough for small creators, flexible enough for serious studios, and educational enough to teach real electronics and networking skills along the way. Whether you are using OBS Studio, vMix, Blackmagic ATEM, Companion, or a custom control system, the core idea remains beautifully simple: tell people which camera is live before they look at the wrong one.
A great tally system is not just about blinking LEDs. It is about trust. Camera operators trust the cue. Presenters trust the lens. Producers trust that the system will recover when software restarts or a connection drops. With careful wiring, stable networking, clean source naming, and a little testing, Raspberry Pi tally lights can make a modest production feel polished, confident, and far less chaotic.
And yes, there is something deeply satisfying about watching a tiny Raspberry Pi control the visual rhythm of a livestream. It is practical, nerdy, and oddly theatrical. In other words, it is exactly the kind of project the Raspberry Pi was born to do.