Beautiful curtain panels can make a room feel taller, warmer, and far more finished. Unfortunately, custom drapery can also make a checking account feel noticeably smaller. The good news is that you do not need a sewing machine, professional workroom, or mysterious inherited talent for threading bobbins to create an elegant window treatment.
These no-sew curtain panels borrow their inspiration from the polished, traditional-meets-relaxed look often associated with Ballard Designs: generous fabric, tailored borders, understated colors, floor-length proportions, and hardware that feels substantial rather than flimsy. The construction method, however, is refreshingly approachable. Most of the work is performed by an iron, fusible hem tape, curtain ring clips, and your willingness to measure twice before cutting once.
This guide explains how to choose fabric, calculate panel dimensions, create crisp hems, attach decorative trim, add optional lining, and hang the finished DIY drapes so they resemble custom window treatments rather than an emergency craft project completed five minutes before guests arrive.
What Creates the Ballard-Inspired Curtain Look?
The designer effect does not depend on complicated pleating or expensive fabric alone. It comes from proportion, restraint, and a handful of carefully chosen details.
Generous Fullness
Flat, narrow panels rarely look luxurious. A curtain should retain visible folds even when it is closed. Ballard Designs recommends approximately twice the window width for attractive fullness, while broader industry guidance commonly suggests two to three times the rod width, depending on the fabric and desired effect. Lightweight linen blends generally benefit from more fullness, while thick velvet or lined fabric can look substantial with slightly less.
Full-Length Proportions
For this project, the finished panels should reach the floor. Let them barely touch it for a clean, tailored appearance, add a one-inch break for a relaxed look, or allow several extra inches to puddle if the room is formal and nobody minds occasionally vacuuming a textile sculpture.
Mounting the rod higher than the window trim draws the eye upward and can make both the window and ceiling appear taller. Extending the hardware beyond the window also allows more glass to remain exposed when the curtains are open. Guides from Ballard Designs, Home Depot, This Old House, and other home-design publications commonly recommend positioning rods several inches above and outside the frame.
Tailored Decorative Trim
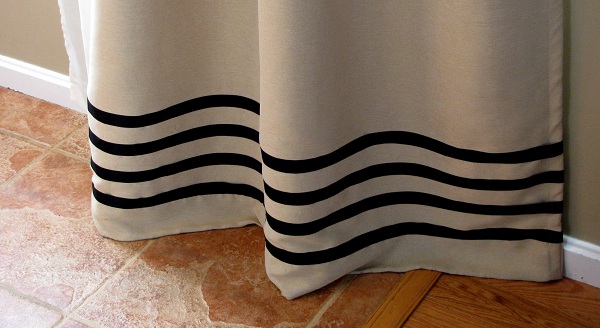
A contrasting band along each leading edge is one of the easiest ways to turn plain fabric into something that appears custom-made. Grosgrain ribbon, woven tape, geometric trim, Greek-key-inspired tape, or a narrow strip of contrasting fabric can all work. The detail should be noticeable without shouting across the room like an enthusiastic wallpaper sample.
Decorative tape can be attached with fusible hem tape rather than stitching. This no-sew upgrade is also used by major home-improvement and design publications to give ready-made panels a more expensive appearance.
Supplies for No-Sew Curtain Panels
- Decorator fabric, linen blend, cotton canvas, or heavyweight cotton
- Iron-on hem tape suitable for the fabric weight
- Decorative ribbon or woven drapery trim
- Curtain rod and matching brackets
- Curtain rings with clips
- Optional blackout or privacy lining
- Steel measuring tape
- Long ruler, carpenter’s square, or straightedge
- Fabric scissors or rotary cutter and cutting mat
- Iron and ironing board
- Press cloth
- Fabric-safe marking pencil or tailor’s chalk
- Fray-prevention liquid for loose woven edges, if needed
Choose permanent fusible tape rather than temporary fashion tape. Regular-weight adhesive is usually appropriate for cotton and linen blends, while heavier canvas, blackout cloth, and thick trim may require a super-weight product. Always test the adhesive on a fabric scrap before committing your entire curtain panel to the relationship.
How to Measure for DIY Curtain Panels
Step 1: Install or Mark the Curtain Rod Position
Decide where the rod will sit before calculating the fabric length. A common starting point is four to six inches above the window frame, although rods may be mounted closer to the ceiling when the room and panel length allow. Extend the rod approximately eight to twelve inches beyond the window on each side when wall space is available.
Check for studs and use anchors appropriate for the wall material. Wide or heavy installations may also need a center bracket. A beautiful curtain rod that gradually bows in the middle is less “European manor” and more “tired fishing pole.”
Step 2: Calculate the Finished Length
Measure from the underside of the curtain ring clip to the floor. Do not measure from the rod itself unless the panel will hang directly on it. Ring clips add length, and ignoring them is a reliable way to create curtains that quietly sweep the floor like household brooms.
Choose one of these finished lengths:
- Floor kiss: Ends approximately one-quarter inch above the floor.
- Exact floor length: Barely touches the floor.
- Soft break: Adds about one inch of fabric.
- Puddle: Adds three to eight inches for a dramatic effect.
Add approximately eight to ten inches to the finished measurement for the top and bottom folds. For example, a 96-inch finished panel might begin with a fabric length of 104 to 106 inches.
Step 3: Calculate the Width and Fullness
Measure the entire curtain rod between the finials, not merely the glass. Multiply that number by two for a classic full appearance. Divide the result by the number of panels you plan to make.
Suppose the rod measures 64 inches. A two-times-full treatment requires approximately 128 inches of finished fabric width. Two panels would therefore need to finish around 64 inches wide each. If your fabric is only 54 inches wide, two unjoined widths will create a slightly more relaxed result. For true fullness, use wider fabric, create four narrower panels, or bond additional widths together with fusible seam tape.
Choosing Fabric That Looks Expensive
Linen, linen-look blends, cotton duck, cotton canvas, and matte woven fabrics are excellent choices. They hang naturally, accept an ironed crease, and suit the relaxed traditional style behind this project. Velvet can also look impressive, but it is heavier, more difficult to press, and less forgiving of adhesive mistakes.
Avoid fabric that is extremely shiny, stiff, stretchy, loosely woven, or unable to tolerate heat. Interior designers frequently favor versatile natural-looking materials such as linen and cotton over high-sheen fabrics when aiming for a timeless curtain treatment.
Neutral shades such as ivory, flax, oatmeal, soft gray, warm white, and muted blue provide a convincing designer foundation. The decorative border can then introduce black, navy, camel, olive, or another color already present in the room.
How to Make No-Sew Curtain Panels
Step 1: Prepare the Fabric
Read the care label before doing anything involving water or heat. If the fabric is washable and you expect to wash the completed curtains, prewash and dry it first to reduce future shrinkage. If it is dry-clean-only, do not improvise a washing experiment because optimism is not a recognized fabric-care setting.
Press the material thoroughly. Work on a large, clean surface and align the selvage edges. Use a square and straightedge to ensure the top and bottom cuts are perpendicular to the sides. Accurate cutting is essential because a crooked panel remains crooked no matter how confidently it is hung.
Step 2: Form the Side Hems
Place the panel wrong side up. Fold each side edge inward by one-half inch and press. Fold it inward again by one inch to hide the raw edge. Slide fusible hem tape inside the second fold and bond it according to the manufacturer’s instructions.
Do not drag the iron back and forth as though ironing a shirt. Press one section at a time, lift the iron, and move to the next section. This reduces stretching and helps keep the hem straight.
Step 3: Create a Substantial Bottom Hem
A deep bottom hem helps the panel hang with more authority. Fold the bottom edge upward by one inch and press. Fold it again by three to four inches, checking the finished length at several points. Insert the adhesive tape near the upper edge of the fold and fuse it in place.
For many iron-on hem products, the manufacturer calls for a medium iron without steam, firm pressure, and several seconds of heat per section. Requirements vary, however, so the package instructions should outrank advice from the internet, your neighbor, and the tiny craft expert living inside your imagination.
Step 4: Make the Reinforced Top Header
Fold the top edge inward by one inch and press. Fold it again by three inches to create a sturdy header. Bond the fold with fusible tape along its lower edge.
Because curtain clips will grip this area, the header should feel crisp and stable. For lightweight fabric, place a strip of fusible interfacing inside the fold before sealing it. The added structure prevents the top edge from collapsing between the rings.
Step 5: Add the Decorative Leading-Edge Trim
Place the panels side by side with their right sides facing up. Identify the two inner edges that will meet when the curtains close. These are the leading edges.
Position the decorative tape approximately one to three inches from each leading edge. Measure its distance from the hem every twelve inches so the trim remains parallel from top to bottom. Mark the position lightly, then use narrow fusible tape to attach the decoration.
Work in short sections. Cover delicate trim with a press cloth and test the iron temperature first. Thick woven trim may need heavier adhesive or a longer pressing time, while synthetic ribbon can melt if overheated. A test scrap is significantly cheaper than discovering that your beautiful border has transformed into modern art.
Step 6: Add Optional Blackout Lining
Bedrooms, nurseries, media rooms, and street-facing windows may benefit from blackout or privacy lining. One approach is to cut the lining slightly narrower and shorter than the decorative panel, then bond it along the top and side edges. Leaving the bottom separate can help both layers hang more naturally.
A simpler option is to purchase clip-on curtain liners and hang them from the same rings behind the decorative fabric. Martha Stewart’s no-sew blackout guidance also demonstrates that by-the-yard blackout material can be joined and finished using iron-on adhesive rather than machine stitching.
Step 7: Attach Curtain Ring Clips
Lay the finished panel flat and mark evenly spaced clip positions across the header. A spacing of approximately five to seven inches works for many medium-width panels. Place the first and last clips near the outer edges, then distribute the remaining clips evenly.
For soft pleats, pinch a small fold at every marked position before attaching the clip. Make each fold face the same direction. Curtain clips allow the panels to glide more easily than many rod-pocket styles and offer a practical no-sew hanging method.
Step 8: Hang, Check, and Train the Folds
Hang the panels and inspect the hem from across the room. Floors and ceilings are not always perfectly level, particularly in older houses. Adjust individual clip positions to correct small differences before reaching for the scissors again.
Arrange the fabric into even vertical folds. Loosely tie strips of fabric around the panels in two or three places and leave them for a day or two. When the ties are removed, the curtains should retain cleaner folds and stack more neatly when opened.
Ways to Customize the Design
Create a Wider Border
For a bolder treatment, use a four- to six-inch strip of contrasting fabric instead of narrow trim. Fold the raw edges underneath and attach the strip with heavy-duty fusible web. This works especially well with ivory panels and navy, black, camel, or sage borders.
Use Ready-Made Panels as the Foundation
You can shorten the project by buying plain, extra-long curtains and customizing them with trim. Hem tape can correct the length, while curtain clips can replace an uninspiring rod-pocket presentation. Ready-made panels are particularly helpful when decorator fabric would require joining several widths.
Combine Shades and Curtains
Woven wood shades, bamboo shades, or simple Roman shades add texture and privacy behind the panels. The curtains frame the window while the shade handles everyday light control. This layered arrangement also makes decorative panels practical even when they are not wide enough to close completely.
Add Drapery Weights
Small drapery weights can be tucked into the lower corners before the final section of the hem is sealed. They help lightweight panels hang straighter and reduce movement near vents or frequently opened doors. Drapery weights are commonly recommended as an inexpensive way to improve the fall of budget curtains.
Common No-Sew Curtain Mistakes
Cutting Before Installing the Rod
The final curtain length depends on the rod, rings, clips, and desired floor clearance. Cutting fabric before establishing those measurements turns a straightforward project into textile gambling.
Using Too Little Fabric
Panels that barely span the window may provide privacy, but they will not create a full designer appearance. Calculate width using the rod measurement and desired fullness rather than purchasing two panels simply because curtains traditionally travel in pairs.
Using the Wrong Adhesive
Lightweight hem tape may fail under heavy fabric or thick trim. Conversely, an overly aggressive adhesive can make thin material stiff and visible from the front. Match the product to the fabric weight and test it first.
Skipping the Pressing Stage
Fusible tape cannot rescue a wrinkled, uneven fold. Press every hem before inserting adhesive. Well-pressed curtains also look noticeably more finished after installation.
Hanging the Rod Too Narrow
A short rod forces open panels to cover part of the glass, reducing natural light and making the window appear smaller. Extending the hardware outside the frame creates space for the stacked fabric and gives the treatment a more deliberate architectural presence.
Real-World Experience: What This Project Usually Teaches You
The first lesson from making no-sew curtain panels is that the “no-sew” portion is not necessarily the part that saves the most time. Measuring, pressing, aligning trim, and repeatedly stepping back to inspect the work require patience. The adhesive may bond in seconds, but the professional appearance comes from everything done before that moment.
Fabric selection has a larger effect on the result than most beginners expect. A medium-weight linen blend is often easier to handle than very thin cotton because it holds a crease without becoming stiff. It also disguises tiny inconsistencies in the hem. Lightweight fabric can be beautiful, but every uneven fold may become visible when sunlight shines through it. Heavy canvas feels substantial, yet it demands stronger tape and more effort from the iron.
Another common experience is discovering that walls, rods, windows, and floors are not as level as they appear. A panel may measure perfectly on the worktable and still seem longer on one side after installation. Before trimming anything, adjust the ring clips and verify the rod with a level. Moving one clip by half an inch can solve what initially looks like a serious cutting mistake.
Decorative trim is also less forgiving than plain hems. A border that drifts by even a small amount becomes surprisingly noticeable over a 96-inch panel. The easiest solution is to avoid bonding the entire strip at once. Secure the first few inches, check the alignment, and continue in short sections. Measuring from the side edge repeatedly may feel excessive, but it prevents the trim from slowly wandering toward another ZIP code.
Clip rings provide useful flexibility during installation. They allow small corrections to the finished length and make it possible to experiment with different pleat shapes. However, weak clips may slide off thick headers. Substantial metal rings with strong teeth generally perform better than lightweight decorative clips, especially when the curtains are lined.
The project also demonstrates why curtain fullness matters. Two flat panels may technically cover a window, yet they can look unfinished when closed. Adding another panel or using wider fabric often produces a bigger visual improvement than purchasing more expensive trim. Luxury is frequently a matter of generous proportion rather than a famous label.
Iron-on adhesive works best when heat, pressure, and time are applied consistently. Moving the iron constantly can create weak spots. Holding it still over each section, as directed by the product manufacturer, usually produces a cleaner bond. A press cloth is worth using, particularly with synthetic ribbon, dark fabric, or material that may develop shine.
Finally, the curtains may not look perfect immediately after hanging. Freshly folded fabric tends to flare outward, and packaged panels can retain stubborn horizontal creases. Pressing or steaming the completed treatment and training the folds for a day or two can dramatically improve the finished presentation. This final stage is easy to underestimate, but it is often the difference between “I made curtains” and “Where did you order those?”
Final Thoughts
No-sew curtain panels offer an accessible route to custom-looking window treatments without the cost or complexity of traditional drapery construction. The most important ingredients are accurate measurements, sufficient fullness, quality fabric, strong hardware, crisp pressing, and one restrained decorative detail.
Hang the panels high, let them reach the floor, and give them enough width to form relaxed folds. Add a contrasting leading-edge border, sturdy curtain rings, and optional lining, and the result can deliver much of the tailored Ballard-inspired character at a far friendlier price. Your sewing machine may feel left out, but it will recover.
Editorial note: This independent tutorial synthesizes established measuring, hanging, styling, adhesive, lining, and no-sew construction guidance from reputable U.S. home-improvement, design, craft, and decorating resources, including Ballard Designs, Home Depot, Lowe’s, Martha Stewart, HGTV, The Spruce, Apartment Therapy, This Old House, Better Homes & Gardens, Country Living, Family Handyman, JOANN, and HeatnBond/Therm O Web.
Note: Ballard Designs is referenced solely as design inspiration. This article is an independent DIY guide and is not sponsored by, endorsed by, or affiliated with Ballard Designs.