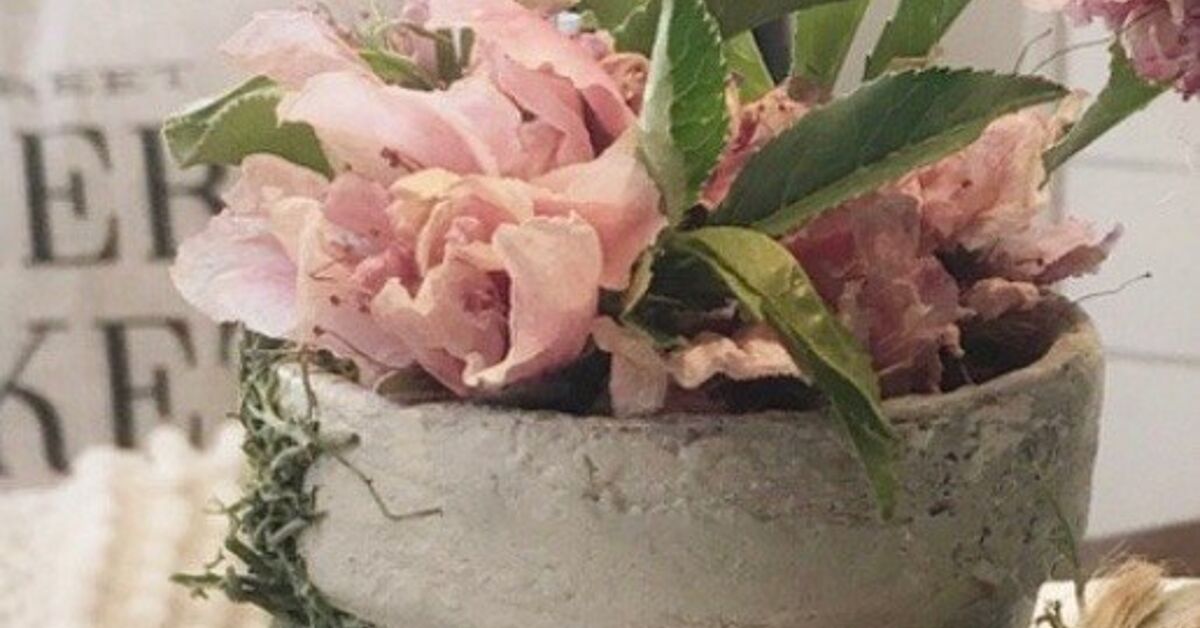
A joint compound flower pot makeover is the wonderfully sneaky DIY project that turns an ordinary planter into something resembling hand-carved limestone, aged plaster, or an expensive boutique pot with an unnecessarily dramatic price tag. The secret ingredient is drywall joint compoundthe same creamy material normally used to smooth seams and repair walls.
With a putty knife, an old brush, and a little artistic confidence, you can add realistic texture to terra-cotta, ceramic, concrete, or sturdy plastic planters. The project is inexpensive, beginner-friendly, and forgiving. In fact, small imperfections usually make the finished pot look more authentic. That is excellent news for anyone whose crafting style can best be described as “enthusiastic but loosely supervised.”
However, joint compound was primarily developed for finishing drywall, not for spending its retirement outdoors in thunderstorms. Proper surface preparation, thin applications, thorough drying, and a compatible protective sealer are essential. For the longest-lasting result, use the finished planter indoors, on a covered porch, or as a decorative cachepot holding a removable nursery pot.
Why Use Joint Compound on a Flower Pot?
Joint compound is popular for planter makeovers because it spreads easily and can be manipulated into many different finishes. You can smooth it like plaster, stipple it with a brush, scrape it into horizontal stone bands, or leave irregular ridges that imitate handmade pottery.
Compared with buying a new decorative planter, this makeover is budget-friendly. A plain flower pot, leftover joint compound, sample-size paint, and clear sealer may be all you need. It is also an effective way to reuse a scratched, faded, or mismatched planter instead of sending it to the trash.
Premixed all-purpose joint compound provides plenty of working time and is usually easiest for beginners. Setting-type powder compounds harden more quickly and generally offer lower shrinkage, but they require careful mixing and faster application. Whichever type you choose, follow the manufacturer’s instructions rather than improvising a mysterious countertop potion.
Drying time depends on product type, layer thickness, temperature, and humidity. Under moderate conditions, a drying-type joint compound may need approximately 24 hours, while cool or humid conditions can slow the process considerably.
Best Pots for a Joint Compound Makeover
Terra-Cotta Pots
Terra-cotta is an excellent starting surface because its slightly rough texture gives primer and decorative coatings something to grip. It is also inexpensive and widely available. The challenge is that unglazed clay is porous, so moisture can move through the pot wall. That movement benefits many plants but may eventually loosen an exterior decorative coating if the pot is not properly sealed.
Unglazed clay naturally absorbs and releases moisture, which is why terra-cotta containers often dry more quickly than plastic or glazed ceramic pots. Drainage holes should remain completely open throughout the makeover.
Glazed Ceramic Pots
Joint compound can be applied to glazed ceramic, but the glossy finish must be cleaned, lightly scuffed, and coated with a bonding primer. Without preparation, the texture may peel away in one dramatic sheet, which is satisfying only when removing old wallpaper.
Plastic or Resin Planters
Plastic pots are lightweight and inexpensive, but thin plastic flexes when moved. A rigid joint compound coating does not enjoy this behavior and may crack. Choose a thick, sturdy resin planter, scuff it thoroughly, use a primer labeled for plastic, and keep the texture relatively thin.
Concrete Planters
Concrete provides a stable base and works well when you want a heavier layered-stone appearance. Clean away dirt and loose material before priming. Because concrete can absorb moisture, sealing remains important even though the planter already looks tough enough to survive a minor medieval siege.
Tools and Materials
- A clean, structurally sound flower pot
- Premixed joint compound or an appropriate setting-type compound
- Flexible putty knife or small drywall knife
- Disposable bowl or mud pan
- Stiff paintbrush, chip brush, sponge, or palette knife
- 80- to 120-grit sandpaper for initial scuffing
- 150- to 220-grit sandpaper for smoothing the texture
- Bonding primer suitable for the planter material
- Acrylic craft paint or compatible interior/exterior paint
- Clear protective sealer compatible with the paint and intended location
- Gloves, safety glasses, and a well-fitting dust mask or respirator
- Drop cloth, cardboard, or protective paper
Drywall sanding creates fine dust that can irritate the eyes, nose, throat, and respiratory system. Work in a ventilated location, avoid aggressive dry sanding, wear suitable protection, and remove dust with a vacuum or damp cloth rather than blowing it into the room like an indoor weather event.
How to Complete a Joint Compound Flower Pot Makeover
Step 1: Clean the Pot Thoroughly
Remove the plant, soil, mineral deposits, labels, grease, and loose paint. Used terra-cotta pots can be scrubbed with warm water and a small amount of dish detergent. Stubborn mineral residue may require additional cleaning, but the pot must be rinsed and allowed to dry completely before coating.
Moisture trapped inside a porous pot can interfere with primer adhesion and later push against the decorative finish. A terra-cotta pot that feels cool or looks darker in patches probably needs more drying time. Cleaning recommendations for used clay pots commonly emphasize scrubbing, thorough rinsing, and complete drying before reuse or decoration.
Step 2: Scuff Glossy Surfaces
Lightly sand glazed ceramic, painted metal, resin, or plastic to reduce shine. You are not trying to carve your initials into the pot. The goal is to create a uniformly dull surface that helps the primer grip.
Remove all sanding residue with a vacuum and a barely damp cloth. Allow the planter to dry again before proceeding.
Step 3: Apply a Bonding Primer
Choose a primer specifically labeled for the planter’s material. Apply a thin, even coat to the exterior and any portion of the rim that will receive texture. Do not cover the drainage hole.
Primer improves adhesion, reduces uneven absorption, and helps separate the joint compound from moisture or contaminants in the original surface. Let the primer dry for the full period stated on its label. Painting guides also recommend cleaning away sanding dust before priming repaired or prepared surfaces.
Step 4: Plan the Texture
Before spreading compound over the entire pot, test your technique on cardboard or on a hidden area near the base. Decide whether you want a smooth plaster look, rough stone, horizontal ridges, stippling, or a heavily weathered finish.
A little planning prevents the common situation in which the front of the planter resembles elegant limestone while the back resembles mashed potatoes.
Step 5: Apply the First Thin Coat
Scoop a small amount of joint compound onto the putty knife and spread it over the pot in sections. Keep the first coat thingenerally around 1/16 to 1/8 inch. Thick applications dry slowly and are more likely to shrink, crack, or detach.
Hold the planter by the inside rim or set it upside down on a stable support. Work around the sides, leaving the bottom edge and drainage opening clean. Feather the edges of each section so they blend together.
Step 6: Create the Decorative Finish
For a limestone effect, smooth the compound with broad, irregular strokes. Flatten most ridges but leave subtle tool marks. For aged plaster, drag a stiff brush lightly through the wet surface and then soften selected areas with the putty knife.
To imitate travertine, press the tip of a brush or natural sponge into the compound to create shallow pits. Avoid deep holes that can trap water. Horizontal scraping creates the appearance of layered stone, while gentle vertical strokes make a tall pot look more sculptural.
Do not chase perfection. Real stone, plaster, and handmade ceramics contain variations. Perfectly identical marks can make the planter look manufactured rather than artisanal.
Step 7: Allow the Compound to Dry Completely
Set the planter in a dry, ventilated area away from rain, direct watering, and freezing temperatures. A fan may improve airflow, but avoid blasting dust or debris onto the wet surface.
The compound should feel uniformly hard and dry before sanding. Darker, cooler, or slightly soft areas are not ready. Waiting an additional day is less annoying than discovering that the center of the texture is still damp after you have painted it.
Step 8: Sand Selectively
Use 100- or 120-grit sandpaper to remove unwanted peaks, followed by approximately 150 grit for smoother transitions. Decorative texture does not need to become perfectly flat. Focus on sharp projections, crumbly edges, and obvious application lines.
Light sanding preserves character while making the planter pleasant to handle. Standard drywall-finishing guidance similarly recommends allowing compound to dry fully before sanding rough areas with medium grit and refining the surface with a finer grit.
Step 9: Add a Second Coat if Needed
A second thin application can fill bare areas, soften transitions, or add dimension. Spot-apply the compound rather than automatically covering the entire pot again. Let every new section dry completely and sand only where necessary.
Step 10: Paint the Planter
Begin with a solid base coat. Warm white, beige, greige, charcoal, muted olive, and clay colors work especially well with stone-like textures. Apply paint with a brush, pushing it into shallow crevices without flooding them.
After the base coat dries, create depth with one or more accent colors. A thin darker wash settles into low areas, while dry-brushing a lighter shade across raised texture makes the surface appear naturally worn.
Painted terra-cotta projects typically rely on clean, dry pots, multiple light coats, and adequate drying between applications. Clear protection is commonly recommended when greater durability is needed.
Step 11: Seal the Finish
Once the paint is fully dry, apply a compatible clear sealer in several light coats. Matte or satin finishes usually look more convincing than high gloss when imitating plaster, limestone, or concrete.
Follow the sealer label for surface compatibility, ventilation, application temperature, drying time, recoating, and final curing. Do not assume that a product is waterproof merely because it feels dry. Some patching products intended for moisture-exposed applications require both a waterproof primer and a waterproof topcoat before exposure.
If the planter will hold soil directly, moisture can still enter the coating system from inside the pot. The most durable arrangement is to place a plant in a separate nursery container inside the decorative pot. Remove the inner pot for watering, let it drain, and then return it to the makeover pot.
Color and Texture Ideas
Old-World Limestone
Use a creamy beige base, a diluted taupe wash, and a small amount of pale ivory dry-brushed over the highest areas. Add a few shallow pits before painting to imitate weathered stone.
Modern Concrete
Paint the planter medium gray, stipple on a second gray, and lightly dry-brush with a warmer pale gray. A dead-flat or matte sealer produces the most believable concrete effect.
Mediterranean Plaster
Choose warm white, muted sand, or sun-faded terracotta. Apply the color unevenly and expose tiny areas of the darker base coat for a naturally aged appearance.
Dark Charcoal Stone
Start with charcoal paint, add a black wash in deeper crevices, and brush a small amount of soft gray over raised areas. Pair the finished pot with bright green foliage for dramatic contrast.
Weathered Garden Patina
Layer dusty gray, mossy green, and muted brown in small amounts. Concentrate darker color near the base and under the rim, where natural aging might appear. Restraint is important; otherwise, the pot may look less “historic European garden” and more “forgotten behind a shed since 1987.”
Common Problems and How to Fix Them
The Joint Compound Cracked
The application may have been too thick, the substrate may have flexed, or the surface may have dried unevenly. Remove loose material, sand the area, prime exposed substrate, and repair it with a thinner layer.
The Texture Is Peeling Off
Peeling usually points to poor adhesion. Dirt, grease, glossy glaze, dust, or missing primer may be responsible. Scrape away everything loose and rebuild the finish over a properly cleaned and primed surface.
The Finish Becomes Soft After Watering
Water has probably entered through an unsealed area, the interior of a porous pot, or the drainage opening. Allow the planter to dry completely, remove damaged material, and reseal it. Consider switching to the cachepot method.
The Pot Looks Too Rough
Use a sanding sponge to soften the tallest ridges. You can also skim selected areas with a very thin coat of compound rather than sanding the entire surface flat.
The Paint Looks Flat and Lifeless
Add dimension with a translucent wash in the low areas and a lighter dry-brushed color on the raised texture. Two or three closely related shades generally look more realistic than one solid color.
A Practical Project Diary: Lessons From the Makeover Process
The first lesson this type of project teaches is that joint compound has a personality. It looks calm and cooperative in the container, but once applied to a curved flower pot, it develops opinions. The compound may gather under the rim, create a ridge where two sections meet, or follow the putty knife in a direction you did not request.
My most useful approach was to stop trying to complete the whole planter in one uninterrupted sweep. Working in sections made the pot easier to hold and allowed me to study the texture from different angles. I completed one side, rotated the pot, and blended the next section into the first while the material was still workable.
The first coat looked disappointing. It was patchy, slightly lumpy, and not remotely similar to the elegant stone planter I had imagined. This is a normal stage. Wet joint compound often looks heavier and less refined than it will after drying, sanding, painting, and highlighting.
Adding more compound was tempting, but restraint produced a better result. A thin base coat gave the later texture something to build on without adding unnecessary weight. Where I wanted deeper character, I added small patches during the second application instead of spreading another thick coat everywhere.
Drying required more patience than the actual application. The outside felt firm long before several thicker ridges were ready. Sanding too early caused one area to drag and crumble rather than produce clean dust. That mistake was easy to repair, but it confirmed that drying time is not the stage for creative interpretation.
A flexible sanding sponge proved more useful than a rigid sanding block because it followed the curved shape of the planter. I sanded only the sharpest points and obvious seams. Leaving most of the irregularity intact created the stone-like appearance; removing every mark would have returned the pot to an ordinary smooth cylinder wearing an unusually complicated coat.
Painting was the moment when the makeover finally made sense. A single beige coat looked pleasant but plain. A watery taupe wash immediately emphasized the pits and tool marks. After it dried, a nearly dry brush loaded with pale cream caught the raised areas and made the texture appear much deeper.
The biggest visual improvement came from using very little paint during the dry-brushing stage. When the brush seemed almost empty, it was ready. A heavily loaded brush covered the shadows and flattened the effect, while a nearly dry brush highlighted only the highest points.
Sealing changed the color slightly, making the layers appear richer and more unified. Testing the sealer on the bottom first would have been wise because clear finishes can deepen colors or alter sheen. Multiple light coats looked more natural than one heavy application and reduced the risk of drips collecting beneath the rim.
The finished planter looked most convincing when grouped with natural materials such as wood, linen, woven baskets, and real stone. It also looked considerably more expensive than its ingredients. The project was not flawless, but the irregularities became part of the design rather than evidence for the prosecution.
Most importantly, I learned to treat the pot as decorative art rather than indestructible masonry. Using a removable nursery pot made watering easier and kept moisture away from the joint compound. The makeover can last much longer when it is protected from standing water, hard freezes, and prolonged exposure to rain.
Conclusion
A joint compound flower pot makeover is an affordable way to transform a basic planter into textured decor with the appearance of plaster, limestone, concrete, or aged pottery. Success depends less on artistic perfection and more on preparation: clean the pot, scuff glossy surfaces, use the correct primer, apply thin coats, allow complete drying, and protect the finish with a compatible sealer.
For indoor rooms and covered outdoor areas, this technique offers enormous creative freedom. For exposed patios or gardens, manage expectations and moisture carefully. A decorative cachepot setup is generally the safest choice because it allows the plant to drain normally without repeatedly soaking the textured exterior.
The best part is that every finished pot will look slightly different. Tool marks, rough edges, soft color variations, and tiny imperfections give the makeover its handmade appeal. In other words, the project rewards creativity, patience, and the ability to look at a slightly crooked ridge and confidently call it “authentic Old-World texture.”
Note: Joint compound is a decorative surfacing material rather than a complete waterproofing system. Product formulas vary, so follow the instructions and safety information on the joint compound, primer, paint, and sealer labels. Keep drainage holes open, avoid coating unstable or flexible pots, and protect the finished planter from prolonged moisture and freezing conditions.