Ripping multiple episodes from a DVD sounds like one of those jobs that should take five minutes, right up until the disc menu starts acting like a tiny maze designed by a sleep-deprived raccoon. One episode is Title 2, another is Title 5, the bonus trailer is somehow Title 8, and the “Play All” option may be hiding under a title that lasts three hours. Fortunately, VLC Media Player can help you convert DVD titles into separate video files when you are working with unprotected, public-domain, home-recorded, or otherwise authorized DVDs.
This guide explains how to use VLC to rip multiple episodes from a DVD, identify the correct titles, choose export settings, name files neatly, and avoid the most common mistakes. The goal is simple: turn a multi-episode DVD into organized MP4 files such as ShowName_S01E01.mp4, ShowName_S01E02.mp4, and so onwithout losing your afternoon to random buttons and mystery filenames.
Important legal note: Do not use this guide to bypass copy protection or rip DVDs you do not have permission to copy. Laws vary by location, and commercial DVDs may include encryption or access controls. VLC may convert accessible DVD content, but this article does not provide instructions for defeating DRM.
What You Need Before You Start
Before opening VLC, gather the basics. You need a computer with a DVD drive, the latest stable version of VLC Media Player, enough free storage space, and a DVD you are allowed to copy. A single 22-minute episode converted to MP4 may be a few hundred megabytes depending on quality settings, while a full season disc can take several gigabytes.
You should also create a dedicated folder before converting anything. For example, make a folder named DVD_Rips_ShowName. Inside it, you can later create subfolders such as Season 1 or Disc 1. This tiny bit of preparation saves you from the classic “Where did VLC put my file?” treasure hunt.
How DVDs Store Multiple Episodes
DVDs are usually organized into titles and chapters. A title is often a major video item, such as an episode, feature, trailer, or “Play All” sequence. Chapters are smaller divisions inside a title, commonly used for scene selection.
For TV DVDs, each episode is often stored as a separate title. For example, Episode 1 may be Title 1, Episode 2 may be Title 2, and Episode 3 may be Title 3. However, not every disc is that polite. Some discs place all episodes inside one long title, separated by chapters. Others include duplicate-looking titles for menus, previews, commentary tracks, or bonus material.
That is why the most important step is not clicking “Convert.” The most important step is figuring out which title corresponds to which episode. Think of it as labeling leftovers before putting them in the fridge. Future you will be grateful.
Step 1: Open the DVD in VLC and Identify Episode Titles
Insert the DVD and open VLC. On Windows, click Media, then Open Disc. On macOS, use File, then Open Disc. Make sure the disc device points to your DVD drive.
Start playback and use the top menu to explore the DVD. In VLC, you can usually check different titles through Playback > Title. When you select a title, VLC begins playing that title. Watch the first 20 to 30 seconds and note what episode it appears to be. Then check the running time. A standard sitcom episode might be around 21 to 24 minutes, while a drama may be around 42 to 48 minutes.
Create a simple title map like this:
| DVD Title | Likely Episode | Approximate Length | Notes |
|---|---|---|---|
| Title 1 | Episode 1 | 23 minutes | Main audio |
| Title 2 | Episode 2 | 22 minutes | Main audio |
| Title 3 | Episode 3 | 23 minutes | Main audio |
| Title 7 | Bonus feature | 5 minutes | Skip unless needed |
If all episodes appear inside one long title, check Playback > Chapter. You may need to split by chapter ranges instead of title numbers. VLC’s graphical interface is better for one title at a time than for advanced batch splitting, so chapter-based discs may require more patience.
Step 2: Use Convert/Save for the First Episode
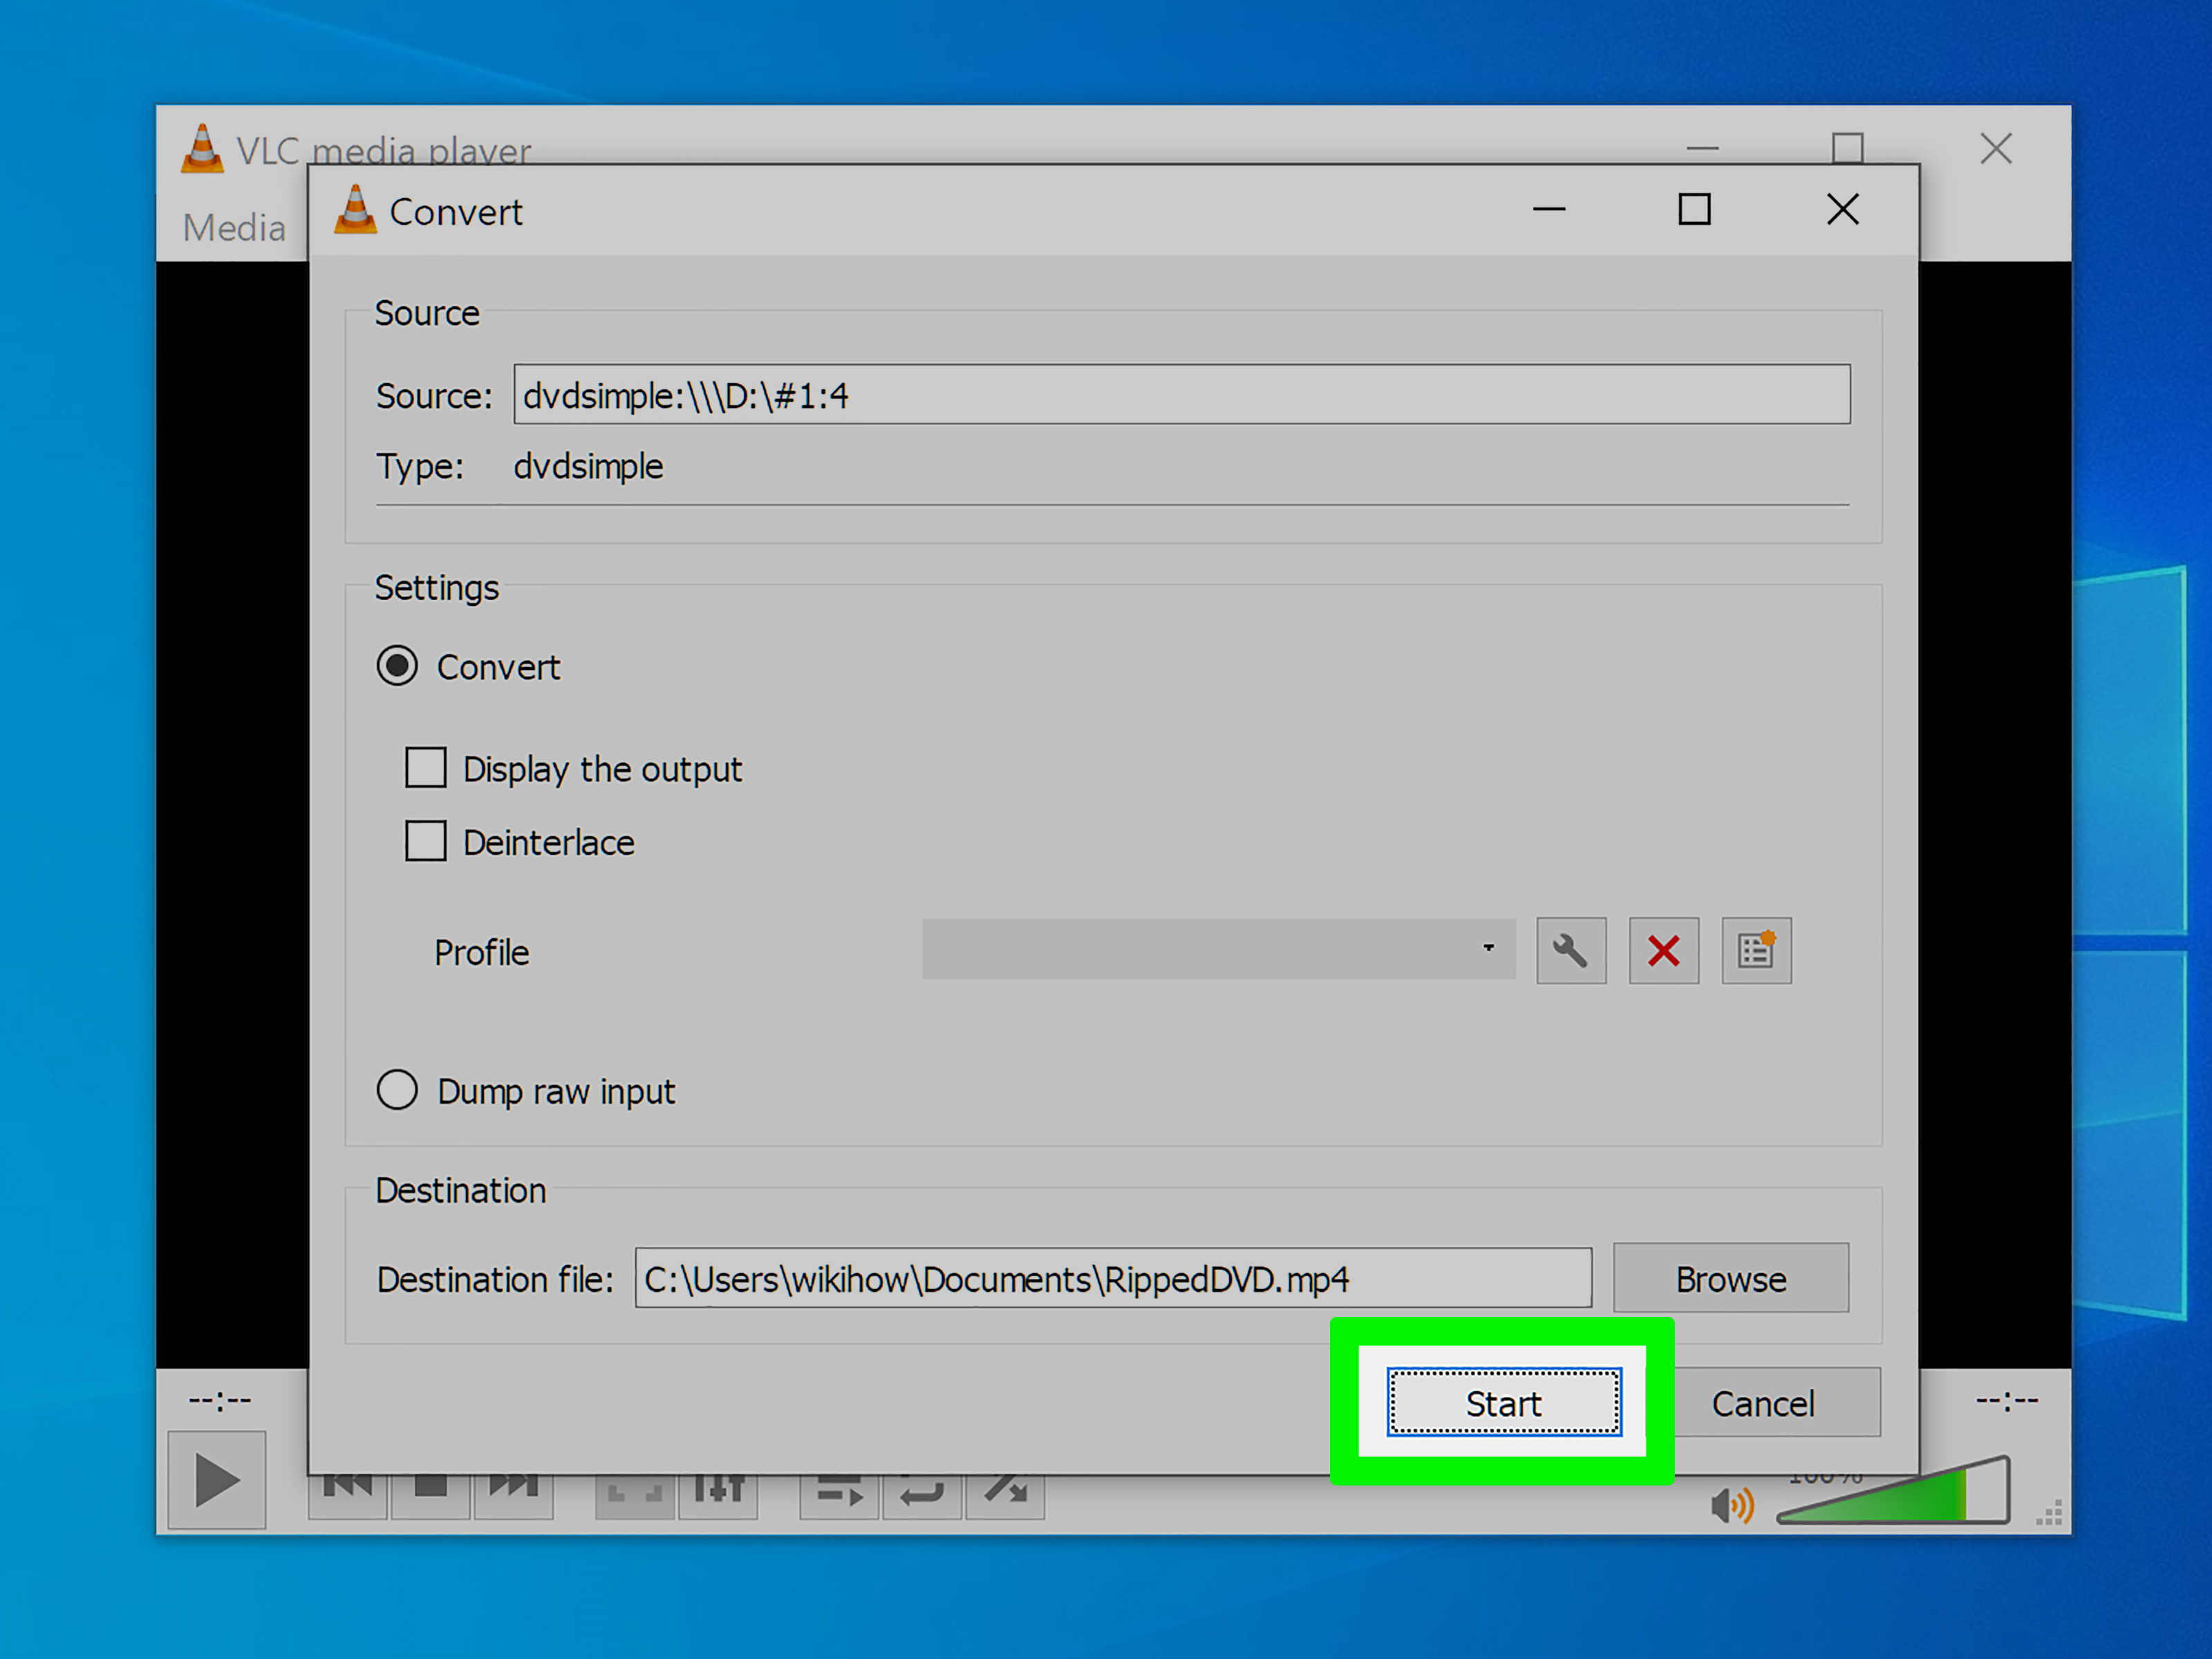
Once you know the title number for the first episode, go to Media > Convert/Save. Click the Disc tab. Select DVD, confirm the disc device, and look for the title and chapter fields. Enter the title number for the episode you want to convert. If the episode starts at the first chapter, leave the chapter field at the beginning unless your disc map shows otherwise.
Click Convert/Save. In the next window, choose a profile. For broad compatibility, Video – H.264 + MP3 (MP4) is a practical starting point. It creates an MP4 file that works on many computers, phones, tablets, smart TVs, and media servers.
Under Destination, click Browse. Choose your folder and name the file clearly. Use a consistent pattern such as:
Make sure the filename ends in .mp4. Forgetting the file extension is a small mistake that can create a surprisingly annoying playback problem. Finally, click Start. VLC will begin converting the selected DVD title into a video file.
Step 3: Repeat the Process for Each Episode
VLC does not provide a perfect one-click “rip every episode into separate files” button in the normal graphical interface. The reliable beginner-friendly method is to repeat the Convert/Save process for each episode title.
For example, if your title map shows four episodes, you would export them like this:
- Convert Title 1 as ShowName_S01E01.mp4.
- Convert Title 2 as ShowName_S01E02.mp4.
- Convert Title 3 as ShowName_S01E03.mp4.
- Convert Title 4 as ShowName_S01E04.mp4.
Yes, it is repetitive. No, it is not glamorous. But it is dependable, and dependable beats “I accidentally encoded the DVD menu twelve times” every day of the week.
Best VLC Settings for DVD Episodes
Use MP4 for Compatibility
MP4 with H.264 video is usually the safest choice if you want the files to play almost anywhere. It balances quality, file size, and device support. If you plan to edit the files later, you may prefer a less compressed format, but for everyday viewing, MP4 is the practical winner.
Keep the Original Frame Rate When Possible
DVDs may use different frame rates depending on the region and source. If you are not sure what to choose, avoid forcing unusual frame-rate changes. Unnecessary conversion can create choppy movement or audio sync issues.
Use Deinterlacing for Older TV Content
Many DVDs, especially older TV shows, may be interlaced. Interlacing can create horizontal “comb” lines during motion. If you notice jagged motion after conversion, enable deinterlacing in the profile settings. This can make old footage look smoother on modern screens.
Do a Short Test First
Before ripping every episode, convert one short title or one episode and inspect the result. Check the video, audio, subtitles, aspect ratio, and ending. A five-minute test can save you from discovering two hours later that every file has the wrong audio track.
How to Handle Subtitles and Audio Tracks
DVDs may include multiple audio tracks, such as stereo, surround sound, commentary, or foreign-language dubs. They may also include subtitle tracks. VLC’s conversion results can vary depending on the disc structure and selected profile, so always test the first episode before processing the whole disc.
If you need a specific audio track, play the episode first and choose the correct audio from Audio > Audio Track. Then check your conversion options. If the exported file contains commentary instead of the main episode audio, do not panic. That is not the universe judging you; it is just a track-selection issue. Go back, choose the correct track, and test again.
For subtitles, decide whether you want them burned into the video or kept separate. Burning subtitles makes them permanently visible. Separate subtitle tracks are more flexible, but VLC’s basic DVD conversion workflow may not preserve every subtitle option perfectly. If subtitles are essential, test carefully before committing to a full batch.
How Long Does DVD Ripping with VLC Take?
VLC conversion can happen close to real time, depending on your computer, drive speed, disc condition, and encoding settings. A 23-minute episode may take roughly 23 minutes, sometimes less on a faster machine and sometimes more if the DVD is scratched or your settings are demanding.
Do not run five heavy apps, a game, and thirty browser tabs while converting. Technically, your computer may survive. Emotionally, it may not. For smoother results, close unnecessary programs, plug in your laptop, and avoid moving an external DVD drive during the process.
Common Problems and Fixes
VLC Rips the Wrong Episode
This usually means the wrong title was selected. Return to playback mode and check Playback > Title. Compare the running time and opening scene with your title map.
The Output File Has No Extension
Rename the file and add .mp4 if you selected an MP4 profile. Better yet, include the extension when choosing the destination filename inside VLC.
The Audio Is Out of Sync
Try a different profile, avoid unnecessary frame-rate changes, and test with deinterlacing enabled or disabled. Scratched discs can also cause sync problems, so clean the disc gently and try again.
The Video Looks Stretched
The aspect ratio may not have been interpreted correctly. Try another conversion profile or adjust video settings. DVDs can store widescreen footage in ways that rely on playback flags, and conversion sometimes mishandles those flags.
VLC Cannot Read the DVD
The disc may be damaged, unsupported, or protected. This guide does not cover bypassing encryption or access controls. Use only discs you are legally allowed to copy and that VLC can access normally.
Optional: Using VLC Command Line for Repeated Jobs
Advanced users may prefer VLC’s command-line tools for repetitive conversions. Command-line workflows can be helpful when you already know the title numbers and want to create a repeatable process. However, command-line syntax can vary by operating system, VLC version, disc path, and output settings.
A general workflow looks like this: identify the title, choose a destination file, specify a transcode profile, and tell VLC to quit when finished. This is powerful, but it is also less forgiving than the graphical interface. If you are not comfortable with Terminal or Command Prompt, use the manual Convert/Save method first.
For most people converting a few episodes, the graphical method is easier and safer. For a large personal archive of authorized discs, command-line conversion may be worth learning after you understand how VLC sees your DVD titles.
File Naming Tips for Multiple Episodes
A good naming system matters more than you think. Media apps, smart TVs, and home servers often sort files alphabetically. If you name files casually, Episode 10 may appear before Episode 2, and suddenly your season order looks like it was arranged by a mischievous librarian.
Use two-digit episode numbers:
If you know the episode titles, add them after the episode number:
Avoid special characters that may confuse devices, such as slashes, question marks, or quotation marks. Keep names clean, readable, and consistent.
Quality vs. File Size: Finding the Sweet Spot
DVD video is standard definition, so there is no magic setting that turns it into true 4K. Upscaling a DVD rip may create a larger file without adding real detail. In many cases, a clean H.264 MP4 at the original resolution looks perfectly fine for casual viewing.
If your files are too large, lower the video bitrate slightly. If they look blocky, raise the bitrate or choose a higher-quality profile. The best setting depends on the content. Cartoons, dark scenes, and fast action can need more bitrate than a brightly lit talk show.
Always compare a test export to the original DVD playback. The best conversion is the one that looks good to your eyes, plays on your devices, and does not devour your hard drive like a hungry digital raccoon.
Extra Experience: Practical Lessons from Ripping Multiple Episodes with VLC
The first real lesson is that DVD ripping is mostly a patience game. The software matters, but the disc structure matters more. Two DVDs from the same TV series can behave differently. One disc may list episodes neatly as Titles 1 through 4. Another may hide them under Titles 3, 5, 7, and 9, with short menu clips scattered between them. That is why experienced users always preview titles before converting. Guessing is faster for about thirty seconds, then slower for the rest of the evening.
The second lesson is to test one episode before building a full workflow. A test file tells you whether the audio is correct, whether the image is stretched, whether subtitles appear as expected, and whether the file plays on your target device. This is especially important if you plan to watch the episodes on a smart TV, media server, tablet, or phone. A file that plays beautifully on your computer may not behave the same way everywhere.
The third lesson is to keep notes. A simple text file named disc-log.txt can save serious time. Write down the disc name, title numbers, episode names, conversion profile, and any issues. For example: “Disc 2: Title 1 is E05, Title 2 is E06, Title 4 is bonus interview, use deinterlace.” That tiny note becomes priceless if you need to redo an episode later.
The fourth lesson is to avoid multitasking during conversion. DVD drives are mechanical, and external drives can be touchy. If the disc is spinning, let it work. Do not bump the desk, unplug the drive, or decide that this is the perfect moment to reorganize cables. VLC can only convert the data it can read cleanly.
The fifth lesson is that “Play All” titles can be both useful and annoying. Sometimes the Play All title is perfect if you want one long file. But if your goal is separate episode files, it can create extra work because you will later need to split the file. Separate title exports are usually cleaner when the DVD structure allows them.
The sixth lesson is to check the ending of each file. Do not only watch the opening. Some incorrect titles start with the right episode but end early, include a menu transition, or roll into the next episode. Scrub near the end of the exported file and confirm that it ends naturally.
The final lesson is to respect the limits of VLC. VLC is excellent, free, flexible, and surprisingly powerful, but it is not a full professional DVD authoring or archival suite. For simple authorized DVD conversions, it can do the job well. For complex discs, unusual subtitles, damaged media, or precise archival requirements, you may need specialized legal tools or professional services. Start with VLC, stay organized, and let the humble orange traffic cone do what it does best.
Conclusion
Learning how to use VLC to rip multiple episodes from a DVD is mainly about understanding titles, choosing sensible MP4 settings, and staying organized. The process is not fully automatic in VLC’s standard interface, but it is straightforward once you map the DVD structure. Identify each episode title, convert one episode at a time, name files consistently, and test before processing the entire disc.
Used responsibly with unprotected or authorized DVDs, VLC can help preserve home videos, public-domain collections, training discs, school recordings, and other content you have permission to copy. The workflow may not be flashy, but it is practicaland sometimes practical is exactly what you need when a DVD menu is giving you attitude.