If your garden has ever looked at night and whispered, “I could use a little fairy-tale nonsense,” this project is for you. Mushroom solar lights made from dollar store bowls are charming, budget-friendly, and surprisingly easy to build. With a few plastic or glass bowls, basic solar pathway lights, outdoor adhesive, spray paint, and a tiny bit of patience, you can turn ordinary discount-store finds into glowing mushroom garden decor that looks custom-made.
The best part? This DIY mushroom solar lights project does not require wiring, electrical skills, or a garage full of mysterious tools. You are not building a spaceship. You are basically giving a solar stake light a cute mushroom hat and letting the sun do the hard work. These lights are perfect for flower beds, walkways, patios, fairy gardens, container gardens, and any outdoor corner that needs a little personality after dark.
Why Dollar Store Bowls Work So Well for Mushroom Solar Lights
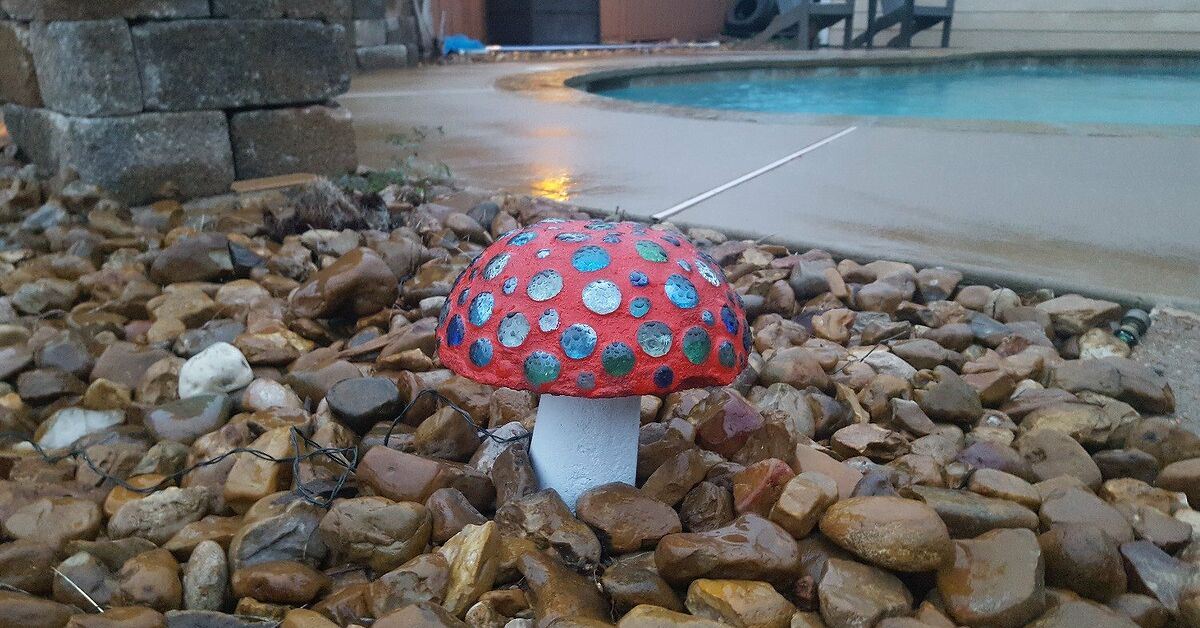
Dollar store bowls are ideal for DIY mushroom solar lights because they already have the rounded dome shape of a mushroom cap. Clear plastic bowls, frosted bowls, colorful party bowls, and small glass bowls can all work, depending on the style you want. A red bowl with white painted dots gives you a classic storybook toadstool. A clear bowl with translucent spray paint creates a soft lantern effect. A white bowl can look modern and minimal, especially in a clean garden bed with gravel, hostas, or ornamental grasses.
The trick is choosing bowls that are lightweight enough to sit securely on a solar light but sturdy enough to handle outdoor conditions. Plastic bowls are easier to drill, cut, and glue, while glass bowls often create a prettier glow. If you choose glass, handle it carefully and avoid placing it where kids, pets, or lawn equipment might knock it over. For most beginners, plastic bowls are the easiest and safest choice.
Materials You Need
Before you begin, gather everything in one place. Nothing ruins a fun craft session faster than realizing your glue is missing, your spray paint nozzle is clogged, or your solar light is still in the shopping bag in the car.
Basic Supplies
- Small dollar store bowls for mushroom caps
- Solar pathway lights or solar stake lights
- Clear plastic cups, slim vases, or light shades for stems, if desired
- Outdoor-rated adhesive such as E6000, clear Gorilla glue, or another waterproof craft adhesive
- Spray paint made for plastic or outdoor use
- White acrylic paint or paint markers for spots
- Clear outdoor sealer
- Painter’s tape
- Fine-grit sandpaper
- Rubbing alcohol or mild soap and water for cleaning
- Small paintbrush or sponge brush
- Disposable gloves
- Drop cloth, cardboard, or newspaper for painting
- Small rocks, gravel, or glass gems for extra weight
Optional Tools
- Drill with a hole saw attachment
- Craft knife
- Scissors for thin plastic bowls
- Clamps, rubber bands, or painter’s tape for holding glued pieces together
You can make a very simple version with only a bowl, a solar light, glue, and paint. However, adding a clear cup or vase as the mushroom stem can make the light glow more evenly. A weighted stem also helps keep your mushroom from taking a dramatic midnight tumble during windy weather.
Choosing the Best Bowls for the Mushroom Cap
Look for bowls with a rounded bottom and a smooth rim. A shallow cereal bowl often creates a wide mushroom cap, while a deeper bowl creates a taller, cartoon-style mushroom. If you want a cluster of mushrooms, buy bowls in two or three sizes so the finished display looks more natural. Real mushrooms do not usually line up like soldiers, and your garden mushrooms do not have to either.
Clear bowls are great because light passes through them easily. Frosted bowls soften the glow and hide glue marks better. Colored bowls can save you a painting step, but make sure the solar light still shines through. Very dark plastic may look great during the day but glow like a sleepy firefly at night.
Choosing the Right Solar Lights
Solar pathway lights are the heart of this project. Most basic garden solar lights include a small solar panel, rechargeable battery, LED bulb, top housing, pole, and ground stake. For mushroom solar lights DIY projects, choose lights with a removable top and a simple shape. Avoid complex lights with wide decorative cages unless you plan to redesign the entire piece.
Before you glue anything, test every solar light. Remove any battery pull tab, switch the light on, and place it in direct sunlight for a full day. Then check it after dark. This step sounds boring, but it prevents heartbreak. Nobody wants to build a beautiful mushroom only to discover the light inside has the energy level of a tired potato.
Step-by-Step: How to Make Dollar Store Bowl Mushroom Solar Lights
Step 1: Clean and Dry Every Surface
Wash the bowls, cups, vases, and solar light parts with mild soap and water. Dry everything completely. If the plastic feels slick, wipe the areas you plan to paint or glue with rubbing alcohol. Clean surfaces help paint stick better and give adhesive a stronger bond. Dust, fingerprints, grease, and price-tag residue are small things that can cause big peeling problems later.
Step 2: Lightly Sand Glossy Plastic
If your bowls are very smooth or shiny, lightly sand the outside with fine-grit sandpaper. You are not trying to destroy the bowl; you are just giving the paint and glue something to grip. After sanding, wipe away the dust. This step is especially important if your mushroom lights will live outdoors in sun, rain, wind, and sprinkler mist.
Step 3: Plan the Solar Panel Opening
The solar panel must receive sunlight, so do not cover it with paint or glue. For many designs, the solar light sits underneath the bowl and shines upward, while the solar panel remains exposed on top or slightly above the cap. In another common version, you cut or drill an opening in the center of the bowl so the solar light top can fit through it.
Place the solar light against the bowl and mark where the opening should go. If using thin plastic, you may be able to cut the hole carefully with a craft knife. If using thicker plastic, a drill with a hole saw can make a cleaner opening. Work slowly and support the bowl so it does not crack. For glass bowls, do not drill unless you have the correct glass-cutting tools and experience. It is usually better to design the light so the glass bowl rests over or around the solar light instead.
Step 4: Paint the Mushroom Cap
Set up your painting area outdoors or in a very well-ventilated space. Place the bowls upside down on cardboard or a drop cloth. Apply thin, even coats of spray paint rather than one heavy coat. Heavy paint can drip, bubble, or stay tacky longer than expected. Red is classic, but you can also try coral, terracotta, yellow, teal, white, or even copper for a more grown-up garden look.
Let each coat dry according to the paint label. If the bowl is clear and you want the light to glow through, consider using translucent or stained-glass-style paint. Opaque paint gives a stronger daytime color but may reduce the nighttime glow. A good compromise is to paint the outside lightly and leave the underside clear or lightly frosted.
Step 5: Add Mushroom Spots
Once the base color is dry, add white dots with acrylic paint, a paint marker, or a small round sponge. Vary the dot sizes for a more natural, playful look. Place a few larger spots near the top and smaller spots near the edges. If you want a whimsical fairy-garden style, make the dots bold and bright. If you prefer a subtle design, use cream, pale beige, or soft gray instead of pure white.
Let the spots dry fully. Do not rush this step. Wet dots can smear when you apply sealer, turning your adorable mushroom into something that looks like it lost a fight with a marshmallow.
Step 6: Seal the Paint
Apply a clear outdoor sealer to protect the painted bowl from moisture and UV exposure. Use light coats and allow proper drying time. Sealer will not make the project immortal, but it helps the finish last longer. Outdoor crafts deal with sunlight, rain, dust, humidity, and temperature changes, so protection matters.
Step 7: Build the Stem
You have several options for the mushroom stem. The simplest method is to use the original solar light stake as the stem. Paint it white or leave it black, depending on your style. Another option is to glue a clear plastic cup, slim glass vase, or acrylic tumbler under the mushroom cap. This creates a thicker stem and allows the LED light to glow through the body of the mushroom.
If using a cup or vase, add small rocks, gravel, or glass gems inside the bottom for weight. This keeps the mushroom steadier outdoors. Clear glass gems are especially pretty because they catch and scatter the light. Just do not block the LED completely.
Step 8: Glue the Pieces Together
Dry-fit everything first. Make sure the solar light still turns on, the panel is exposed, and the cap sits straight. Once you like the arrangement, apply outdoor-rated adhesive where the bowl, stem, and light housing meet. Use enough glue to create a secure bond, but not so much that it oozes everywhere. More glue is not always more strength; sometimes it is just more mess wearing a cape.
Use painter’s tape, rubber bands, or light clamping pressure to hold the pieces in place while the adhesive cures. Follow the adhesive label for drying and curing time. Many strong craft glues need several hours to set and up to 24 hours or more to fully cure. Keep the project indoors or in a protected area while it dries.
Step 9: Charge the Lights Before Displaying
Place the finished mushroom solar lights in direct sunlight before expecting a strong glow. Solar lights perform best when their panels receive several hours of unobstructed sun. If the lights seem dim, move them to a sunnier location, clean the panel, or check the battery compartment. Shade from trees, fences, porch rails, or even the mushroom cap itself can reduce charging.
Step 10: Arrange Them in the Garden
Mushroom solar lights look best in groups. Try placing three mushrooms of different heights near a walkway, under a shrub, beside a birdbath, or around a container garden. For a woodland look, tuck them among ferns, hostas, mulch, and stones. For a colorful cottage garden, place them near zinnias, marigolds, salvia, or lavender. A single mushroom is cute; a little glowing mushroom village is where the magic starts.
Design Ideas for Different Garden Styles
Classic Red Toadstools
Use red bowls, white dots, and white stems for the traditional fairy-tale mushroom look. These are perfect for kids’ gardens, whimsical paths, and playful backyard corners.
Modern White Mushroom Lights
Paint the caps warm white or matte ivory and skip the dots. Pair them with clean gravel, ornamental grasses, and simple planters for a modern outdoor lighting effect.
Glow-in-the-Dark Accent Mushrooms
Add glow paint to the dots or rim of the cap. This gives the mushrooms a little extra sparkle before the solar light fully turns on.
Colorful Fairy Garden Mushrooms
Try pink, turquoise, purple, or yellow caps. These work well in container fairy gardens, balcony planters, and small patio displays.
Glass Garden Mushrooms
Use thrifted glass bowls or textured dollar store glassware for a more elegant version. Glass reflects light beautifully, but it is heavier and more fragile, so place it carefully.
Safety Tips for This DIY Solar Light Project
Use only battery-powered solar garden lights for this craft. Do not modify plug-in outdoor lighting unless you are qualified to work with electrical components. Keep the solar panel exposed, avoid covering vents or battery compartments with glue, and never submerge the finished lights in water.
When spray painting, work outdoors or in a well-ventilated area and wear gloves. Follow the paint and adhesive labels for temperature, drying time, and surface compatibility. If you use glass, protect your hands and eyes, especially if there is any cutting or drilling involved. For households with young children or pets, plastic bowls are usually the smarter choice.
Common Mistakes to Avoid
Covering the Solar Panel
The solar panel needs sun. If you paint over it, hide it under the cap, or place it in deep shade, the light will not charge well.
Using Indoor Glue
Basic school glue and many hot glues are not designed for outdoor moisture and heat. Choose a strong, outdoor-friendly adhesive for a longer-lasting project.
Skipping Surface Prep
Paint and glue stick better to clean, dry, slightly rough surfaces. Skipping prep can lead to peeling paint and loose caps.
Making the Mushroom Too Top-Heavy
A large bowl on a tiny stake may wobble. Add weight to the stem or choose a wider base if your mushroom cap is large.
Expecting Solar Lights to Shine Bright in Shade
Solar lights need direct sun to perform their best. If your mushroom lights are dim, placement is often the problem.
How to Maintain Mushroom Solar Lights
Clean the solar panels every few weeks with a soft damp cloth. Dust, pollen, bird droppings, and sprinkler residue can reduce charging. Check the glued joints after storms or very hot weather. If the paint begins to fade, clean the cap and add another coat of outdoor sealer or paint.
In areas with harsh winters, bring the lights indoors or store them in a shed during freezing weather. Solar batteries can wear out over time, but many inexpensive lights allow battery replacement. If one mushroom stops glowing, check the battery before blaming your crafting skills.
Budget Breakdown
This dollar store mushroom solar lights DIY can be very affordable. A basic version may cost only a few dollars per mushroom if you already have paint and glue. Buying new spray paint, sealer, and adhesive increases the first-project cost, but those supplies can be used for several mushrooms. Making a full cluster is usually more cost-effective than making just one.
For example, you might buy six bowls, six solar lights, one tube of outdoor adhesive, one can of red spray paint, one white paint marker, and one clear sealer. That is enough to create a cheerful mushroom patch for a walkway or flower bed without spending boutique garden-decor money. Your wallet remains calm, and your garden gets to act fancy.
Creative Placement Ideas
Place mushroom solar lights beside stepping stones to guide guests along a path. Add them around a raised garden bed to create a soft border. Tuck them under leafy plants for a hidden glow. Use them near a patio seating area as conversation pieces. You can even place a few in large planters on a balcony if you do not have a yard.
For the best visual effect, avoid spacing them too evenly. A natural cluster with varied heights looks more charming. Put one taller mushroom in the back, two medium mushrooms nearby, and one tiny mushroom in front. Add mossy stones, bark, or small garden figurines if you want the display to feel like a miniature enchanted forest.
Experience Notes: What You Learn After Making a Few Mushroom Solar Lights
After making several dollar store bowl mushroom solar lights, one thing becomes clear: the project is simple, but the small details make the finished lights look polished instead of homemade in the “I found this in the junk drawer” way. The first lesson is to test the solar lights before building around them. It is tempting to rip open the package, glue everything together, and admire your future glowing mushroom kingdom. But not every inexpensive solar light performs the same. Some are brighter, some have warmer light, and some need a little switch flipped before they work. Testing them first saves time and frustration.
The second lesson is that paint choice matters. Regular craft paint can work for small details, but the cap needs paint that can handle outdoor life. Plastic bowls are smooth, and smooth plastic can be stubborn. Cleaning, sanding, and using spray paint designed for plastic makes a noticeable difference. Thin coats look better than thick coats. If you rush and blast the bowl with paint like you are frosting a cake, you will probably get drips. Patience creates a smoother finish.
Another useful experience is to keep the mushroom cap slightly larger than the stem, but not wildly oversized. Oversized caps look adorable on the craft table, then start leaning outdoors like they had a long day. If you want a big mushroom, use a wider stem, add weight inside the base, or place the stake deeper into the soil. Small rocks inside a clear vase or cup work well because they add stability and still look decorative.
Glue also deserves respect. Outdoor adhesive usually needs curing time, and moving the project too soon can weaken the bond. Let the mushroom sit overnight or longer before putting it outside. Painter’s tape is surprisingly helpful for holding pieces in place while they dry. It is not glamorous, but neither is chasing a rolling mushroom cap across the driveway.
Placement is the final secret. A mushroom solar light that looks dim may not be poorly made; it may simply be sitting where it cannot charge. Place the solar panel where it gets strong sunlight for much of the day. If your garden is shady, try putting the mushrooms near the front edge of the bed, along a sunny path, or in containers that can be moved. Also, clean the solar panels now and then. A dusty panel can make even a good light look weak.
The most enjoyable part of this project is how customizable it becomes. Once you make one red-and-white mushroom, you may start seeing potential mushroom caps everywhere: bowls, lamp shades, plastic party dishes, thrifted glassware, and even old light covers. That is the official warning. This project may cause you to wander through dollar stores saying, “That could be a mushroom,” which is not a medical condition, but it is definitely a lifestyle.
Conclusion
Learning how to use dollar store bowls to make mushroom solar lights DIY is a fun way to add personality, color, and soft nighttime glow to your outdoor space without spending much money. With simple bowls, solar pathway lights, outdoor adhesive, paint, and sealer, you can create garden decor that feels whimsical during the day and magical after sunset.
The key is to prep surfaces properly, keep the solar panel exposed, use outdoor-friendly materials, and give glue and paint enough time to cure. Whether you make classic red toadstools, elegant glass mushrooms, or a colorful fairy garden cluster, this project proves that charming outdoor lighting does not have to be expensive. Sometimes, the cutest garden upgrade starts in the dollar store aisle between plastic bowls and party cups.