Note: This guide is for typical residential wood or composite deck surfaces. If the hole involves joists, beams, posts, railings, stairs, the ledger board, or any area that feels soft underfoot, treat it as a safety issue and consider calling a qualified deck contractor or local building professional.
A hole in your deck has a special talent for ruining a perfectly good afternoon. One minute you are carrying lemonade outside like the hero of summer, and the next minute your foot finds a suspicious soft spot that says, “Congratulations, you now own a project.” The good news is that many deck holes can be repaired without replacing the entire deck. The even better news is that you do not need to panic-buy every tool in the hardware aisle.
Knowing how to repair a hole in your deck starts with one simple question: is the damage cosmetic or structural? A small screw hole, knot hole, shallow gouge, or chip can often be fixed with exterior wood filler or epoxy. A larger hole caused by rot, impact, insects, or a broken board usually requires cutting out the damaged section or replacing the whole deck board. The trick is not making the deck look good for one weekend; the trick is making it safe, weather-resistant, and sturdy enough for real life.
This in-depth guide walks you through deck hole repair step by step, including inspection, tools, small-hole patching, board replacement, composite deck fixes, finishing, and prevention. We will keep it practical, clear, and just lightly humorous, because if your deck has betrayed you, the least we can do is bring a little personality to the repair plan.
First, Figure Out What Kind of Hole You Have
Before you grab a tub of filler and start spreading it around like frosting on a birthday cake, inspect the damaged area carefully. Deck repair depends on the cause and size of the hole. A tiny surface hole from a screw, nail, dropped tool, or old furniture foot is very different from a soft, dark, crumbly section of wood. One is cosmetic. The other may be your deck politely asking for retirement.
Small Cosmetic Holes
Small holes are usually less than an inch wide and do not pass all the way through the deck board. Common examples include old fastener holes, shallow gouges, knot holes, woodpecker damage, or minor cracks. If the surrounding wood is firm, dry, and not splintering badly, you can usually repair these with an exterior-rated wood filler, two-part wood epoxy, or a stainable deck patching product.
Medium Holes and Damaged Sections
A medium hole may be large enough to catch a chair leg, collect water, or expose the inner wood. These holes are often caused by rot around knots, heavy impact, or long-term moisture exposure. If the damage is limited to one board and the joists underneath are solid, you can cut out the bad section and install a replacement piece between joists.
Large Holes or Soft Spots
Large holes, spongy boards, crumbling edges, or areas that flex when stepped on should not be patched with filler. Filler is not a structural repair. It is not magic. It is not a tiny construction worker in a can. If the board has lost strength, replace it. If the framing below is rotten, damaged, or moving, the repair becomes more serious and may require joist replacement, blocking, or professional help.
Tools and Materials You May Need
You do not need every item on this list for every repair. A small hole repair may only require filler, a putty knife, sandpaper, and finish. A full board replacement will need cutting tools, fasteners, and a matching replacement board.
Basic Tools
- Safety glasses, work gloves, and dust mask
- Flat-head screwdriver or awl for testing wood firmness
- Putty knife or 5-in-1 painter’s tool
- Drill or impact driver
- Pry bar, nail puller, or cat’s paw
- Circular saw, oscillating multi-tool, jigsaw, or reciprocating saw
- Speed square and tape measure
- Sandpaper or sanding block, usually 80-grit to 120-grit
- Shop vacuum or stiff brush
Materials
- Exterior wood filler, stainable filler, or two-part epoxy filler
- Replacement deck board, matched by material, width, thickness, and profile
- Exterior-grade deck screws or manufacturer-approved composite fasteners
- Wood preservative for exposed cuts, if appropriate for your decking
- Deck stain, sealer, paint, or matching composite plugs
- Joist tape or flashing tape for exposed joist tops, optional but helpful
- Blocking lumber, if the replacement section needs extra support
Step 1: Make the Area Safe
Block off the damaged area before you begin. Move furniture, grills, planters, rugs, and anything else that might hide additional damage. If the hole is big enough for a foot, paw, chair leg, or toddler’s toy dinosaur to fall through, cover it temporarily with plywood and mark the area clearly. Deck holes are not just ugly; they are trip hazards.
Never stand directly on the questionable board while inspecting it. Work from a stable area nearby. If the board flexes, bounces, or makes a cracking sound, stop treating it as a simple repair. That deck board has moved from “annoying” to “possibly unsafe.”
Step 2: Inspect for Rot, Insects, and Hidden Damage
Use a screwdriver or awl to gently probe the wood around the hole. Healthy wood should resist pressure. Rotten wood may feel soft, spongy, crumbly, or punky. Pay special attention to areas that stay damp, such as boards under planters, near downspouts, beside stairs, around rail posts, and close to the house.
Look underneath the deck if you can access it safely. Check the joists below the damaged board. If the joist directly under the hole is dark, soft, cracked, or separating, the repair is no longer just about the deck surface. A deck board sits on framing, and if the framing is compromised, replacing only the board is like putting new tires on a car with a broken axle. Technically shiny, practically terrifying.
Step 3: Decide Whether to Fill, Patch, or Replace
Here is a simple rule: fill small cosmetic holes, patch limited damage between solid joists, and replace boards that are rotten, split, warped, or structurally weakened. When in doubt, choose replacement over filler. Exterior filler is useful, but it cannot restore a board that has lost strength.
Use Filler When:
- The hole is small and shallow.
- The surrounding wood is firm.
- The damage does not go through the board.
- The area is not a high-stress spot like stair treads or railing posts.
- You plan to sand and reseal the repair.
Replace the Board or Section When:
- The hole goes through the deck board.
- The board feels soft, bouncy, or cracked.
- Rot extends beyond the visible hole.
- The damage is near a joist, stair, railing, or ledger area.
- The board has multiple holes or long splits.
How to Repair a Small Hole in a Wood Deck
If the hole is cosmetic, this is the easiest deck repair. Choose an exterior-rated wood filler or two-part epoxy product designed for outdoor wood. For unfinished wood you plan to stain, use a stainable filler. For painted decks, a paintable exterior filler works well.
1. Clean the Hole
Remove loose splinters, dirt, old stain flakes, and soft wood. Use a screwdriver, utility knife, or small brush. Vacuum the area so the filler bonds to clean wood rather than dust. If moisture caused the hole, let the area dry fully before filling unless the product specifically allows damp-wood application.
2. Apply Filler or Epoxy
Press the filler into the hole using a putty knife. Do not just skim the surface. Pack it firmly so there are no empty pockets underneath. Slightly overfill the hole because many fillers shrink a bit as they dry. For deep holes, apply in layers according to the product instructions.
3. Let It Cure
Drying time depends on the product, weather, temperature, and hole depth. Do not rush this step. Sanding half-cured filler is like trying to shave peanut butter. It smears, clogs, and makes everyone question your decisions.
4. Sand Smooth
Once cured, sand the repair flush with the deck board. Start with medium-grit sandpaper and finish with a finer grit if needed. Sand with the grain to avoid making the patch stand out more than necessary.
5. Seal, Stain, or Paint
Exterior wood repairs need protection. Apply deck stain, sealer, or paint after the patch is sanded and cleaned. A filled hole left unsealed can absorb moisture around the edges, which may lead to future cracking or rot.
How to Repair a Large Hole by Replacing a Deck Board Section
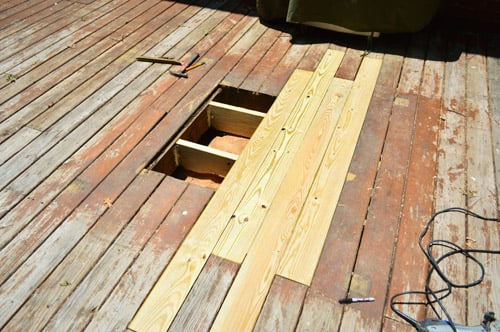
If the hole goes through the board but the damage is limited to one area, you may be able to replace only a section instead of the entire board. This works best when the damaged board is wood, the joists are solid, and the replacement piece can be supported at both ends.
1. Mark the Cut Lines
Locate the joists on either side of the damaged area. Ideally, cut the damaged board back to the centerline of the nearest joists so the replacement piece has solid support. Use a square to mark clean, straight cut lines. A neat cut is easier to patch than a wild zigzag that looks like a raccoon operated the saw.
2. Set Saw Depth
Set your circular saw depth just slightly deeper than the deck board thickness. You want to cut the board, not the joist underneath. If you are not comfortable with a circular saw, an oscillating multi-tool or jigsaw can give more control in tight spaces.
3. Cut Out the Damaged Section
Cut along your marks and remove the damaged section. You may need a pry bar to lift it free. Remove screws or nails carefully. If old fasteners are stubborn, cut the board into smaller pieces and pry them out one at a time.
4. Inspect the Joists
With the damaged board removed, inspect the exposed joists. Clear debris from the top. If the joists are solid, you can proceed. If they are soft or cracked, stop and repair the framing first. For minor surface checking, you may add joist tape to reduce future water exposure. For serious rot, the joist may need sistering or replacement by someone who understands deck framing and local code.
5. Add Blocking if Needed
If the replacement piece does not land fully on joists at both ends, install pressure-treated blocking between joists to support it. Blocking gives the new piece something solid to fasten into. Outdoor repairs need solid backing, not wishful thinking.
6. Cut the Replacement Piece
Measure the opening carefully and cut a matching deck board to fit. Use the same thickness and width as the existing decking. If the old deck has shrunk or weathered, test-fit the new piece before fastening. Leave a small, consistent gap between boards for drainage and expansion.
7. Fasten the New Section
Attach the replacement piece with exterior deck screws. Use two screws at each joist or support point for wood decking unless your local code or product instructions specify otherwise. Keep screws aligned, pre-drill near board ends to reduce splitting, and avoid reusing old fastener holes in the joists when possible.
8. Finish the Repair
Sand rough edges, clean the surface, and apply stain or sealer. New wood often looks brighter than old decking, so expect a slight color difference at first. Sunlight, weather, and a fresh coat of deck finish can help blend the repair over time.
How to Replace an Entire Damaged Deck Board
Sometimes the cleanest repair is replacing the whole board. This is often the right choice when a board has multiple holes, severe rot, long cracks, cupping, or fastener damage. Full board replacement can also look better because you avoid a short patch in the middle of a long run.
Remove Fasteners
Back out screws with a drill or impact driver. For nails, use a pry bar, nail puller, or cat’s paw. Work slowly to avoid damaging neighboring boards. If fasteners are stripped or rusted, cut the board into sections and pry it out carefully.
Lift the Board
Slide a pry bar under the damaged board and lift gradually along its length. Do not force one end upward too aggressively or you may damage the joists or adjacent boards. Deck repair rewards patience. It is less “demolition derby” and more “convincing stubborn wood to retire.”
Prepare the Opening
Clean the joist tops, remove old fastener fragments, and inspect for rot. Apply joist tape if desired. Cut the new board to length, test the fit, and maintain proper spacing from neighboring boards.
Install the New Board
Fasten the new board at every joist. Use corrosion-resistant deck screws made for exterior use. Do not use drywall screws; they are not built for outdoor deck loads and weather exposure. If the deck is pressure-treated lumber, choose fasteners approved for contact with treated wood.
How to Repair a Hole in a Composite Deck
Composite decking is different from wood. Small scratches may be cleaned or treated according to the manufacturer’s instructions, but holes, burns, deep gouges, or impact damage usually require replacing the damaged board. Many composite boards are installed with hidden fasteners, clips, or color-matched plug systems, so identify the brand and fastening method before you start.
If the board is face-screwed, replacement may be as simple as removing the screws, lifting the damaged board, cutting a matching replacement, and reinstalling with approved screws or plugs. If the board uses hidden clips, you may need to loosen adjacent boards or use a manufacturer-specific replacement method. Composite decking expands and contracts differently than wood, so follow spacing and fastening recommendations for the product.
Common Mistakes to Avoid
Using Interior Filler Outside
Interior filler may fail quickly on a deck because decks face rain, sun, temperature swings, and foot traffic. Use products labeled for exterior wood repair.
Patching Over Rot
Do not trap rot under filler. Rotten wood must be removed. If you patch over soft wood, the repair may look decent for a short time, but moisture and decay will continue working underneath.
Ignoring the Joists
A deck board hole can be the symptom, not the disease. Always inspect the framing below. Joists, beams, posts, and ledger boards matter far more than the surface appearance.
Forgetting Drainage
Deck boards need gaps so water can drain. If you wedge a replacement board too tightly against neighboring boards, water may sit in the seams and speed up future damage.
Using the Wrong Screws
Outdoor deck screws should be corrosion-resistant and appropriate for the decking material. Cheap or incompatible fasteners can rust, stain the deck, loosen, or react with treated lumber.
How to Prevent Future Deck Holes
Once you know how to repair a hole in your deck, prevention becomes much easier. Sweep the deck regularly so leaves and debris do not hold moisture against the boards. Move planters occasionally and place them on stands or saucers that allow airflow. Keep grills on protective mats designed for outdoor use. Redirect downspouts that splash water onto the deck. Inspect fasteners, railings, stairs, and boards at least once or twice a year.
Stain or seal wood decking on a schedule that matches your climate and product instructions. In sunny, wet, snowy, or humid regions, deck finishes wear faster. A neglected deck can turn one tiny hole into a family of holes, and nobody wants a deck that looks like Swiss cheese with railings.
When to Call a Professional
DIY deck repair is reasonable for small holes, isolated board replacement, and simple surface damage. Call a professional if you find widespread rot, sagging framing, loose rail posts, stair movement, ledger board damage, insect infestation, or cracks in multiple joists. Also call for help if the deck is high off the ground or if the repair affects structural connections.
Local building codes may apply when structural components are repaired or replaced. A contractor can help determine whether permits, inspections, or code upgrades are needed. A deck is not just a backyard decoration; it is an elevated outdoor floor that carries people, furniture, pets, grills, and occasionally one uncle who insists he can still dance.
Real-World Experience: What Deck Hole Repairs Teach You
After dealing with deck repairs, one thing becomes obvious: the visible hole is rarely the whole story. Many homeowners first notice a small problem because a chair leg sinks into a weak board, a grill wheel catches on a splintered section, or someone spots a dark circle around an old knot. At first, the temptation is to treat it like a cosmetic blemish. Putty it, sand it, stain it, and move on. But the deck usually has more to say once you start looking closely.
One common experience is discovering that planters are secret deck assassins. A big ceramic pot may look charming, especially with bright flowers spilling over the edge, but if it sits in the same spot for months, moisture can stay trapped underneath. When the pot finally moves, the board may show a dark, soft ring or even a small hole. The lesson is simple: beautiful plants are welcome, but they need airflow. Raising pots on feet or stands can prevent moisture from turning a deck board into oatmeal.
Another lesson comes from old fastener holes. When screws loosen or nails pop, water can sneak into the openings. Over time, those little holes widen, especially if the deck is not sealed regularly. The fix may be easy when caught early: clean the hole, fill it with exterior filler, sand it smooth, and seal the board. But if the fastener area becomes soft, replacement is smarter. A screw needs solid wood to hold. Driving a new screw into punky wood is like trying to hang a picture on pudding.
Many DIYers also learn that matching the new board to the old deck takes patience. A fresh pressure-treated board may look greenish, wet, or much brighter than weathered boards. Cedar, redwood, and composite decking each age differently. Even when the size is correct, the color may not match on day one. That is normal. Let new wood dry properly before staining, and consider cleaning or refinishing the surrounding area so the repair blends naturally.
The best experience-based advice is to widen your inspection. If one board has a hole, check the boards beside it. Check underneath. Look at joist tops, rail posts, stairs, and the ledger area where the deck connects to the house. Most small repairs stay small when caught early. Most expensive repairs start as small problems that were ignored because everyone hoped the deck would “hang in there.” Decks are loyal, but they are not immortal.
Finally, deck repair teaches respect for water. Rain, snow, sprinklers, wet leaves, clogged gutters, and damp rugs can all shorten a deck’s life. The strongest repair is not just the new board or the smooth patch. It is the habit of keeping the deck clean, sealed, ventilated, and inspected. Repair the hole, yesbut also fix the reason the hole happened. That is how you turn a weekend repair into several more seasons of barefoot coffee, backyard dinners, and safe summer lounging.
Conclusion
Repairing a hole in your deck is not about hiding damage; it is about choosing the right fix for the problem. Small cosmetic holes can often be cleaned, filled, sanded, and sealed. Larger holes, soft spots, rot, and broken boards call for replacement. The most important step is inspection. If the surrounding wood and framing are solid, many repairs are manageable for a careful DIY homeowner. If the structure is compromised, bring in a professional and protect the people who use the deck.
A safe deck is more than a place to park patio furniture. It is where coffee tastes better, burgers somehow become an event, and ordinary evenings turn into outdoor living. Fix the hole correctly, protect the surface, and keep an eye on moisture. Your deck will thank you by not surprising anyone’s foot at the next barbecue.