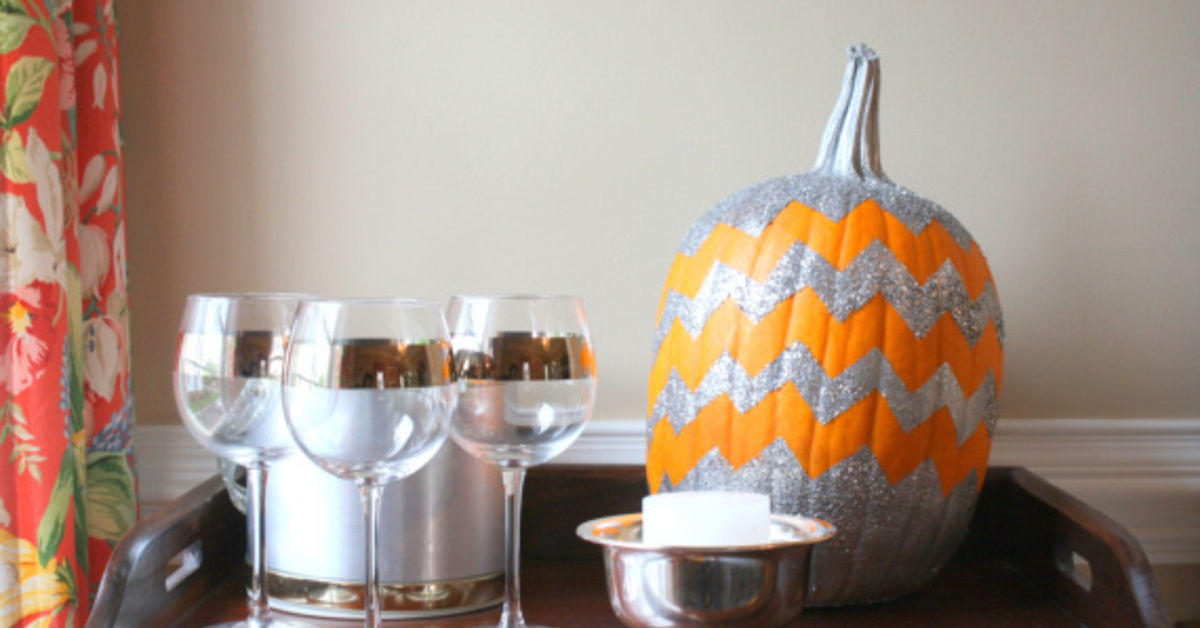
There are two kinds of fall people: the ones who lovingly arrange pumpkins on the porch like they are curating a tiny harvest museum, and the ones who grab the first squash-shaped object they see and call it “seasonal.” A chevron pumpkin is for both groups. It looks polished, trendy, and just crafty enough to earn compliments, but it does not require an art degree, a deep emotional relationship with glitter, or the patience of a saint.
If you want a pumpkin that feels modern instead of monster-faced, a chevron design is one of the smartest ways to go. The pattern is graphic, playful, and surprisingly forgiving. Even better, it works on real pumpkins, faux pumpkins, mini pumpkins, and that one lopsided pumpkin you bought because it had “character.” With the right tape, paint, and a little dry-time discipline, you can turn a plain pumpkin into a front-porch show-off.
This guide walks you through exactly how to make a chevron pumpkin, step by step, while also covering the little details that make the difference between “wow, that looks boutique” and “wow, that looks like I lost a fight with masking tape.”
Why a Chevron Pumpkin Works So Well
A chevron pattern gives a pumpkin clean visual structure. Pumpkins are naturally round, ribbed, and slightly chaotic in the way all produce likes to be. Chevron brings order to the party. The zigzag lines create movement, make the pumpkin look more intentional, and fit everything from classic black-and-white Halloween decor to soft neutral fall styling.
It is also one of the easiest geometric designs to scale. You can make wide, bold stripes for a dramatic look, or tighter, repeated zigzags for something more detailed. On a white pumpkin, metallic chevrons feel elegant. On an orange pumpkin, cream, black, or gold chevrons feel festive. On a faux pumpkin, the design can become reusable decor, which means your future self will be thrilled when next fall rolls around and you are not starting from zero again.
What You Need
Basic Supplies
- 1 pumpkin, real or faux
- Painter’s tape or delicate-surface masking tape
- Acrylic craft paint or spray paint
- Foam brush or small paintbrush
- Scissors
- Paper towels or a soft cloth
- Rubbing alcohol or mild soap and water for cleaning
- Optional: primer, metallic paint pen, clear sealer for faux pumpkins
Choosing the Right Pumpkin
The smoother the surface, the easier the job. Deep ridges can still work, but they make your tape bend, lift, and act like it suddenly has personal boundaries. A medium-size pumpkin with a relatively even shape is easiest for beginners. If you are painting a real pumpkin, choose one that feels firm and looks fresh, without mushy spots or bruising. If you are painting a faux pumpkin, a matte, clean, dry surface usually gives you the best result.
Best Paint for a Chevron Pumpkin
Acrylic craft paint is usually the easiest choice for real pumpkins. It dries fairly quickly, cleans up with water, and is beginner-friendly. If you make a mistake, you usually have a fighting chance to fix it before it fully sets. Spray paint can work beautifully, especially on faux pumpkins, but it is best used in light coats and in a well-ventilated area. It can also be a great option if you want a very smooth base coat.
If you are painting a real pumpkin in a lighter color, such as white, cream, blush, or pale gray, plan on doing more than one coat. Orange pumpkins love to peek through like they paid rent. A solid base coat can make your chevron pattern look sharper and more professional.
Step-by-Step: How To Make a Chevron Pumpkin
Step 1: Clean and Dry the Pumpkin
Wipe down the surface to remove dirt, dust, or field residue. If you are using a real pumpkin, let it dry completely before adding tape or paint. Any moisture left behind can mess with adhesion and turn your crisp lines into something more “abstract expressionist.”
Step 2: Decide on Your Color Palette
Before you touch the tape, figure out your look. Here are a few winning combinations:
- White pumpkin with gold chevrons for elegant fall decor
- Orange pumpkin with black chevrons for classic Halloween contrast
- Black pumpkin with white chevrons for modern drama
- Cream pumpkin with sage or taupe chevrons for soft, upscale styling
- Pink, copper, and ivory for a more playful, Instagram-friendly vibe
If you want the chevron stripes to be the star, keep the palette to two or three colors max. Too many shades can make a geometric design feel visually busy.
Step 3: Apply a Base Coat
Paint the entire pumpkin in your base color and let it dry fully. This is the color that will show through under or between your chevron stripes. If needed, add a second coat for even coverage. Rushing this stage is one of the fastest ways to peel paint off with your tape later, and nobody enjoys that particular seasonal heartbreak.
Step 4: Cut and Place the Tape
Now the magic starts. Cut your painter’s tape into shorter strips so it can better follow the curve of the pumpkin. Start around the widest part of the pumpkin and place the tape in a zigzag pattern. Then create a second row that mirrors the angle of the first. Continue around the pumpkin until you have a repeating chevron pattern.
Press each piece down firmly, especially along the edges. On a curved pumpkin, tight adhesion matters. If the tape is floating even slightly, paint can slip underneath and soften the line.
Step 5: Paint Over the Taped Design
Use a foam brush or brush with a light hand and apply your second color over the taped pumpkin. Dab rather than slather if you want cleaner edges. Thin, controlled coats are better than one heavy coat. If you are using metallic paint, go slow and build coverage gradually.
Step 6: Let It Dry, Then Peel
This is where patience earns its paycheck. Let the top layer dry enough that it will not smear, but do not wait so long that the tape bonds too aggressively. Peel the tape off slowly and at an angle. If one section resists, use a craft knife carefully to score the edge before removing it.
When the tape comes off cleanly, you get those deliciously crisp zigzags that make people assume you are much more organized than you really are.
Step 7: Touch Up the Edges
No DIY project is perfect, and frankly, perfection is exhausting. Use a small detail brush to fix any tiny bleeds or uneven spots. You can also add a metallic paint pen outline along the chevrons if you want to sharpen the pattern even more.
How To Make It Look Better Than “Just Fine”
Use the Pumpkin’s Shape to Your Advantage
Instead of fighting the ridges, let the pattern wrap with them. Chevron does not have to be mathematically perfect to look intentional. In fact, a little variation can make the design feel handmade in the best way.
Try Half-and-Half Styling
You do not have to cover the whole pumpkin. Paint only the top half with chevrons and leave the lower half neutral. This creates a cleaner, more editorial look, especially for mantels, entry tables, or centerpieces.
Pair It With Other Pumpkins
One chevron pumpkin is cute. Three chevron pumpkins in graduated sizes with a few solid-color pumpkins nearby looks like you hired a stylist named Autumn who drinks maple lattes and speaks only in mood boards.
No-Carve vs. Carved Chevron Pumpkin
The easiest version is no-carve, and for most people, it is the better option. Painted pumpkins tend to feel more modern, they are safer when kids are helping, and they usually last longer than carved ones. If you want a lit effect, you can still hollow the pumpkin and place a battery-operated light inside. That gives you glow without open flame drama.
If you do carve, let adults handle the cutting, work on a flat, stable surface, and use flameless lighting when the design is done. A carved chevron pumpkin can look amazing, but it is more labor-intensive and less forgiving than the painted version.
Common Mistakes to Avoid
Painting a Dirty Pumpkin
If the surface is dusty or damp, the paint will not behave well. Clean first. Dry completely. Future you says thank you.
Using the Wrong Tape
Super aggressive tape can lift paint. Flimsy tape can leak. Painter’s tape hits the sweet spot for most projects.
Skipping Dry Time
Wet paint plus tape equals a chaotic peel. Dry each layer thoroughly. This is the boring advice that secretly saves the whole project.
Applying Paint Too Thickly
Heavy coats are more likely to bleed under the tape or peel unevenly. Light coats win. They always do, even if they are less dramatic about it.
Choosing a Pumpkin With Deep Damage
Soft spots, cracks, or bruises shorten the life of a real pumpkin and can make the finish look patchy. Pick the healthiest pumpkin you can find.
How To Make Your Chevron Pumpkin Last Longer
Keep a real pumpkin out of intense sun and away from excessive moisture. Display it in a cool, dry spot when possible. If you carve it, clean out the inside thoroughly and use battery-operated lights rather than candles. For any cut areas, a little moisture protection helps reduce shriveling.
If you want the design to last the longest, use a faux pumpkin instead. It takes paint beautifully, stores easily, and can come back next fall like the overachiever of your seasonal decor collection.
Chevron Pumpkin Style Ideas
- Classic Halloween: black and orange with sharp white accents
- Modern farmhouse: ivory, black, and muted sage
- Glam fall: white, champagne gold, and copper
- Minimalist porch: matte taupe chevrons on pale pumpkins
- Kid-friendly: bright rainbow zigzags on mini pumpkins
You can also mix finishes. Try matte paint for the base and metallic paint for the chevrons, or use a paint pen to add tiny dots between the zigzags. Little details make the design feel layered without making it complicated.
Final Thoughts
Making a chevron pumpkin is one of those rare seasonal DIYs that looks fancy without being fussy. It gives you the charm of fall decor with a cleaner, more updated feel than the standard triangle-eyes jack-o’-lantern. It is easy enough for a casual crafter, stylish enough for design-minded decorators, and flexible enough to suit just about any color palette.
The real secret is not artistic talent. It is prep, patience, and tape placement. Clean the pumpkin, let the paint dry, press down the edges, and peel carefully. Do those things well, and your chevron pumpkin will look crisp, festive, and entirely worthy of porch admiration. Or at least worthy of one very flattering photo before the squirrels get opinions.
Hands-On Experience: What Making a Chevron Pumpkin Actually Feels Like
The first time I made a chevron pumpkin, I went into it with the confidence of someone who had watched exactly two craft videos and therefore believed I was basically a fall artisan. I grabbed a pumpkin that looked smooth enough, chose a white-and-gold palette because I wanted something that said “elegant autumn” instead of “haunted produce aisle,” and started taping without really planning the spacing. This, unsurprisingly, led to a mild geometric crisis about ten minutes later.
What I learned fast is that the pumpkin itself decides whether your afternoon will be peaceful or character-building. A smoother pumpkin really does make the whole process easier. On a deeply ribbed pumpkin, the tape wants to lift at the edges, especially if the strips are too long. Once I started cutting shorter pieces and smoothing each one down carefully, the project became much more manageable. That was the moment the chevron pattern stopped looking like a confused lightning storm and started looking intentional.
I also learned that paint has a sneaky personality. The base coat always seems dry until you put tape on it and discover it was, in fact, emotionally dry but not physically dry. Waiting longer between coats made a huge difference. On my second attempt, I let the base coat sit well past the point where I thought it needed to, and the tape peeled off much more cleanly. That single change made the finished pumpkin look sharper and less handmade-in-a-hurry.
Another surprise was how much the color palette affected the mood of the pumpkin. Bold black-and-white chevrons feel graphic and Halloween-ready. Soft neutrals make the pumpkin feel more like general fall decor you can leave out longer. Metallics, when used with restraint, look expensive. When used without restraint, they can make your pumpkin look like it is preparing for a disco. That is not necessarily bad, but it is a decision.
The most satisfying part of the whole project is peeling the tape. It has the same dramatic reveal energy as pulling off a face mask or removing painter’s plastic after a room makeover. When the lines come out clean, it is ridiculously rewarding. When one section bleeds, a tiny brush usually fixes it. That is the good news. The better news is that most people will never notice the tiny flaw you have been staring at for seven minutes.
By the end, I understood why chevron pumpkins are such a lasting favorite. They feel creative without being chaotic. They are structured enough to look stylish, but relaxed enough that you do not need machine-level precision. The project also scales well. After making one larger pumpkin, I tried mini versions, and they were even more charming grouped together on a tray. Suddenly the whole setup looked intentional, as though I had planned a seasonal vignette instead of simply refusing to throw away leftover paint.
If you are trying this for the first time, the experience is honestly half the fun. There is something deeply satisfying about turning an ordinary pumpkin into decor that feels personal and polished. It is not difficult, but it does reward a little patience. And once you finish one chevron pumpkin, there is a strong chance you will start looking around your home wondering what else could use a zigzag pattern. That is how craft season gets you.