Finishing an attic is basically taking the most dramatic room in your house (all angles, mystery corners, and “why is it so hot up here?” energy)
and turning it into a real living space. The secret sauce isn’t just drywall and cute dormer windowsit’s insulation done the right way.
Because a finished attic with bad insulation is like wearing a winter coat made of Swiss cheese: technically clothing, emotionally disappointing.
This DIY guide walks you through how to insulate an attic you’re finishingespecially the tricky parts like sloped ceilings, knee walls,
and those awkward triangular “attic side” spaces. We’ll keep it practical, code-aware, and (mostly) free of regret.
Before You Buy Insulation: Pick Your “Thermal Envelope” Plan
When you finish an attic, you’re deciding where the home’s thermal boundary (aka the insulation line) will be. There are two common approaches:
Option A: Insulate the roofline (sloped rafters) and gable walls
- Best for: finished attic rooms where you want consistent comfort and fewer icy drafts from side cavities.
- Result: the attic becomes part of the conditioned space (more comfortable, usually more efficient if done well).
- Watch-outs: ventilation details and moisture control matter a lot.
Option B: Insulate the knee walls + attic floor behind them (keep side attics “outside”)
- Best for: situations where roof framing is hard to access or you’re not opening ceilings.
- Result: the triangular side spaces stay unconditioned; your finished room is insulated like a box inside the attic.
- Watch-outs: knee walls are notoriously drafty unless you add an air barrier and seal everything.
You can do either plan DIY. The “right” one depends on access, budget, ductwork location, and how much you enjoy crawling into weird spaces
while wearing a headlamp like a cautious raccoon.
Step 1: Handle Roof Leaks, Bathroom Fans, and Other Moisture Villains
Insulation is not a magical sponge that fixes moisture problems. If the roof leaks, fix it first. If bathroom fans dump humid air into the attic,
vent them outdoors. If you see heavy staining, moldy patches, or soggy sheathing, address the cause before you trap the problem behind finished surfaces.
- Roof leaks: repair and let materials dry fully.
- Vent fans: duct to the exterior with proper roof/wall capsno “attic exhaust perfume.”
- Old insulation issues: if you find vermiculite insulation, treat it as potentially asbestos-containing and get professional guidance before disturbing it.
Step 2: Know Your Target R-Value (So You Don’t “Eyeball” Comfort)
R-value is insulation’s resistance to heat flow. Higher R-value generally means better thermal performance. Your target depends on climate zone and assembly
(roofline vs. attic floor). Many U.S. recommendations for attics fall around R-38 to R-60, but finished attics may be constrained by rafter depth.
Two important realities:
- Code vs. best practice: your local code may set a minimum; good performance often means aiming higher if space allows.
- Rafter depth limits: a 2×6 rafter bay can’t magically hold R-49 fiberglass batts without additional strategies (like foam layers or furred-down depth).
Step 3: Air-Seal First (Because Warm Air Is a Sneaky Escape Artist)
If insulation is the sweater, air sealing is the zipper. Without air sealing, your heated (or cooled) air will leak through gaps and carry moisture with it.
That can mean drafts, ice dams, and moisture trouble in roof cavities. Air sealing typically happens before you install insulation.
Common attic air leaks to seal
- Top plates of walls (especially under sloped ceilings)
- Plumbing stacks and vent pipes
- Electrical penetrations and wiring holes
- Chases around chimneys (use proper non-combustible flashing materials)
- Recessed lights and attic access hatches (if they exist in your layout)
DIY-friendly sealing tools include acrylic/latex caulk for small gaps and foam sealant for larger cracksplus sheet goods (rigid foam or plywood)
for big openings. The goal: a continuous air barrier aligned with your insulation.
Step 4: Decide Vented vs. Unvented Roof Assembly (Don’t Mix the Rules)
A finished attic roof can be built as a vented assembly (air channel from soffit to ridge) or an unvented assembly
(roof deck insulated in a way that doesn’t require ventilation). Both can work, but they’re not “pick-and-mix buffet” systems.
Vented roofline: the classic approach
In a vented roof, you keep a continuous ventilation channel under the roof sheathingusually using rafter vents (baffles)so air can enter at soffits
and exit at ridge vents (or other high vents). This helps manage roof temperature and moisture.
Unvented roofline: typically spray foam or approved hybrid assemblies
Unvented assemblies usually rely on air-impermeable insulation (commonly spray foam) in direct contact with the underside of the roof deck,
or a code-compliant hybrid that controls condensation risk. This approach can be helpful when venting is impractical (complex roofs, limited soffit vents, etc.).
If you’re unsure which you have or should build, a safe DIY default is: vented roofline with baffles, unless your design or local code/conditions
strongly point to unvented.
Step 5A: How to Insulate a Vented Sloped Ceiling (DIY-Friendly and Effective)
For vented sloped ceilings in a finished attic, your mission is: air channel + insulation + interior air barrier.
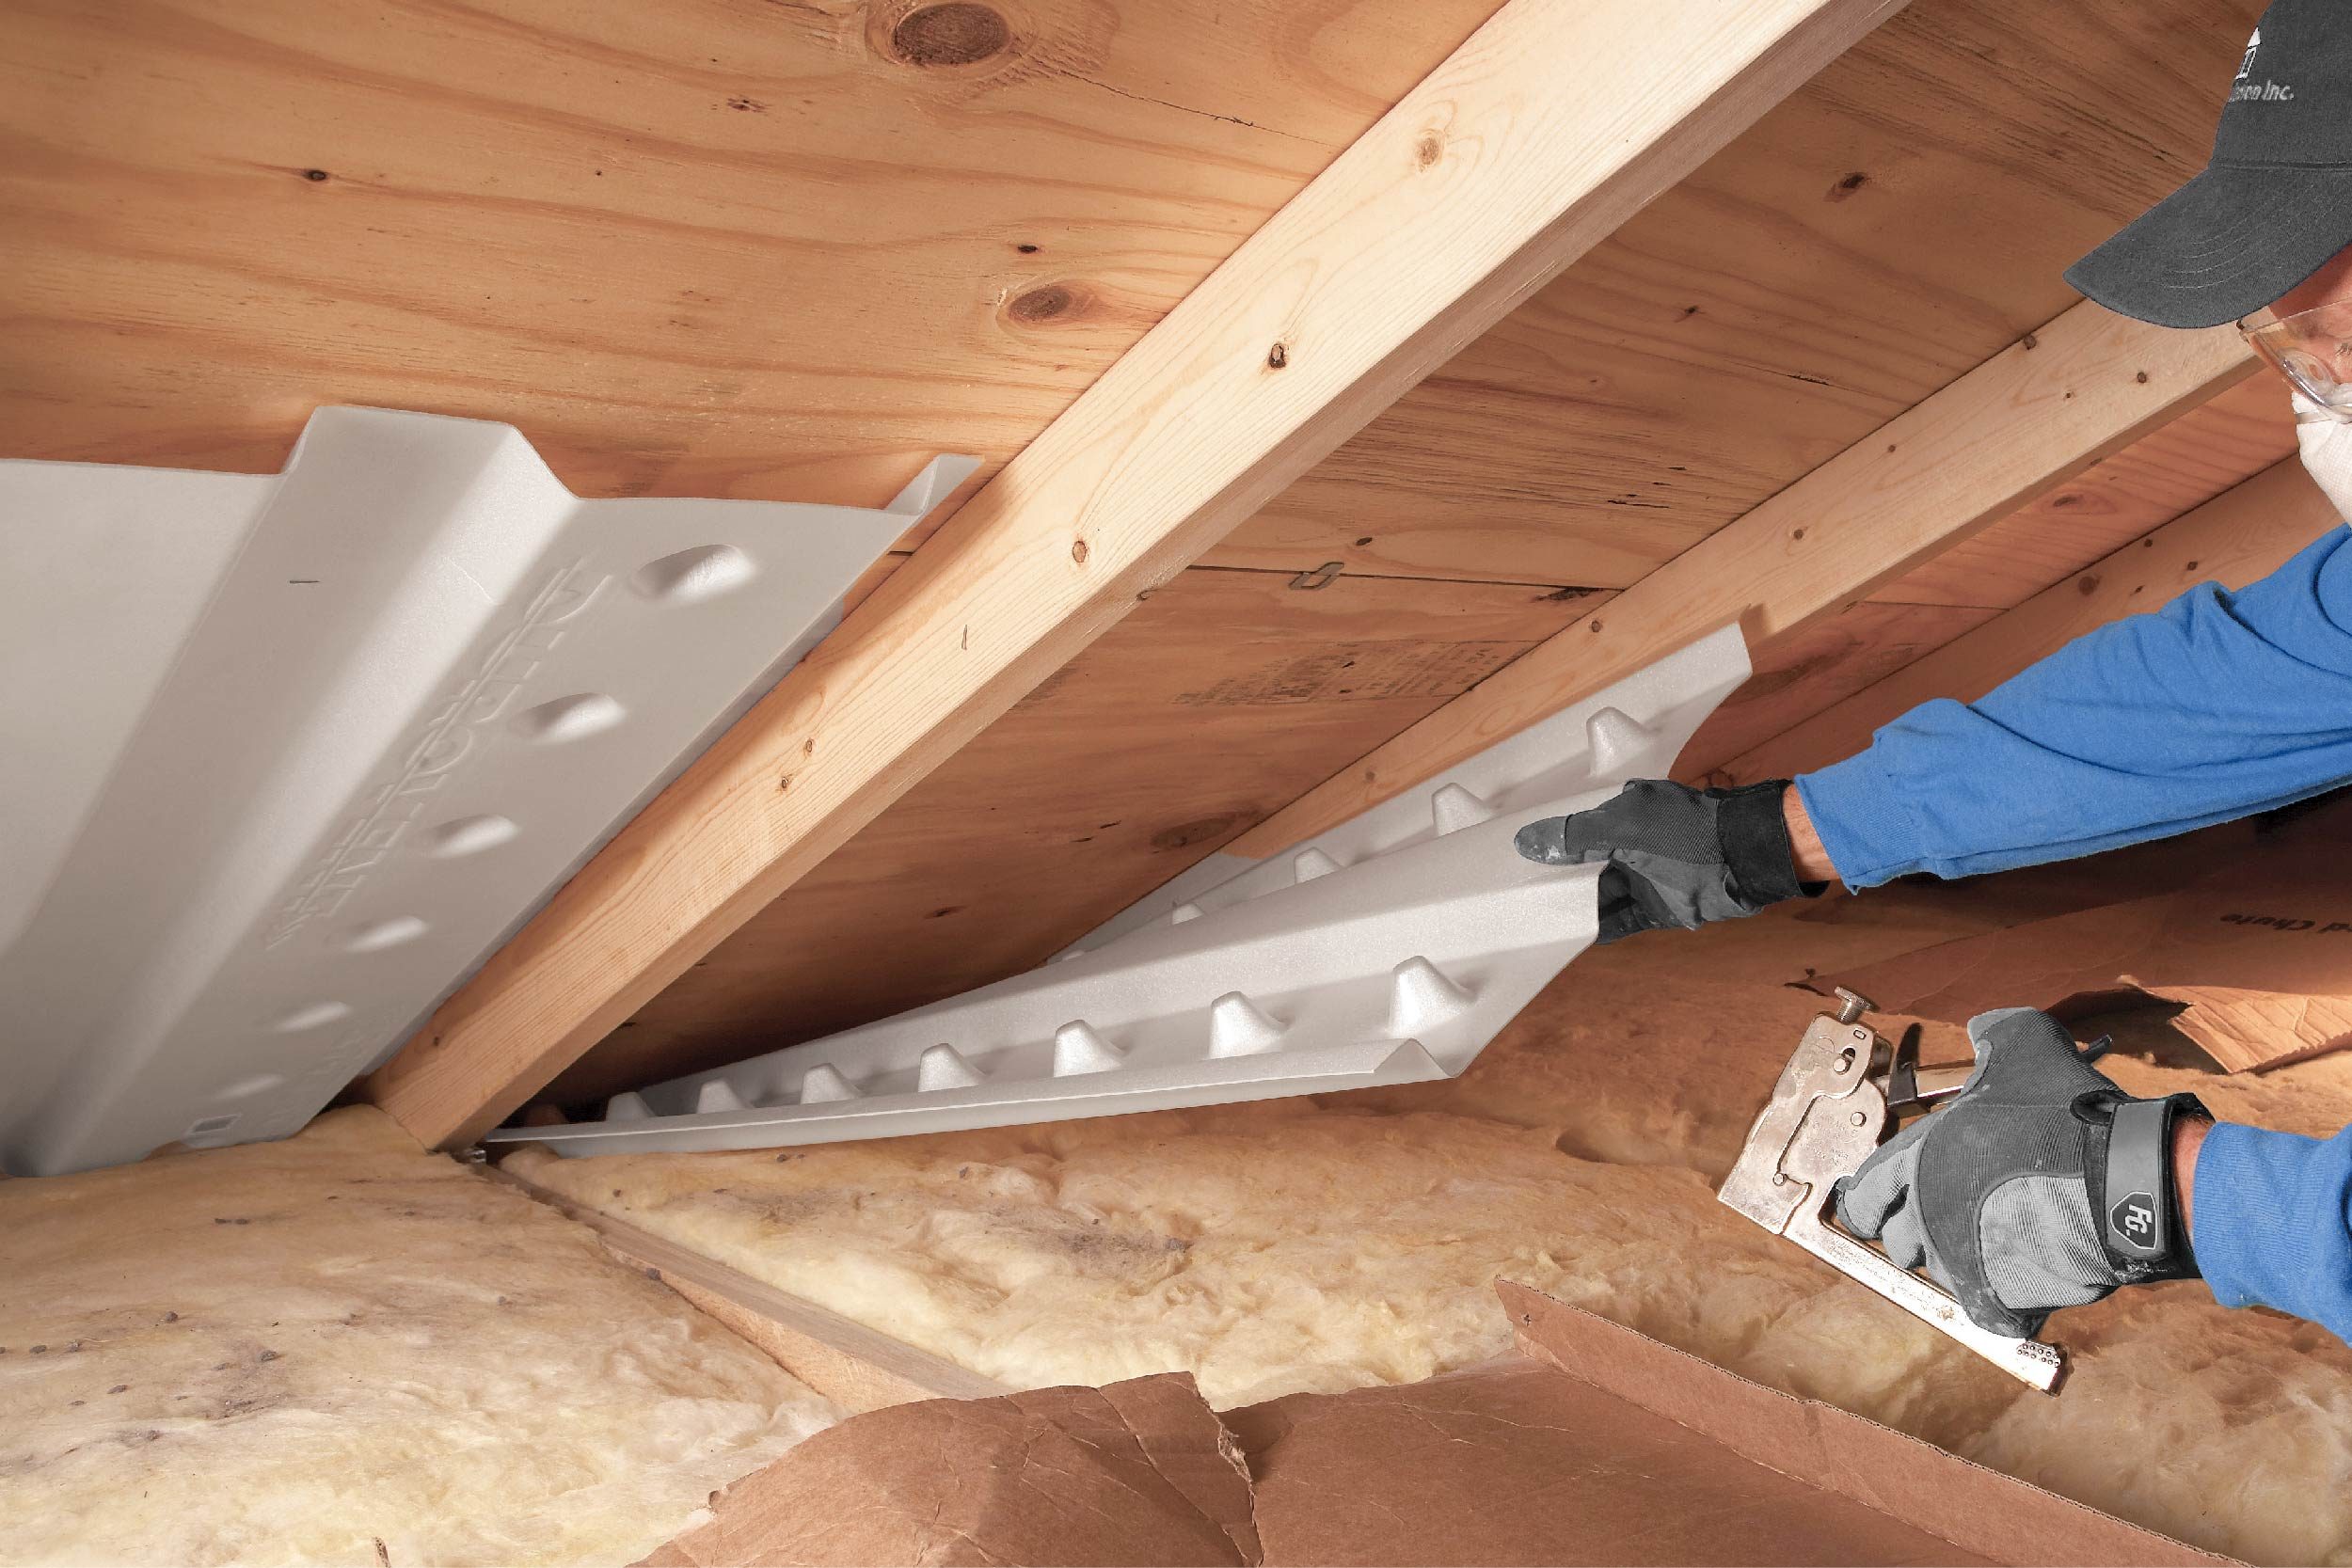
1) Install baffles (rafter vents) from soffit up
- Staple or fasten baffles to maintain a clear ventilation path under the roof deck.
- Run them from the soffit area up past the top of the insulation line (and ideally toward the ridge).
- Seal edges if needed to prevent wind washing (cold air blasting into insulation).
2) Insulate the rafter bays (batts or dense-pack)
Common DIY options:
- Fiberglass batts: affordable, widely available. Must be cut accurately and installed without gaps or compression.
- Mineral wool batts: denser, good for sound control, and more forgiving around minor irregularities.
- Dense-pack cellulose or fiberglass: great performance when installed correctly, but often best with a blower and careful technique.
Whatever you choose, avoid compressing batts to “make them fit.” Compression reduces effective R-value and performance.
3) Add a thermal break if you can (continuous insulation)
Rafters are wood, and wood conducts heat more than fluffy insulation. Adding a layer of rigid foam board or similar continuous insulation
across the bottom of rafters reduces thermal bridging and boosts real-world comfortespecially in cold or very hot climates.
4) Finish with a tight interior layer
Drywall can be part of your air barrier if the assembly is sealed well (caulk/foam at edges and penetrations).
Paint also contributes to vapor control in many climates when paired with smart detailing.
Step 5B: How to Insulate an Unvented Finished Attic Roof (Proceed Carefully)
Unvented roofs can work beautifullybut they’re less forgiving. If you choose this route, the big idea is:
control air movement and condensation at the roof deck.
Common unvented strategies
- Spray foam at the roof deck: air-impermeable insulation applied directly to underside of roof sheathing (typical code path).
- Hybrid system: a layer of air-impermeable insulation against the deck, with additional air-permeable insulation below it (must be designed to avoid condensation).
DIY note: small spray foam kits exist, but full roofline spray foam is often a pro job due to thickness consistency, chemical safety, and code requirements.
If you DIY anything here, keep it to careful prep and air sealing, then bring in a qualified installer for the foam.
Step 6: Insulating Knee Walls (Where Drafts Are Born)
Knee walls are those short walls under sloped ceilingscommon in finished attics. They’re also famous for being insulated poorly, because the insulation
is exposed to windy, unconditioned side attic space. That wind can strip away performance like it’s peeling a sticker off a new laptop.
The winning combo: insulation + air barrier on the attic side
If you insulate knee walls, don’t stop at stuffing batts between studs. Add a rigid, sealed air barrier on the cold side:
- Rigid foam board with taped seams
- OSB/plywood with sealed edges
- Drywall (less common in side attics, but works if detailed well)
Also insulate the floor behind the knee wall
The floor of the side attic space often sits over the rooms below. If you keep those side attics unconditioned, insulate that floor
(and air-seal it!) so the rooms below don’t feel like they’re living under a refrigerated storage unit.
Step 7: Vapor Retarders and “Which Side Faces In?” Without Starting a Family Argument
Moisture moves in two ways: air leaks (biggest culprit) and vapor diffusion (smaller but still relevant).
Air sealing is priority #1. Vapor control depends on climate and assembly type.
- Cold climates: you often want more vapor control on the warm-in-winter side, but avoid creating double vapor barriers that trap moisture.
- Mixed/hot-humid climates: interior polyethylene can cause problems; “smart” vapor retarders or standard painted drywall may be safer choices.
- Unvented roofs: vapor control is strongly tied to the insulation design (especially foam type and thickness).
Bottom line: follow local code guidance and manufacturer instructions, and when in doubt, prioritize air sealing and assemblies that can dry in at least one direction.
Step 8: Fire Safety and Clearance Rules You Should Not Freelance
Attics contain things that get hot: chimneys, flues, recessed lights, and sometimes exhaust ducts. Insulation must be installed with required clearances.
When something says “maintain clearance,” believe it the first time.
- Chimneys/flues: use non-combustible flashing and maintain code-required separation from combustibles.
- Recessed lights: only cover fixtures rated for insulation contact (IC-rated). Older non-IC cans can be a hazard.
- Wiring: don’t bury junction boxes; keep them accessible as required.
Materials Cheat Sheet: What Works Best Where?
| Material | Best Use in Finished Attics | Pros | DIY Difficulty |
|---|---|---|---|
| Fiberglass batts | Rafter bays, knee walls (with air barrier) | Affordable, available, easy to cut | Easy–Moderate |
| Mineral wool batts | Knee walls, sound control in rafters | Denser, good fit, sound dampening | Moderate |
| Dense-pack cellulose | Sloped cavities (with proper netting/baffles) | Fills gaps well; strong performance if installed correctly | Moderate–Hard |
| Rigid foam board | Continuous insulation under rafters; knee-wall air barrier | Reduces thermal bridging; can air-seal seams | Moderate |
| Spray foam | Unvented rooflines; tricky air-seal zones | Air-impermeable; great sealing when done right | Hard (often pro) |
Step 9: A Simple DIY Sequence (So You Don’t Insulate Yourself Into a Corner)
- Inspect and fix moisture issues: roof leaks, vent fans, wet wood.
- Plan your envelope: roofline vs knee wall + side attic floor approach.
- Air-seal: penetrations, top plates, chases, edgeseverywhere you can access.
- Install ventilation baffles (if vented roofline).
- Install cavity insulation: batts or dense-pack, fitted snug without compression.
- Add continuous insulation where possible to reduce thermal bridging.
- Build knee-wall air barriers (if using knee-wall approach) and insulate the side attic floor.
- Detail the interior layer: drywall + sealed edges/penetrations.
- Verify airflow paths (soffit-to-ridge remains open) and confirm clearances at hot elements.
Common DIY Mistakes (And How to Avoid Them)
- Blocking soffit vents: always use baffles so insulation can’t clog airflow.
- Skipping air sealing: this is why “new insulation didn’t help much.”
- Compressing batts: it reduces performancecut to fit instead.
- Insulating knee walls without an air barrier: wind washing kills R-value fast.
- Creating a moisture trap: avoid double vapor barriers; use assemblies that can dry.
When to Call a Pro (No Shame, Just Wisdom)
DIY is greatuntil it’s not. Consider professional help if:
- You need a full unvented spray foam roofline.
- You suspect asbestos/vermiculite or extensive mold.
- Your attic has complex framing or limited venting and you’re not sure the assembly will stay dry.
- There are multiple HVAC ducts up there and you’re changing the thermal envelope location.
DIY Experience Notes: What Finishing Attics Teaches You (the Fun Way)
Here’s the part nobody tells you until you’re halfway through the job and sitting on a joist, wondering why your knees have suddenly aged 40 years:
finishing an attic is less like “one project” and more like a small series about problem-solving. You start confidentarmed with a shopping list and optimism
and then you meet the attic’s personality. It has opinions. It has surprises. It has exactly one nail sticking out at forehead height.
The biggest “aha” moment for most DIYers is how much air sealing changes everything. A lot of people expect insulation to be the hero,
but air leaks are the villains doing the most damage. Once you seal the top plates, the wiring holes, the plumbing stack gaps, and the weird chase that
leads to who-knows-where, the space feels calmerless drafty, less “temperature roulette.” It’s the difference between “cozy” and “why is there a breeze
in my bedroom… indoors?”
Another real-world lesson: knee walls are drama queens. You can install beautiful batts between studs and still get a cold room if the attic-side
of that wall is exposed to moving air. The first time you add a rigid foam air barrier and tape the seams like you actually mean it, you’ll understand why
pros get so excited about “continuous air barriers.” It’s not glamorous, but it’s wildly effectivelike flossing for buildings.
DIYers also discover that ventilation details are not optional. It’s tempting to cram insulation all the way to the roof deck because it feels like
“more insulation = more better.” But if you’re building a vented roofline, those baffles are sacred. The best installs keep that soffit-to-ridge pathway clear,
even when it means working in tight rafter bays with a stapler and a vocabulary you don’t want your neighbors to hear.
Comfort-wise, the most satisfying upgrades usually come from layering strategies: a snug cavity fill plus a thin layer of continuous insulation to cut thermal bridging.
People describe it as the attic suddenly feeling “normal”not a space that overheats at noon and turns into an icebox at midnight. And yes, you may still want a fan
or mini-split depending on your climate and roof exposure, but good insulation makes HVAC work with you instead of fighting you.
Finally, there’s the emotional side: a finished attic is a victory lap. Once it’s insulated correctly, the room becomes genuinely usefuloffice, guest room, studio,
reading nook, teen hangout, or “I need five minutes away from everyone” sanctuary. The best DIY feeling is stepping into that space during a heat wave or cold snap
and realizing: it’s steady, quiet, and comfortable. That’s not luck. That’s you making smart building-science choices while wearing safety glasses slightly crooked.