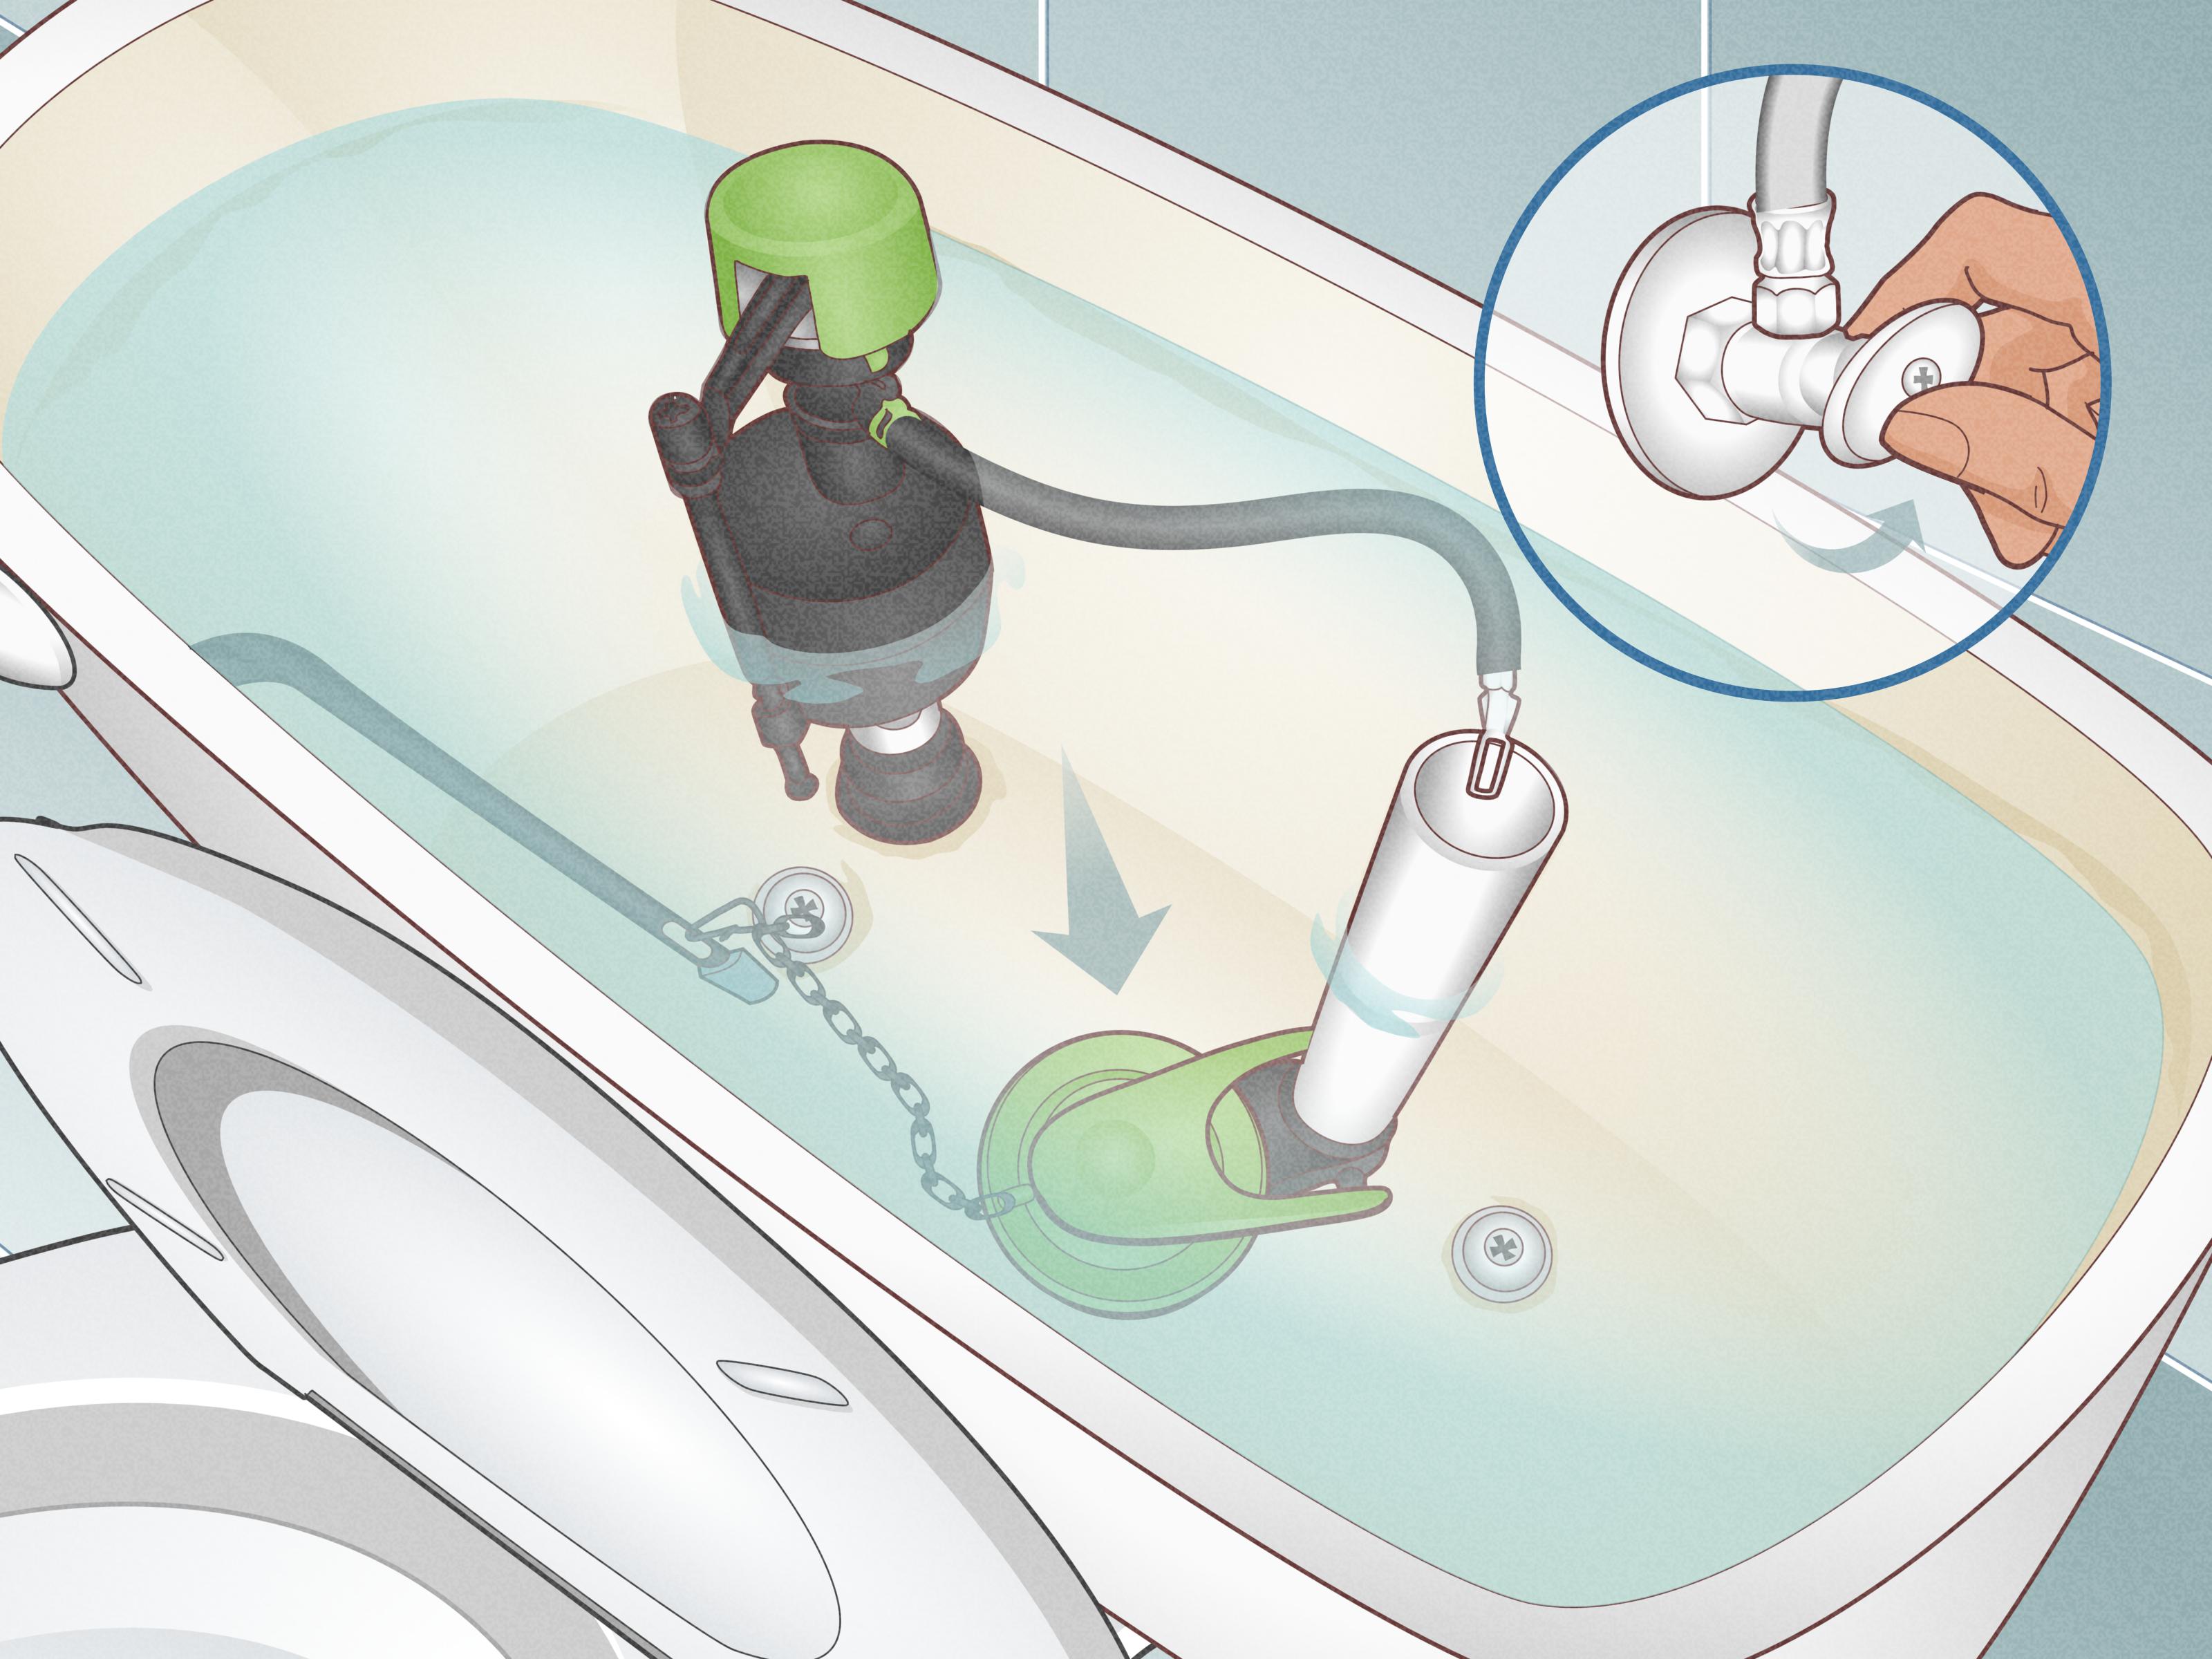
A toilet that keeps running is like a smoke alarm with a gym membership: small, loud, and determined to ruin your peace. In many cases, the culprit is a worn, warped, dirty, or badly adjusted flapper. The good news? Fixing a toilet flapper is one of the easiest bathroom repairs a homeowner can tackle without summoning a plumber, a prayer circle, or a second mortgage.
If your toilet refills at random, hisses when no one has flushed, or quietly leaks water into the bowl all day long, this guide walks you through the job step by step. You will learn how to diagnose the problem, replace the flapper correctly, avoid common mistakes, and know when the issue is bigger than the flapper itself. Grab a pair of gloves and your best “I totally know what I’m doing” face. Let’s fix that toilet.
What a Toilet Flapper Does
The flapper is the rubber or plastic-and-rubber valve at the bottom of the toilet tank. When you flush, the handle lifts the chain, the chain lifts the flapper, and water rushes from the tank into the bowl. After the flush, the flapper drops back down to seal the flush valve opening so the tank can refill.
When that seal fails, even slightly, water sneaks from the tank into the bowl. The fill valve then keeps topping off the tank, which leads to the classic running toilet sound. Translation: your toilet becomes a tiny indoor waterfall with a utility bill.
Signs the Flapper Is the Problem
Before replacing anything, make sure the flapper is actually the troublemaker. Common clues include a toilet that runs on and off, a weak flush, a handle that needs jiggling, or water that seems to disappear from the tank for no obvious reason.
An easy test is the food coloring test. Add several drops of food coloring to the tank and wait without flushing. If color appears in the bowl, water is leaking past the flapper or flush valve area. That simple test can save you from guessing and prevent you from replacing the wrong part.
Tools and Supplies You May Need
- Replacement toilet flapper
- Rubber gloves
- Sponge or small towel
- Cleaning cloth or scrub pad
- Measuring tape or ruler
- Flashlight
- Scissors or wire cutters for excess chain, if needed
Most flapper jobs do not require a toolbox that would impress a contractor. The repair is simple, but buying the correct replacement matters. Toilets commonly use a 2-inch or 3-inch flapper, and some models use a canister-style flush valve instead of a standard flapper. If your toilet has a flapper built into the flush valve assembly, you may need more than a basic flapper replacement.
How to Fix a Flapper on a Toilet in 10 Easy DIY Steps
Step 1: Confirm the Flapper Is Leaking
Start with the dye test or simply listen closely. If the toilet refills every few minutes for no reason, the tank is losing water. Lift the lid carefully and look inside. If the water level slowly drops and the flapper looks crooked, stiff, or crusty, you are on the right track.
Step 2: Buy the Right Replacement Flapper
Do not wing it in the plumbing aisle like you are picking candy. Toilet flappers are not all the same. Measure the flush valve opening or compare your old flapper to the replacement. In general, a standard toilet uses a 2-inch flapper, while many newer or high-performance models use a 3-inch version. Brand-specific toilets may also need a matching part.
If your toilet uses a canister instead of a hinged flapper, stop here and buy the correct seal or flush valve part for that model. A standard flapper will not magically adapt because you believe in it.
Step 3: Shut Off the Water Supply
Find the shutoff valve on the wall below or behind the toilet and turn it clockwise until the water stops. This prevents the tank from refilling while you work. If the valve is stubborn, do not force it like you are opening a pickle jar in a competition. Use steady pressure. If it will not budge, you may need to shut off the home’s main water supply before continuing.
Step 4: Flush and Drain the Tank
Flush the toilet to empty most of the tank water. Hold the handle down if needed so as much water as possible drains out. Use a sponge or towel to soak up the last bit of water near the bottom. A mostly dry tank makes the repair easier and keeps your hands from feeling like they joined a swamp expedition.
Step 5: Inspect the Chain, Flapper, and Valve Seat
Now look closely. Is the chain too short and holding the flapper slightly open? Is it so long that it can get trapped under the flapper? Is the flapper warped, slimy, cracked, or stiff? Check the flush valve seat too, which is the smooth rim the flapper seals against. Mineral deposits, grit, or rough spots can prevent a watertight seal.
Sometimes the fix is not replacement at all. A simple chain adjustment or a quick cleaning solves the issue. That is the plumbing version of finding twenty dollars in an old jacket pocket.
Step 6: Clean the Valve Seat and the Flapper Area
Use a cloth, sponge, or non-scratching scrub pad to clean the flush valve seat and surrounding area. Remove mineral buildup, slime, and debris. If the old flapper is still in decent condition, cleaning both surfaces may improve the seal. If the flapper is worn, keep cleaning anyway because a new flapper seals best on a clean surface.
A dirty valve seat is one of the most common reasons a flapper replacement seems to “not work.” The part is innocent; the seat is guilty.
Step 7: Remove the Old Flapper
Unhook the chain from the flush lever arm. Then detach the flapper from the mounting ears on the overflow tube. Some flappers pop off easily, while others require a little wiggle. If the rubber feels brittle or leaves residue on your fingers, congratulations, you have found a flapper that has fully committed to retirement.
Step 8: Install the New Flapper
Attach the new flapper to the mounting ears on the overflow tube or follow the manufacturer’s instructions if the design is slightly different. Hook the chain to the flush lever arm. Make sure the flapper sits evenly over the flush valve opening. It should rest flat and centered, not tilted like a hat in a jazz club.
If the replacement flapper has adjustment settings for water-saving or flush timing, start with the default setting recommended on the package. You can fine-tune later if needed.
Step 9: Adjust the Chain for Proper Slack
This step matters more than many DIYers realize. The chain should have a small amount of slack when the flapper is closed. Too tight, and the flapper cannot seal. Too loose, and the chain may snag under the flapper or fail to lift it fully during a flush.
A good rule is to leave just enough slack for the flapper to sit flat, while still allowing the handle to lift it cleanly. Trim or secure extra chain if there is a long tail hanging around inside the tank.
Step 10: Turn the Water Back On and Test
Slowly reopen the shutoff valve and let the tank refill. Watch how the flapper behaves during the fill cycle. Flush the toilet several times. The flapper should lift, drop, and reseal smoothly. Listen for phantom refills over the next few minutes. If the toilet stays quiet, you did it. Your bathroom can now return to being boring, which is exactly what you want from plumbing.
Common Problems After Replacing a Toilet Flapper
The Toilet Still Runs
If the toilet keeps running after the new flapper is installed, check the chain first. A chain that is too short is the classic repeat offender. Next, confirm the flapper is the correct size and seated properly. Then inspect the valve seat for cracks, pitting, or stubborn buildup.
The Toilet Has a Weak Flush
If the new flapper closes too quickly, the tank may not release enough water during the flush. Some adjustable flappers can be tuned to stay open slightly longer. Also make sure the chain is not too loose and the handle lifts the flapper fully.
The Flapper Will Not Stay Centered
This may happen if the flapper is the wrong style for your toilet or if the mounting ears are damaged. At that point, replacing the flush valve assembly may be the better repair.
When the Flapper Is Not the Real Problem
Not every running toilet is a flapper issue. Sometimes the fill valve is malfunctioning, the float is set too high, or the refill tube is pushed too far down into the overflow pipe. In those cases, the toilet may keep running even with a brand-new flapper.
Here is when to suspect another problem:
- Water flows into the overflow tube continuously
- The tank water level rises too high
- The refill tube sits below the water line
- The flush valve seat is cracked or damaged
- Your toilet uses an integrated canister or specialty flush system
If you replace the flapper, adjust the chain, clean the seat, and the toilet still runs, shift your attention to the fill valve and flush valve assembly.
How Long Does This Repair Take?
For most homeowners, fixing a toilet flapper takes less than 30 minutes. If the shutoff valve works, the part matches, and the tank is not full of mineral buildup from a hundred years of hard water, it can be even faster. It is one of the rare DIY projects that usually finishes before your coffee gets cold.
How to Keep the New Flapper Working Longer
- Check the tank once or twice a year for wear, buildup, or chain issues.
- Clean the flush valve seat when you notice residue forming.
- Avoid harsh in-tank chemical cleaners that can wear out rubber parts faster.
- Address small running-toilet symptoms early before they become bigger repairs.
- Use the correct replacement part instead of forcing a “close enough” solution.
Toilet flappers are simple parts, but they work hard. They open, close, soak in water, and deal with minerals, chemicals, and constant use. They eventually wear out. That is normal. The trick is catching the problem before the toilet turns into a slow-motion money leak.
Real-World Experiences and Lessons From Fixing Toilet Flappers
One of the funniest things about toilet flapper repairs is how often people assume the worst before checking the easiest part. A toilet starts running, and suddenly the mind goes straight to “The entire bathroom is doomed.” In reality, many homeowners lift the tank lid, see a chain that is too tight, make a tiny adjustment, and the problem disappears in under five minutes. That is not just satisfying. That is superhero-level efficiency in slippers.
Another common experience is discovering that the old flapper looks fine until you touch it. It may seem normal from above, but once removed, the rubber is often stiff, warped, slimy, or slightly cracked around the sealing edge. That is why a toilet can leak even when nothing appears obviously broken. Rubber ages quietly. It does not always crumble dramatically like a movie villain. Sometimes it just stops sealing well enough to do its job.
Many DIYers also learn that cleaning matters almost as much as replacing. A new flapper placed on a crusty flush valve seat can still leak, which leads to the frustrating conclusion that the new part is defective. Usually it is not. The real issue is mineral buildup, especially in homes with hard water. Wiping down the seat, removing residue, and then reseating the flapper often makes the difference between “Why is this still running?” and “Well, that fixed it immediately.”
Then there is the famous chain problem. A chain that is too short acts like an overeager assistant and holds the flapper open. A chain that is too long can slide under the flapper and break the seal. Plenty of people replace the flapper only to discover that the chain was the real drama queen all along. It is a good reminder that toilet repairs are not always about replacing parts. Sometimes they are about paying attention to tiny details with surprisingly large consequences.
Homeowners with newer toilets often run into another lesson: not every toilet uses the same setup. Some people proudly return from the store with a universal flapper, open the tank, and discover they have a canister-style flush valve instead. Cue the classic DIY stare into the middle distance. It is a useful lesson in checking the inside of the tank before buying parts. A two-minute inspection can save an extra trip to the store and the emotional cost of arguing with plumbing hardware on a Saturday afternoon.
There is also the surprisingly satisfying moment when the toilet finally goes silent. No hiss. No ghost refill. No random water noise in the middle of the night that makes you wonder whether the bathroom is haunted. Just silence. It is one of the most underrated victories in home maintenance. Fixing a flapper will not get you applause from the neighborhood, but it does deliver the kind of low-key triumph that makes ordinary life better.
People who tackle this repair for the first time often come away more confident than expected. Once you understand the fill valve, flush valve, chain, and flapper, the inside of a toilet tank stops looking mysterious. It becomes a simple system with a few moving parts. That confidence tends to spill over into other repairs too. Suddenly, replacing a showerhead or fixing a loose handle does not seem so intimidating.
The biggest lesson from real flapper-fixing experience is this: simple repairs are worth learning. A running toilet wastes water, makes noise, and chips away at your patience. But the solution is often inexpensive, fast, and beginner-friendly. In the grand universe of home repair, fixing a toilet flapper is one of the best places to start. Low risk, high reward, and no need to open a wall. That is a beautiful thing.
Conclusion
If your toilet keeps running, fixing the flapper is one of the smartest first steps you can take. It is simple, affordable, and often solves the problem without a major repair. The key is to confirm the leak, choose the right replacement, clean the sealing surface, and adjust the chain correctly. Those little details turn a “temporary fix” into a solid repair.
Whether your issue is a worn rubber seal, mineral buildup, or a chain with commitment issues, this is a DIY plumbing job most homeowners can handle confidently. And once the toilet stops running, you get more than a quieter bathroom. You get the sweet satisfaction of having outsmarted a surprisingly dramatic piece of plumbing.