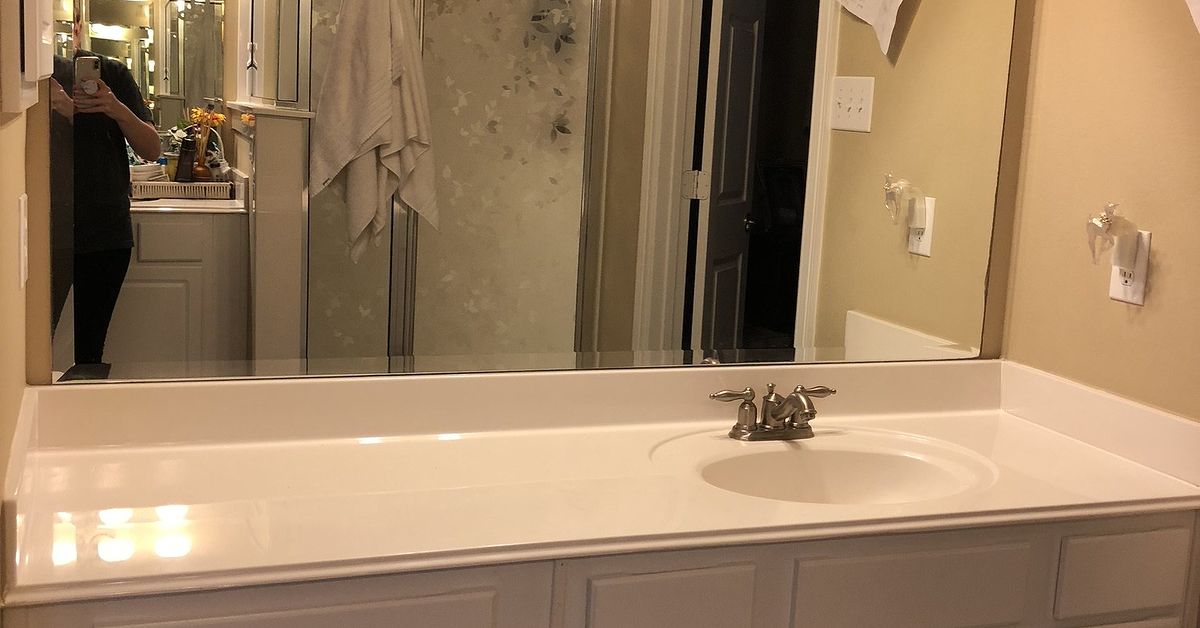
A builder grade mirror is wonderfully good at showing your reflection and remarkably bad at showing any personality. Usually large, frameless, and attached directly to the bathroom wall, it can make an otherwise attractive vanity feel unfinished. Fortunately, you do not need to wrestle a giant sheet of glass off the wallor explain the resulting disaster to your insurance companyto improve it.
A DIY mirror frame can transform that plain rectangle into a custom-looking focal point for far less than the cost of a replacement mirror. The basic project involves measuring carefully, cutting four pieces of molding or lumber, applying a moisture-resistant finish, and attaching the frame over the existing glass with an appropriate adhesive.
This guide explains how to frame a builder grade mirror safely, including what to do about mounting clips, how to calculate mitered cuts, which materials work well in humid bathrooms, and how to avoid the little mistakes that become surprisingly visible at eye level.
Why Frame a Builder Grade Bathroom Mirror?
Replacing a large vanity mirror can become expensive quickly. Besides buying a new mirror, you may need heavy-duty mounting hardware, wall repairs, paint touch-ups, and a second person willing to hold a large piece of glass while questioning your life choices.
Framing the existing mirror offers several advantages:
- It creates a custom appearance without removing the mirror.
- It can coordinate the vanity, lighting, faucets, and cabinet hardware.
- It covers chipped edges, aging adhesive marks, and small installation gaps.
- It requires only basic woodworking tools and beginner-friendly techniques.
- It produces a major visual change without a full bathroom renovation.
The frame is decorative, however. It should never be expected to support the mirror itself. Before beginning, confirm that the glass is securely attached with approved clips, channels, fasteners, mirror mastic, or another proper mounting system.
Choose the Right Frame Material
The best material depends on the desired style, available tools, and bathroom humidity. Bring a sample of the vanity finish, paint color, or cabinet hardware when shopping. Memory is not a reliable color-matching tool, particularly under the dramatic fluorescent lighting of a home-improvement store.
Common Pine or Select Wood Boards
Solid wood is a good choice for a stained, rustic, farmhouse, or natural frame. Select straight boards with minimal twisting, cupping, and large knots. Pine is affordable and easy to cut, although it can absorb stain unevenly. Sanding and applying a compatible pre-stain wood conditioner can reduce blotching.
Stain adds color but does not fully protect wood. Apply a clear protective topcoat after the stain dries, paying special attention to cut ends and the bottom board, where splashed water tends to gather.
Primed MDF Molding
Medium-density fiberboard is smooth, affordable, and excellent for painted frames. Decorative baseboard or door casing can produce a polished result with minimal woodworking. MDF does not appreciate moisture, though. Prime and paint the front, back, edges, and cut ends before installation so humid air cannot reach exposed fibers.
PVC or Composite Trim
PVC and moisture-resistant composite molding are practical options for frequently used bathrooms. They resist swelling and do not require the same degree of sealing as unfinished wood. Confirm that your chosen adhesive and paint are compatible with the trim material.
Ready-Made Mirror Frame Kits
A mirror framing kit is the easiest route when custom cutting is not appealing. Many kits attach over an existing frameless mirror and include precut molding, corner hardware, adhesive, or mounting strips. They usually cost more than raw lumber but reduce the chance of a miter-saw melodrama.
Tools and Materials
- Tape measure and pencil
- Four pieces of wood, MDF, PVC, or decorative molding
- Miter saw, miter box with hand saw, or suitable cutting tool
- Speed square and level
- 120-grit and 220-grit sandpaper
- Primer and bathroom-suitable paint, or stain and clear finish
- Paintbrush, foam roller, or clean staining cloths
- Adhesive specifically rated for glass or mirrors and the selected frame material
- Wood glue for joining wood corners
- Paintable caulk or wood filler
- Painter’s tape and optional corner clamps
- Safety glasses, hearing protection, and work gloves
- Optional rotary tool or router for recessing mirror clips
Read the adhesive label rather than relying on the heroic claims printed in the largest font. The product must bond the frame material to glass and be suitable for the bathroom environment. Follow its instructions for surface preparation, application pattern, working time, ventilation, temporary support, and full cure time.
How to Measure a Builder Grade Mirror for a Frame
Measure the mirror’s width and height in at least two places. Walls, vanities, and mirrors are not always perfectly square, even when they appear innocent. Use the smallest relevant measurement if the available clearance varies.
Inspect all four sides before choosing the frame width. Account for:
- Light fixtures above or beside the mirror
- Faucet handles and backsplash clearance below it
- Side walls, outlets, switches, shelves, and cabinets
- Plastic clips, metal channels, screws, or anchors
- How much glass the frame will overlap
An overlap of approximately 1/2 to 1 inch on each side is common, provided it does not interfere with hardware. The frame must cover enough glass to hide the unfinished perimeter while leaving a useful reflective area.
A Simple Mitered-Frame Example
Suppose the mirror measures 60 inches wide by 36 inches high, and the frame will overlap the glass by 3/4 inch on every side. The intended inner opening would be 58 1/2 inches wide by 34 1/2 inches high.
For a traditional mitered frame, the short inside edge of the top and bottom pieces should match the planned inner width. The short inside edge of each side piece should match the planned inner height. The long outside edge of each piece depends on the actual width of the molding.
Do not assume that a board’s nominal size is its true size. A board sold as a 1-by-4 is typically about 3 1/2 inches wide. Measure the material in your hands before cutting; lumber has already supplied enough plot twists.
How to Handle Mirror Clips
Do not remove mounting clips merely because they prevent the trim from lying flat. If the clips help secure the mirror, removing them could leave the glass inadequately supported.
Low-profile clips may disappear behind sufficiently thick molding. For protruding plastic clips, mark their locations on the back of the frame and create shallow recesses with a router or rotary tool. Remove only enough frame material to clear the hardware without weakening the board.
Another option is to add thin spacers behind all four frame pieces so they sit evenly above the clips. Commercial frame kits may include clip-clearing systems. Whichever method you choose, dry-fit every piece before applying adhesive.
How To DIY Frame Your Builder Grade Mirror Step by Step
1. Clean and Inspect the Mirror
Clean the front surface, especially where the frame will attach, using a method approved by the adhesive manufacturer. Remove soap film, grease, dust, and old residue, then allow the glass to dry completely.
Check for cracks, loose clips, blackened edges, and movement. A decorative frame can conceal minor cosmetic wear, but it should not disguise a damaged or poorly secured mirror. Consult a glass professional if the mirror is cracked, unstable, unusually large, or mounted in a way you cannot identify.
2. Mark and Cut the Frame Pieces
Mark the inner and outer edges of every piece so you do not accidentally cut two left sides and no right sidea classic DIY achievement. For mitered corners, set the saw to 45 degrees and cut slowly with the finished face positioned according to the saw manufacturer’s instructions.
Cut pieces slightly long when uncertain. You can remove another 1/16 inch; putting it back requires advanced woodworking sorcery. After the first matching piece is correct, use it as a template for its opposite partner.
If miters feel intimidating, use square butt joints. Place the side boards between full-width top and bottom boards, or reverse the arrangement. This modern frame style requires straight 90-degree cuts and can look intentional, clean, and substantial.
3. Dry-Fit the Entire Frame
Position the pieces on the mirror with painter’s tape. Confirm that the frame is level, the corners close neatly, the overlap is consistent, and the reflection does not reveal unfinished material behind the inner edges.
Stand at normal viewing distance and open nearby cabinets. Turn faucet handles, check the light fixture, and make sure the frame does not block an outlet. Five minutes of testing can prevent a beautifully finished frame from becoming an unusually decorative obstruction.
4. Sand and Finish Every Visible Surface
Remove the boards and sand in the direction of the wood grain. Start with approximately 120-grit paper to smooth rough areas, then use 220-grit for a finer finish. Ease sharp edges lightly without changing the dimensions of the joints.
For a painted frame, prime bare wood or MDF and apply durable paint suitable for interior trim and humid rooms. Thin, even coats usually look better than one enthusiastic coat. Sand lightly between coats if the product directions recommend it.
For a stained frame, test the complete finishing system on a scrap. Apply conditioner when appropriate, stain with the grain, wipe away unabsorbed product within the label’s stated time, and let it dry. Finish with a protective clear coat.
Coat the backs and inner edges as carefully as the fronts. The mirror will reflect part of the back edge, turning any unfinished stripe, stain drip, or pencil note into a permanent little exhibit.
5. Assemble the Frame or Install It Piece by Piece
A manageable frame can be assembled on a flat surface before installation. Apply wood glue to wooden corner joints, align them with corner clamps or a square, and allow the assembly to set. Reinforce the back with flat corner braces only if they will not contact the glass or prevent the frame from sitting evenly.
For a very large mirror, installing individual pieces may be easier. Begin with the bottom piece if it can be positioned and supported securely, then add the sides and top. Constantly check the corners, level, and spacing.
6. Apply the Correct Adhesive
Follow the selected adhesive’s directions exactly. Apply it far enough from the inner edge that it cannot squeeze into the visible reflection. Avoid giant blobs; excess adhesive can prevent the frame from lying flat and may ooze onto the glass.
Press each piece or the assembled frame into position within the product’s working time. Use painter’s tape to hold it securely without scratching the finish. A level and speed square help keep the pieces aligned while the adhesive is still adjustable.
Never drive a nail or screw through a frame that overlaps the mirror unless you know it will enter clear wall space. Guessing where the glass ends is an exciting game with a terrible prize.
7. Allow the Adhesive to Cure
Leave the temporary tape or support in place for the time specified by the manufacturer. “Grabs instantly” does not necessarily mean “fully cured instantly.” Bathroom humidity, temperature, frame weight, and the materials being bonded can affect curing.
Avoid shower steam and splashing while the adhesive and finish cure. Ventilate the room according to the product instructions, and keep children and pets away from wet coatings and tools.
8. Fill, Caulk, and Touch Up
After the frame is secure, fill tiny gaps at painted corners with paintable caulk or wood filler. Smooth the repair, allow it to dry, and apply touch-up paint. Stained frames are less forgiving; tinted filler or carefully color-matched touch-up products usually look better than white caulk.
Clean the exposed glass without flooding the lower frame. Spray cleaner onto a microfiber cloth instead of spraying the mirror directly, which helps keep liquid away from the wood, adhesive, and mirror edges.
Design Ideas for a Custom Mirror Frame
Modern Black
Use simple square-edged molding with a satin or matte black finish. This style coordinates well with black faucets, light fixtures, and cabinet pulls without requiring every metal finish in the room to match perfectly.
Warm Natural Wood
A medium-tone wood frame adds warmth to white tile, gray walls, or a painted vanity. Choose a stain that complements the cabinet instead of attempting an almost-but-not-quite exact match.
Classic Painted Trim
Door casing or layered molding can give a plain vanity mirror an architectural appearance. Match the frame to the room’s trim for continuity, or use the vanity color to create a furniture-like focal point.
Wide Spa-Inspired Frame
Wide, streamlined boards make an oversized mirror feel substantial and intentional. Before committing, tape paper strips to the glass in the proposed width. This mock-up reveals how much reflection the frame will consume without sacrificing any lumber.
Common DIY Mirror-Framing Mistakes
- Using ordinary construction adhesive: Select a product explicitly compatible with glass or mirrors and the framing material.
- Ignoring mounting clips: Recess the frame, add spacers, or use a clip-compatible kit without compromising the mirror’s support.
- Finishing only the front: Reflections expose raw inner edges, while bathroom humidity can reach unsealed backs and cut ends.
- Skipping the dry fit: Test all four pieces, hardware clearances, corners, and the reflected edges before gluing.
- Measuring only once: Check the mirror at multiple points and verify opposite frame pieces against each other.
- Applying adhesive near the inner edge: Squeeze-out becomes visible and is much harder to remove after curing.
- Rushing cure time: Tape and support the frame for the full period specified on the label.
- Leaving MDF edges unsealed: Moisture can cause exposed MDF to swell and create fuzzy, distorted edges.
Project Cost and Time
A basic DIY bathroom mirror frame can often be completed with several boards, adhesive, sandpaper, and finishing supplies. The final cost varies with mirror size, molding style, wood species, finish, and whether tools must be purchased or rented. Decorative hardwood and commercial kits increase the budget, while common boards or primed molding keep it modest.
Cutting and fitting may take only a few hours, but finishing and adhesive curing can extend the project across several days. Plan around drying time rather than promising the household a one-hour makeover. Paint and glue are immune to motivational speeches.
Real-World Experiences and Lessons From Mirror-Frame Projects
The most common lesson from DIY mirror framing is that preparation determines whether the installation feels easy or mysteriously cursed. Many first-time builders focus on choosing a beautiful stain and overlook the less glamorous details: clip depth, reflected edges, faucet clearance, and whether the wall is square. Those details are exactly what separate a crisp custom frame from four attractive boards having an argument.
The Reflected Back-Edge Surprise
A frequent experience occurs after a perfectly painted frame is placed against the mirror: the glass reflects the unfinished back of the molding. From straight ahead, everything looks wonderful. From the side, a pale stripe of raw MDF or lumber appears around the opening.
The practical lesson is to paint or stain the back several inches beyond the inside edge. Finishing the entire back provides even better moisture protection. Dark frames are especially revealing because a light unfinished edge creates a noticeable line in the reflection.
The “Perfect” Miter That Was Not Perfect
Another familiar problem is four mathematically correct 45-degree cuts that refuse to create four tight corners. The cause may be a slightly misaligned saw, bowed molding, inconsistent measurements, or a mirror that is not perfectly square.
Experienced DIYers dry-fit the complete rectangle on a flat surface and then test it on the mirror. They compare opposite pieces directly and make tiny adjustment cuts rather than repeatedly measuring from scratch. Small gaps in painted frames can be repaired with filler or paintable caulk. For stained frames, tighter joinery matters because patches are harder to conceal.
The Clip Conflict
Mirror clips often appear harmless until the frame rocks on top of them. Removing the clips can seem like the quickest solution, but it may compromise the glass installation. Successful projects treat the mounting hardware as a fixed design constraint.
Shallow recesses in the back of thick molding usually provide a clean solution. On thin trim, evenly distributed spacers or a purpose-made framing kit may work better. The crucial point is that the frame must sit in one consistent plane; otherwise, adhesive contact will be uneven and the corners may lift.
The Sliding-Frame Moment
A large frame may look stationary immediately after it is pressed onto the glass, then slowly drift while the adhesive remains wet. Gravity is patient and has no respect for fresh miters. Painter’s tape should be applied before the installer steps back to admire the work.
Long strips anchored to clean, secure surfaces can stabilize each frame member. Temporary blocks resting on the vanity may support the bottom board, provided they cannot tip, scratch the counter, or press dangerously against the glass. The adhesive labelnot impatiencedetermines when the support comes off.
The Finish That Finally Tied the Room Together
One of the most satisfying outcomes is how a relatively simple frame connects previously unrelated bathroom elements. A warm wood frame can echo a shelf or woven basket. Satin black can repeat a faucet and towel ring. Painted trim can make the mirror look as though it was designed with the vanity rather than delivered on a builder’s checklist.
The best color is not always an exact cabinet match. Slightly contrasting wood tones often look more intentional than two finishes that nearly match. Before finishing, place sample boards beside the vanity in morning, evening, and artificial light. Bathroom colors can change dramatically once the overhead fixture joins the conversation.
The Final Takeaway From Experienced DIYers
The project rewards patience more than advanced skill. Measure repeatedly, test the frame before gluing, finish every potentially visible surface, respect the existing mounting system, and allow coatings and adhesives to cure fully. Those habits are not glamorous, but neither is watching the top board slide downward during dinner.
Conclusion
Learning how to DIY frame a builder grade mirror is one of the most effective ways to upgrade a bathroom without replacing expensive glass. With carefully selected molding, accurate measurements, sealed surfaces, and an adhesive approved for the materials, a plain mirror can become a polished feature that complements the entire vanity area.
The project is approachable for beginners, but safety remains essential. Confirm that the mirror is structurally secure, leave necessary clips in place, wear appropriate protection while cutting, and seek professional assistance when the glass is cracked, loose, exceptionally large, or difficult to assess.
Note: Product compatibility, ventilation requirements, application methods, support times, and cure times vary. Always follow the current instructions supplied by the mirror, paint, finish, tool, and adhesive manufacturers.