Few woodworking joints earn as much respect, fear, and quiet staring as the dovetail joint. It is beautiful, stubborn, mechanical, old-school, and just dramatic enough to make a drawer look like it went to private school. If you have ever seen the corner of a handmade box or drawer where the boards lock together in a neat row of angled “tails” and “pins,” you have seen why dovetail joints in woodworking are considered a badge of craftsmanship.
The good news: learning how to cut a dovetail joint is not magic. It is a repeatable process built on accurate layout, sharp tools, controlled sawing, careful waste removal, and patient fitting. The bad news: your first dovetail may not look like it belongs in a museum. That is perfectly normal. Your first pancake probably was not shaped like a perfect circle either, and society survived.
This guide walks through the anatomy of a dovetail, the tools you need, the step-by-step process for hand-cut dovetails, router jig options, common mistakes, and practical workshop experience that helps beginners move from “woodworking panic” to “that actually fits.” Whether you are making drawers, boxes, cabinets, trays, or heirloom furniture, a well-cut dovetail joint gives your project strength, style, and a satisfying little flex every time someone notices it.
What Is a Dovetail Joint?
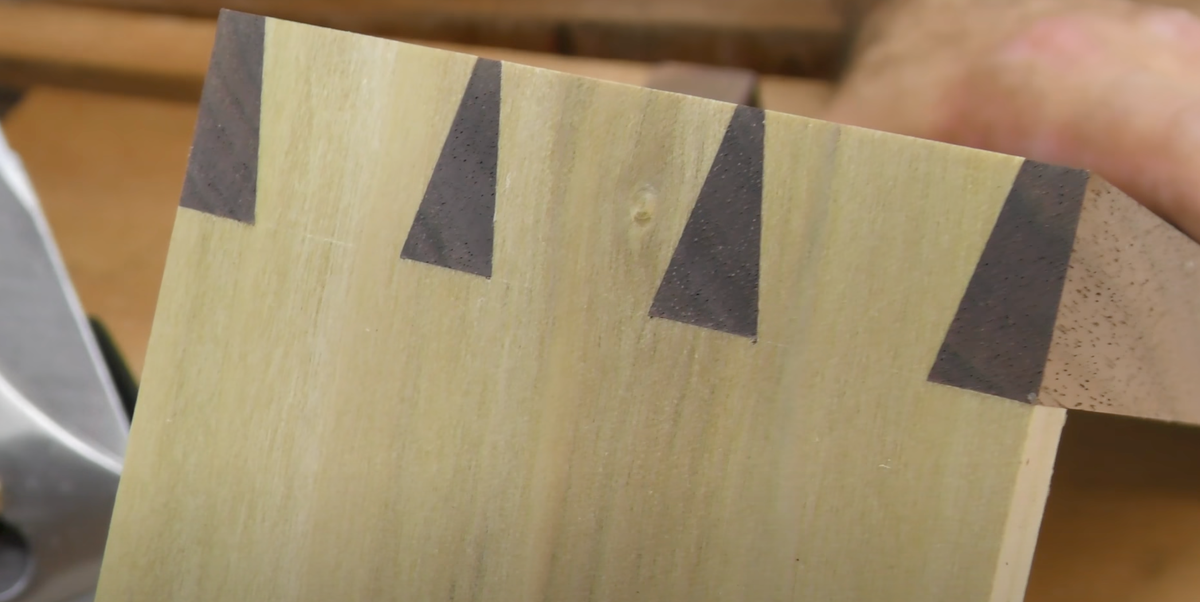
A dovetail joint is an interlocking woodworking joint made by cutting angled tails on one board and matching pins on another. When the two boards slide together, the shapes resist being pulled apart. That mechanical lock is the secret sauce. Glue helps, but the geometry is already doing serious work before the bottle even shows up.
The most common use is joining drawer fronts to drawer sides, but dovetails also appear in boxes, carcasses, chests, cabinets, and decorative joinery. They are valued for two reasons: strength and beauty. A plain butt joint simply places one board against another and depends heavily on glue, screws, or nails. A dovetail joint creates long-grain glue surfaces and a physical wedge shape that fights tension. In simple terms, the joint is not just stuck together; it is trapped together.
Main Parts of a Dovetail Joint
Before cutting anything, learn the vocabulary. The wide, fan-shaped pieces are called tails. The narrower pieces that fit between them are called pins. The gaps between pins or tails are often called sockets. The baseline is the line that marks the depth of the joint, usually equal to the thickness of the mating board. Cut beyond this line and your joint may show gaps. Stop short of it and the boards may not seat fully. The baseline is not a suggestion; it is the tiny pencil line with authority issues.
Types of Dovetail Joints in Woodworking
Through Dovetail Joint
A through dovetail shows the end grain of both boards on both faces of the corner. This is the classic dovetail seen on boxes and many handmade drawers. It is also the best style for beginners because the layout is visible and the process is easier to understand.
Half-Blind Dovetail Joint
A half-blind dovetail hides the joint from the front while showing it on the side. This is common in drawer construction where the maker wants a clean drawer front but still wants the strength of dovetail joinery. It is more challenging than a through dovetail because the sockets do not pass all the way through the front board.
Sliding Dovetail Joint
A sliding dovetail is shaped like a tapered dado. One board has a dovetail-shaped groove, and the other has a matching tongue. It is excellent for shelves, dividers, and cabinet parts because it locks components together while adding glue surface.
Machine-Cut Dovetails
Router jigs can cut clean, repeatable dovetails, especially when making multiple drawers. They are practical, fast, and accurate once set up correctly. Hand-cut dovetails, however, offer more design freedom. You can vary the spacing, make thinner pins, and give the work a handmade character that says, “Yes, I did this on purpose.”
Tools Needed to Cut a Dovetail Joint by Hand
You do not need a palace-sized shop to cut dovetails. You need sharp tools, stable workholding, and enough patience not to blame the wood for your coffee-fueled layout mistake.
- Dovetail saw: A fine-toothed backsaw designed for accurate rip cuts along the grain.
- Marking gauge: Used to scribe the baseline around the boards.
- Marking knife: Produces crisp layout lines that guide the saw and chisel better than pencil alone.
- Sliding bevel or dovetail marker: Helps mark consistent tail angles.
- Sharp chisels: Essential for chopping and paring waste cleanly.
- Coping saw or fret saw: Removes most of the waste between tails and pins.
- Woodworking vise or clamps: Holds boards steady while cutting.
- Square: Keeps layout lines accurate across the end grain and faces.
- Mallet: Used with chisels for controlled chopping.
- Fine file or small rasp: Useful for tiny adjustments, though chisels should do most of the fitting.
Sharpness matters. A dull chisel turns dovetail work into emotional cardio. If your chisel crushes fibers instead of slicing them, stop and sharpen. The fastest way to cut cleaner dovetails is often not buying a new jig; it is honing the tools you already own.
Choosing Wood for Practice Dovetails
Start with straight-grained, medium-density wood. Poplar is a friendly practice choice because it is inexpensive and easy to cut, though it can bruise if your tools are dull. Pine is cheap but can be soft and splintery. Cherry, walnut, and maple produce beautiful dovetails, but harder woods demand sharper tools and better control.
For practice, mill your boards square and flat. Dovetails punish twisted, cupped, or uneven stock. If the ends are not square, the joint may be doomed before the saw even touches wood. Think of stock preparation as the quiet first step that saves you from loud frustration later.
Step-by-Step: How to Cut a Dovetail Joint
Step 1: Prepare and Label the Boards
Plane or sand the boards flat, square the ends, and mark the inside and outside faces. Label the parts clearly: front, side, inside, outside, top, and bottom. This may feel excessive until you cut perfect tails on the wrong end of the wrong board. Then labeling starts to look like wisdom wearing a pencil mark.
Step 2: Set the Baseline
Set your marking gauge slightly deeper than the thickness of the mating board. Scribe a baseline across the face and edges of each board. This line defines how deep the tails and pins will be cut. A knife or gauge line also gives your chisel a physical groove to register against when cleaning shoulders.
Step 3: Lay Out the Tails
Many woodworkers cut tails first because it is easier to transfer tail shapes onto the pin board. Decide how many tails you want. A small box may use two or three tails per corner. A drawer side may use several evenly spaced tails. Mark the half pins at the edges first, then divide the remaining space for the tails.
Common dovetail angles include around 1:6 for softwoods and 1:8 for hardwoods, though many modern woodworkers choose based on appearance rather than strict tradition. A steeper angle gives a bold, dramatic look. A shallower angle looks refined. Either way, consistency matters more than showing off geometry like you are auditioning for a ruler commercial.
Step 4: Saw the Tail Lines
Clamp the tail board vertically in the vise. Start the saw lightly on the waste side of the line. Use a relaxed grip and let the saw do the cutting. Watch both the face line and the top line so the saw stays square in one direction and angled in the other. Cut down to the baseline, not past it.
The best dovetail sawing advice is simple: sneak up on accuracy. Do not attack the line. Saw just beside it, leaving the line intact. You can remove a hair of extra wood later with a chisel. You cannot put it back, unless you have discovered reverse carpentry, in which case please alert the rest of us.
Step 5: Remove Waste Between the Tails
Use a coping saw or fret saw to remove most of the waste between the tails, staying slightly above the baseline. Then use a sharp chisel to pare or chop down to the baseline. Work halfway from one face, flip the board, and finish from the other side. This reduces tear-out and keeps the shoulder clean.
For the outside waste at the edges, saw or chisel carefully along the baseline. Keep the chisel flat and controlled. The goal is a crisp shoulder, not a crater that looks like a tiny beaver visited your workbench.
Step 6: Transfer the Tails to the Pin Board
Place the tail board on the end of the pin board, aligning the inside faces and edges exactly. Clamp if needed. Use a sharp marking knife to trace the tail shapes onto the end grain of the pin board. This transfer step determines the fit, so take your time. A pencil line is often too thick for fine dovetail work; a knife line is more precise and gives the saw a clean starting boundary.
Step 7: Mark and Saw the Pins
After transferring the tail layout, use a square to extend the lines down to the baseline on the pin board. Mark the waste clearly. This is important because pins and waste can look suspiciously similar when you are tired. Many woodworkers shade the waste with pencil to avoid cutting the wrong side.
Saw on the waste side of each pin line. Pins are usually narrower than tails, so there is less room for error. Keep the saw vertical and stop at the baseline. If you are new to dovetails, slow down here. The pin board is where a good joint becomes either satisfying or educational.
Step 8: Remove Pin Waste
Remove the waste between the pins with a coping saw or chisel. As with the tails, stay slightly proud of the baseline, then pare to the line with a sharp chisel. Use light cuts. Heavy chopping can split the pins or bruise the shoulders. If your pins are thin, treat them like fine china with grain direction.
Step 9: Test the Fit
Bring the joint together by hand. Do not immediately smash it with a mallet like it owes you money. If it starts but stops, look for shiny burnished spots or compressed areas showing where the joint is tight. Pare only those areas. A well-fit dovetail should require firm hand pressure or light mallet taps, not heroic violence.
If the joint is too tight, remove tiny amounts from the sides of pins or sockets. If it is loose, do not panic. Small gaps can sometimes be disguised with careful glue-up and matching sawdust, but the better lesson is in the next attempt. Dovetails teach through repetition, and they are not shy about grading your work.
Step 10: Glue and Clamp
Apply a thin, even coat of glue to the mating surfaces. Too much glue makes a slippery mess and can prevent the joint from closing fully. Assemble the corner and use light clamping pressure if needed. Dovetails should not require extreme clamp force. If they do, something is still too tight.
After the glue dries, plane or sand the proud end grain flush. This final cleanup is one of the pleasures of dovetail woodworking. The joint that looked a little rough during assembly suddenly becomes crisp, polished, and ready to humble your store-bought furniture.
Cutting Dovetails with a Router Jig
If you need to make many drawers, a dovetail jig and router can save time. The jig holds the boards while a router bit follows a template to cut matching pins and tails. Router-cut dovetails are consistent and efficient, especially for production work.
The key is setup. Use test boards of the same thickness and species as your project parts. Adjust the bit depth carefully. A tiny change can make the joint too tight or too loose. Use a backer board or caul when appropriate to reduce tear-out. Once dialed in, a jig can produce clean half-blind or through dovetails repeatedly. It may not have the romantic hand-tool soundtrack, but it does have the lovely rhythm of getting twelve drawers done before dinner.
Common Dovetail Mistakes and How to Fix Them
Cutting on the Wrong Side of the Line
This is the classic beginner mistake. Always mark the waste. Then pause before cutting and ask, “Am I saving the line or sacrificing it?” The correct answer should be clear before the saw moves.
Sawing Past the Baseline
Overcutting leaves visible scars on the finished joint. Practice stopping just short of the baseline and finishing with a chisel if needed. Good lighting helps, and so does not rushing like your dovetail is being timed by a game show host.
Dull Tools
Dull chisels crush fibers, wander in the cut, and make end grain look fuzzy. Keep chisels sharp and polish the backs. Dovetail work rewards sharp edges immediately.
Poor Stock Preparation
Boards that are not square will create joints that do not close cleanly. Check your stock before layout. A perfect dovetail pattern cannot rescue a twisted board.
Forcing the Joint
If the dovetail does not close, find the tight spot. Do not simply clamp harder. Excessive force can split the board or deform the pins. Fitting is a conversation with the wood, not a wrestling match.
Design Tips for Better-Looking Dovetails
Dovetail spacing affects the personality of the piece. Wide tails and narrow pins create a bold handmade look. Even spacing feels tidy and traditional. Uneven spacing can look elegant when done intentionally, especially on fine boxes and custom drawers.
Consider the project style. A rustic tool chest can handle chunky dovetails. A delicate jewelry box may look better with small, refined pins. For drawer fronts, half-blind dovetails hide the joint from the front while still showing craftsmanship on the sides. For decorative boxes, through dovetails proudly display the joinery from both directions.
Are Hand-Cut Dovetails Stronger Than Machine-Cut Dovetails?
Strength depends more on fit, grain direction, glue surface, and wood quality than on whether the joint was cut by hand or machine. A sloppy hand-cut dovetail is not automatically superior to a clean router-cut dovetail. However, hand-cut dovetails allow more flexibility in layout and often produce thinner pins than standard jigs. Machine-cut dovetails offer speed and repeatability.
For one heirloom box, hand tools may be the better choice. For twenty kitchen drawers, a router jig may save your wrists and your weekend. The best method is the one that matches the project, your tools, and your tolerance for sawdust in your socks.
Beginner Practice Plan
If you are learning how to cut a dovetail joint, do not begin on expensive walnut drawer parts. Start with two practice boards. Cut one corner per evening for a week. Keep the first attempt, even if it looks like a raccoon helped. Label it with the date. After five or six practice joints, compare the first and last. The improvement is usually obvious.
Practice one skill at a time. Spend a session only sawing to a line. Spend another session chopping baselines cleanly. Then practice transferring tails to pins. Dovetail success is not one giant skill; it is several small skills stacked together like a very picky sandwich.
Workshop Experience: What Cutting Dovetails Really Teaches You
The first real experience most woodworkers have with dovetails is a mixture of confidence and betrayal. You watch a skilled craftsperson cut a joint in a video, and it looks calm, clean, and almost musical. Then you try it yourself and discover that your saw has developed opinions. The line wanders, the chisel bruises the baseline, and the joint fits with all the elegance of a suitcase stuffed five minutes before checkout.
That awkward beginning is valuable. Dovetails expose the truth about your fundamentals. They reveal whether your boards are square, whether your tools are sharp, whether your layout is precise, and whether your sawing is controlled. A dovetail joint is like a woodworking teacher who does not yell but does leave visible gaps.
One practical lesson is that the marking knife matters more than beginners expect. Pencil lines are fine for rough carpentry, but dovetails live in the world of tiny differences. A knife line gives the saw and chisel a place to register. Once you use a sharp knife line, the work feels less like guessing and more like following a physical track.
Another lesson is that fitting should be slow. Beginners often remove too much wood because they want the joint to close immediately. Experienced woodworkers learn to test, observe, pare, and test again. A few careful shavings can change everything. The joint should gradually improve, not suddenly collapse into looseness because you got ambitious with a chisel.
There is also a rhythm to cutting dovetails. Mark, saw, remove waste, transfer, saw again, chop, pare, test. Once that rhythm becomes familiar, the fear disappears. You stop treating the dovetail as a mystical symbol of elite woodworking and start seeing it as a process. A demanding process, yes, but still a process.
In real projects, dovetails also teach design judgment. Not every piece needs delicate pins thin enough to make your heartbeat audible. A shop drawer can have sturdy, practical dovetails. A presentation box can have elegant, closely spaced joinery. Good craftsmanship is not just technical accuracy; it is choosing the right level of refinement for the object.
The most satisfying moment comes after glue-up, when you plane the joint flush. The end grain brightens, the pins and tails appear crisp, and the corner feels unified. Even if the joint is not perfect, it is yours. It carries evidence of skill, patience, and a small private battle won at the bench. That is why dovetails remain beloved. They are strong, useful, and beautiful, but they also record the hand of the maker. A screw can hold wood together. A dovetail tells a story.
Conclusion
Learning how to cut a dovetail joint is one of the most rewarding steps in woodworking. The joint combines mechanical strength, glue surface, and visual appeal in a way few other wood joints can match. Start with square boards, mark carefully, saw on the waste side, remove waste cleanly, and fit the joint patiently. Whether you use hand tools or a router jig, the principles remain the same: accuracy first, force last, and sharp tools always.
Dovetail joints in woodworking are not just about showing off. They make drawers stronger, boxes more durable, and furniture more refined. More importantly, they train your hands and eyes to work together. Your first dovetail may be humble. Your tenth will be better. Your fiftieth may cause you to stare at drawer corners in public, which is socially unusual but professionally understandable.
If you want to build better furniture, learn dovetails. Practice on scrap, study each mistake, and keep cutting. The dovetail joint rewards patience, and unlike some houseplants, it will not die if you ignore it for a weekend.