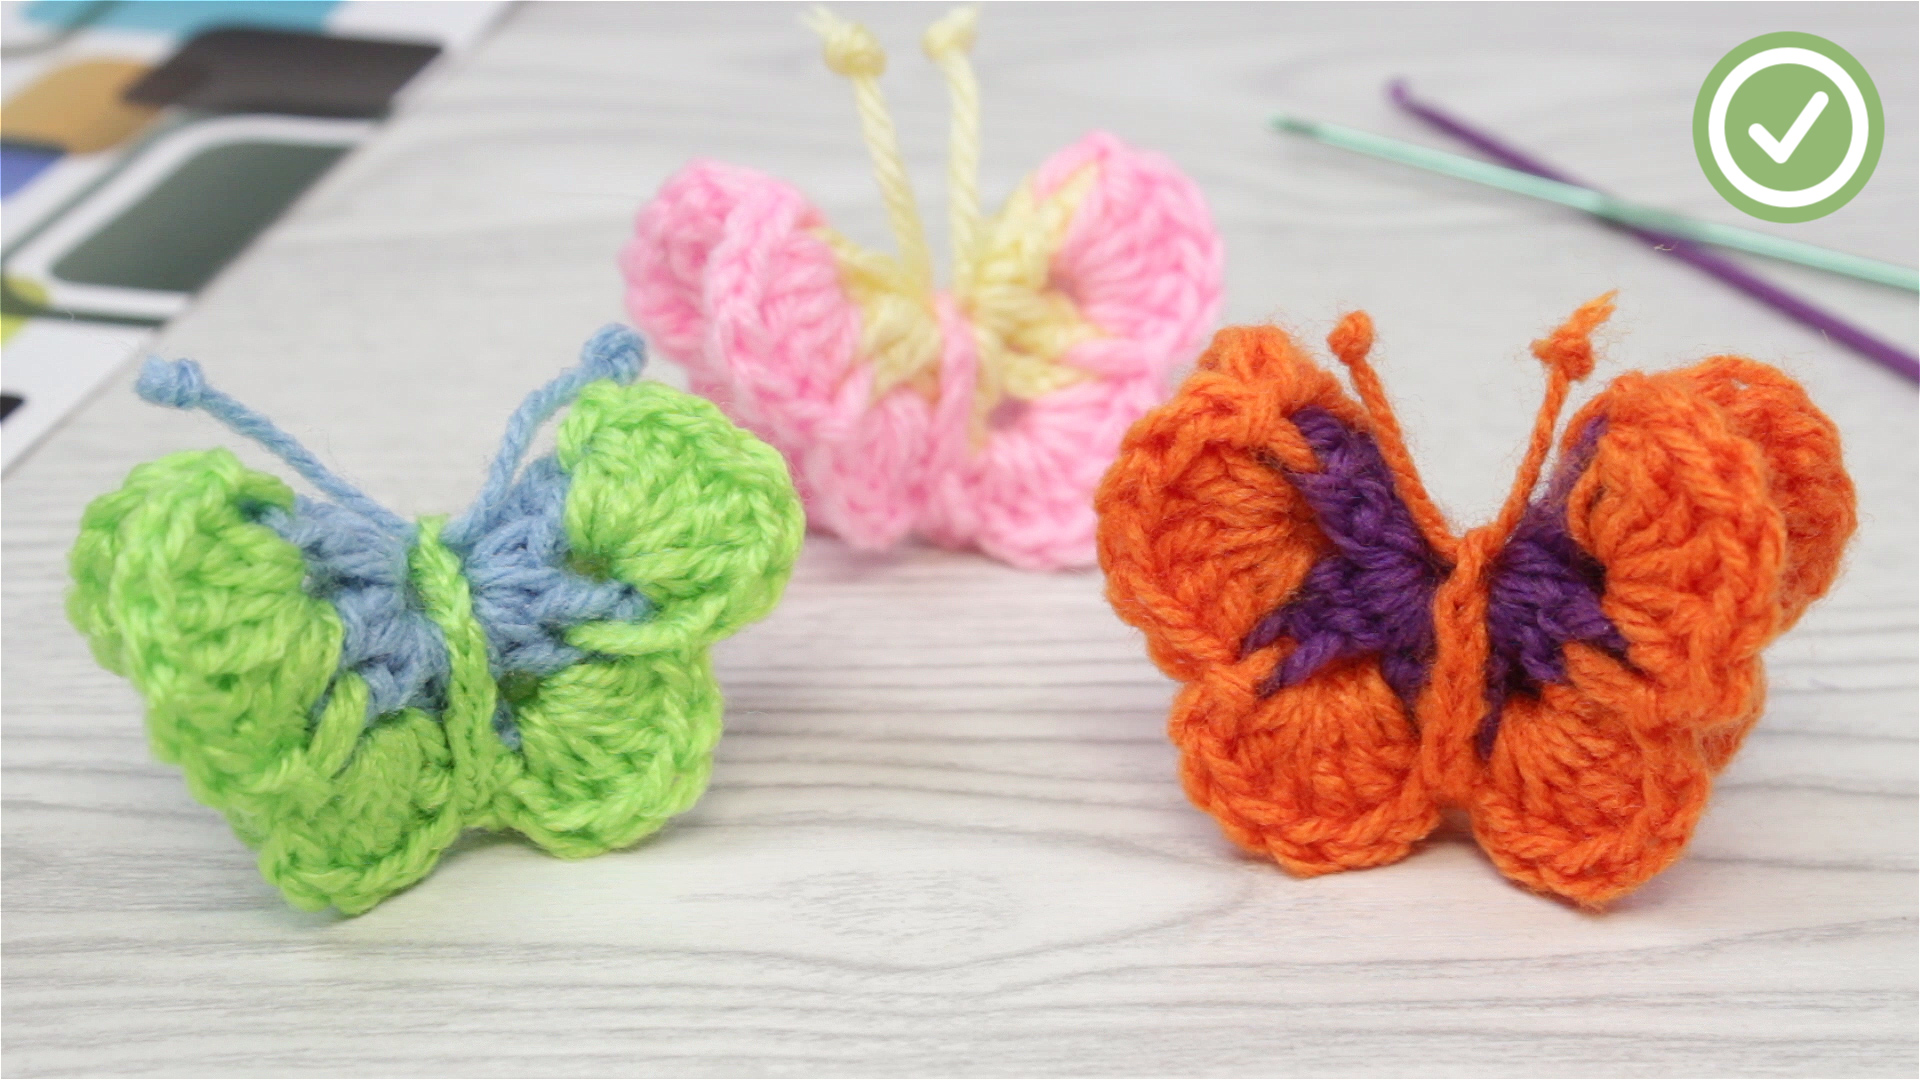
Learning how to crochet a butterfly is one of those tiny yarn victories that feels wildly satisfying. One minute you are holding a hook, a small scrap of yarn, and the confidence level of a suspicious cat. A few minutes later, you have a cheerful little butterfly ready to decorate a hat, baby blanket, tote bag, greeting card, hair clip, bookmark, or gift wrap. It is small, quick, colorful, and forgivingbasically the snack-sized cupcake of crochet projects.
This guide walks you through a beginner-friendly butterfly applique using standard American crochet terms. You do not need a huge yarn stash or advanced skills. If you can make a chain, slip stitch, single crochet, double crochet, and treble crochet, you can make this butterfly. If those words still look like alphabet soup, do not panic. The steps below explain what each part does and how to shape the wings, body, and antennae without making your yarn question your life choices.
The crochet butterfly pattern in this article is designed as a simple 13-step project. It uses a small center ring, tall stitches to create wing curves, and a strand of yarn wrapped around the middle to form the body. The result is a soft, slightly ruffled butterfly with a handmade look that works beautifully for spring crafts, nursery decor, scrap yarn projects, and quick handmade gifts.
Before You Start: What Kind of Crochet Butterfly Are You Making?
There are many ways to crochet a butterfly. Some patterns use separate heart-shaped wings. Others use granny-square-style clusters that are folded into shape. You can also make detailed amigurumi butterflies with stuffed bodies and sewn-on wings. For this tutorial, we will focus on a small crochet butterfly applique because it is fast, practical, and beginner-friendly.
An applique is a flat or lightly textured crochet piece that can be sewn or glued onto another item. Think of it as a yarn sticker, except cuter and less likely to end up stuck to your elbow. This butterfly can be made in one color, two colors, or a playful variegated yarn. The pattern also works well for using up leftover yarn from larger projects.
Materials and Tools
You only need a few basic supplies to crochet a butterfly. The exact size of your finished butterfly depends on yarn weight, hook size, and tension. Lighter yarn makes a smaller, delicate butterfly, while worsted weight yarn creates a bolder applique.
- Small amount of worsted weight yarn, cotton or acrylic
- Optional second yarn color for the body and antennae
- Size G/4.0 mm or H/5.0 mm crochet hook
- Yarn needle for weaving in ends
- Scissors
- Optional stitch marker
- Optional fabric glue, pin back, hair clip, or keychain ring
Recommended Yarn
Cotton yarn gives the butterfly crisp definition, which is great for appliques on bags, clothing, wall hangings, or bookmarks. Acrylic yarn is softer and often more budget-friendly, making it a good choice for blankets, hats, and children’s crafts. If you want a dainty butterfly, try sport weight yarn or crochet thread with a smaller hook.
Best Hook Size
Use the hook size recommended on your yarn label as a starting point. For a firmer butterfly, go down half a hook size. For a softer, looser butterfly, go up slightly. If your stitches look floppy, your hook may be too large. If you feel like you are wrestling a spaghetti noodle through a keyhole, your hook may be too small.
Abbreviations Used in This Pattern
This tutorial uses standard U.S. crochet abbreviations. Keep this small glossary nearby if you are new to reading crochet patterns.
- ch = chain
- sl st = slip stitch
- sc = single crochet
- dc = double crochet
- tr = treble crochet
- st = stitch
- sp = space
- FO = fasten off
How to Crochet a Butterfly: 13 Steps
Now let’s make the butterfly. This pattern creates two larger upper wings and two smaller lower wings around a center ring. Then the piece is folded and tied in the middle to form the butterfly shape.
Step 1: Choose Your Yarn Colors
Select one color for the wings and another color for the body if you want contrast. Pink and yellow make a cheerful spring butterfly. Blue and white look soft and airy. Orange and black give a monarch-inspired look without needing complicated color changes. Variegated yarn is a wonderful shortcut because it creates a multicolor effect with zero extra effort. We support this kind of yarn laziness because it is really just efficiency wearing a craft apron.
Step 2: Make a Slip Knot
Start with a slip knot on your hook. Keep it snug but not tight. A tight slip knot can make the first round harder to work into. If you are a beginner, take a moment to relax your hands. Crochet is easier when you are not gripping the hook like it owes you money.
Step 3: Chain 6
Chain 6 stitches. These chains will form the foundation ring for the butterfly wings. Try to make the chains even in size. They do not have to be perfect, but if one chain is huge and the next is tiny, your butterfly may look like it flew through a wind tunnel.
Step 4: Join to Form a Ring
Insert your hook into the first chain and make a slip stitch to join. You now have a small ring. This center space is where you will work the wing stitches. If the ring looks tiny, do not worry. The stitches will open it up as you go.
Step 5: Chain 3 for the First Wing Section
Chain 3. This chain acts as height for the first part of the wing. In crochet, chains often help tall stitches stand properly at the beginning of a section. For this butterfly, the height helps create a rounded wing shape.
Step 6: Make the First Upper Wing
Work 3 treble crochet stitches into the center ring. Treble crochet stitches are tall, which makes them ideal for the upper wings. To make a treble crochet, yarn over twice, insert the hook into the ring, pull up a loop, yarn over and pull through two loops, yarn over and pull through two loops again, then yarn over and pull through the last two loops.
After the 3 treble crochet stitches, chain 3 and slip stitch into the ring. This anchors the first upper wing. You should see a tall, slightly curved section forming. It may look more like a ruffle than a butterfly wing at this stage. That is normal. Crochet butterflies have a dramatic “trust the process” phase.
Step 7: Make the Second Upper Wing
Chain 3 again. Work 3 treble crochet stitches into the ring. Chain 3 and slip stitch into the ring. Now you have two tall wing sections. These will become the upper wings after the butterfly is folded and shaped.
Step 8: Make the First Lower Wing
Chain 2. Work 3 double crochet stitches into the center ring. Chain 2 and slip stitch into the ring. Double crochet stitches are shorter than treble crochet stitches, which helps the lower wing look smaller and balanced.
If your lower wing looks a bit compact, gently pull it outward with your fingers. Crochet stitches can be shaped by hand, especially in small applique projects.
Step 9: Make the Second Lower Wing
Chain 2. Work 3 double crochet stitches into the ring. Chain 2 and slip stitch into the ring. You now have four wing sections around the center. The piece may look like a lumpy flower, a tiny sea creature, or a yarn pancake with ambitions. That is exactly where it should be.
Step 10: Fasten Off and Leave a Tail
Cut the yarn, leaving a tail about 6 inches long. Pull the tail through the loop on your hook to fasten off. Use a yarn needle to weave the tail into the back of the stitches, or leave it temporarily if you plan to use it for sewing the butterfly onto another project.
Step 11: Fold the Wings Into Shape
Fold the crochet piece in half so the two treble crochet sections sit at the top and the two double crochet sections sit at the bottom. The fold creates the butterfly’s center line. Adjust the wings with your fingers until both sides look even.
This is the magical moment when the “yarn pancake” becomes a butterfly. If it does not look perfect right away, rotate it, flatten it gently, and shape each wing. Small crochet motifs often need a little persuasion.
Step 12: Wrap the Body
Cut a 10- to 12-inch strand of yarn in a contrasting color. Wrap it around the center of the folded butterfly several times to create the body. Pull the wraps snug enough to define the wings, but not so tight that the center puckers awkwardly.
Tie the strand securely at the top with a double knot. The two yarn ends can become antennae. Trim them evenly, or knot the ends to keep them from fraying. For a polished look, use a yarn needle to hide one end and leave two short strands at the top.
Step 13: Shape, Finish, and Use Your Butterfly
Gently spread the wings with your fingers. If you used cotton yarn, you can lightly steam block the butterfly to help it stay flat. Do not press the iron directly onto acrylic yarn because high heat can melt or flatten the fibers. Instead, hover with steam and shape carefully.
Once finished, sew the butterfly onto a hat, blanket, scarf, pillow, tote bag, baby cardigan, or headband. You can also attach it to a card, bookmark, gift tag, garland, wreath, or keychain. One butterfly is cute. Five butterflies are a theme. Twenty butterflies mean you have officially entered your crochet garden era.
Simple Crochet Butterfly Pattern Summary
For quick reference, here is the condensed version of the pattern:
- Make a slip knot.
- Ch 6.
- Join with sl st to form a ring.
- Ch 3.
- Work 3 tr into ring, ch 3, sl st into ring.
- Ch 3, work 3 tr into ring, ch 3, sl st into ring.
- Ch 2.
- Work 3 dc into ring, ch 2, sl st into ring.
- Ch 2, work 3 dc into ring, ch 2, sl st into ring.
- FO and weave in ends.
- Fold piece in half.
- Wrap yarn around center for body.
- Tie ends for antennae and shape wings.
Tips for Making Your Crochet Butterfly Look Better
Use Even Tension
Even tension is the secret sauce of neat crochet. If your stitches vary wildly in size, your butterfly wings may look uneven. Practice a few chains and tall stitches before beginning if you are brand new. The goal is not machine-level perfection; it is friendly consistency.
Try Cotton for Cleaner Wing Definition
Cotton yarn tends to show stitch shapes clearly, making it a strong choice for appliques. It also blocks nicely and holds its shape well. Acrylic can still work beautifully, especially for soft projects, but cotton gives a slightly sharper outline.
Change Hook Size to Change Butterfly Size
A smaller hook creates a tighter, smaller butterfly. A larger hook creates a looser, larger butterfly. You can use the same basic pattern to create different sizes by changing yarn weight and hook size. For example, crochet thread makes a tiny butterfly for earrings or cards, while bulky yarn makes a playful butterfly for wall decor.
Do Not Skip Shaping
Many beginners finish the stitches and feel disappointed because the butterfly does not instantly look symmetrical. Shaping matters. Spread the wings, pinch the center, adjust the top and bottom sections, and trim the antennae. These finishing touches take less than a minute but make a big difference.
Common Mistakes and Easy Fixes
The Butterfly Looks Like a Flower
This usually means you have not folded and wrapped the center yet. Before wrapping, the motif often resembles a flower or rosette. Fold it in half and secure the middle, and the butterfly shape should appear.
The Wings Are Uneven
Check that both upper wings have the same number of treble crochet stitches and both lower wings have the same number of double crochet stitches. Uneven tension can also cause one side to look larger. Gently stretch and shape the smaller side.
The Center Ring Is Too Loose
If the center hole looks too large, use a smaller starting chain, such as chain 5 instead of chain 6, or begin with a magic ring. You can also wrap the body yarn more times around the middle to cover the center.
The Butterfly Is Too Floppy
Try using a smaller hook, cotton yarn, or light blocking. For decorative projects, you can also apply a tiny amount of fabric stiffener to help the butterfly hold its shape.
Creative Ways to Use Crochet Butterflies
Once you make one butterfly, it is dangerously easy to make a dozen. Luckily, crochet butterflies are useful in many projects. Sew them onto baby blankets for a sweet garden theme. Add them to plain beanies or headbands for a cheerful accessory. Attach them to tote bags, zipper pouches, or denim jackets for a handmade accent.
For home decor, string several butterflies onto a chain to create a garland. Use soft pastel yarn for a nursery, bright colors for a child’s room, or neutral cotton for a modern handmade look. You can also glue small butterflies to greeting cards, scrapbook pages, wrapped gifts, or handmade bookmarks.
If you sell handmade items, crochet butterflies can add personality to simple products. A plain hat becomes a boutique-style accessory. A basic blanket becomes a thoughtful keepsake. A gift tag becomes something the recipient may actually save instead of tossing into the recycling bin two seconds after opening the present.
Color Ideas for Crochet Butterflies
Color can completely change the mood of your butterfly. Soft pink, lavender, mint, and cream create a gentle spring look. Bright yellow, turquoise, coral, and lime feel playful and energetic. Earthy tones such as rust, mustard, olive, and brown create a cozy autumn butterfly. Black and orange can hint at monarch butterflies, while blue and white can resemble sky-inspired designs.
You can also use two strands of thin yarn held together for a marled effect. Another option is to crochet the wings in one color and wrap the body with metallic embroidery floss for a tiny sparkle. Just remember: sparkle is optional, but joy is mandatory.
How to Make the Butterfly Larger or Smaller
To make a larger butterfly, use thicker yarn and a bigger hook. You can also add extra tall stitches to each wing section. For example, use 4 treble crochet stitches instead of 3 for each upper wing, and 4 double crochet stitches instead of 3 for each lower wing. This creates fuller wings.
To make a smaller butterfly, use sport weight yarn, fingering weight yarn, or crochet thread. Use a smaller hook that matches the yarn. You can also reduce the starting chain from 6 to 5. Smaller butterflies are lovely for cards, jewelry, ornaments, and delicate appliques.
Experience Notes: What I Learned While Crocheting Butterflies
The first thing you learn when crocheting butterflies is that they do not always look like butterflies until the very end. This can feel suspicious. You follow the steps, make the stitches, stare at the piece, and think, “Wonderful, I have crocheted a decorative cabbage.” Then you fold it, wrap the middle, spread the wings, and suddenly the butterfly appears. It is one of the nicest little surprises in crochet.
Another helpful experience is learning that yarn choice matters more than expected. With smooth cotton yarn, the wings look crisp and defined. The treble crochet stitches stand up nicely, and the butterfly keeps its shape after a gentle blocking. With soft acrylic yarn, the butterfly has a warmer and puffier look, which is great for blankets or children’s accessories. Neither is wrong. They simply create different personalities. Cotton says “neat garden party.” Acrylic says “cozy craft basket with snacks nearby.”
Color also changes everything. A single-color butterfly looks clean and simple, especially in white, cream, or pastel shades. A two-color butterfly adds contrast and makes the body stand out. Variegated yarn can be especially fun because every butterfly looks slightly different. If you are making a garland, try using the same body color for all butterflies and different wing colors for variety. This gives the set a coordinated look without becoming too matchy-matchy.
One practical lesson is to leave longer yarn tails than you think you need. Short tails are annoying to weave in, and short antennae can disappear into the body wrap. A 10- to 12-inch strand for the body gives you enough length to wrap comfortably, tie securely, and trim the antennae evenly. If the antennae look too plain, tie tiny knots at the ends. It gives them a finished look and helps reduce fraying.
Blocking is another small step that can upgrade the final result. Many beginners skip blocking because it sounds fancy, but for a crochet butterfly, it can be very simple. Shape the wings with your fingers, mist lightly with water, and let the butterfly dry flat. Cotton responds especially well to this. If you are using acrylic, avoid direct heat from an iron. Steam from a safe distance can help, but too much heat may flatten the yarn. The goal is to encourage the butterfly, not interrogate it under a hot appliance.
Finally, crochet butterflies are excellent confidence builders. They are quick enough to finish in one sitting and small enough that mistakes do not feel tragic. If one butterfly turns out uneven, make another. The second one will almost always look better. By the third, you may start experimenting with colors, sizes, and decorations. By the fifth, you may be attaching butterflies to everything in the house. This is normal. Hide the lampshades if necessary.
Conclusion
Crocheting a butterfly is a simple, satisfying project that turns basic stitches into something charming and useful. With a small amount of yarn, a hook, and a few beginner-friendly techniques, you can create a butterfly applique for blankets, hats, bags, cards, garlands, and gifts. The key is to use taller stitches for the upper wings, shorter stitches for the lower wings, then fold and wrap the center to reveal the final shape.
This 13-step crochet butterfly tutorial is flexible enough for beginners but fun enough for experienced crocheters who want a quick scrap yarn project. Try different yarn weights, color combinations, and finishing ideas to make each butterfly unique. Once you understand the basic shape, you can make a whole flutter of butterflies faster than you can explain why your yarn stash is “absolutely necessary.”