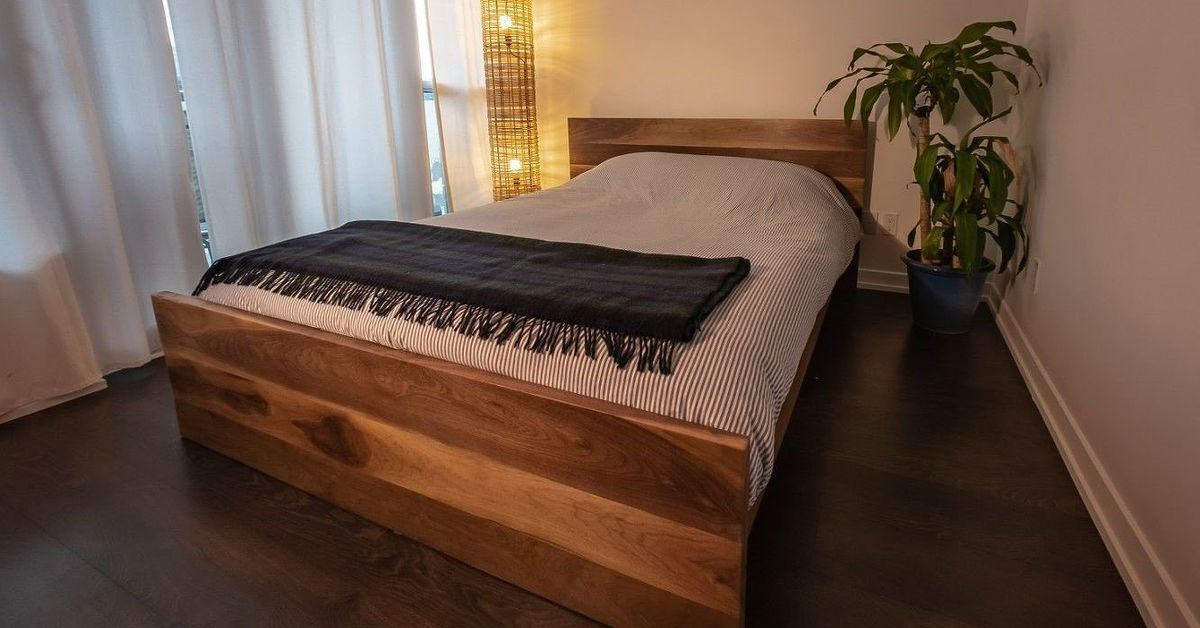
Building your own bed frame sounds ambitious until you realize that a basic bed is essentially a sturdy rectangle with a reliable support system. It is less “master carpenter creates heirloom furniture” and more “careful person measures twice and avoids attaching a board backward.” With a sensible design, common lumber, and a few basic tools, you can create a custom bed frame that fits your mattress, bedroom, storage needs, and decorating style.
A DIY bed frame also gives you control over details that mass-produced furniture often gets wrong. You can choose the height, wood species, finish, under-bed clearance, headboard style, and whether the frame can be disassembled when it is time to move. Most importantly, you can build a support system that matches the requirements of your mattress instead of hoping a bargain frame with six widely spaced slats will somehow understand structural engineering.
Note: This guide uses a queen-size platform bed as the main example. Adjust every measurement to your actual mattress and follow the mattress manufacturer’s foundation requirements before cutting lumber.
Research for this article was synthesized from guidance published by The Home Depot, Lowe’s, This Old House, Family Handyman, Ana White, Kreg Tool, Sleep Foundation, Purple, Tempur-Pedic, Popular Mechanics, Rockler, Minwax, OSHA, CDC/NIOSH, and The Spruce.
Why Build a DIY Bed Frame?
The most obvious reason is customization. Store-bought frames come in predetermined sizes, heights, colors, and styles. A homemade wooden bed frame can be designed around an unusually thick mattress, a low window, a narrow room, oversized storage containers, or a beloved robot vacuum that demands unrestricted access to every dust bunny.
A simple platform bed may also eliminate the need for a box spring, provided the mattress is approved for use on a solid or closely spaced slatted foundation. That can reduce the overall cost and produce a cleaner, lower-profile appearance. Building the frame in detachable sections also makes it easier to carry through stairways and doorways than a permanently assembled wooden rectangle the size of a small boat.
Cost savings are possible, but they depend on the lumber, hardware, finish, and tools you already own. Construction-grade pine is affordable and easy to find, while hardwoods such as oak, maple, or walnut can turn the project into premium furniture. The real value is that your money goes toward the materials and features you choose rather than retail packaging, warehouse costs, and a mysterious collection of leftover hex keys.
Plan the Bed Before Buying Lumber
Choose the Type of Frame
For a first project, a basic platform bed is usually the most approachable option. It consists of an outer frame, internal cleats, cross slats, and a center support beam. The mattress rests directly on the slats, so a traditional box spring is usually unnecessary when the mattress manufacturer permits this arrangement.
Other designs include panel beds that support a box spring, floating beds with a recessed base, storage beds with drawers or cubbies, and decorative frames with headboards and footboards. Storage beds are useful in compact rooms, but drawers add considerable measuring, alignment, and hardware work. Start with the structure you actually need rather than attempting to build a bed, dresser, bookshelf, charging station, and espresso bar in one heroic weekend.
Measure the Mattress, Room, and Doorways
Never design the frame using only the size printed on a mattress label. Measure the mattress itself because dimensions can vary slightly among manufacturers. Standard U.S. mattress dimensions are generally about 38 by 75 inches for a twin, 38 by 80 inches for a twin XL, 54 by 75 inches for a full, 60 by 80 inches for a queen, 76 by 80 inches for a king, and 72 by 84 inches for a California king.
Mattress dimension guidance:
Add approximately 1/2 to 1 inch to the mattress width and length when determining the clear interior opening. A small allowance makes changing sheets easier and prevents the mattress from becoming wedged between the rails. Do not create an enormous gap, however, unless you enjoy retrieving phones, socks, and paperback novels from a wooden canyon.
Measure the intended bedroom location, nearby nightstands, doors, closets, vents, and walking paths. If the completed frame will not be detachable, confirm that it can pass through every doorway and turn in the hallway. Better yet, use removable bed-rail brackets or bolts so the frame can be assembled in the bedroom and dismantled during a move.
Decide on the Finished Height
Bed height affects appearance, comfort, and storage. A low platform creates a modern look, while a taller frame provides more room underneath. Calculate the combined height of the legs or base, side rails, slat position, and mattress. Sit on a chair or stack boxes to test the proposed height before building. Your knees will offer an immediate and surprisingly opinionated design review.
Tools and Materials
Recommended Tools
- Tape measure, pencil, and carpenter’s square
- Circular saw or miter saw
- Drill and impact driver
- Drill bits and countersink bit
- Clamps
- Random-orbit sander or sanding block
- Level or long straightedge
- Safety glasses, hearing protection, and suitable dust protection
Use sharp blades, support lumber securely, keep tool guards in place, and follow every manufacturer instruction. Woodworking creates flying chips, noise, and fine dust, particularly during sanding. Work in a ventilated area, collect dust at the source when possible, and wear appropriate protective equipment.
Woodworking safety guidance:
Typical Materials
- 2-by-6 lumber for the outer rails
- 2-by-4 lumber for the center beam and structural supports
- 1-by-4 lumber for mattress slats
- 1-by-2 or 2-by-2 lumber for support cleats
- Wood glue
- Structural wood screws or approved furniture fasteners
- Bed-rail brackets or bed bolts for a knockdown design
- Wood filler, sandpaper, stain or paint, and a protective topcoat
Avoid using drywall screws as primary structural fasteners. They are designed for attaching drywall, not for repeatedly supporting a bed occupied by people, pets, children practicing trampoline techniques, and one suspiciously heavy weighted blanket. Choose structural wood screws, carriage bolts, threaded bed connectors, or dedicated bed-rail hardware.
Example Queen-Size Cut Plan
For a queen mattress measuring exactly 60 by 80 inches, you might design an interior opening of approximately 60 1/2 by 80 1/2 inches. One straightforward arrangement places the two long side rails between full-width head and foot rails.
- Two 2-by-6 side rails at 80 1/2 inches
- Two 2-by-6 end rails at approximately 63 1/2 inches
- Two support cleats sized to fit along the inside of the side rails
- One 2-by-4 center beam sized to fit between the end rails
- Approximately 13 or 14 1-by-4 slats cut to the interior width
- Corner and center supports sized for your chosen bed height
These dimensions are an adaptable example rather than a universal furniture plan. The exact cut lengths depend on the joint style, actual lumber dimensions, mattress measurements, decorative trim, and whether the legs sit inside, outside, or beneath the frame.
How to Build Your Own Bed Frame Step by Step
1. Select Straight, Dry Lumber
Inspect each board from the end and along its length. Avoid severe bows, twists, splits, loose knots, and damaged edges. A slightly imperfect board may be acceptable for a short support block, but twisted side rails can make the entire frame difficult to square. Allow indoor furniture lumber to adjust to the workshop environment before final assembly when practical.
2. Create a Cut List and Label Every Part
Write down every finished dimension before turning on the saw. Group identical parts so they can be cut together, and label each piece with painter’s tape or pencil. Marking “left rail,” “foot rail,” and “center beam” may feel excessive until several nearly identical boards begin exchanging identities on the workshop floor.
Cut slightly long only when you plan to trim pieces to an exact matching length. After cutting, verify the parts against the actual mattress dimensions and dry-fit the outer rectangle.
3. Sand Before Assembly
It is far easier to sand individual boards than to maneuver a sander around assembled corners. Begin with medium-grit paper, such as 120 grit, to remove mill marks and roughness. Continue with 150 or 180 grit for most painted or stained furniture. Some finishing systems call for sanding to 220 grit, but follow the directions for your chosen product because excessively polished wood may absorb certain stains unevenly.
Ease sharp corners with a few light passes of sandpaper. Concentrate on the top edges of the rails, exposed ends, and any location where hands, legs, bedding, or the household cat may make contact.
Wood preparation guidance:
4. Assemble the Outer Frame
Place the head rail, foot rail, and side rails on a flat surface. Apply wood glue to permanent joints, clamp the parts, drill pilot holes, and install structural screws. If you want a frame that can be taken apart, install surface-mounted or mortised bed-rail brackets according to the hardware manufacturer’s instructions.
Check the corners with a carpenter’s square. Then measure diagonally from one corner to the opposite corner in both directions. When the two diagonal measurements match, the rectangle is square. Adjust the clamps before the glue sets. This simple check prevents a surprising number of future conversations beginning with, “Why does the mattress fit on one end but not the other?”
Detachable bed-rail hardware guidance:
5. Install the Side Cleats
Cleats are narrow boards attached along the inside faces of the side rails. The mattress slats rest on them. Mark a consistent line below the top edge of each rail, using a spacer block or combination square to keep both cleats at exactly the same height.
Apply glue if the bed is permanently assembled, drill pilot holes, and fasten the cleats securely. The setback should allow the slats and mattress to sit at the desired depth. A shallow recess keeps the mattress from sliding while still making it easy to lift for sheet changes.
6. Add a Center Beam and Support Legs
A queen, king, or California king frame should normally include a center beam running from the head to the foot of the bed. Support the beam with multiple legs or a continuous base so it transfers weight to the floor rather than hanging entirely from the end rails.
Make sure every support reaches the floor without lifting a corner of the frame. On uneven flooring, adjustable furniture feet can prevent rocking. For exceptionally heavy mattresses or occupants, increase the support structure and obtain advice from an experienced carpenter rather than relying on optimism and one heroic 2-by-4.
Center-support and mattress-base guidance:
7. Cut and Space the Slats
Cut all slats to the same length so they sit fully on both cleats without binding against the rails. Sand the edges and remove splinters that could damage the mattress cover.
Check the mattress warranty before choosing the spacing. Common foam-mattress guidance calls for slats at least about 3 inches wide with gaps no greater than approximately 3 1/2 to 4 inches. Some manufacturers require even closer spacing. Thirteen or fourteen evenly distributed 1-by-4 slats are often suitable for a queen-size opening, but the final number must satisfy the mattress manufacturer’s requirements.
Slat-width and spacing guidance:
Use a spacer block to produce equal gaps. Secure the slats with screws, hook-and-loop strips, fabric webbing, or another method that prevents them from shifting and squeaking. Predrill near board ends to reduce splitting.
8. Test the Structure
Before applying the final finish, place the frame on a level surface and press firmly on every corner, rail, and support. Listen for movement and inspect each joint. Add blocking or tighten hardware where necessary.
Place the mattress on the frame and apply weight gradually. Do not celebrate by launching yourself onto the bed from across the room. Controlled testing is less cinematic, but it is kinder to both the furniture and your health insurance deductible.
9. Apply the Finish
Remove the slats and disassemble detachable components before finishing. Vacuum the wood and wipe away all sanding dust. If you are staining pine or another blotch-prone wood, test the complete finishing schedule on a scrap and consider using a compatible pre-stain conditioner.
Apply stain, paint, or clear finish in a well-ventilated workspace while following the product label. Coat hidden edges as well as visible surfaces for a more consistent result. Let every component dry and cure fully before bringing it into the bedroom or placing bedding against it.
10. Assemble the Bed in Its Final Location
Carry the components into the bedroom, protect the floor, and assemble the frame where it will remain. Recheck that all fasteners are tight, the center supports contact the floor, and the slats are evenly spaced. Add felt pads beneath wooden feet when appropriate.
After several nights of use, inspect the connections again. Wood fibers may compress slightly around hardware, especially in softwood, so a small amount of tightening is normal. Periodic inspections can stop a minor squeak from evolving into a dramatic midnight furniture announcement.
Common DIY Bed Frame Mistakes
Building From Nominal Lumber Dimensions
A board sold as a 2-by-4 is usually about 1 1/2 by 3 1/2 inches after drying and surfacing. Use actual dimensions when calculating the opening and joint layout. Otherwise, several innocent-looking half inches can combine into a mattress fit problem.
Ignoring Mattress Support Requirements
Wide slat gaps may allow a foam mattress to sag and can conflict with warranty terms. Confirm the required foundation type, slat width, spacing, center support, and number of legs before completing the design.
Skipping Pilot Holes
Driving large screws directly into the ends of dry boards can split the wood. Pilot holes make assembly easier, improve alignment, and reduce damage. Countersinking also allows screw heads to sit below the surface where they will not catch bedding.
Using Only Screws to Correct Bad Joinery
Fasteners cannot make warped boards square or rescue poorly fitted joints forever. Clamp parts into alignment, create flat contact surfaces, and use suitable hardware. A screw should secure a good joint, not negotiate a permanent peace treaty between two boards that refuse to meet.
Forgetting Future Moves
A permanently glued king-size frame may be wonderfully strong and completely impossible to remove from the room. Use detachable rail hardware or bolted connections on large frames. Mark matching components discreetly so reassembly is straightforward.
Ways to Customize the Design
Once the basic structure is sound, customization becomes the enjoyable part. Extend the head rail upward into a slatted, paneled, or upholstered headboard. Add a recessed lower base for a floating appearance. Increase the ground clearance for storage bins, or build rolling drawers that stop short of the center supports.
You can also wrap inexpensive structural lumber with cleaner finish boards, add rounded corners, install integrated nightstand shelves, or route a shallow channel for discreet lighting. Keep electrical components accessible and use listed products according to their instructions.
For a minimalist frame, choose clear-coated maple or light pine. Dark stain and substantial rails create a traditional appearance, while painted plywood panels can produce a clean contemporary platform. Whatever style you choose, preserve access to the structural fasteners. Decorative trim should not make future tightening or disassembly an archaeological excavation.
Conclusion
Learning how to build your own bed frame is largely an exercise in planning, accurate measurement, and patient assembly. Start with the actual mattress, design the correct interior opening, provide closely spaced support slats, and include a properly supported center beam for larger sizes. Use furniture-grade or structural fasteners, check the frame for square, and finish every exposed surface carefully.
The result does not need complicated joinery or expensive hardwood to be successful. A simple pine platform bed can be strong, attractive, repairable, and perfectly suited to the room. Build the structure first, confirm that it is silent and stable, and then add the decorative details. A bed frame has one extremely important job: remaining boringly dependable while you are unconscious.
A Builder’s-Eye Experience: What the Project Really Feels Like
The typical DIY bed frame experience begins with confidence. You look at a photograph of a clean wooden platform and think, “That is just a rectangle.” Technically, this is correct. Emotionally, however, the rectangle is about to teach a short course in measurement, lumber selection, floor space management, and why professional woodworkers own so many clamps.
The first useful lesson usually arrives at the lumber rack. Boards that appeared perfectly straight from ten feet away may curve like hockey sticks when viewed along their edges. Taking time to inspect each piece feels slow, but it saves far more time than trying to force a twisted rail into alignment later. The best-looking face should be marked immediately, along with the direction each board will face in the finished frame.
Cutting the components is often the fastest part of the project. The danger is becoming comfortable and rushing through the final pieces. A good routine is to measure, mark, confirm the part name, and then cut. After every pair of matching components, stand them together and verify that their ends align. Two side rails that differ by even a small amount can pull the frame out of square.
Dry assembly is where the bed begins to feel real. It is also where minor design mistakes become visible without becoming permanent. The frame may initially sit crooked because the shop floor is uneven, a clamp is pulling one corner too hard, or one board has a slight bow. Measuring the diagonals turns this confusion into a specific adjustment. When both diagonal measurements finally match, the structure suddenly looks intentional rather than like four boards holding an emergency meeting.
Installing cleats and the center beam tends to take longer than expected because consistency matters. A spacer block is more reliable than making dozens of individual pencil marks. The same principle applies to slats: one accurately cut spacer can create an orderly support system in minutes. Without it, the gaps often become progressively wider until the final slat appears to have missed an appointment.
Sanding can feel tedious, but it is the stage people appreciate every time they change the sheets. Rounded edges and smooth rail tops prevent splinters, fabric snags, and bruised shins. Finishing also rewards patience. Testing stain on scrap lumber may reveal a color that looks elegant on the label but strangely orange on pine. Discovering that on a scrap is mildly annoying; discovering it on an assembled queen bed is a personality test.
The most satisfying moment is not necessarily placing the mattress on top. It is pressing on each corner and hearing nothing. No clicking hardware, sliding slat, or theatrical creakjust a solid structure built to the exact height and style you wanted. A few imperfections may remain, but they become part of the story rather than defects. The frame works, it fits the room, and nobody had to decipher instructions translated into twelve languages using diagrams of a cheerful cartoon wrench.
After the first week, checking the hardware is worthwhile. Tightening one or two connections and adding a small felt pad beneath an uneven support can make the frame completely stable. That final adjustment is a reminder that good furniture is not created by one dramatic moment. It comes from a series of ordinary decisions made carefully: choosing straight lumber, measuring again, drilling the pilot hole, checking for square, and resisting the urge to put the mattress on before the finish has cured.