A bottle of wine, champagne, tequila, whiskey, or sparkling cider can already be a perfectly respectable gift. But sometimes “respectable” is not the assignment. Sometimes the occasion demands enough sparkle to be visible from low Earth orbit.
Learning how to bedazzle a bottle of alcohol lets you transform ordinary packaging into personalized party decor, a birthday centerpiece, a bridal gift, or a memorable graduation keepsake. The process is straightforward: clean the glass, plan the design, choose an appropriate adhesive, and attach flat-back rhinestones in small sections. The challenge is not complexity. It is patienceand resisting the temptation to glue your sleeve to the table.
This in-depth guide covers the tools, adhesives, design options, step-by-step technique, common mistakes, and practical lessons that make a DIY rhinestone bottle look polished rather than accidentally attacked by a craft drawer.
What Does It Mean to Bedazzle a Bottle?
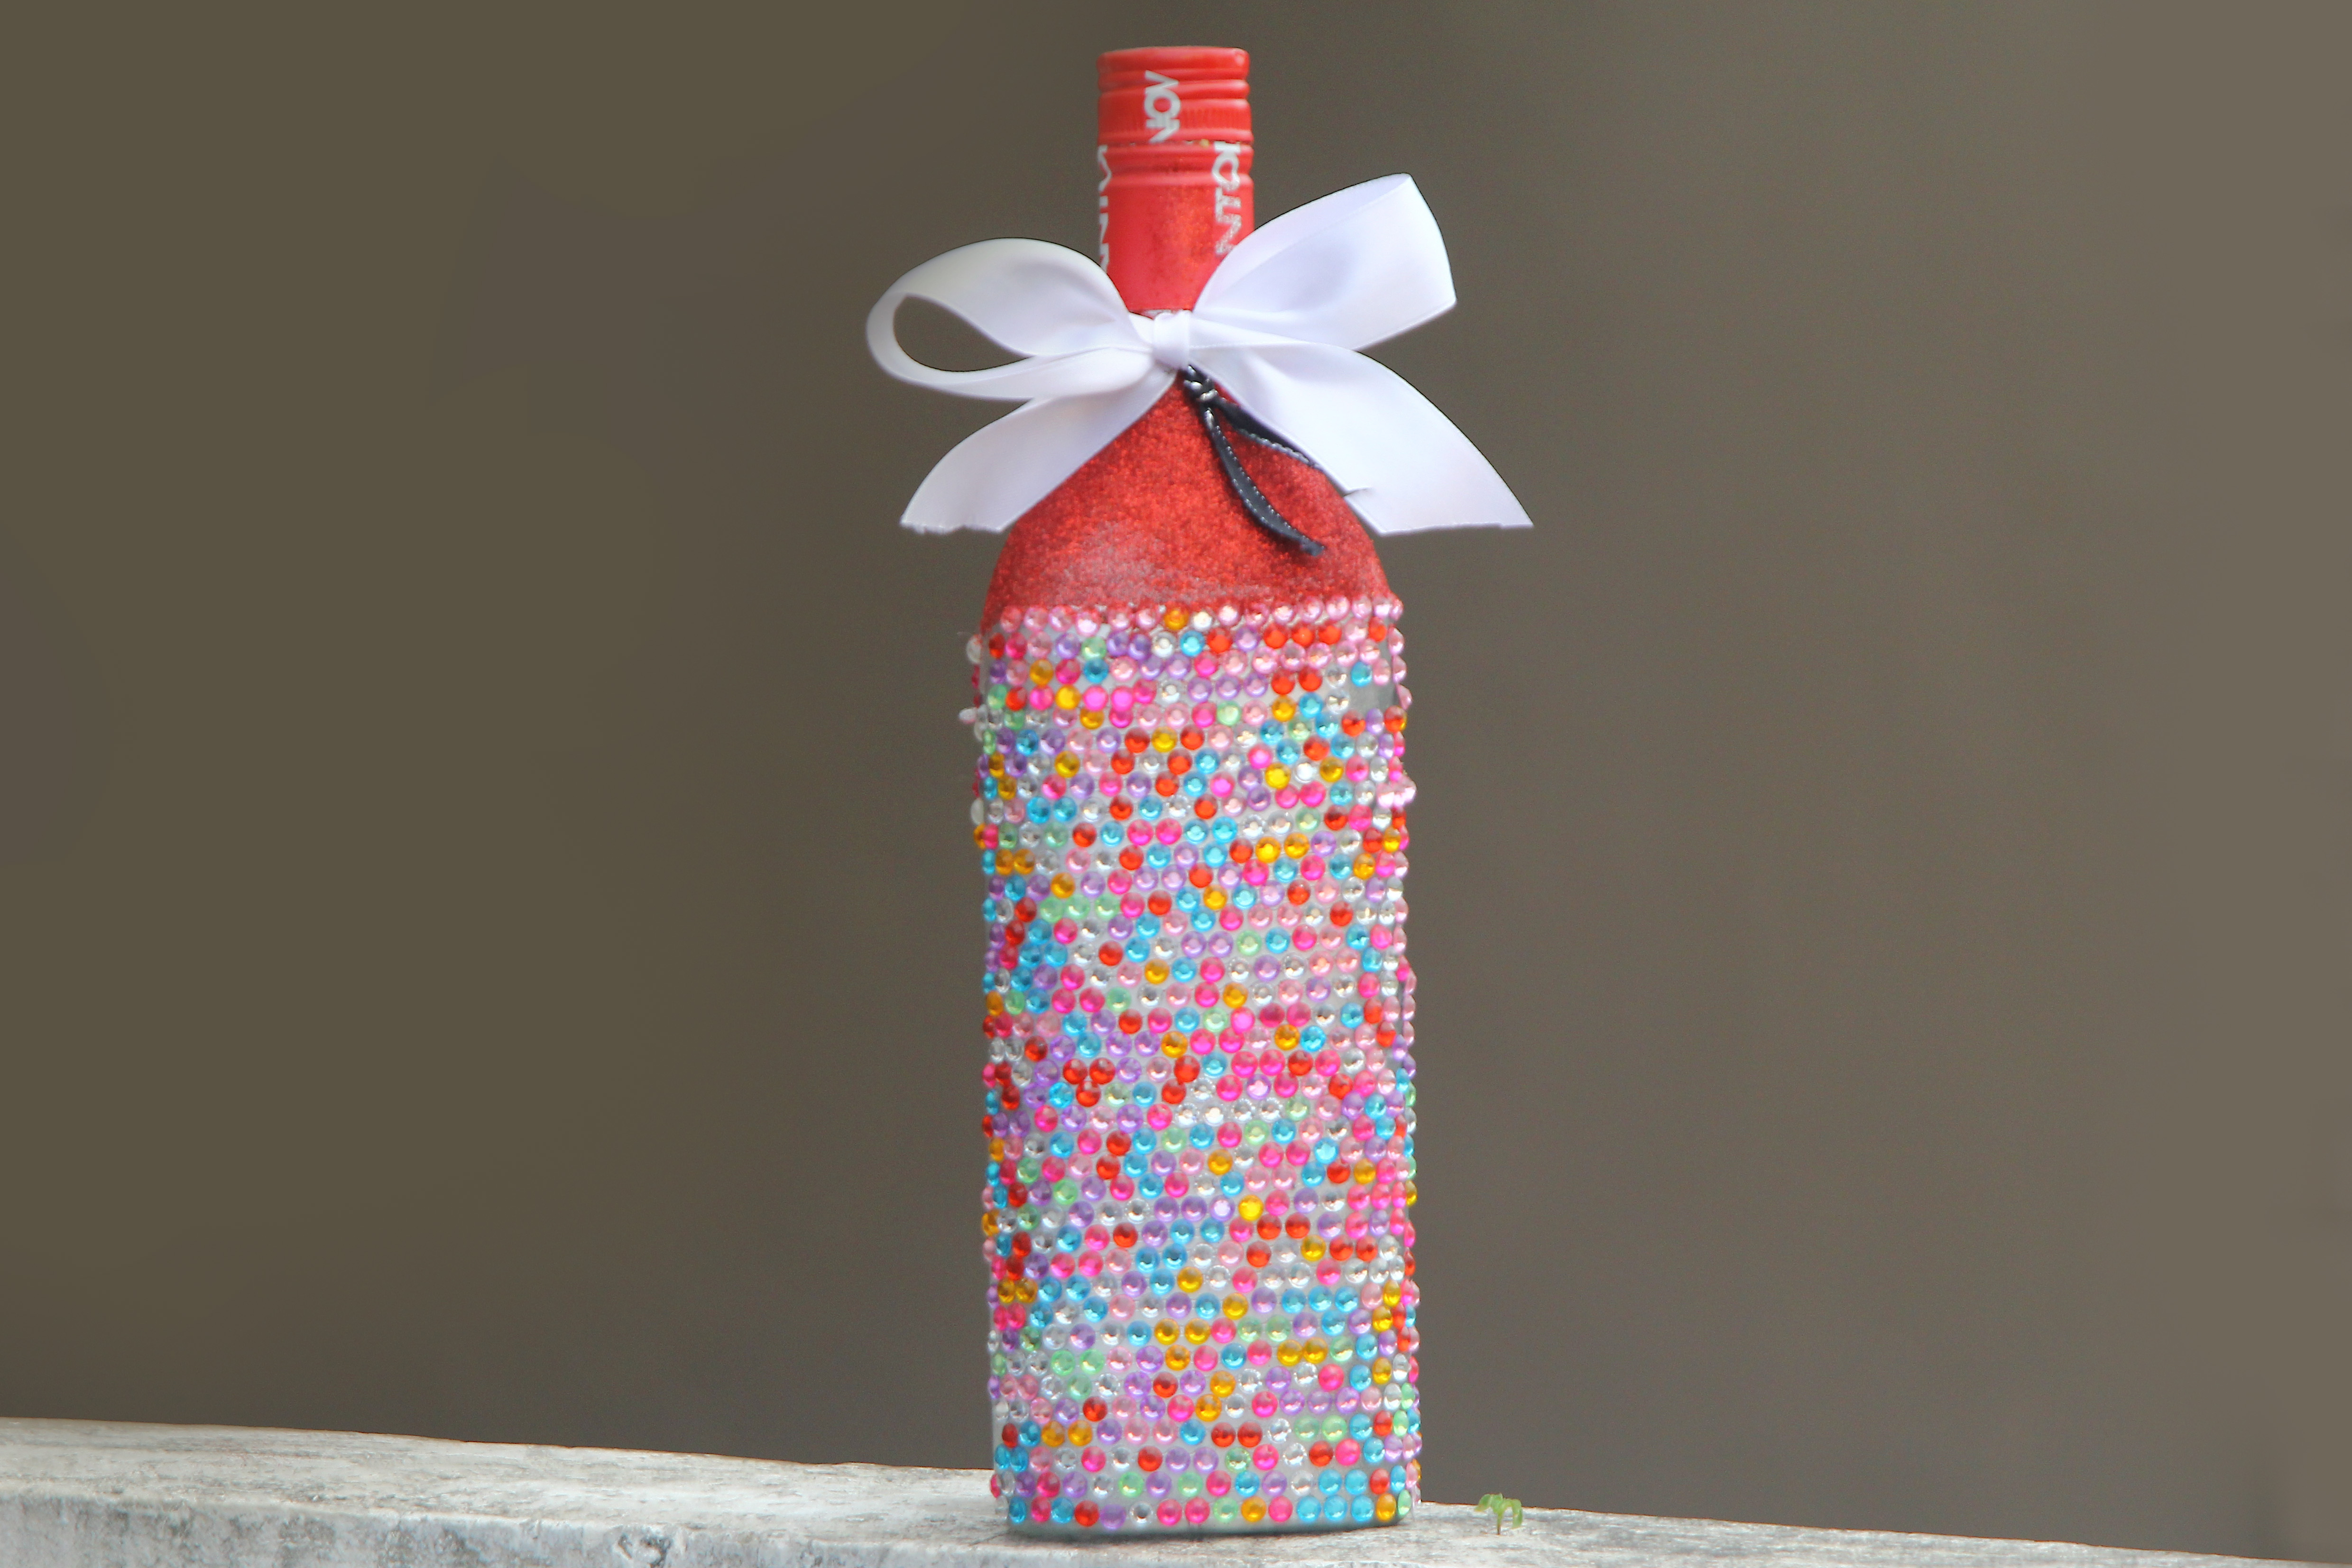
Bedazzling involves attaching rhinestones, crystals, pearls, beads, glitter, or other decorative embellishments to a surface. For bottles, the most popular technique uses individual flat-back rhinestones arranged in rows, patterns, lettering, or a full pavé-style covering.
The bottle may remain sealed as a decorative gift, or an empty bottle can be upcycled into a vase, lamp base, coin container, or display piece. A sealed bottle requires extra care because decorations must stay away from the cap, cork, foil, pull tab, tax seal, and every surface that could touch the beverage during opening or pouring.
Supplies You Will Need
- A clean bottle of alcohol or nonalcoholic sparkling beverage
- Flat-back, non-hotfix rhinestones
- Glass-compatible rhinestone adhesive
- Rubbing alcohol and lint-free cloths
- Painter’s tape or low-tack masking tape
- Wax rhinestone picker, jewel-setting pencil, or tweezers
- Toothpicks or precision applicator tips
- Small sorting trays or shallow dishes
- A folded towel or foam cradle to prevent rolling
- Disposable gloves and protective table covering
- Optional pearls, charms, ribbon, glitter, vinyl letters, or metallic paint
Choose Flat-Back Rhinestones
Use rhinestones with a flat, unfinished back rather than pointed stones intended for jewelry settings. Non-hotfix stones are usually the best choice for a bottle because they are designed to be applied with liquid adhesive. Hotfix stones have a heat-activated backing intended primarily for suitable fabrics and transfer equipment, while non-hotfix flat backs can be glued to hard surfaces.
Acrylic and resin rhinestones are inexpensive, lightweight, and easy for beginners to handle. Glass or crystal stones generally provide sharper reflections and a more luxurious finish, but they cost more and add noticeable weight to a fully covered bottle.
Mixing two or three sizes creates a professional appearance. Medium stones can establish the main pattern, while smaller stones fill awkward gaps around curves, lettering, and label edges. Larger accent stones work well on logos or focal points but can look clumsy if they are used everywhere.
Select the Right Adhesive
The best glue for bedazzling a bottle should bond to smooth glass, dry clear, and remain slightly flexible. Popular options include Gem-Tac, Liquid Fusion, specialized rhinestone adhesive, glass-and-metal craft glue, and E6000.
Water-based rhinestone glues are often more comfortable for indoor projects because they tend to have less odor and allow easier cleanup while wet. Beacon recommends clean, dust-free materials, flat-back crystals, light pressure, and a 24-hour cure for Gem-Tac. Aleene’s precision rhinestone adhesive also calls for a clean, dry surface and up to 24 hours for maximum hold.
E6000 provides a durable, flexible bond, but it should be used only according to its label directions in a well-ventilated area. It becomes tacky within minutes, while complete curing can take 24 to 72 hours depending on temperature, materials, and humidity. The manufacturer also states that it is not recommended for items that contact food or drinking water, so keep it strictly on the outside decorative surface and far from the opening.
Avoid relying on ordinary school glue. It may peel from slick glass. Hot glue is also a poor choice for a permanent rhinestone finish because smooth glass does not provide an ideal long-term bond, and thick blobs can leave stones sitting at crooked angles.
How to Bedazzle a Bottle of Alcohol Step by Step
Step 1: Decide Whether to Keep or Remove the Label
Keeping the original label makes the brand recognizable and reduces the area you must cover. You can frame the label with rhinestones, outline important lettering, or create a sparkling border around it.
Removing the label provides a blank canvas for a full custom design. This option works best with an empty bottle because soaking a sealed bottle can loosen foil, damage closures, or create a general situation best described as “craft night becomes mop night.”
If the bottle will remain sealed, use painter’s tape to protect the label, foil, tax strip, cap, cork cage, or any text you want to preserve.
Step 2: Clean the Exposed Glass
Wash off dust, fingerprints, grease, and sticky residue. After the surface is dry, wipe the exposed glass with a lint-free cloth lightly dampened with rubbing alcohol. Allow it to evaporate completely before applying adhesive.
Do not coat the bottle with hand lotion immediately before working. Rhinestones are glamorous, but they remain strangely opposed to moisturizer, snack crumbs, and fingerprints.
Step 3: Stabilize the Bottle
Place the bottle horizontally on a folded towel, foam block, or rolled dishcloth so it cannot move while you work. A commercial bottle cradle is helpful but not essential.
Do not decorate the entire circumference at once. Complete one upward-facing section, allow the adhesive to set, rotate the bottle, and continue. Otherwise, gravity may rearrange your elegant pattern into a small crystal landslide.
Step 4: Plan the Design
Sketch the idea on paper before opening the glue. Useful beginner designs include:
- Label frame: Outline the existing label with one or two rows of stones.
- Color block: Cover the lower third or bottle neck in a single color.
- Ombré: Blend dark stones into lighter stones from bottom to top.
- Monogram: Add an initial, name, age, year, or short word.
- Scatter design: Place crystals farther apart near the top and closer together near the bottom.
- Full pavé: Cover nearly all exposed glass with tightly arranged stones.
Mark important guide lines with painter’s tape or a removable glass marker. For a full-coverage design, begin near the bottom edge or beside the label, where a straight reference line is easier to maintain.
Step 5: Sort the Rhinestones
Pour small quantities into shallow trays with the faceted sides facing upward. Separate colors and sizes before applying glue. Trying to sort stones with one hand while holding a glue-covered toothpick in the other is an excellent way to discover how many rhinestones fit inside a carpet.
Step 6: Apply Glue in Small Sections
Spread a thin, even layer over an area no larger than one or two square inches. A toothpick or precision applicator helps control the amount. The adhesive should cover the back of each stone without flooding over its edges.
Do not cover half the bottle with wet glue. Most adhesives develop a working skin, and large sections may begin drying before the stones are placed. Small sections provide cleaner placement and fewer cloudy smears.
Step 7: Place the Main Rhinestones
Use a wax picker or jewel-setting pencil to lift each rhinestone. Lower it flat into the adhesive and press gently. Avoid pushing so firmly that glue squeezes across the facets.
For orderly rows, place each stone beside the previous one and check alignment frequently. For an organic design, stagger the stones and vary their sizes. Place the largest accents first, then surround them with medium stones.
Aleene’s craft guidance recommends working in small areas and using a waxed tool, tweezers, or even the waxy tip of a colored pencil to pick up individual rhinestones.
Step 8: Fill the Gaps
Once the main rows are established, use smaller stones, pearls, or microbeads to fill visible spaces. Curved shoulders and tapered necks rarely accommodate perfectly straight rows, so slight adjustments are normal.
Do not force every gap to accept a large stone. A small, intentionally placed filler looks better than a large rhinestone balanced at an angle like a dinner plate on a doorknob.
Step 9: Rotate and Continue
Let the completed section set according to the adhesive instructions before rotating the bottle. Check for stones that have drifted and nudge them back into position while the glue remains workable.
A full-sized bottle may require several hours of active work, especially when every stone is placed individually. Experienced bottle artists often recommend beginning with a mini bottle, a label border, or a partial design before attempting complete coverage. One detailed bottle tutorial estimates that a full project can require approximately six to eight hours.
Step 10: Allow the Bottle to Cure
Place the finished bottle upright in a protected, well-ventilated location. Do not package, chill, carry, or repeatedly inspect it with curious fingers until the adhesive has fully cured.
Many craft adhesives require roughly 24 hours, while certain solvent-based products may need up to 72 hours to reach maximum strength. Follow the directions printed on the exact product rather than assuming that “looks dry” means “ready for vigorous dancing.”
How to Add Names, Numbers, and Logos
Lettering turns a sparkly bottle into a personalized gift. Print the desired name or number in a bold, simple font. Place the paper behind an empty clear bottle as a guide, or transfer the outline to the exterior with removable chalk marker.
For an unopened bottle, create the lettering on removable vinyl, adhesive mesh, or a thin decorative panel before attaching it to the bottle. This reduces the risk of crooked freehand work.
Outline letters with small rhinestones before filling their centers. Block capitals, initials, short names, and two-digit ages are easier than delicate script. Leave narrow spaces between letters so the word remains readable after the surrounding area is filled.
Common Bedazzling Mistakes
Using Too Much Glue
Excess adhesive can ooze around the stones, cloud their reflective backing, and produce raised ridges. Use enough to coat each flat back, not enough to launch a rhinestone into the neighboring zip code.
Skipping Surface Preparation
Dust, oil, and label residue weaken adhesion. Cleaning is not the exciting part of the project, but neither is watching twenty crystals fall off while the recipient opens the gift.
Decorating Over the Closure
Never glue stones over a cork, cap seam, pull tab, wire cage, safety seal, or tamper-evident strip. The bottle should remain easy to inspect and open normally.
Applying Stones Too Far Ahead of the Glue
Glue that has already developed a skin may not grip the stone properly. Work in small, manageable areas and replace the cap whenever the adhesive is not being used.
Moving the Bottle Before It Cures
A bottle that feels dry after an hour may still have weak internal bonds. Premature handling can twist stones out of alignment or leave fingerprints in clear adhesive.
Care, Storage, and Gifting
Handle the finished bottle by uncovered glass near the base whenever possible. Avoid holding it by raised charms, large stones, ribbon, or decorative lettering.
Do not soak a bedazzled bottle, place it in a dishwasher, or leave it submerged in an ice bucket. Condensation and prolonged water exposure may weaken certain adhesives. To chill a sealed bottle, refrigerate it gently and keep it upright rather than burying the decorated surface under wet ice.
For gifting, wrap the bottle loosely in tissue paper and place it in a sturdy box with padding around the sides. Avoid tight cellophane that presses directly against the rhinestones. Include a small card explaining that the exterior is handmade and should be handled carefully.
My Experience Bedazzling Bottles: Lessons That Save Time and Rhinestones
The first important lesson is that a bottle always takes longer to decorate than it appears to take in a thirty-second video. A creator places three stones, the camera cuts, and suddenly an entire champagne bottle is sparkling beneath studio lights. In real life, there are several hours between those shots, plus at least one period spent crawling under the table in search of a rhinestone that cost less than a penny but has somehow become emotionally significant.
Starting with a mini bottle was the smartest choice I made. It provided enough curved glass to learn how the adhesive behaved without committing to hundreds of individual stones. My first attempt also taught me not to spread glue across a large area. The outer section began forming a skin while I was still carefully arranging the first row. Working in sections about the size of a postage stamp felt slower at first, but the overall process became faster because I was not scraping away half-dried adhesive.
Mixed rhinestone sizes made the greatest visual improvement. When I used only one size, the rows looked tidy on the straight center of the bottle but became awkward near the shoulders. Tiny gaps appeared, and forcing the same stones into those spaces created crooked edges. Adding smaller crystals solved the problem immediately. The finished arrangement looked intentional rather than geometrically stressed.
I also learned that good lighting matters almost as much as good glue. Under a dim lamp, a clear rhinestone can appear centered even when it is resting partly on its neighbor. Daylight or a bright adjustable desk lamp reveals spacing, excess adhesive, and reversed stones before the glue cures. A white tray beneath the work area makes dropped gems easier to find, while a dark tray helps clear crystals stand out during sorting.
Another useful discovery was to choose the bottle for its shape, not only for its contents. Cylindrical bottles with broad, relatively straight sides are beginner-friendly. Bottles with elaborate embossing, deep grooves, dramatic shoulders, or square corners require more filler stones and constant adjustments. They can produce beautiful results, but they are not where I would begin unless the goal is to develop a very personal relationship with tweezers.
Preserving the original label usually creates a cleaner gift. A framed label communicates what is inside, provides a natural focal point, and reduces the time and materials required. Full coverage is dramatic, but it can make the bottle difficult to identify and may conceal information the recipient needs. On later projects, I used a double row around the label, a monogram on the back, and a color fade near the base. That combination looked elaborate without requiring every millimeter of glass to be covered.
The curing period deserves respect. On one early project, I assumed the glue was ready because the exposed edges felt dry. I rotated the bottle too aggressively, and several rows shifted just enough to create a visible wave. The stones did not fall off; they simply spent the rest of their lives reminding me that drying and curing are different things. Now I finish the bottle at least two days before it is needed, place it somewhere protected, and pretend it does not exist until the adhesive reaches its recommended cure time.
Finally, perfection is less important than consistency. A handmade bottle viewed from normal distance does not require every gap to be microscopic. Straight visual lines, balanced colors, clean label edges, and firmly attached stones matter more than forcing one final crystal into every tiny opening. The best bedazzled bottles look confident, not overworked. When the bottle sparkles, the lettering is readable, and no rhinestones remain attached to your elbow, the project is officially a success.
Conclusion
Bedazzling a bottle of alcohol is a manageable DIY project that can turn a standard gift into a personalized keepsake. Begin with clean glass, flat-back rhinestones, and an adhesive designed for smooth nonporous surfaces. Plan the layout before gluing, work in small sections, use smaller stones around curves, and allow the finished bottle to cure completely.
A partial design is often just as impressive as full coverage and requires far less time. Frame the label, add a monogram, create an ombré base, or decorate a mini bottle while learning the technique. Once the fundamentals are comfortable, you can attempt detailed logos, crystal patterns, pearls, charms, and complete pavé finishes.