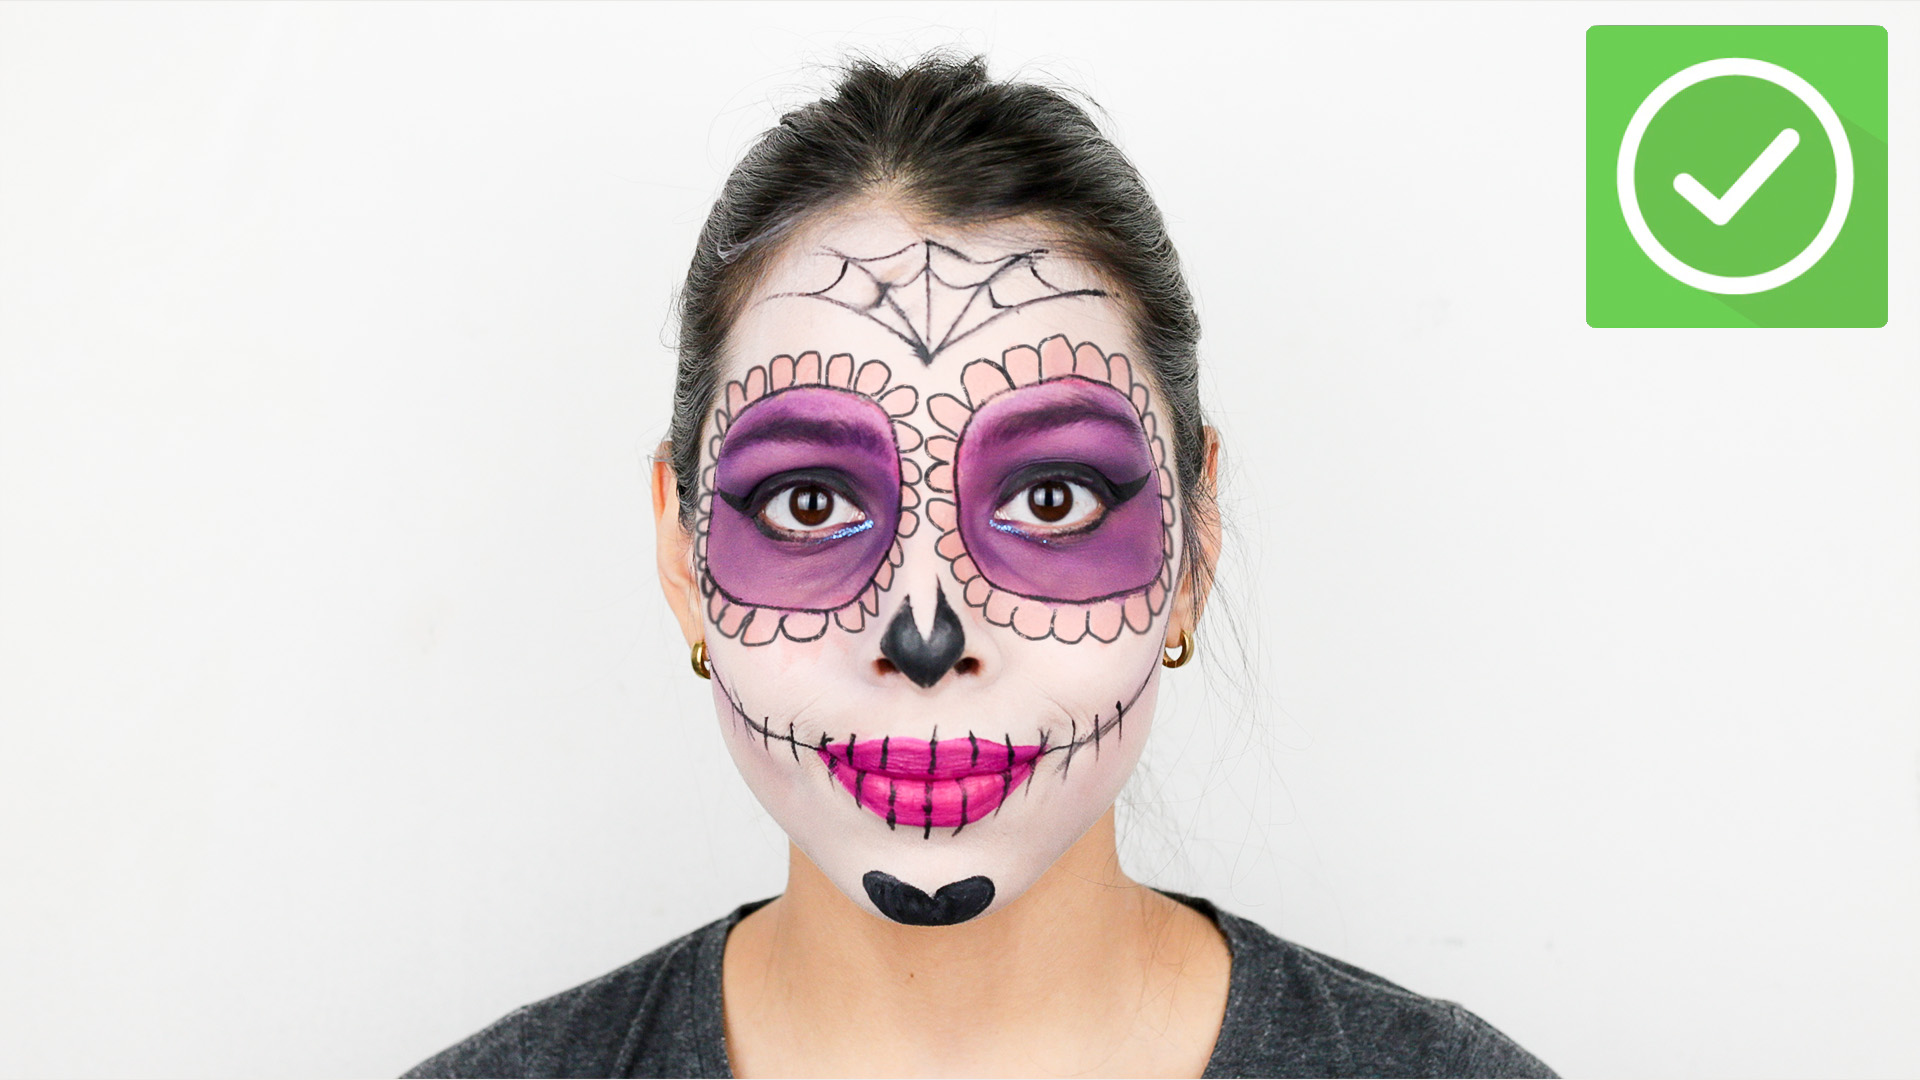
Day of the Dead makeup is instantly recognizable: dramatic skull shapes, rich colors, flower petals, sweeping lines, and enough tiny details to make your eyeliner wonder why regular Tuesday makeup is so boring. But a beautiful Día de Muertos look is more than a spooky face painted for October. It comes from a Mexican tradition centered on remembering, honoring, and celebrating loved ones who have died.
Día de Muertos has Indigenous and Spanish Catholic roots and is traditionally observed around November 1 and November 2. Calaveras, ofrendas, photographs, candles, marigolds, favorite foods, and other meaningful objects help families maintain a connection with those they remember. In the United States, Mexican American communities have also developed vibrant public celebrations while preserving remembrance as the holiday’s central theme.
One of the most influential visual figures is La Catrina, the elegantly dressed skeleton associated with Mexican printmaker José Guadalupe Posada. His satirical skeleton imagery helped communicate a wonderfully inconvenient truth: fancy clothes or no fancy clothes, eventually we’re all skeletons. That history is worth knowing before reaching for the white face paint.
This guide explains how to apply Day of the Dead makeup in 14 steps, including preparation, outlining, color placement, Catrina-inspired details, finishing techniques, makeup safety, and removal. The goal is not simply to produce an impressive photograph. It is to create a thoughtful, polished calavera makeup look while understanding the tradition that inspired it.
What You Need for Day of the Dead Makeup
You do not need a suitcase worthy of a professional makeup trailer. A carefully selected basic kit can create an elaborate result.
- Gentle facial cleanser
- Lightweight moisturizer
- Makeup primer
- Skin-safe white theatrical makeup or white foundation
- Translucent or white setting powder
- Black eyeliner pencil, gel liner, or cosmetic face paint
- Black eyeshadow
- Colorful eye shadows or cosmetic face paints
- Small detail brush
- Medium flat or rounded brush
- Makeup sponge
- Blush or contour powder
- Lipstick or lip-safe black cosmetic product
- Optional cosmetic gems, rhinestones, or eye-safe glitter
- Setting spray
- Makeup remover or cleansing balm
Use products specifically manufactured for cosmetic use. Craft paint, markers, acrylic paint, and random glitter from the arts-and-crafts drawer belong on posters, not around your eyeballs. The FDA advises checking cosmetic labels, following usage directions, and keeping products away from the eye area unless they are specifically intended for use there. Testing unfamiliar face paint in advance can also help identify possible irritation.
How to Apply Day of the Dead Makeup in 14 Steps
Step 1: Learn What the Look Represents
Before applying anything, spend a few minutes learning about Día de Muertos and La Catrina. Calavera imagery is connected with remembrance, cultural expression, and the idea that death is part of life rather than simply something terrifying.
If you are participating in a Día de Muertos community celebration, follow the guidance of the people organizing it. Avoid turning the design into a bloody zombie caricature or combining Mexican stereotypes simply because they look vaguely festive. A colorful, elegant, remembrance-focused interpretation fits the spirit of Catrina makeup much better.
Step 2: Choose Your Design Before Painting
Decide whether you want a full-face Catrina, half skull, minimalist calavera, floral design, or jewel-covered glamorous version. Beginners should sketch the idea on paper or save a visual reference.
Think about three major zones: the eyes, nose, and mouth. Then decide where decorative elements will go. Forehead flowers, cheek swirls, dots, scalloped eye borders, spiderweb-like lines, hearts, and petals are common artistic choices.
A plan prevents the classic makeup disaster known as, “I added one more swirl and somehow became a decorative tablecloth.”
Step 3: Patch-Test Unfamiliar Products
If you have never used a particular face paint, adhesive, glitter product, or theatrical makeup before, test it before the event rather than discovering a sensitivity halfway through your masterpiece.
The American Academy of Dermatology recommends testing new skin products on a small area when possible, while FDA guidance specifically suggests advance testing for novelty makeup. Stop using a cosmetic if it causes significant itching, burning, swelling, redness, or other irritation.
Step 4: Clean and Moisturize Your Face
Wash your face with a gentle cleanser and pat it dry. Follow with a light moisturizer appropriate for your skin type.
This small step matters because theatrical pigments tend to emphasize dry patches. A hydrated surface makes your white makeup easier to blend and less likely to develop the texture of a desert floor by hour two.
Allow moisturizer to absorb before moving forward. Heavy creams can cause face paint to slide, so use enough to keep the skin comfortable without turning it into an ice rink.
Step 5: Apply Primer
Smooth a thin layer of primer across areas where you will paint. Choose a product compatible with your normal complexion products and skin type.
Primer can make application more even and improve wear time, particularly around the forehead, nose, and cheeks. If your skin becomes oily quickly, focus on the T-zone. For dry skin, avoid aggressively mattifying everything.
Step 6: Map Out the Eye Sockets
Before covering your entire face with white, lightly mark the eye sockets. Use a neutral or black cosmetic pencil and follow the natural shape of the orbital bone.
The shape can be circular, oval, scalloped, floral, or slightly elongated. Symmetry helps, but do not chase mathematically perfect circles. Human faces are not printed by office equipment.
Keep the product outside areas where it is not approved for eye use. Brushes, liners, shadows, and pigments used near your eyes should be clean and specifically formulated for that purpose.
Step 7: Apply the White Base
Use a damp sponge or foundation brush to apply a thin layer of white cosmetic makeup around the eye shapes you mapped. Work from the center of your face outward.
Do not pile on a thick layer immediately. Two thin coats usually create a smoother result than one heroic slab of paint. Water-activated theatrical makeup can produce excellent coverage while feeling lighter than some heavy grease-based formulas.
You also do not have to cover every inch of skin. Contemporary Catrina makeup varies widely, and partially painted designs can look just as striking.
Step 8: Set the Base With Powder
Once the white base is even, gently press translucent or white setting powder over it with a powder puff or fluffy brush.
Press rather than aggressively sweep. Sweeping can move the still-fresh base and produce patches. Proper setting reduces transfer and gives you a stable canvas for decorative details.
Dust away excess powder carefully afterward. Congratulations: you now resemble an unfinished masterpiece instead of someone who just argued with a bag of flour.
Step 9: Fill and Define the Eye Sockets
Fill the mapped eye sockets with black, burgundy, purple, blue, gold, or another color that suits your design. Black eyeshadow can add depth around the outer portion while brighter colors make the center more vibrant.
Many Catrina-inspired looks use petals or scallops around the eye sockets. Create them with a small brush or cosmetic pencil. Alternate colors if desired, or add dots between petals for extra detail.
Do not use craft glitter near your eyes. If you want sparkle, choose a cosmetic glitter specifically labeled for its intended placement.
Step 10: Paint the Calavera Nose
A skeletal nose is one of the easiest features to recognize. Traditional interpretations often use black to create an inverted heart, triangle, or stylized nasal-cavity shape across the tip and sides of the nose.
Start smaller than you think you need. You can always expand the shape. Trying to shrink wet black face paint is considerably less entertaining.
For softer dimension, blend black or gray shadow upward beside the bridge instead of filling the entire nose with solid pigment.
Step 11: Create the Skeletal Mouth
Apply lipstick first if your design includes colored lips. Red, berry, black, burgundy, and deep rose work especially well.
Next, draw a thin horizontal line outward from each corner of the mouth. Add short vertical marks across the lips and extended line to suggest skeletal teeth.
Keep the lines narrow. Giant rectangular teeth can overwhelm the rest of the design. Slight curves and tapered strokes generally look more elegant and work better with expressive Catrina makeup.
Step 12: Add Flowers, Swirls, Dots, and Decorative Details
Now comes the enjoyable part: personalization.
Use a fine cosmetic brush to paint curls along the cheeks, teardrop shapes near the temples, flower petals on the forehead, dots around the eye sockets, or delicate lines following your cheekbones.
Marigold-inspired yellow and orange details are especially meaningful because marigolds are strongly associated with Día de Muertos celebrations. Pink, turquoise, red, purple, and gold can create additional contrast.
If your makeup honors someone specific, consider incorporating a favorite color, flower, or small motif connected to that person. That personal element gives the design meaning beyond simply duplicating a social-media photo.
Step 13: Add Dimension and Optional Embellishments
Use gray, taupe, plum, or black shadow beneath the cheekbones and along the temples to suggest skull structure. Blend softly so your shading supports rather than competes with the painted patterns.
You can also add cosmetic rhinestones, gems, metallic accents, or glitter using skin-appropriate adhesive. Place embellishments strategically around the eyes, forehead, or cheek designs rather than covering everything.
More decoration is not automatically more impressive. At some point, your forehead stops being La Catrina and starts applying for chandelier status.
Step 14: Set, Inspect, and Finish the Look
Check the makeup from several angles. Clean uneven edges with a cotton swab and appropriate makeup remover. Reinforce any lines that disappeared during blending.
Once satisfied, apply a setting spray compatible with your cosmetics. Allow the makeup to dry completely before adding a flower crown, hat, veil, jewelry, or costume.
If you wear decorative contact lenses, remember that contact lenses are regulated medical devices. The FDA warns against costume contacts obtained without appropriate professional fitting and instructions. A dramatic makeup look is not improved by an injured cornea.
How to Make Catrina Makeup Look Better
Follow Your Natural Bone Structure
Your cheekbones, eye sockets, temples, and jaw already provide the roadmap for skull makeup. Rather than forcing a design copied from someone with a completely different facial structure, adapt the lines to your own face.
Work From Large Shapes to Tiny Details
Complete the white base, eyes, nose, and mouth before adding decorative dots and curls. Tiny details are much easier to place once your larger shapes are balanced.
Keep Brushes Clean
Clean applicators help create sharper artwork while reducing contamination. Do not casually share eye cosmetics, brushes, or applicators with friends. FDA guidance specifically cautions against sharing eye makeup because bacteria and other microorganisms can spread between users.
Practice Before the Event
A trial run reveals which products crack, which colors stain, and whether your “quick 30-minute design” is secretly a two-hour relationship commitment. Photograph the practice version, identify what looks uneven, and simplify anything unnecessarily difficult.
Common Day of the Dead Makeup Mistakes
Using non-cosmetic paint: Acrylic paints and craft pigments are not substitutes for face cosmetics.
Applying too much white makeup: Heavy base products are more likely to crease, crack, or transfer. Thin layers usually look smoother.
Ignoring eye-area labeling: A product that is approved for facial skin is not automatically suitable around the eyes.
Skipping powder: An unset cream base can quickly turn detailed artwork into abstract expressionism.
Trying complicated details too early: Establish your skull structure first.
Treating Día de Muertos as simply “Mexican Halloween”: Halloween and Día de Muertos can occur close together on the calendar, but they have different histories and purposes. Día de Muertos centers on remembrance, family, and continued relationships with the departed.
How to Remove Day of the Dead Makeup Safely
Removing heavy face makeup deserves almost as much attention as applying it.
Start with micellar water, cleansing balm, cleansing oil, or another remover appropriate for the cosmetics you used. Gently loosen the makeup rather than scrubbing. Follow with a mild cleanser and lukewarm water.
Take extra care around your eyes. Remove eye makeup with products designed for that area and avoid aggressive rubbing. If adhesive was used for gems, loosen it according to the product instructions instead of enthusiastically ripping everything off like you’re opening a stubborn shipping label.
Finish with moisturizer. If your skin develops persistent redness, swelling, pain, or significant irritation, stop using the suspected product and seek appropriate medical advice.
Experience Notes: What Applying Day of the Dead Makeup Teaches You
The first useful lesson from creating a detailed Day of the Dead makeup look is that preparation beats artistic confidence. Someone with average drawing skills and a clear plan can often produce a better result than an experienced makeup user who improvises everything. During a practice run, it becomes obvious how much difference a simple sketch makes. Knowing where the eye sockets end, where forehead decorations begin, and what colors will repeat across the face eliminates dozens of tiny decisions while you’re holding a loaded eyeliner brush.
The second lesson is that thinner makeup generally behaves better. A common beginner instinct is to make a white base completely opaque in one pass. The result may look fantastic for approximately eleven minutes. Then the mouth starts moving, the cheeks crease, and cracks appear. Applying thin layers, allowing them to settle, and setting them carefully creates a surface that survives talking, smiling, eating, and discovering that someone wants another group photograph.
Another practical experience is learning when to stop. Intricate Catrina makeup invites constant additions. One empty space suggests a flower. The flower suggests three dots. The dots demand a swirl. Suddenly every square inch of your face has been assigned a decorative responsibility. Stepping several feet away from the mirror every few minutes helps. Strong makeup needs visual breathing room just as much as graphic design does.
Photography also changes how the makeup appears. Delicate gray contouring may look dramatic in a bathroom mirror yet nearly disappear in a photograph. Fine black details generally need enough contrast to remain visible from normal conversational distance. This does not mean drawing everything twice as thick. It means occasionally checking the design with your phone camera instead of judging exclusively from six inches away.
Comfort matters too. A successful Day of the Dead makeup experience is not simply one that survives until midnight. It should remain wearable. Products near the eyes should not sting. The base should not feel painfully dry. Gems should not pull excessively at the skin. If something becomes uncomfortable, removing or adjusting it is more sensible than suffering for the sacred principle of getting a good selfie.
Perhaps the most valuable experience, however, comes from understanding the cultural context before painting. Learning about Día de Muertos, ofrendas, calaveras, marigolds, remembrance, Posada’s skeleton imagery, and La Catrina changes the creative process. The makeup stops being merely “a cool skull.” Colors can reference flowers or memories. Decorative motifs can have personal significance. The finished design can feel celebratory rather than gruesome.
That distinction matters because Día de Muertos has remained a meaningful living tradition for families in Mexico and Mexican American communities in the United States. Museums and cultural organizations describe the holiday as a celebration of remembrance, where families maintain connections with loved ones through altars, photographs, favorite foods, art, gatherings, and other offerings.
Finally, expect imperfection. One eye may have seven petals while the other mysteriously develops eight. One cheek swirl may possess the confidence of an accomplished calligrapher while its partner looks like it recently learned to hold a pencil. That is fine. Handmade artwork carries personality. Good calavera makeup does not require computer-generated symmetry; it requires intention, patience, safe products, and an appreciation of what inspired the design.
Final Thoughts
Learning how to apply Day of the Dead makeup is part beauty technique, part artistic experimentation, and part cultural education. Start with clean, prepared skin, build a controlled white base, define the eyes, nose, and skeletal mouth, then use flowers, dots, swirls, meaningful colors, and carefully chosen embellishments to make the design your own.
Most importantly, remember what sits behind the beautiful imagery. Día de Muertos is not primarily about making death frightening. It offers a way to remember people, tell stories, preserve relationships, and acknowledge that death belongs to the same human story as life.
Note: This guide is intended as an educational makeup tutorial informed by museum, cultural, dermatology, ophthalmology, cosmetic-safety, and professional beauty guidance. Día de Muertos traditions vary among families, regions, and communities, so cultural context and local practices should always take priority over a one-size-fits-all interpretation.